Let’s learn the Best Ways to Disable Enable Store Activity History in Windows 11. Activity history helps you keep track of what you do on your device, such as the apps and services you use, the files you open, and the websites you browse. Your activity history is stored locally on your device.
Your Microsoft account settings don’t allow you to send your activity history to Microsoft, but your activity history will be stored on your device to help keep track of what you do. You can clear and delete the activity history stored on your device.
Your activity history is stored locally on your device. If you have logged in to your device with a Microsoft account and are allowed your permission, Windows sends your activity history to Microsoft. Microsoft uses the activity history data to provide personalized experiences (based on duration of use) and relevant suggestions (based on your activity history).
All the data is stored on your Windows device and your Microsoft account. This makes it easy to access them again and start working from where you left off. This is known as Activity History. This guide describes how to enable or disable the Store Activity History in detail.

Pros and Cons of Disable Enable Store Activity History
If you want to disable Windows 11 Activity History can enhance privacy, it is important to consider the possible disadvantages of this action. Here are some of them below:
Difficulty in Troubleshooting: Activity History can be a valuable resource for troubleshooting issues on your device. Without this history, diagnosing problems might become more complicated.
Difficulty in Resuming Tasks: Activity History helps seamlessly transition tasks from one device to another for users with multiple devices. Disabling this feature might hinder the ability to pick up where you left off across different devices.
Search Efficiency: The search function in Windows 11 can utilize Activity History to provide quicker and more relevant results. Disabling it may result in less efficient search experiences.
Personalized Experience: Activity History is used to enhance the user experience by customizing features and suggestions based on past activities. Disabling it may lead to a less personalized and potentially inefficient user experience.
Reduced Effectiveness: Some applications, especially those from Microsoft, might use Activity History to improve functionality and user experience. Disabling it could reduce their effectiveness.
What are the Ways to Disable Enable Store Activity History
It is recommended that you create a System Restore Point before proceeding to Disable Enable Store Activity History. This is a precaution in case anything goes wrong after making changes. The methods to make changes to Activity History are listed below.
- Disable Enable Store Activity History Using Windows Settings
- Disable Enable Store Activity History Using Local Group Policy
- Disable Enable Store Activity History Using Registry Editor
What is Activity History?

All the data is stored on your Windows device and your Microsoft account. This makes it easy to access them again and start working from where you left off. This is known as Activity History.
Disable Enable Store Activity History using Windows Settings
You can disable or enable Store Activity History using various methods in Windows. Some methods are described here. The first method is to disable or enable Store Activity History using the Settings menu.
Click on the Windows button, then select Settings, or you can press Win Key + I to open settings directly. Then, under settings, click on the Privacy & Security option on the left panel, and scroll down to find Activity History in the right panel.
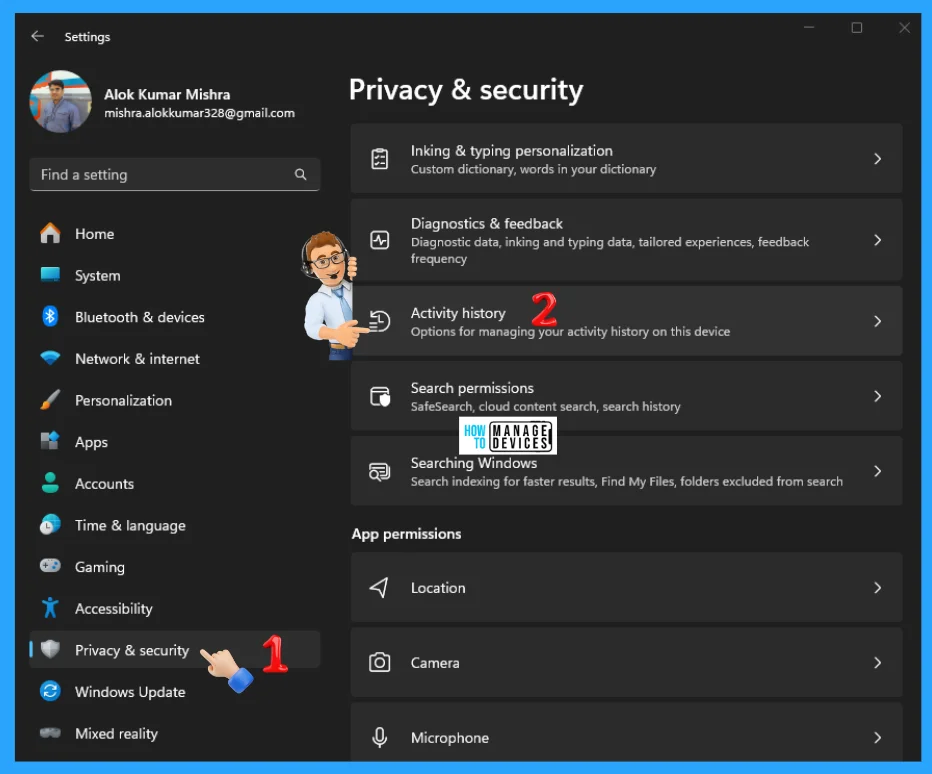
When the Activity History window opens, click the arrow near Activity History. Under Activity History, you can see Store My Activity History on this device option (Jump back into what you were doing on your device by storing your Activity History, toggle the button ON (enable Activity History) or OFF (disable Activity History) near it.
NOTE! The option to send activity history to Microsoft has been deprecated from the Windows 11 23H2 and 22H2, January 23, 2024-KB5034204 update. Previous Windows 11 versions before this update had the option available on their activity history page, and if enabled, activity history data would still be sent to Microsoft. You can either turn this option off or update to the latest Windows version to get the most recent updates.
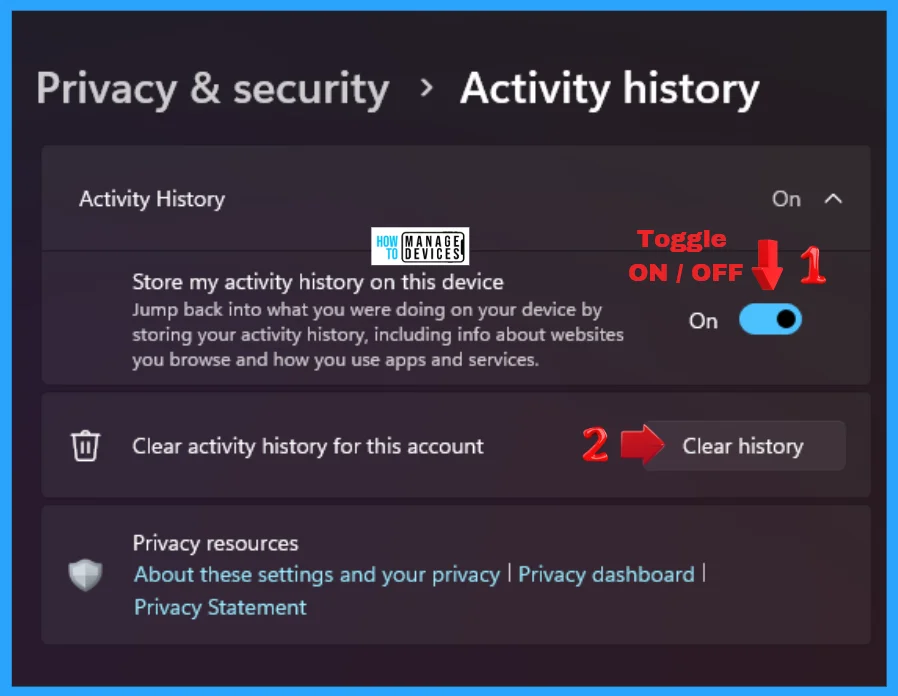
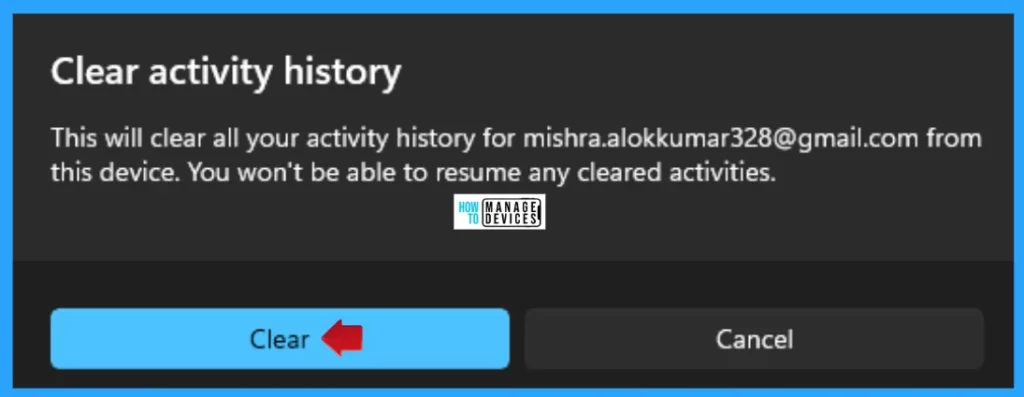
If you want to clear all the account’s Activity History, click on the Clear history button near the option Clear activity history for this account shown in the image above. To be effected, restart your device after performing your changes.
NOTE! If you have a previous activity history stored in the cloud before Windows 11 23H2 and 22H2, January 23, 2024-KB5034204 update, you can use the Clear activity history button to delete previously stored data in the cloud. Otherwise, your activity history will be automatically deleted within 30 days from when your data was last synced to the cloud
Disable Enable Store Activity History Using Local Group Policy
You can also Disable Enable Store Activity History Using Local Group Policy Editor. Open Local Group Policy to allow enable or disable updates and follow the process.
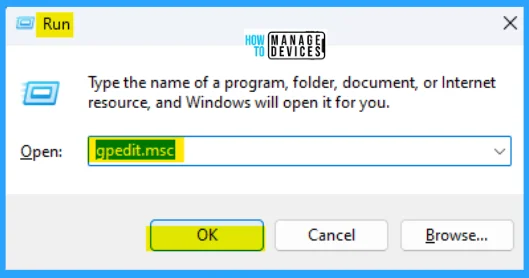
- Open the Run command, press Win Key + R
- Type gpedit.msc
- Click OK or press Enter.
When the Group Policy Editor opens, navigate to the following path to reach the required policy settings and select Allow publishing of User Activities to make changes.
Computer Configuration > Administrative Templates > System > OS Policies
| Edit | Requirements | Description | Note |
|---|---|---|---|
| Policy Settings | At least Windows Server 2016, Windows 10 | This policy setting determines whether User Activities can be published. If you enable this policy setting, activities of the type User Activity are allowed to be published. If you disable this policy setting, activities of type User Activity are not allowed to be published. | The policy change takes effect immediately. |
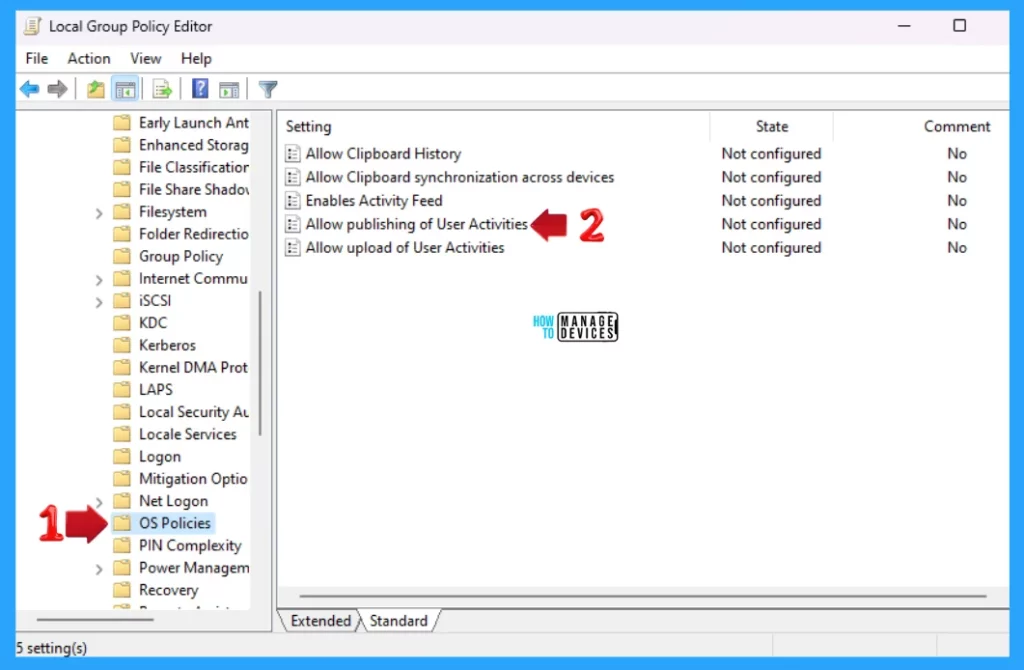
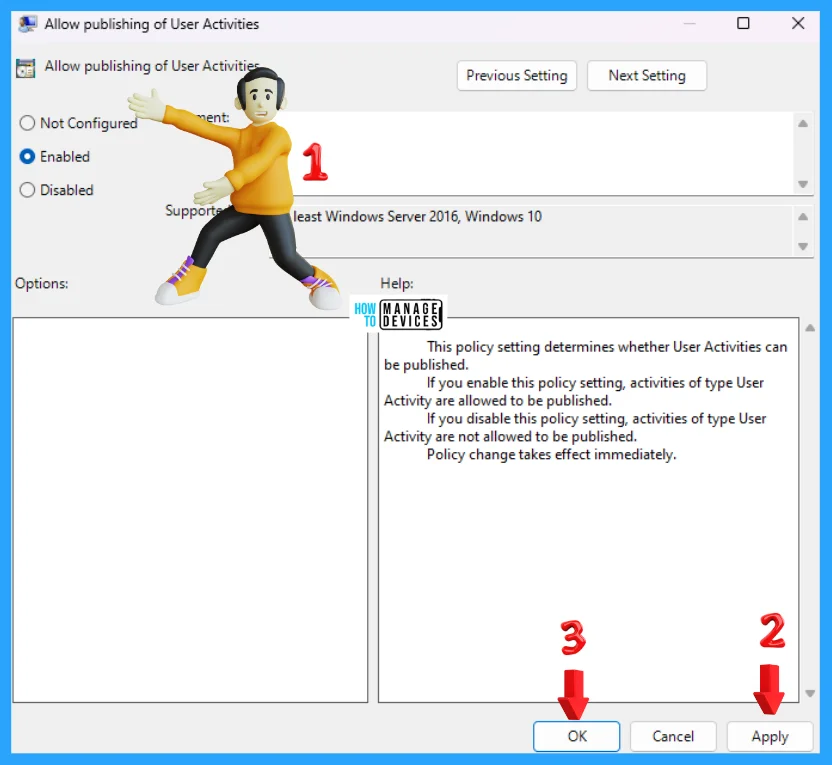
Now scroll down and double-click on Allow publishing of User Activities and then Enable – Turn off Allow publishing of User Activities settings open; the default setting is “Not Configured“. Select Disable Allow publishing of User Activities to show the option in personalization settings.
- Not Configured: The activities of type User Activity are not allowed to be published.
- Enabled: If you enable this policy setting, activities of the type User Activity are allowed to be published.
- Disabled: If you disable this policy setting, activities of type User Activity are not allowed to be published.
Disable Enable Store Activity History Using Registry Editor
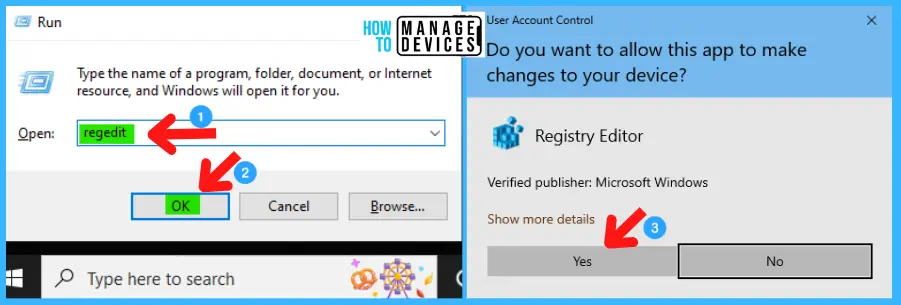
Another way is to Disable Enable Store Activity History on Windows 11 from the registry. This procedure is done using the Registry Editor. Let’s check how to Disable Enable Store Activity History on Windows 11 using the Registry Editor. You can now follow the process listed below to enter the registry editor to modify changes.
- Window Key + R (To open run command)
- Type ‘regedit‘ and press OK
- Administrator permission press Yes
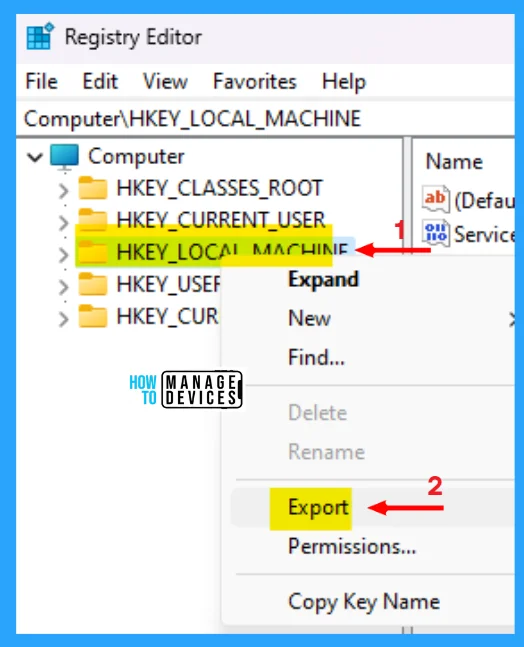
NOTE! Take Backup—If any mistake occurs in the Registry Editor, it may affect the system. It is advisable to take a backup of the Registry before proceeding. In the Registry Editor, go to File in the left top corner for backup. Click on it, then select Export and save the backup.
When the registry editor opens, you must take the backup for your registry editor. Follow the steps below to make a backup for your registry editor.
- Go to File
- Right-click on HKEY_LOCAL_MACHINE
- Click on Export
- Save it
Find the path ‘HKEY_LOCAL_MACHINE\SOFTWARE\Policies\Microsoft\Windows\System.’ Following the trail, reach the required folder for further modification.
Now right-click on the blank space on the System, then tap on New, click on DWORD (32-bit) Value and rename it as PublishUserActivities.
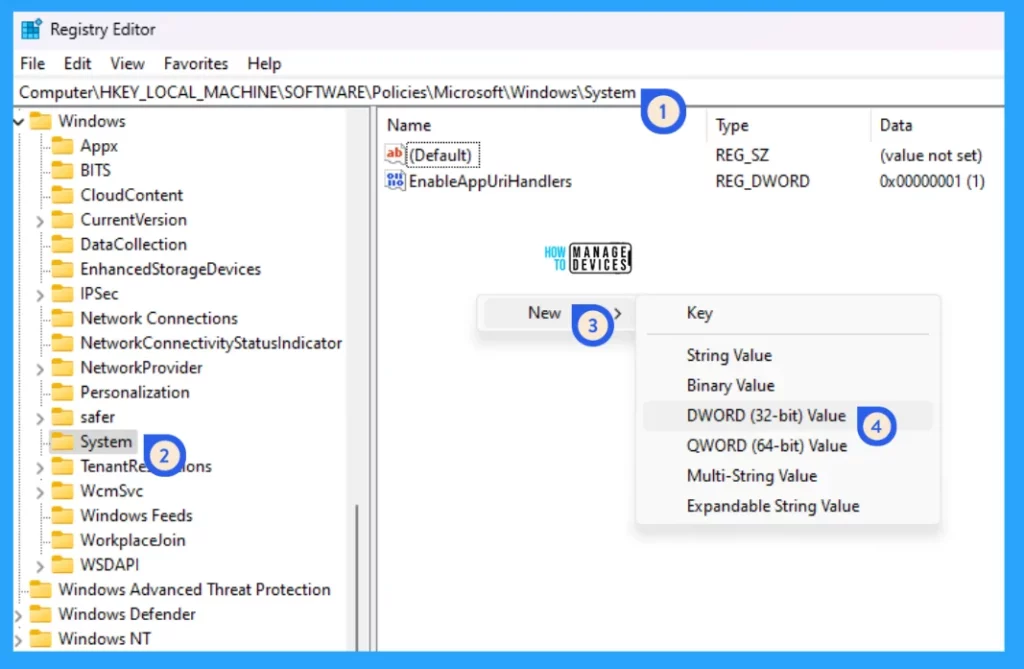
Double-click on PublisheUserActivities to open them. Change the value to 0 to disable and 1 to enable the Store Activity History, then press OK to continue.

NOTE! Restart your device for the applicability of the changes.
Additional (Bonus) Tip: Disable Enable Store Activity History using Registry File
You can also disable or enable Activity History using the .reg file. To create a .reg file, open NotePad, type the following code, and name it EnableStoreActivityHistory. Then, save it on the desktop using the .reg extension.
Windows Registry Editor Version 5.00

[HKEY_LOCAL_MACHINE\SOFTWARE\Policies\Microsoft\Windows\System]
"PublishUserActivities"=-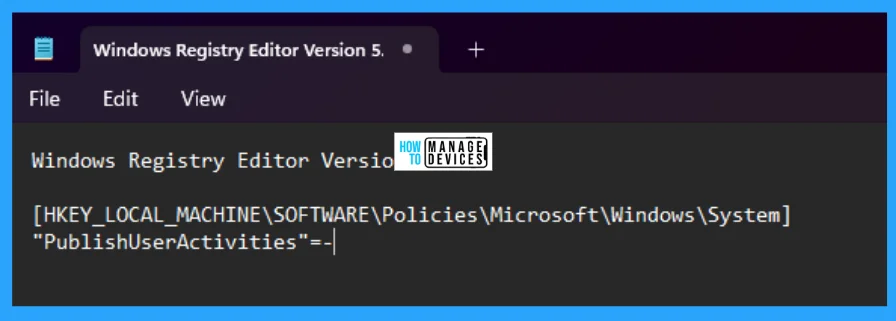
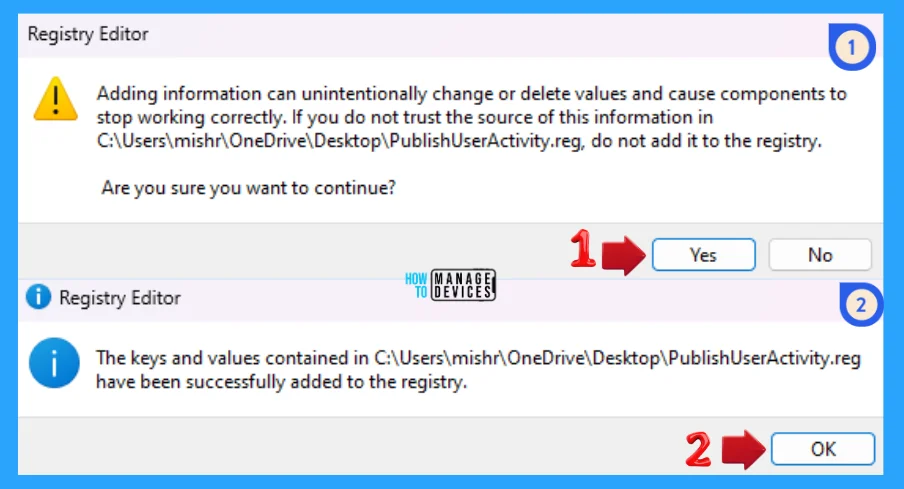
When the file is saved at your selected location, double-click on it. The User Account Control Window will open; click Yes to continue. Then, the Registry Editor Waring window will open.
Adding information can unintentionally change or delete values and cause components to stop working correctly. If you do not trust the source of this information in the path you created, do not add it to the registry; otherwise, click on Yes to continue.
The next window shows that the key and value you added have been successfully added to the registry editor. Now click on OK and restart your PC to add the applicable test.
You can also disable or enable Activity History using the .reg file. To create a .reg file, open NotePad, type the following code, and name it DisableStoreActivityHistory. Then, save it on the desktop using the .reg extension.
Windows Registry Editor Version 5.00

[HKEY_LOCAL_MACHINE\SOFTWARE\Policies\Microsoft\Windows\System]
"PublishUserActivities"=dword:00000000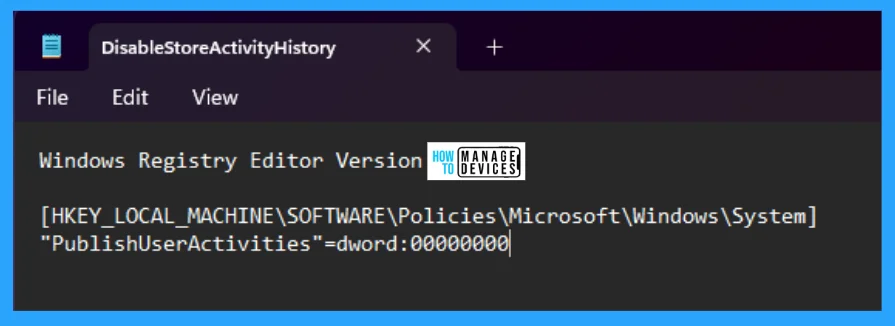
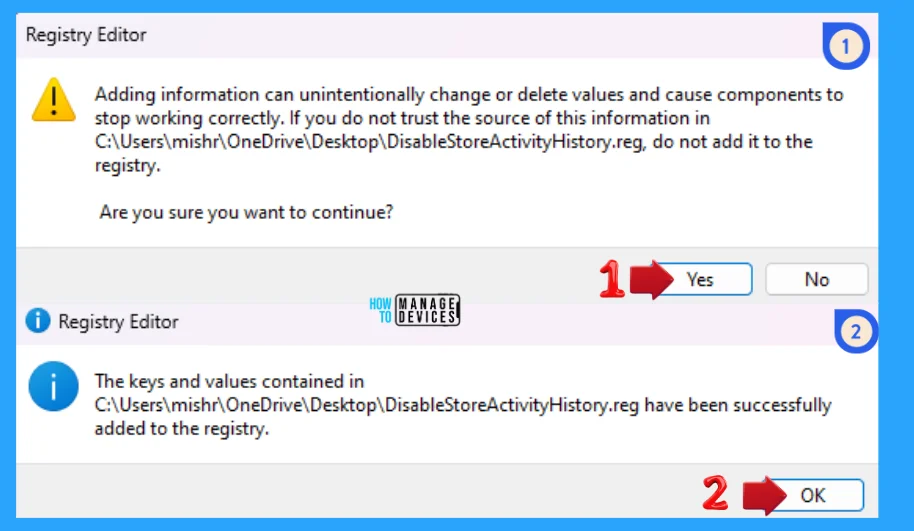
When the file is saved at your selected location, double-click on it. The User Account Control Window will open; click Yes to continue. Then, the Registry Editor Waring window will open.
Adding information can unintentionally change or delete values and cause components to stop working correctly. If you do not trust the source of this information in the path you created, do not add it to the registry; otherwise, click on Yes to continue.
The next window shows that the key and value you added have been successfully added to the registry editor. Now click on OK and restart your PC to add the applicable test.
Features that Use Activity History
The following Windows features use your activity history. Refer back to this page after Windows releases and updates to learn about any new services and features that use your activity history:
- Timeline: See a timeline of activities and choose whether to resume those activities from your device. For example, let’s say you are editing a Word document on your device but cannot finish before you have to stop working for the day. If you turn on the Store My Activity History on this device setting on the Activity History settings page, you will see that Word activity in your timeline the following day—and for the next several days—and from there, you can resume working on it.
- Microsoft Edge: When you use Microsoft Edge Legacy, your browsing history will be included in your activity history. Activity history will not be saved when browsing with InPrivate windows.
I hope the information on the Best Way to Disable Enable Store Activity History in Windows 11 is helpful. Please follow us on the HTMD Community and visit our website, HTMD Forum, if you like our content. Suggest improvements, if any, and we’d love to know which topic you want us to explore next.
We are on WhatsApp. To get the latest step-by-step guides and news updates, Join our Channel. Click here – HTMD WhatsApp.
Author
Alok is a Master of Computer Applications (MCA) graduate. He loves writing on Windows 11 and related technologies. He likes to share his knowledge, quick tips, and tricks with Windows 11 or Windows 10 with the community.
