Hi, let’s learn how to view update history in Windows 11. Update history is an essential part of the Windows 11 Operating System. Windows updates are a vital service that Microsoft provides. Microsoft provides service packs and new features to the system as an Update.
We always do our updates automatically or manually, but we don’t know about the past updates in our system. The view update history is a feature that allows you to see the list of updates that are done in your system.
This feature is essential for knowing your update history, and the main reason for this feature’s usefulness is that it will help you troubleshoot. You can check the updates to see whether they updated successfully or not.
This article provides complete details on how to view updated history and includes an easy way to obtain updated histories. I hope this article will help you.
- Enable Disable Location Services in Windows 11
- Enable Disable Auto-restart Notifications for Windows Update in Windows 11
What are the Advantages of Update History of Windows11?
Windows 11’s update history feature lets you see the details of the updates installed on your device. Updating history has many Advantages, which are given below.
1. You can check the installation date, Version, and build number of each update
2. With this Updated history, you can learn about improvements and known issues of each update
3. It helps you to stay up-to-date with the latest features and security enhancements of Windows 11
4. This option is a user-friendly feature to view History
How to View Update History in Windows 11
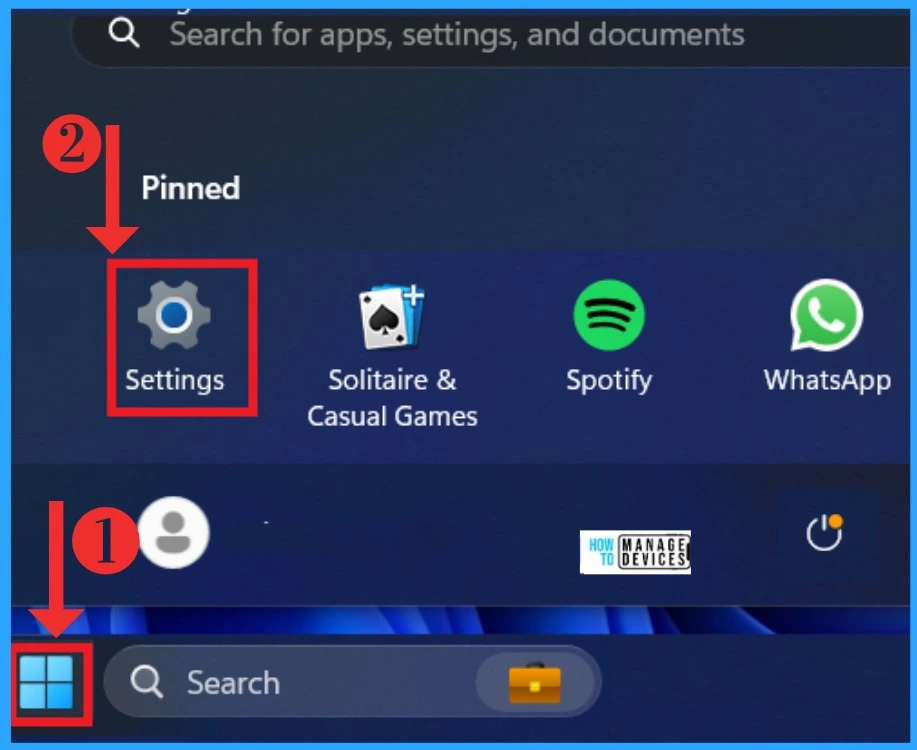
Every user must know how to view updated history. In Windows 11, it is straightforward to view the update history. First, you must access the Settings by pressing Win + I or using the following step.
- Click on the Start Menu
- Select the Setting from the Start Menu
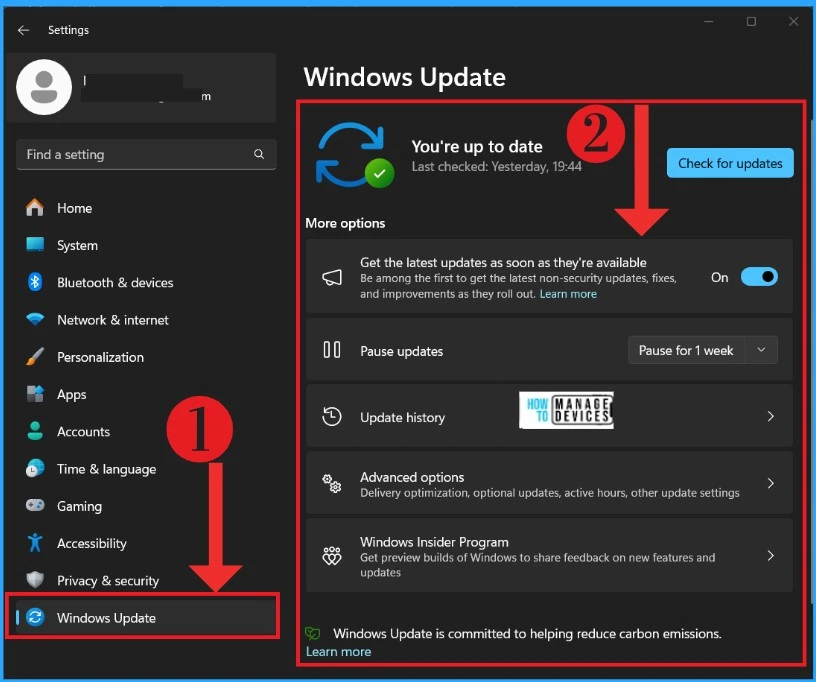
After selecting the settings application, Select the Windows update option. That option provides all the information about Windows updates. You can check when the last update was made to your system. Also, when you enable that option, you can get the latest updates as soon as they are available.
| Windows Update options | Used to |
|---|---|
| Pause Updates | You can pause a Windows update |
| Update History | You can see all the history of Updates |
| Advanced Options | It allows delivery optimization, optional updates, active hours, and other update settings |
| Windows Insider Programme | Get preview builds of Windows to share feedback on new features and updates |
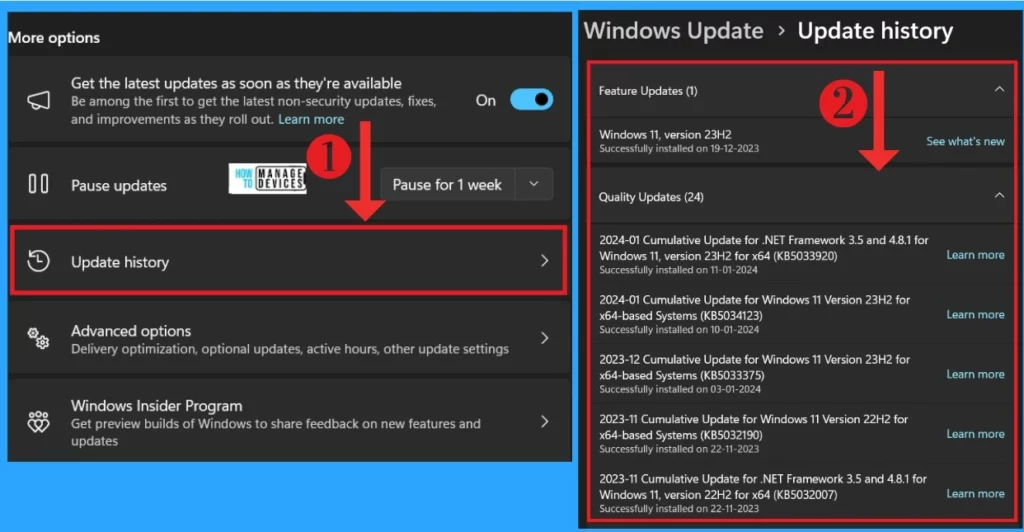
To view Update History, Click the Update History option for a new Windows Update history. In the Update history window, you can see the list of updates in your system in the past months and weeks. You can also notice one thing: it shows the Version of the new update and the updated time.
How to View Update History Through the Command Prompt
The command prompt is a Windows command-line interface. This option lets you see the update history through the command prompt. First, you have to open the command prompt through the search menu. After opening the Command prompt, use the following command to get your system’s update history.
- Type the following command to view the update history
Copy this: wmic qfe list
- Press the Enter key
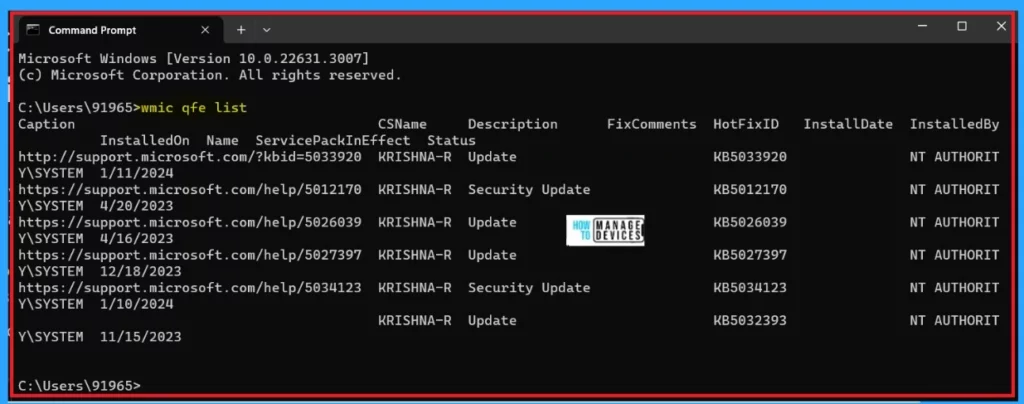
How to View Update History Through the PowerShell
To view updated history through PowerShell, open PowerShell as an Administrator. You will get the PowerShell in the search menu by searching PowerShell (right-click on the PowerShell and open as Administrator).
- Open the powerShell and type the following command
Use this: Install-Module PSWindowsUpdate
- Press the Enter Key
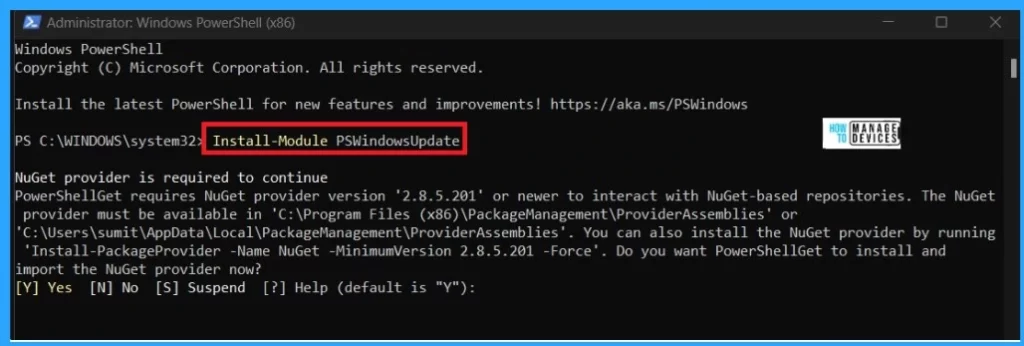
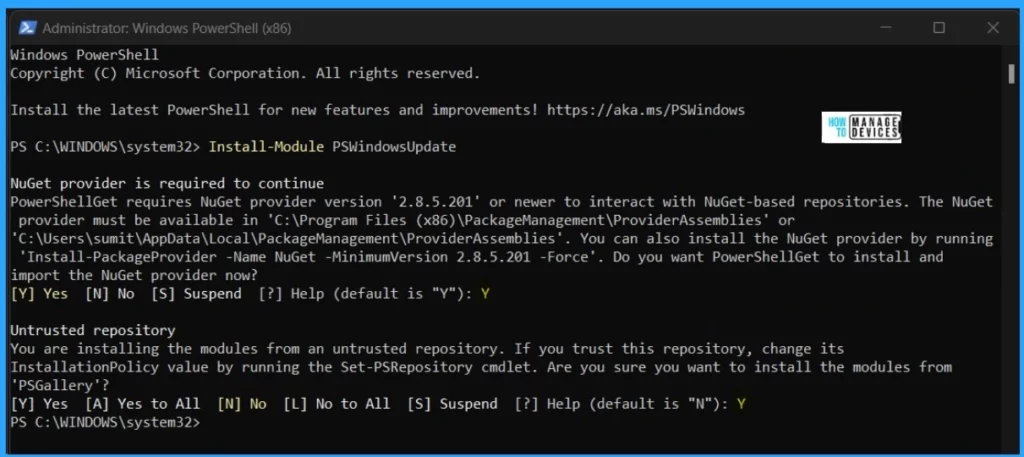
After entering the Command, You may need to install the NuGet provider to proceed. If so, enter Y to confirm. You may also encounter a warning about an Untrusted repository. If that happens, enter A or Y to accept it.
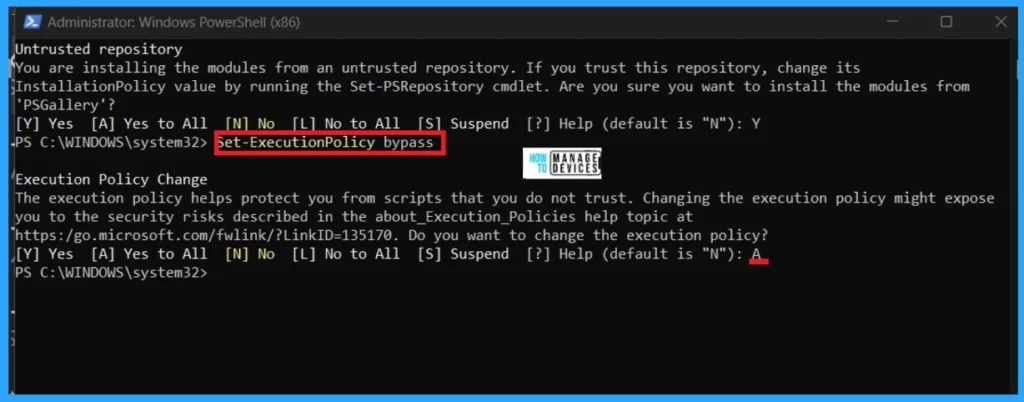
To fix the issue, enter Set-ExecutionPolicy bypass and press Enter. Then, enter A to accept the policy change.
Use this: Set-ExecutionPolicy bypass.
You can see the last 20 updates on your PC by using PowerShell; enter the following command: Get-WUHistory | Select-Object -First 20.
Use this: Get-WUHistory | Select-Object -First 20.
- Press the Enter Key
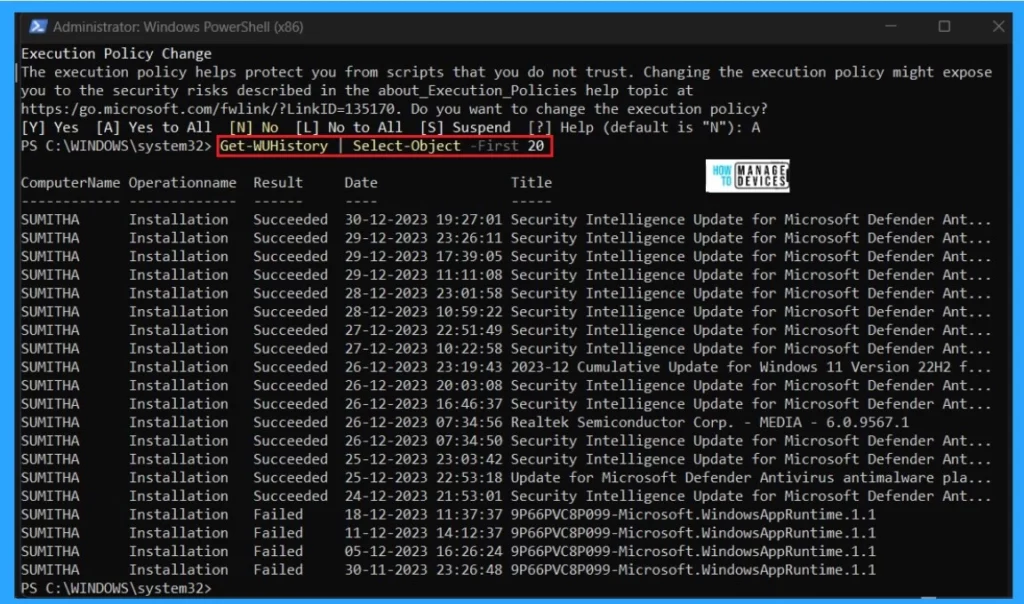
View Update History Through the Get-Hotfix command
You can also use the Get-Hotfix to view the update history. Get-Hotfix is a PowerShell cmdlet that retrieves a list of hotfixes installed on a local or remote computer.
- Open the Powershell
- Enter the Command Get-HotFix
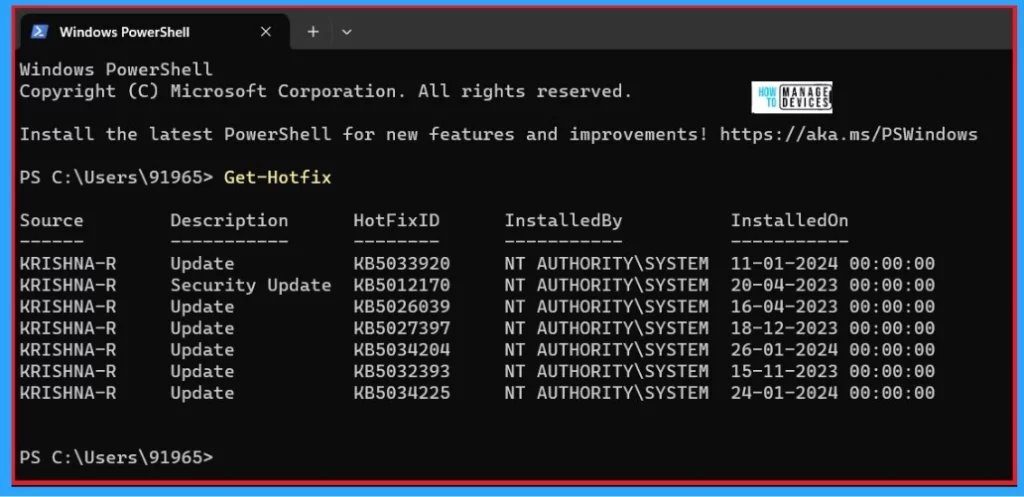
How to View Update History Through the Registry Editor
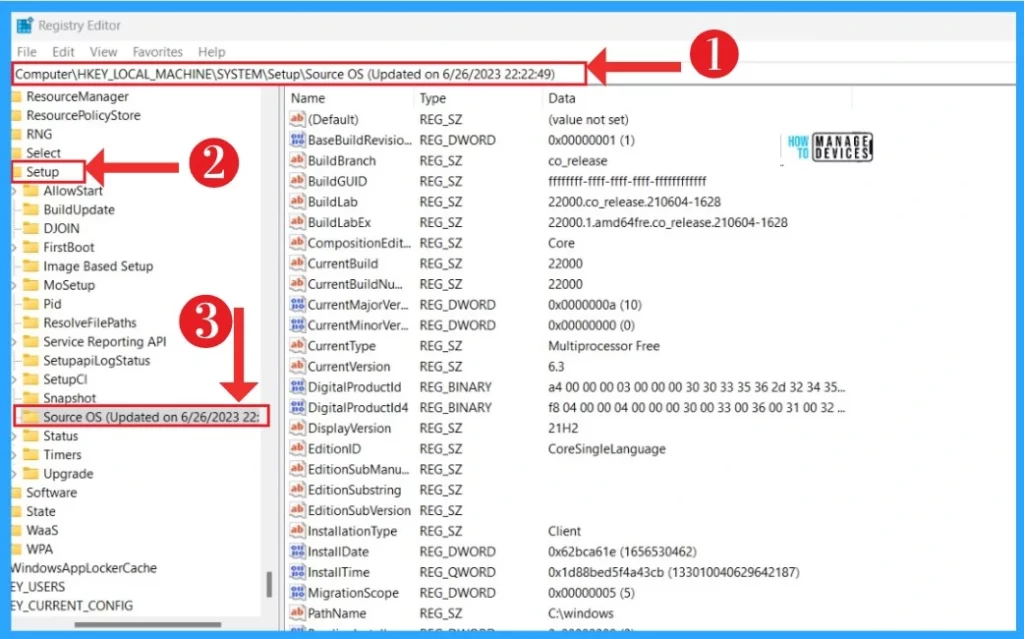
First, you must open the Registry; to launch the Registry, press Win + R. In the dialogue box, Type regedit and press Enter to launch the Registry Editor. Navigate to the following key in the left pane of the Registry Editor.
- Copy this path HKEY_LOCAL_MACHINE\SYSTEM\Setup
- Under the Setup key ( Each Source OS subkey under the Setup key represents a feature update that was installed )
- Select source OS (for the Update History)
We are on WhatsApp. To get the latest step-by-step guides and news updates, Join our Channel. Click here – HTMD WhatsApp.
Author
Krishna. R is a computer enthusiast. She loves writing about Windows 11 and Intune-related technologies. She likes to share her knowledge, quick tips, and tricks with the community about Windows 11 or Windows 10.

Hello, you have also Get-hotfix command.
https://learn.microsoft.com/fr-fr/powershell/module/microsoft.powershell.management/get-hotfix?view=powershell-7.4