Let’s discuss Enable Disable Screenshot Policies in Edge using Microsoft 365 Admin Center Policy. Microsoft Edge policies used to configure how Microsoft Ede runs in an organization. Using Edge policies you can enable or disable taking Screenshot in Edge.
Have you heard about this policy on Microsoft 365 admin center. This policy Controls if users can take screenshots of the browser page. Taking a screenshot in Microsoft Edge is a breeze with the built-in Web Capture feature.
As you know that, Screenshots can capture sensitive information. Employees might capture and share confidential information without proper authorization, compromising privacy and compliance with data protection regulations.
So enabling Taking Screenshot in Edge helps to avoid such security risks in an organization. In this blog post i will help you to Enable Disable Taking Screenshot in Edge Via Microsoft 365 Admin Center Policy. You will get a step by step guide from this blog post.
Table of Contents
What is DisableScreenshots Policy in Edge Browser?
DisableScreenshots Policy in Edge Browser helps to control if users can take screenshots of the browser page.
Enable Disable Screenshot Policies in Edge
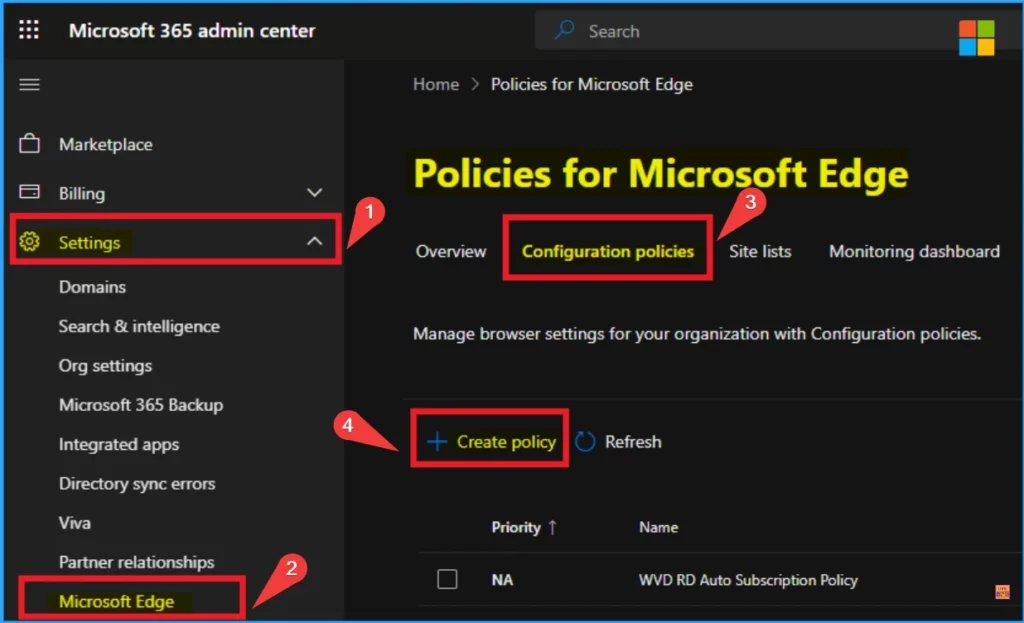
DisableScreenshots Policy in Edge Browser can be access from Microsoft 365 Admin Center. With this policy you can improve the security of your organization. The below list shows the steps to access DisableScreenshots Policy.
- Click on the Settings option from the Left side of the portal
- Select Microsoft Edge from Settings
- Select Configuration Policies
- Click on + Create Policy
- Enable Additional Search Box in Edge Browser using Microsoft 365 Admin Center Policy
- Enable AI Gen Themes in Edge Browser using Microsoft 365 Admin Center Configuration Policy
- Brand Identity Advanced Customization Options for Microsoft Edge Browser for Business
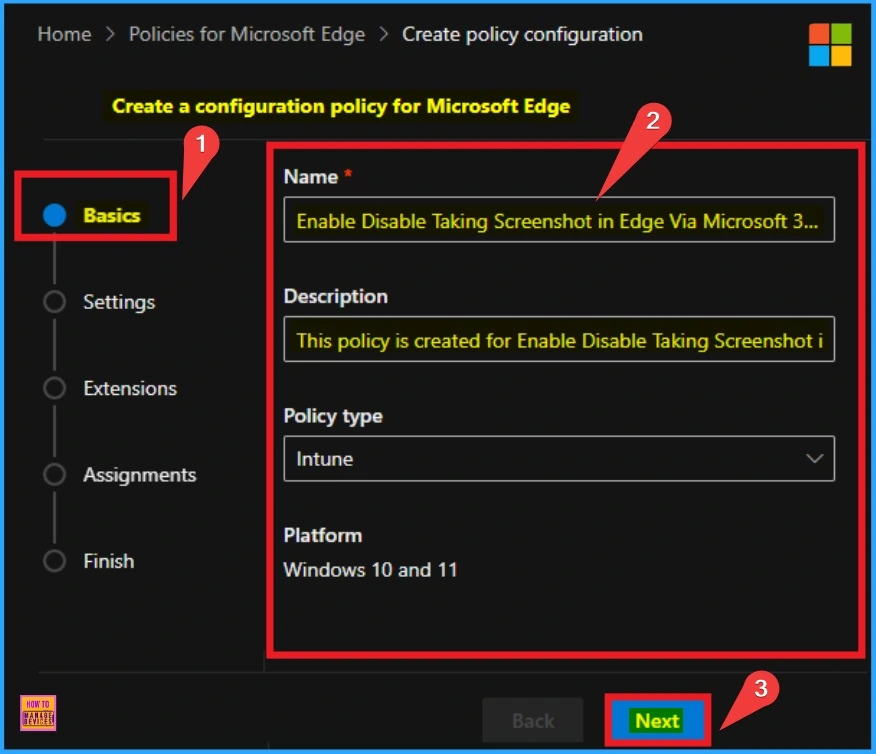
After clicking on the + Create policy, you can see different tabs to create a Configuration policy. Here you can see the First Tab Basic to add Name and Description of the Policy. Here you should add Name and Description of the policy to identify later. In this policy policy type is Intune and Platform in Windows 10 and 11.
- Click on the Next button after adding appropriate Name and Description
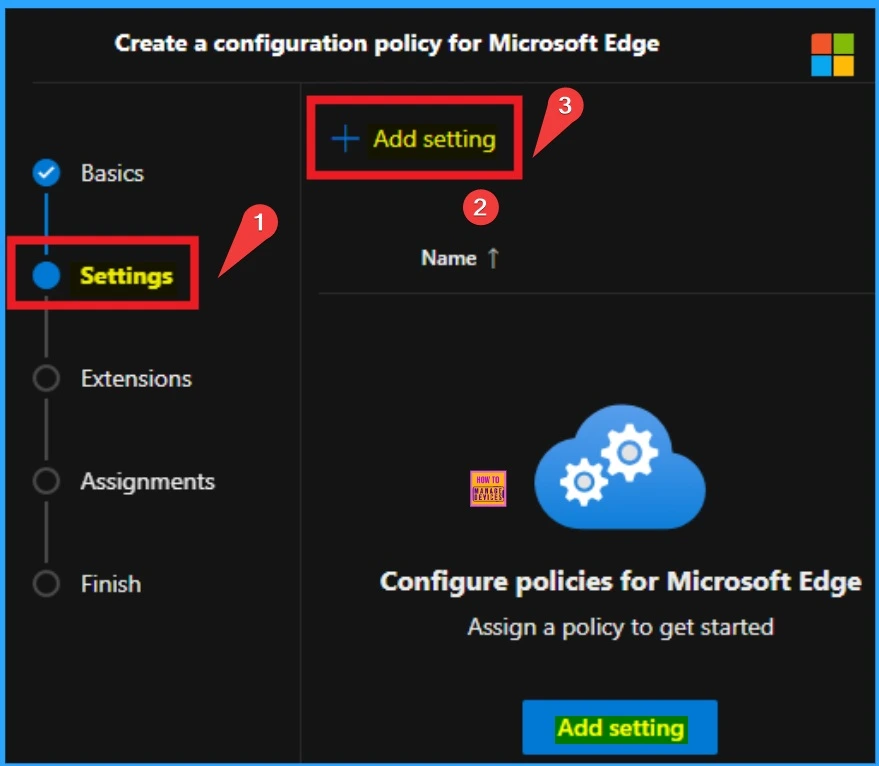
The Second tab is Settings which is the most important section in Configuration Policy creation. Here you can add settings for your policy. Click on the + Add setting.
Configuring a Setting
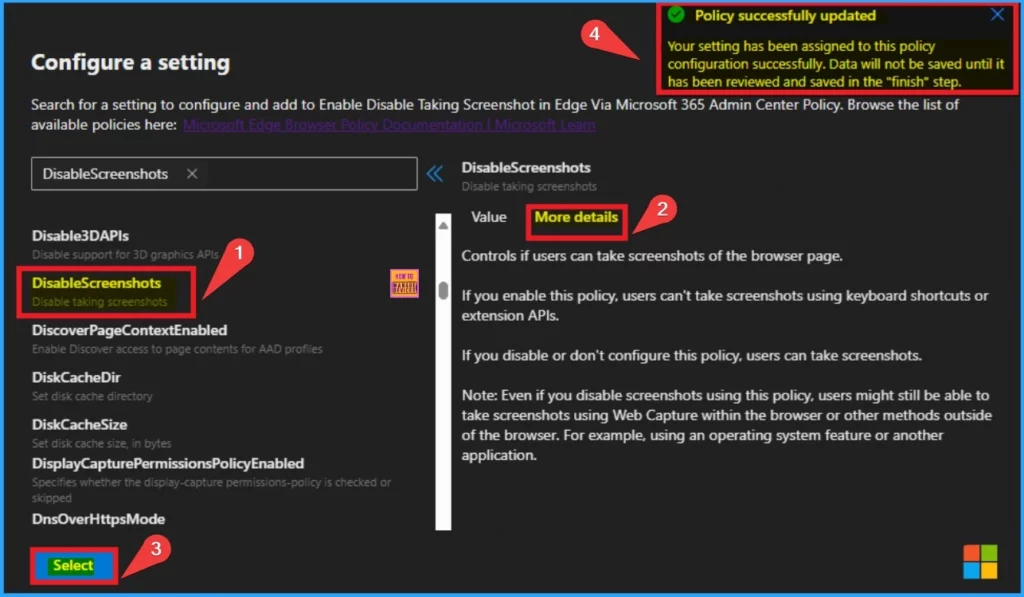
From the below window you can configure a setting. Here you can search for a setting to configure using the searchbox or scroll down and select a settings. Here i select DisableScreenshots policy and its shown on the right side of the window.
On the Value tab you can enable or disable the selected policy. Here i select Enable option from the Value tab. The below window shows the details.
| Enable | Disable |
|---|---|
| If you enable this policy, users can’t take screenshots using keyboard shortcuts or extension APIs. | If you disable or don’t configure this policy, users can take screenshots. |
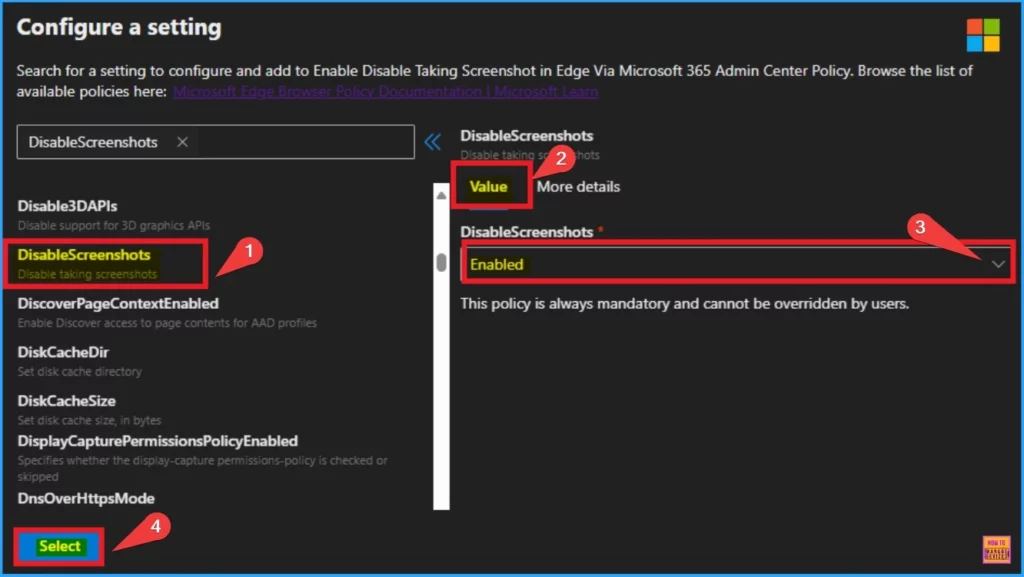
On the More details tab you can read the more informations of the selected policy. With this details you can understand what are the changes happend after enabling the selected policy.
- Click on the Select button
- You will get a notification on the portal as “Policy successfully updated“
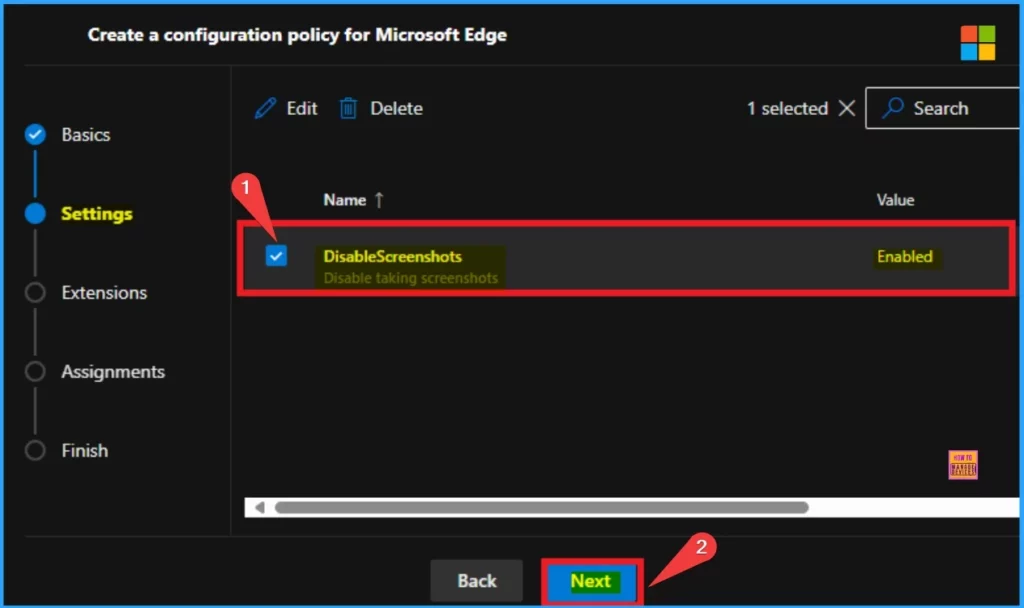
After clicking the select button from the previous window, you can see the selected policy name and value. Here you have to click on the checkbox near the Policy name and click on the Next button.
- Enable Disable Show Downloads Insecure Warnings in Edge via the Microsoft 365 Admin Portal
- Enable Address Bar Editing in the Edge Browser using the Microsoft 365 Admin Center Policy
- Enable Disable Sleeping Tabs Timeout in Edge Browser using the Microsoft 365 Admin Center Policy
Extension Tab
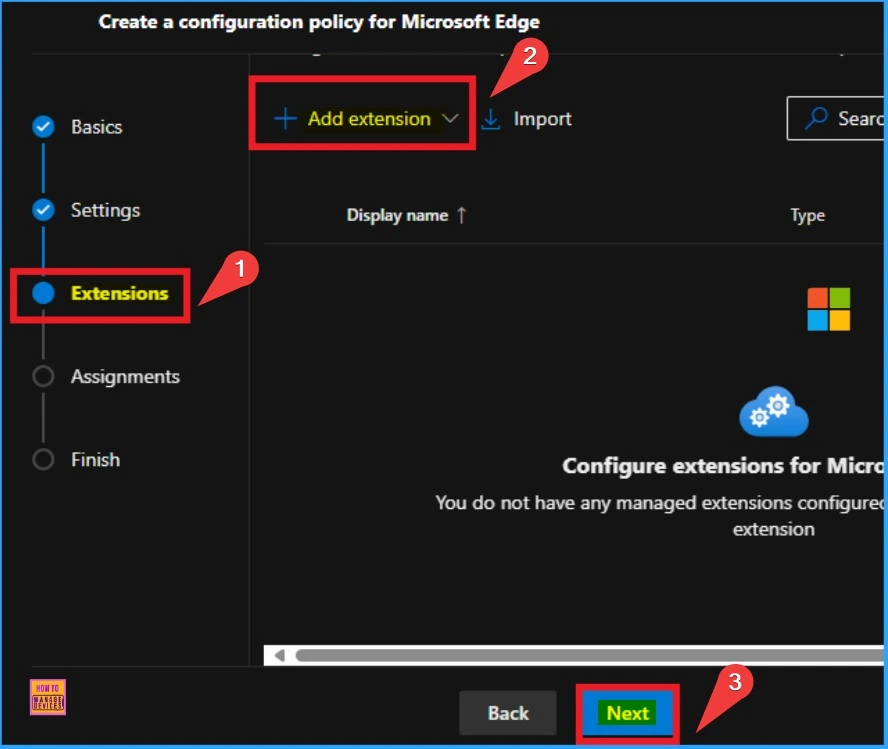
On the Extension tab, you can see extension related to the selected policy. Installation settings, Permissions and URLs, etc. Slightly scroll down the Extension window and you can see the option +Add extension. If you want to add extension, click on the + Add extension. Other wise you can skip this section.
- Click on the Next button
Assignment Tab
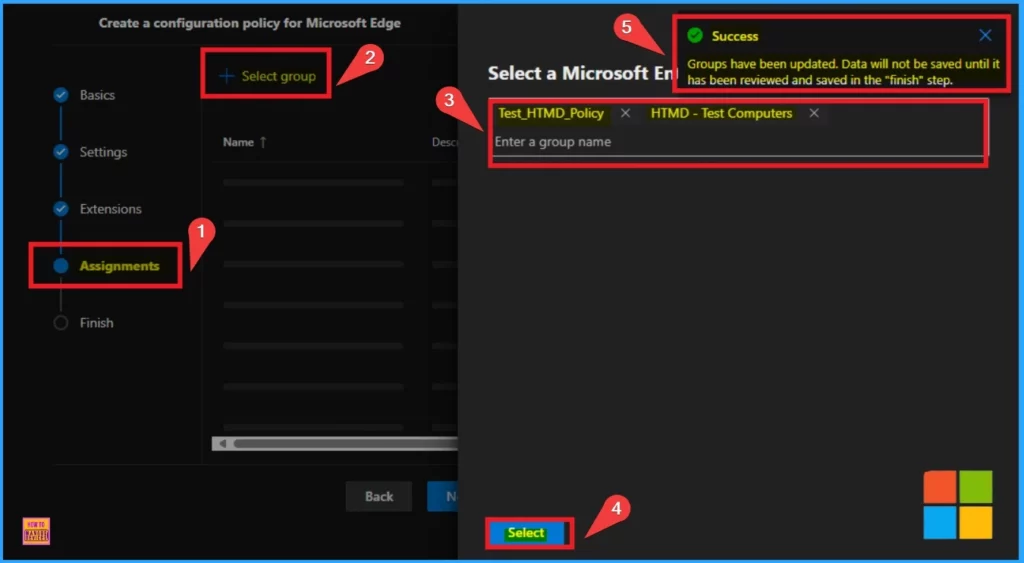
On the Assignment tab you can select groups to assign the policy that you have select. This tab determines which user or device is assigned the policy. Click on the Select group option. Enter a group name on the assignment tab. Here i select 2 groups. Click on the selelect button and you will get a notification on this page like “Group have been updated”.
Finish Settings
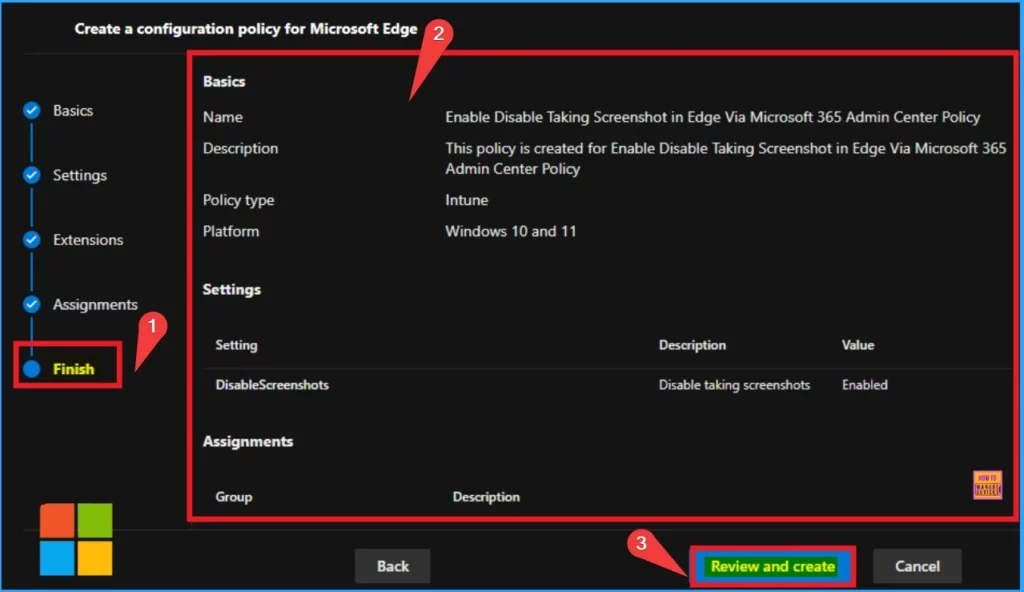
The Finish tab is the last one to complete the policy creation. Here, you can check all the details. If you want to change anything, you can go to the previous window by selecting the back button. After checking all the details, click on Review and create.
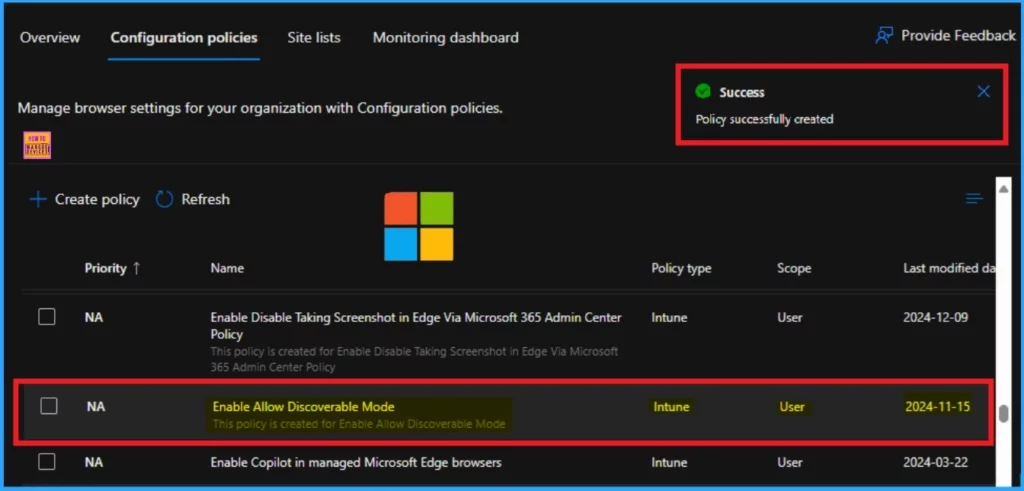
After the policy is created, you will receive a notification on the portal that the Policy has been successfully created. The screenshot below will help you.
Need Further Assistance or Have Technical Questions?
Join the LinkedIn Page and Telegram group to get the latest step-by-step guides and news updates. Join our Meetup Page to participate in User group meetings. Also, Join the WhatsApp Community to get the latest news on Microsoft Technologies. We are there on Reddit as well.
Author
Anoop C Nair has been Microsoft MVP for 10 consecutive years from 2015 onwards. He is a Workplace Solution Architect with more than 22+ years of experience in Workplace technologies. He is a Blogger, Speaker, and Local User Group Community leader. His primary focus is on Device Management technologies like SCCM and Intune. He writes about technologies like Intune, SCCM, Windows, Cloud PC, Windows, Entra, Microsoft Security, Career, etc.
