Let’s discuss how to Enable and use the new Screenshot Tool in MS Edge. You all know about Microsoft Edge; most of us use this wonderful browser, known for its speed and features. A web browser is much needed for everyone; in the browsers list, Microsoft Edge is one of the most important.
Microsoft Edge is mainly designed for speed, efficiency, and security. We can blindly consider Edge, an incredible companion; it’s more than a browser. In previous Edge updates, every feature was updated. Many extraordinary features in Edge will always help users be more productive.
The Edge provides many productivity tools, such as Collections tabs, sidebar, and, most importantly, Copilot and Image Creator, to assist in various tasks. In recent updates, the Edge can capture the screen quickly and effectively. The new feature is an innovation of Microsoft Edge, also called background screenshot support.
Are you wondering how this feature works on your browser? Don’t worry. Now, you can capture anything on your screen. Quick customization will help you get this feature at your fingertips. In this article, I will share how to Enable and use this feature and share my experience through this post.
- Enable Disable Let Copilot Use Content from Microsoft Edge in Windows 11
- Add or Remove the Copilot Toolbar Icon in Microsoft Edge
- Turn On or Off Microsoft Defender SmartScreen for Microsoft Edge in Windows 11
How to Enable and Use the New Screenshot Tool in MS Edge
Background screenshot support( Rich screenshot ) is a new feature on Edge. With this, you can capture screenshots even if the Edge browser is not the active window on your screen. We always use many apps to capture screens on devices.
With the Edge browser, you can take screenshots of your screen. If you are interested in accessing this tool, check whether your Edge browser is up to date and then follow the steps.
- In the Edge browser, copy-paste this edge://flags/#edge-screenshot
- Press Enter
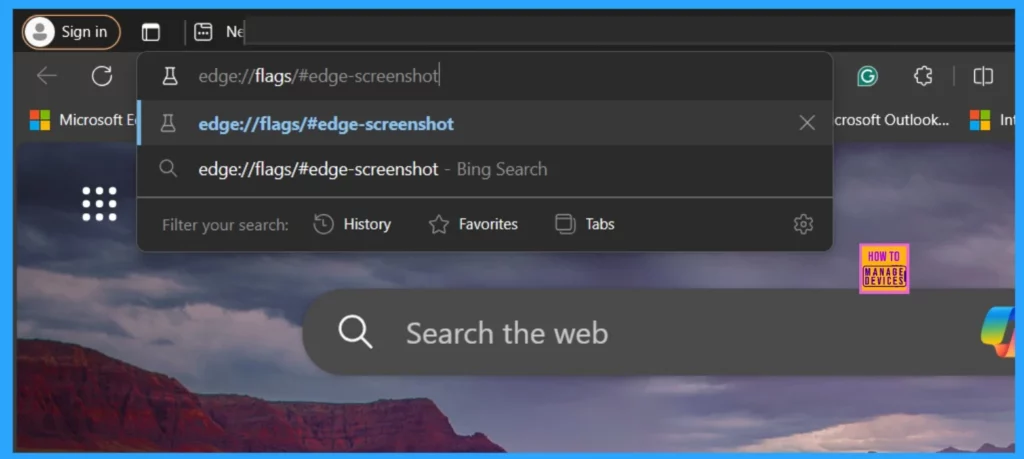
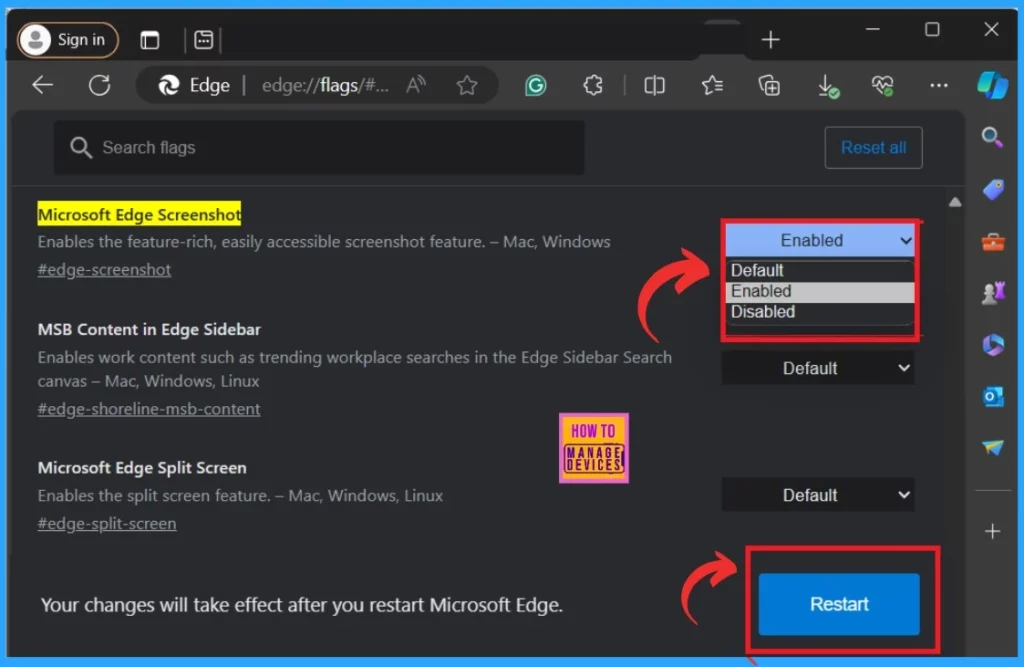
After I pressed Enter, I got a Window with many enable options. We had to select the Microsoft Edge Screenshot, which was already highlighted. So, you don’t need to worry about finding the feature on your Edge. You can click the dropdown arrow next to Microsoft Edge Screenshot and select the Enable option.
- After that, Click on the Restart option; your changes will take effect after you restart Microsoft Edge.
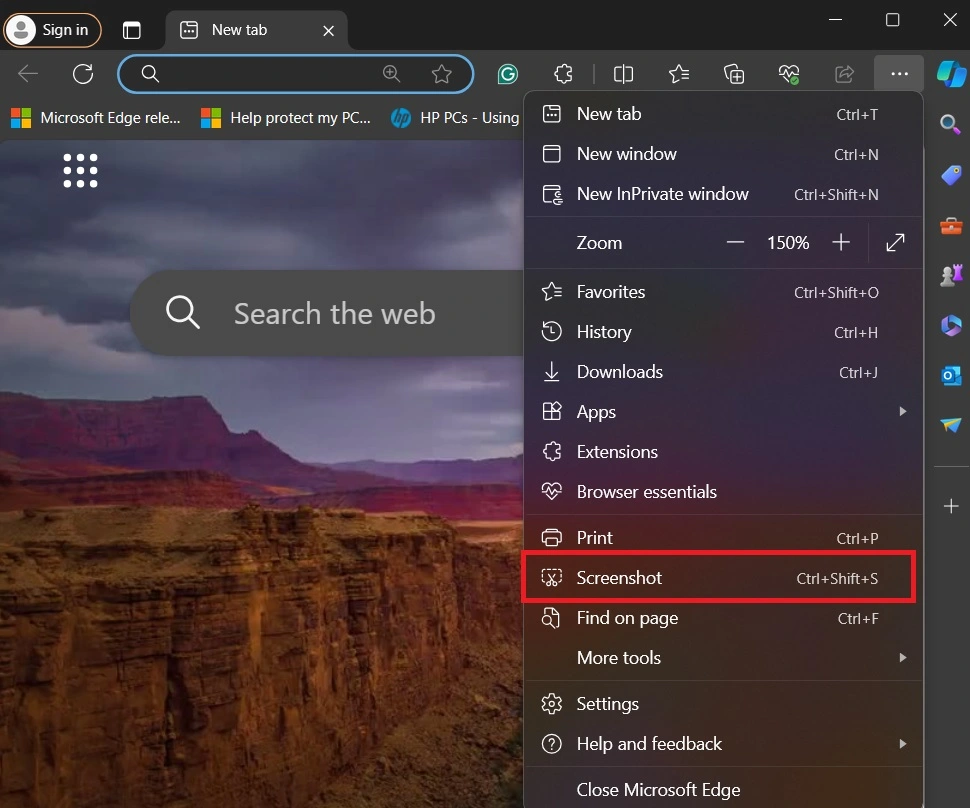
When you restart your Edge browser, the feature is turned on. You can easily find the screenshot option in your Edge. To take a screenshot, Click on the Settings and More option by clicking on the 3 option (…). When you click on the 3 dot option, you can select the screenshot option from the menu.
You can also use the CTRL+SHIFT+S Shortkey ( if you press these keys together, it will trigger the screenshot function of the Edge browser, even if you’re working in a different application).
How it Works on Your Edge
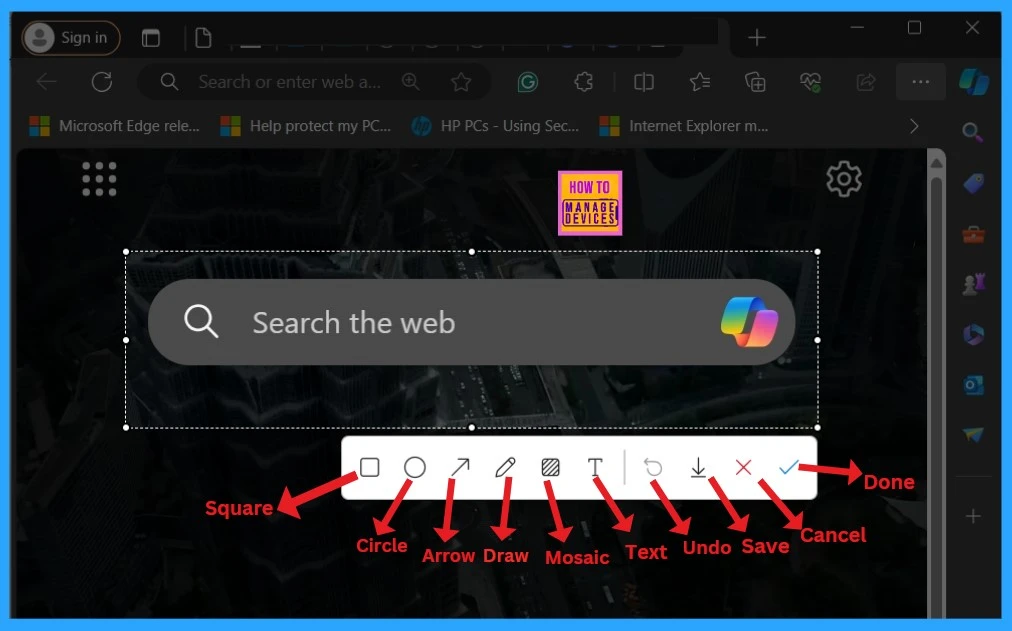
After all those settings, you are now able to capture your screen. To access this, first follow the above steps. (Click on the 3-dot menu and select the screenshot). You can drag the cursor to the screen and keep moving the mouse to capture the screen. When you capture a screenshot, you can get many options in that screenshot tool.
| Options in the Screenshot Tool | Info |
|---|---|
| Circle | You can highlight the captured screenshot with Circle |
| Square | You can highlight the captured screenshot with Square |
| Arrow | You can put an arrow in the screenshot to point out any information |
| Draw | You can Draw in the screenshot |
| Mosaic | With this option, you can blur something in your screen capture |
| Text | The Text option allows you to add text |
| Undo | You can Undo any current actions |
| Save | The save option will help you to save the screenshot on your device |
| Cancel | You can cancel the particular screenshot that you have taken |
| Done | This option is just like the Save option; you can save the screenshot |
- New Shapes Feature in Snipping Tool How to Use Guide
- New Shared Links Feature in Microsoft Edge for Business
- Enable Disable Website Typo Protection in Edge Browser
After capturing the screen, you will get the above options( See the Table). I think this is an essential option in this screenshot tool. Whenever we capture a screen, you need to do other editing work, such as if anything you want to highlight in a square box or blur any particular portion from that screenshot you may need to edit. But these options are a game changer.
- You can easily use these tools in your screenshots with different colours
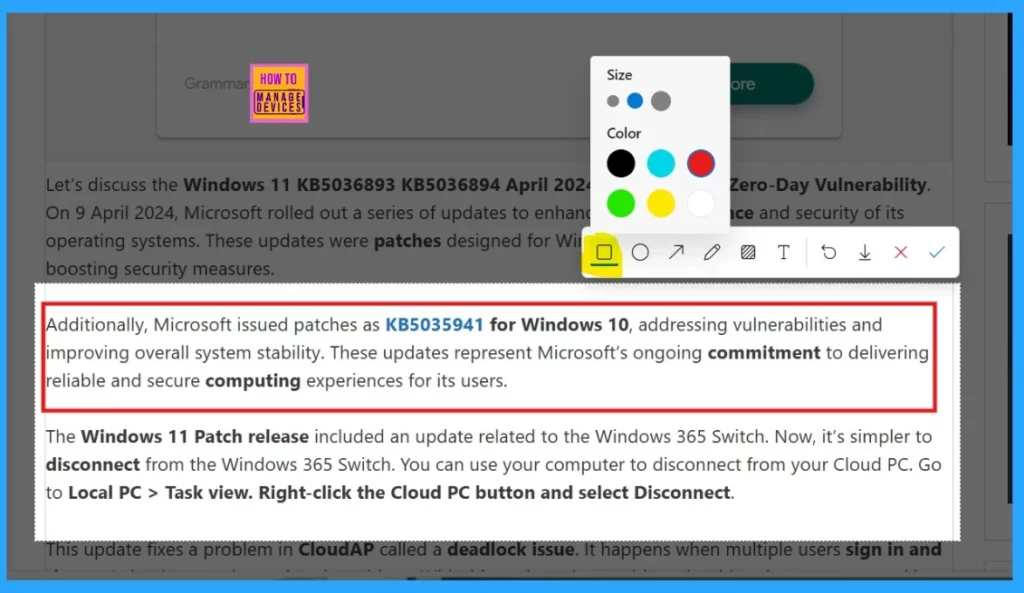
- For example, I captured our blog post as a screenshot, here I wanted to highlight the paragraph, so I chose the square option and drew a square box around the paragraph
- When you click on the Square, you will get many colour options and Size options.
- The colour option and size options are available for Square, Circle, Arrow, Draw, Mosaic and Text options
Add the Screenshot Tool in the Microsoft Edge Toolbar
You can add the screenshot tool in the Microsoft Edge toolbar. This is the best way to quickly access the screenshot option for capturing. Every time you have to invest time in accessing screenshots, it is not a cool option, So you can add this tool to the Microsoft Edge toolbar for easy access.
Follow the steps below to add the screenshot tool in the Microsoft Edge toolbar.
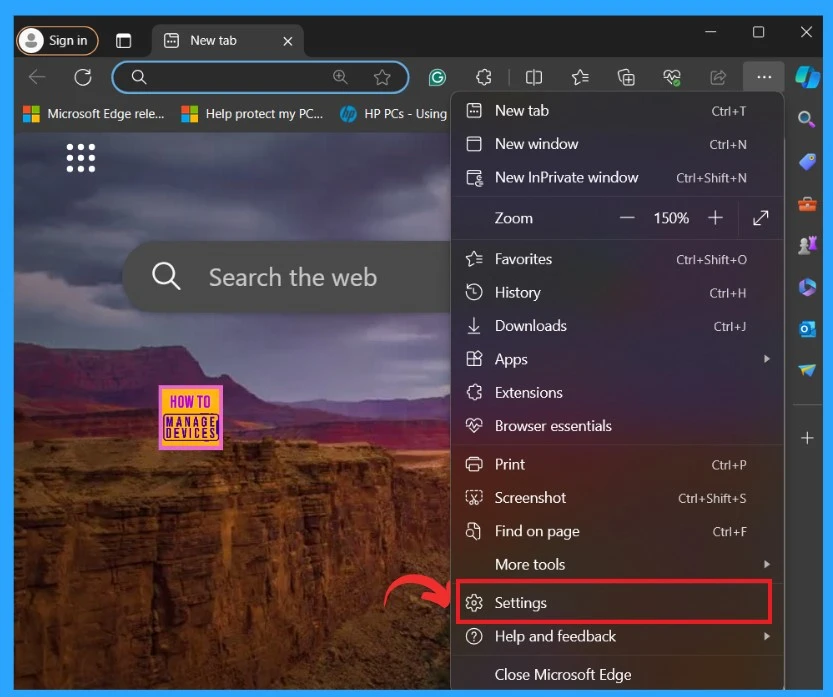
- Click on the Setting and More option (…) in the Microsoft Edge
- Select Settings From the Menu
- How to Enable Mica Effect in Microsoft Edge
- Fixing MS Edge Battery Drain Issue on Windows 11
- Create AI Images from Microsoft Edge
In the Edge window settings, you have to select the Appearance option. Here, you will find many options for enabling and disabling. We have to select the Screenshot Button option from there; the option is disabled by default. For Enabling, I toggled the pane from Left to Right.
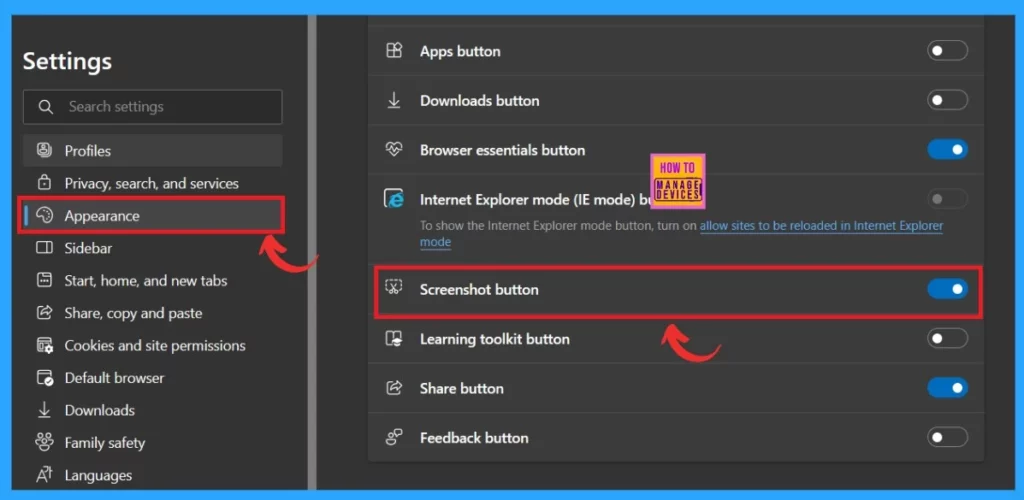
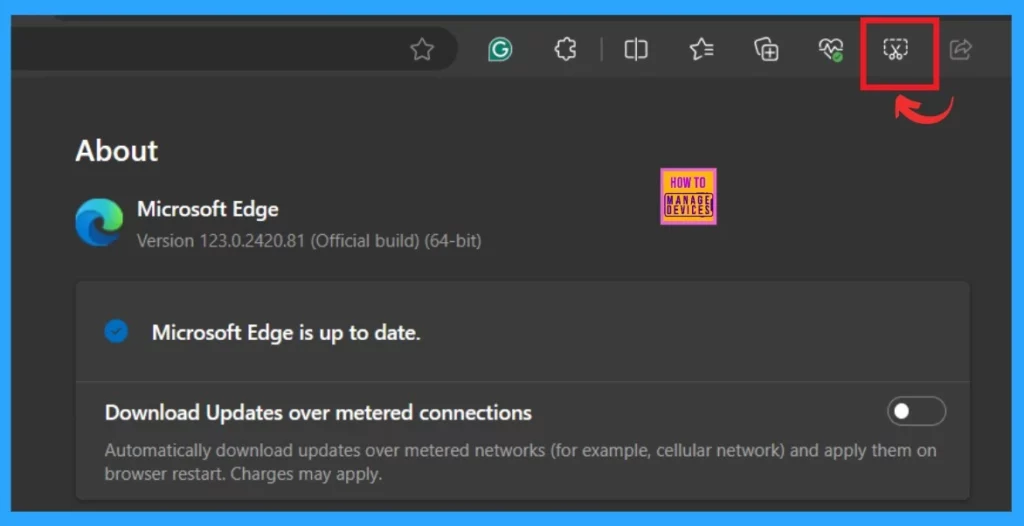
After Enabling the Screenshot button, you may get the Screen capture option at the top of the Microsoft Edge toolbar. Now, you can easily access this tool with just one click. If you cannot find the screenshot option in your settings, you have to check whether your browser is up to date.
- In my experience, after using this tool, its extraordinary features that you are going to experience through a browser
- You can easily use this feature while working on your browser
We are on WhatsApp. To get the latest step-by-step guides and news updates, Join our Channel. Click here –HTMD WhatsApp.
Author
Krishna. R is a computer enthusiast. She loves writing about Windows 11 and Intune-related technologies and sharing her knowledge, quick tips, and tricks about Windows 11 or 10 with the community.

This is not working now, only snip but no option coming on snip are to cirle, box, arrow to highlight