Let’s learn the 3 Best Ways to Disable Taskbar Thumbnail Preview on Windows 11. Sometimes, the user notices a slight delay between placing the pointer on the taskbar icon and the thumbnail appearing. If you find this delay and want to increase it, you can disable the taskbar thumbnails.
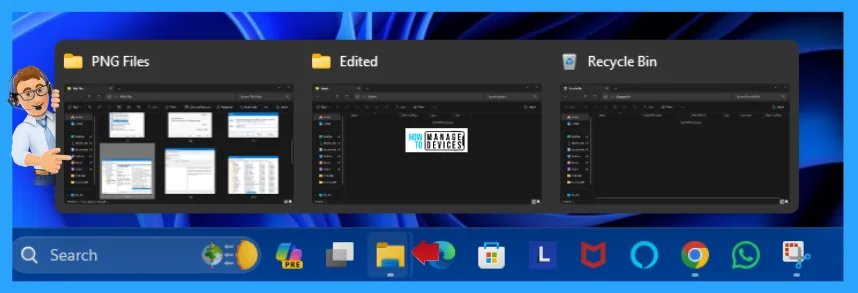
Taskbar thumbnails are useful, but many users do not want them on Windows 11 as they distract them. This feature looks good unless it takes up a lot of space, specifically when the user is multitasking. For example, when multiple file explorers or browsers (Edge, Chrome, etc.) are opened, and you hover the mouse cursor over the taskbar icon, it shows the thumbnail previews.
This feature displays a tiny preview in the form of a small thumbnail image of the open Windows programs. The thumbnail previews match the new operating system’s design; however, the thumbnail takes some time to appear.
By default, the taskbar thumbnail preview on Windows is enabled and the hover time is predefined, basically set to half a second. When the user hovers over the thumbnail that pops up, the user can sneak a peek of what is running on the task window without going to the running program. This guide helps you to disable Taskbar Thumbnail Preview on Windows 11.

How to Disable Taskbar Thumbnail Preview on Windows 11
Taskbar thumbnails are useful; this feature displays a tiny preview in the form of a small thumbnail image of the open Windows programs. The thumbnail previews match the new operating system’s design; however, the thumbnail takes some time to appear.
By default, the taskbar thumbnail preview on Windows is enabled. There are 3 ways to disable the taskbar thumbnail preview on Windows 11, which are listed below.
- Use Windows Settings to Disable Taskbar Thumbnail Preview on Windows 11
- Use Local Group Policy to Disable Taskbar Thumbnail Preview on Windows 11
- Use Registry Editor to Disable Taskbar Thumbnail Preview on Windows 11
Use Windows Settings to Disable Taskbar Thumbnail Preview on Windows 11
You can disable the Taskbar Thumbnail Preview using various methods in Windows. There are some methods described here. The first method is to disable the Taskbar Thumbnail Preview using the settings menu.
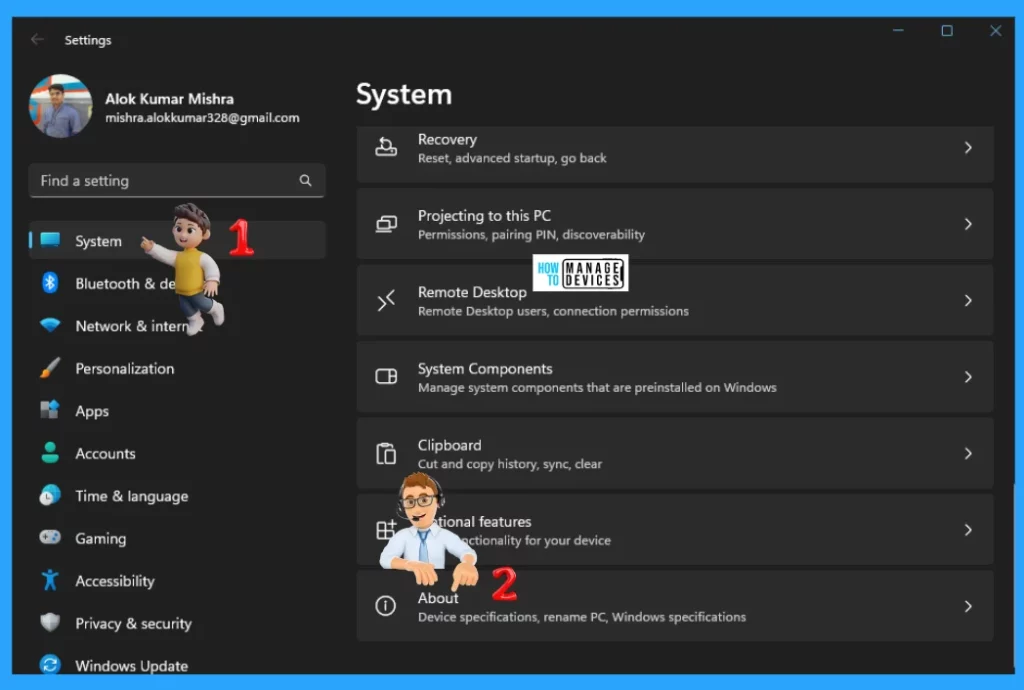
Click on the Windows button, then select Settings, or you can press Win Key + I to open settings directly. Then, under settings, click on the System option on the left panel, and scroll down to find About in the right panel.
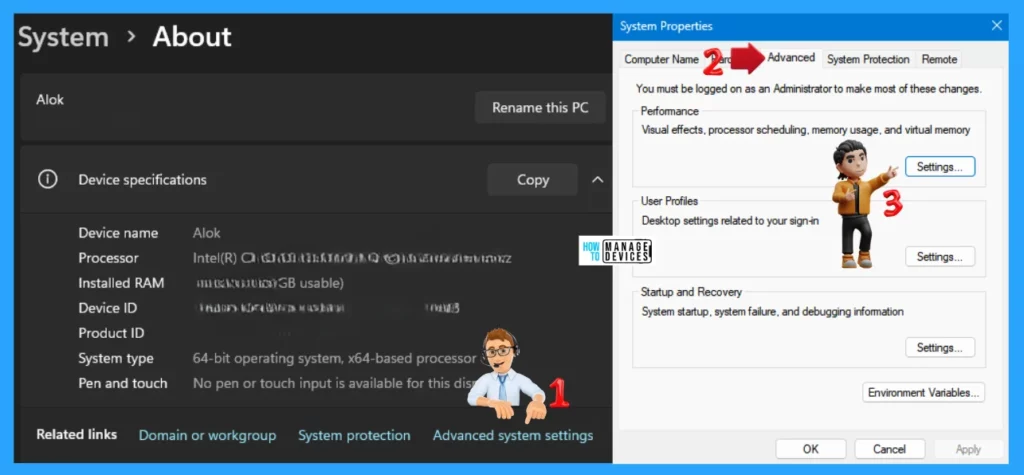
When About the window opens, click on the Advanced System Settings link. Next, the System Properties window opens. Click on the Advanced tab. Here, you can see three options; click on Settings under the Performance option.
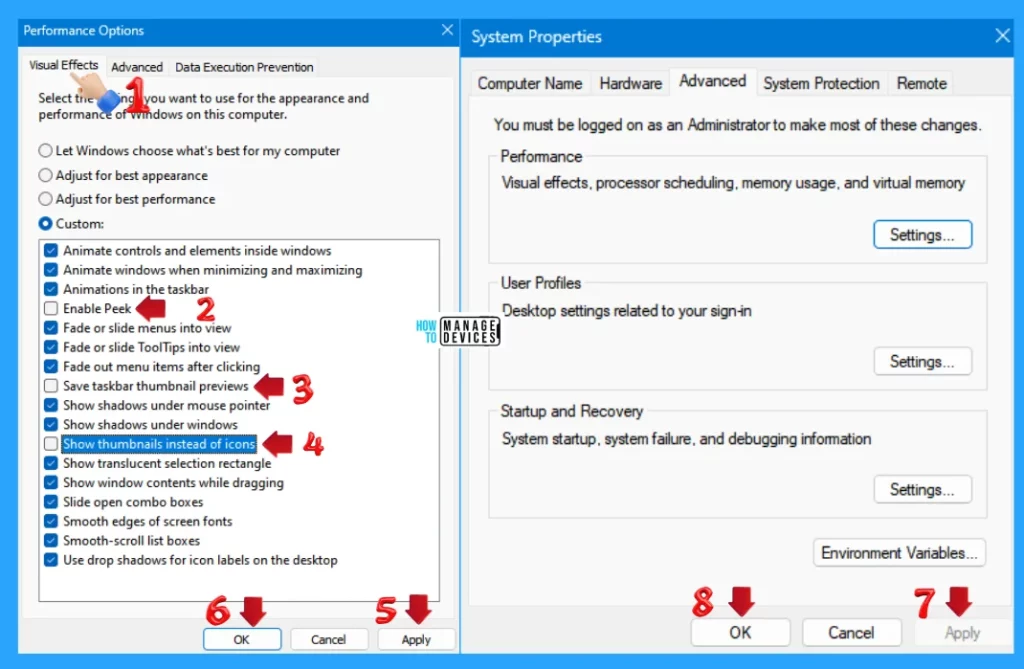
Under the Performance Options window, click on the Visual Effects tab, check the Custom button, and uncheck the three options listed below. Tap on Apply, then OK; it returns to the System Properties window here. Also, tap on Apply, then OK.
NOTE! Restart your device to apply the changes.
Use Local Group Policy to Disable Taskbar Thumbnail Preview on Windows 11
You can also Disable Taskbar Thumbnail Preview Using Local Group Policy Editor. Open Local Group Policy to allow enable or disable updates and follow the process.
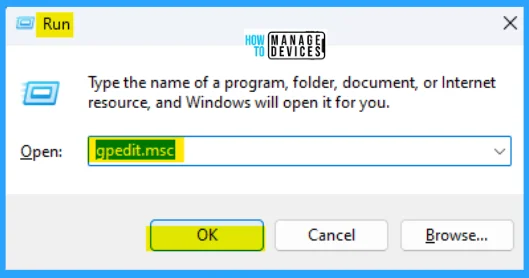
- Open the Run command, press Win Key + R
- Type gpedit.msc
- Click OK or press Enter.
When the Group Policy Editor opens, navigate to the following path to reach the required policy settings and select Turn off Taskbar Thumbnails to make changes.
User Configuration > Administrative Templates > StartMenu & Taskbar
| Edit | Requirements | Description | Note |
|---|---|---|---|
| Policy Settings | Windows Vista only | This policy setting allows you to turn off taskbar thumbnails. If you enable this policy setting, the taskbar thumbnails are not displayed and the system uses standard text for the tooltips. If you disable or do not configure this policy settings, the thumbnails are displayed. | If you disable or do not configure this policy settings, the thumbnails are displayed. |
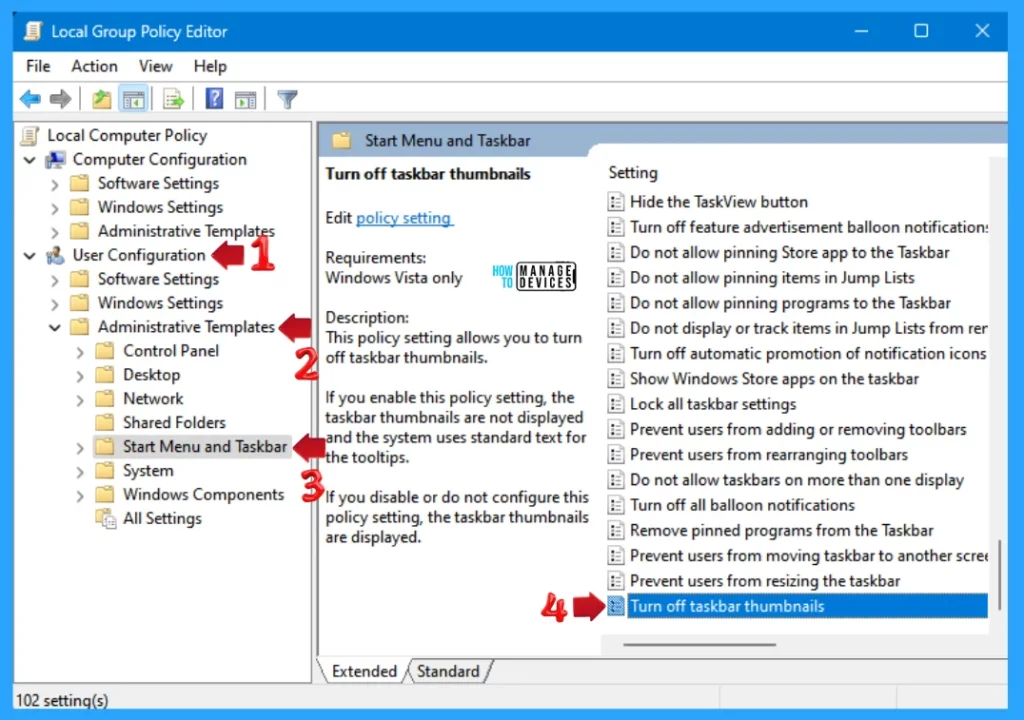
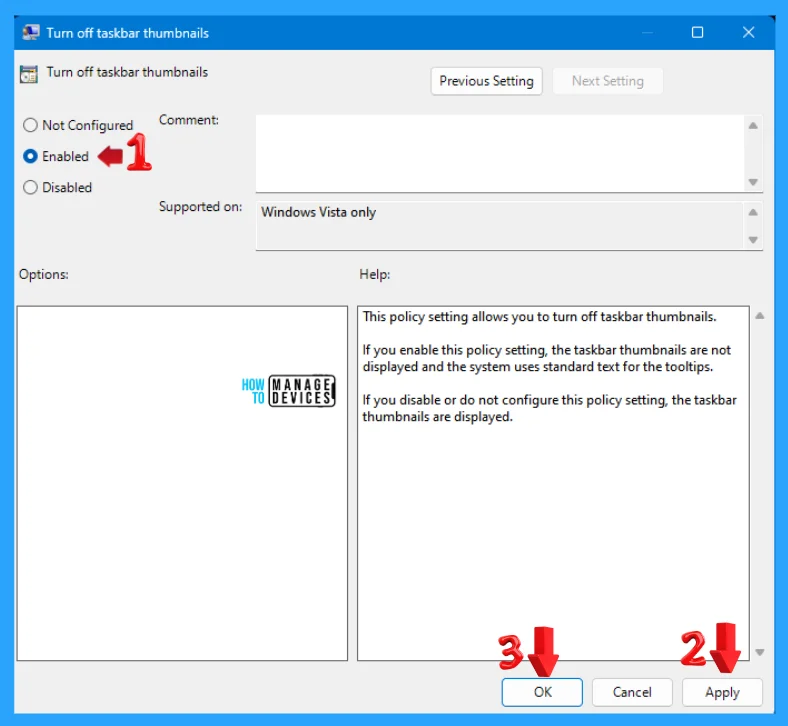
Now scroll down and double-click on Turn off Taskbar Thumbnails and then Enable – Turn off Taskbar Thumbnails settings open; the default setting is “Not Configured“. Select Disable Turn off Taskbar Thumbnails to show the option in personalization settings. Select Enable – Turn off Taskbar Thumbnails.
- Not Configured: The thumbnails are displayed if you do not configure this policy setting.
- Enabled: If you enable this policy setting, the taskbar thumbnails are not displayed, and the system uses standard text for the tooltips.
- Disabled: The thumbnails are displayed if you disable this policy setting.
Use Registry Editor to Disable Taskbar Thumbnail Preview on Windows 11
Another way is to Disable the Taskbar Thumbnail Preview on Windows 11 from the registry. This procedure is done using the Registry Editor. Let’s check how to Disable the Taskbar Thumbnail Preview on Windows 11 using the Registry Editor. You can now follow the process listed below to enter the registry editor to modify changes.
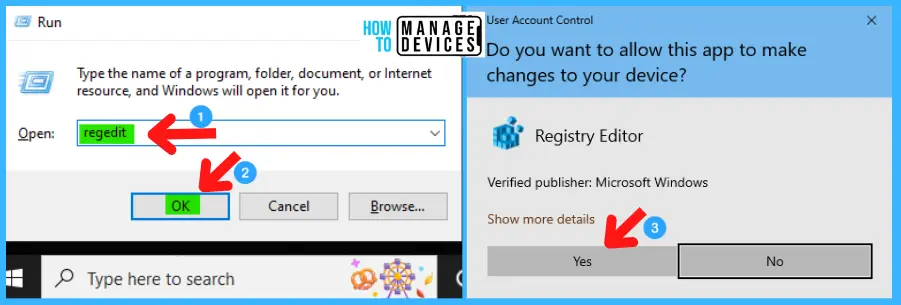
- Window Key + R (To open run command)
- Type ‘regedit‘ and press OK
- Administrator permission press Yes
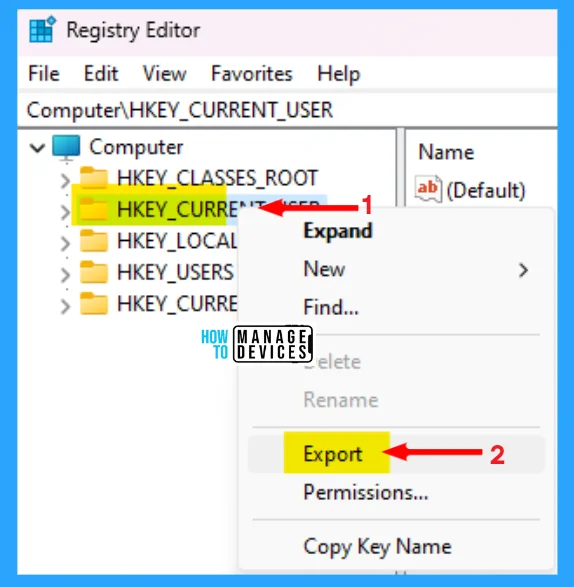
Note! Take Backup—If any mistake occurs in the Registry Editor, it may affect the system. It is advisable to take a backup of the Registry before proceeding. In the Registry Editor, go to File in the left top corner for backup. Click on it, then select Export and save the backup.
When the registry editor opens, then you must have to take the backup for your registry editor. Follow the steps below to make a backup for your registry editor.
- Go to File
- Right-click on HKEY_CURRENT_USER
- Click on Export
- Save it
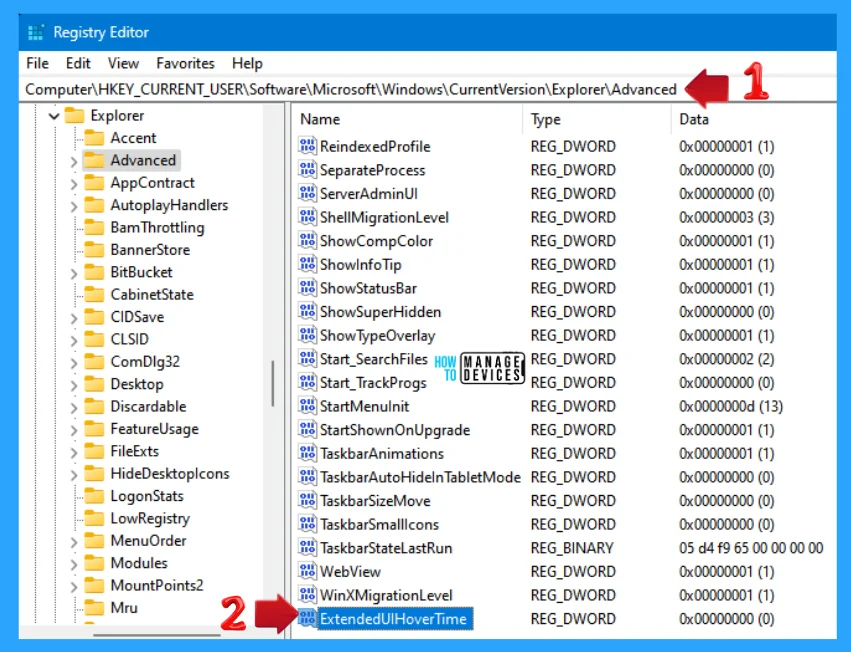
Now, find the path ‘HKEY_CURRENT_USER\Software\Policies\Microsoft\Windows\CurrentVersion\Explorer\Advanced’. Following the trail, reach the required folder for further modification. Now search for the ExtendedUIHoverTime option; create one if it isn’t there.
Right-click on the blank space in Advanced in Registry Editor, click on New, select DWORD (32-bit) Value, and rename it ExtendedUIHoverTime.
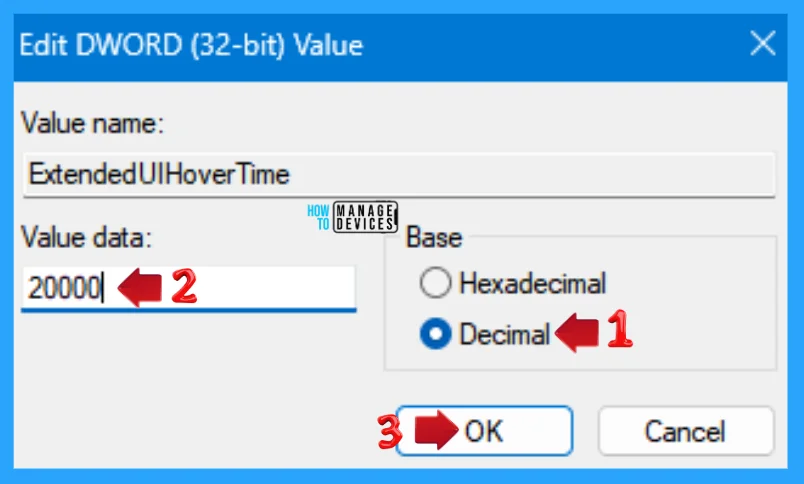
Double-click on ExtendedUIHoverTime, and in the Value data entry, type in a value less than 10000. Here, you can select the Decimal value and add the number of seconds you want to add. You can add less than 10 seconds, as shown in the image below.
NOTE! Here, you can multiply the number of seconds with 1000, then type the value.
Additional (Bonus) Tip
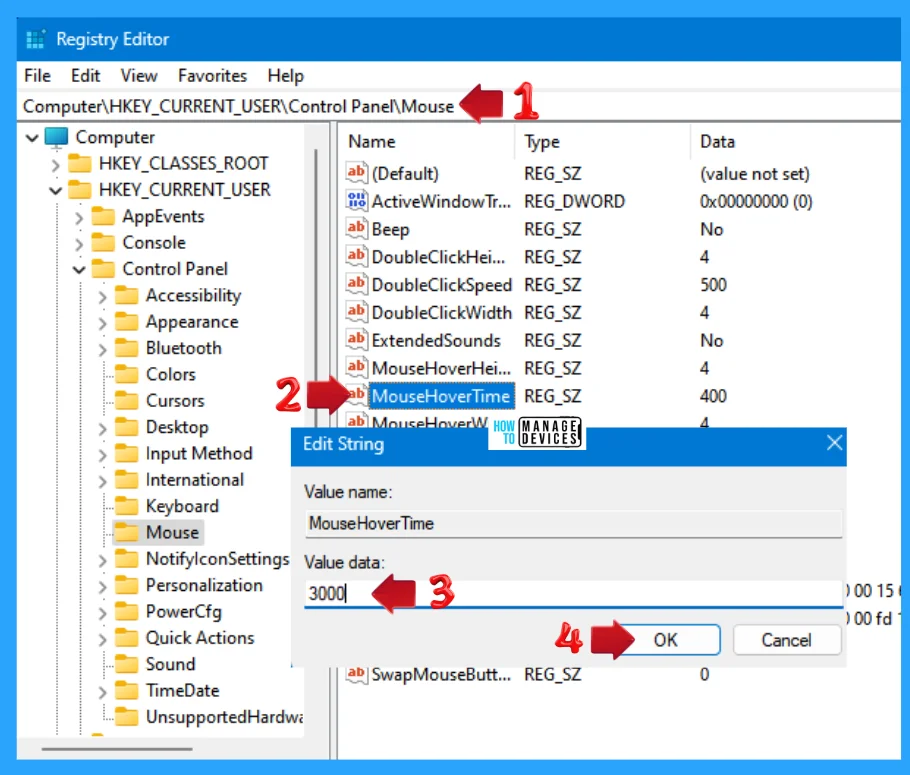
Follow the above image to access the registry editor and find the path ‘HKEY_CURRENT_USER\Control Panel\Mouse’. Following the trail, reach the required folder for further modification. Now search for the MouseHoverTime option; create one if it isn’t there.
Double-click on MouseHoverTime, and in the Value data entry, type in a value less than 1000. Here, you can select the value and add the number of seconds you want to add. You can add less than 10 seconds, as shown in the image below.
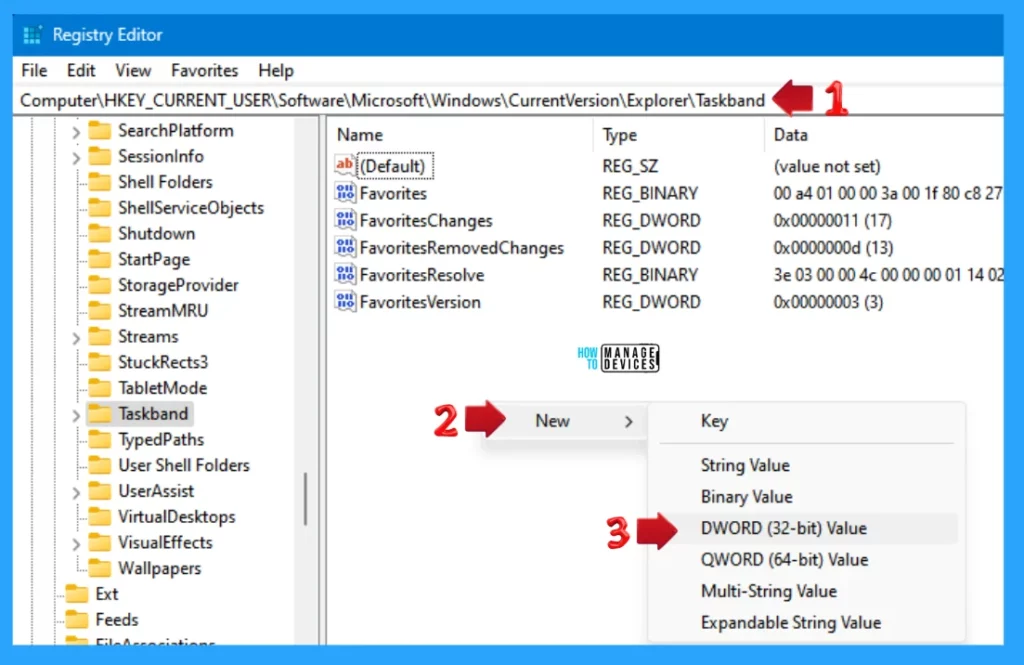
Another bonus setting is to follow the above procedure to access the registry editor. Find the path ‘HKEY_CURRENT_USER\Software\Policies\Microsoft\Windows\CurrentVersion\Explorer\Taskband’. Following the trail, reach the required folder for further modification.
Now right-click on the blank space on the Taskband, then tap on New, click on DWORD (32-bit) Value and rename it as NumThumbnails.
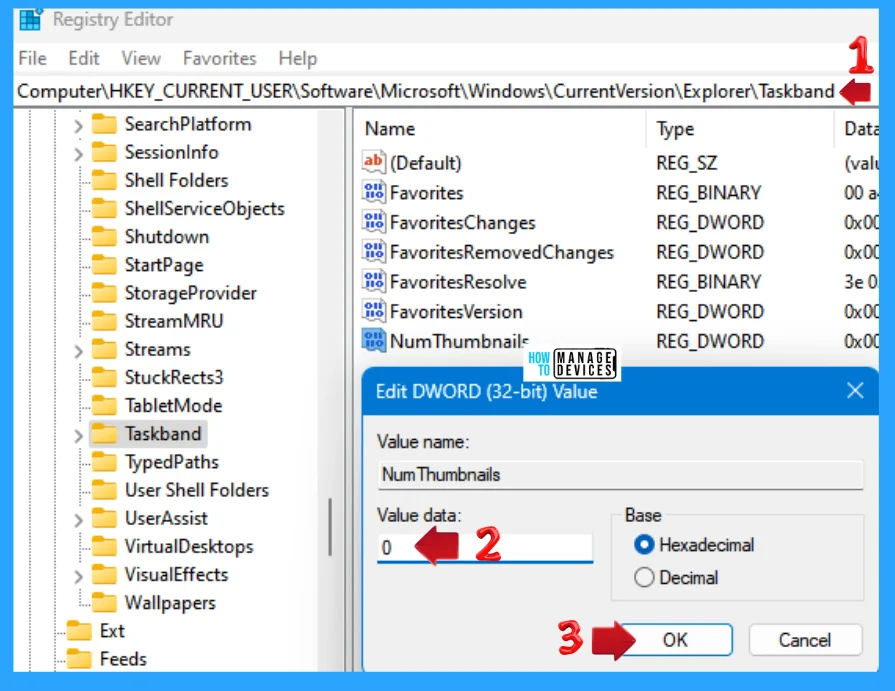
Double-click on the NumThumbnails to open them. The value is set to 0 by default; if not, change it to 0 and press OK to continue.
NOTE! Restart your device for the applicability of the changes.
I hope the information on Various Ways to Set up Environment Variables on Windows 11 is helpful. Please follow us on the HTMD Community and visit our website, HTMD Forum, if you like our content. Suggest improvements, if any, and we’d love to know which topic you want us to explore next.
We are on WhatsApp. To get the latest step-by-step guides and news updates, Join our Channel. Click here – HTMD WhatsApp.
Author
Alok is a Master of Computer Applications (MCA) graduate. He loves writing on Windows 11 and related technologies. He likes to share his knowledge, quick tips, and tricks with Windows 11 or Windows 10 with the community.

None worked at all 🙁
NONE of them work!
Way number 2 even says on screen that “only in Vista”. But article is about Windows 11.
Why author who “loves writing on Windows 11” did not make any checks itself????
Probably those way are turn-on ways from Vista times then this feature was somehow experimental.
So, question remains — how to turn off annoying thumbnails which prevent quick navigation (you must wait until thumbnail fades away, otherwise wrong things happen)
I did the DWORD setting to 10000 and it worked for one day, then they came back. I REALLY don’t like the previews, they cover up my screen. Hoping a 3rd party software can fix this. I am currently using “startallback’ to fix the terrible taskbar and start menu in Windows 11. It’s a life SAVER. It’s the only reason Win 11 is usable at all. Hopefully Startallback can get the taskbar previews off someday soon.
I reloaded my OS after each method. The third one didn’t show any changes before the reboot, but after restarting the system, it worked. Thank you so much.
Only one thing needs to be fixed: the path to Regedit should be
‘HKEY_CURRENT_USER\Software\Microsoft\Windows\CurrentVersion\Explorer\Advanced’
instead of
‘HKEY_CURRENT_USER\Software\Policies\Microsoft\Windows\CurrentVersion\Explorer\Advanced’