Today, I will explore the easy methods to take screenshots on Windows 11. Sometimes, you want to share a picture or a funny conversation with a friend or save important information for later reference. What are the easy methods to do so? Windows 11 has a good remedy for that: taking screenshots.
In Windows 11, we have various methods for capturing the screen. You can use the traditional Print Screen key (PrtSC) to photograph the entire screen or the Snip & Sketch tool to capture a particular area.
The new Snipping Tool feature lets you capture and paste directly into a document or email. Screen recording is a valuable tool in modern times. We can take still images from our screens, select a portion of our screens, and start recording videos.
We have various options for taking screenshots, such as Print Screen, Snipping Tool Window, Snipping Tool Panel, etc. In this post, I will explain these methods. You can use these options to suit your situation.
Table of Contents
What is Screenshots?

A screenshot is a photo taken from your current PC screen. You can capture your monitor picture using various options. Whatever photos you take are stored in the clipboard. You can find all of your full-screen screenshots in Pictures > Screenshots.
Methods To Take Screenshots On Windows 11
Let’s discuss the various option features available for taking screenshots and become easy with the keyboard shortcuts that will enable you to capture different screenshots efficiently.
Print Screen
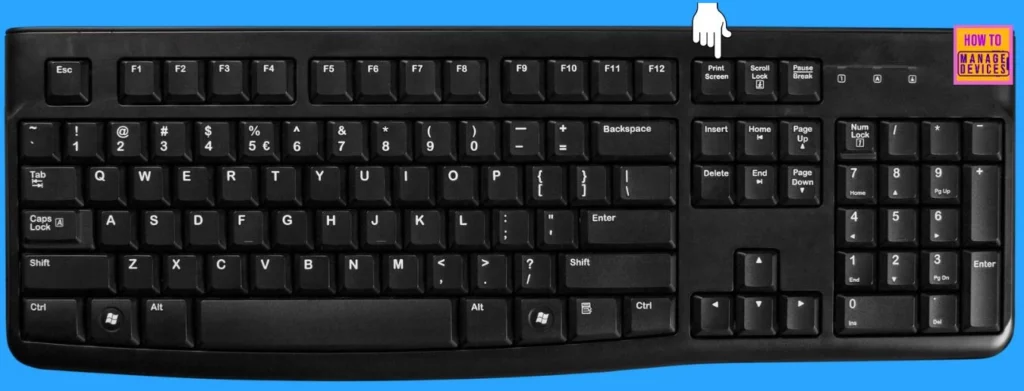
The Print Screen key, located at the top-right corner of most keyboards, can take screenshots. It is commonly labelled as Print Screen, PrtSc, PrtScn, or PrntScrn.
To take a screenshot from an active window, press one of the Print Screen, PrtSc, PrtScn, or PrntScrn buttons. Then press CTRL+V to where you want to paste the screenshot.

- Top 83 Windows 11 Desktop Admin Interview Questions
- Turn On Screen Capture Protection in AVD using Intune
- How to Enable Disable Automatic Screenshots for Web Pages on Microsoft Edge
Windows Key+Print Screen
You can also apply the Print Screen as another way to take screenshots by pressing the Windows Key and PrtScn at a time. To catch your entire screen and automatically save the screenshot, follow these steps:
- Press the Windows key and the Print Screen key simultaneously.
- Your screen will momentarily go dim to indicate you have taken a screenshot.
- The screenshot will be saved to your device’s Pictures > Screenshots folder.

Snipping Tool Window
The Snipping Tool is a widely used application with various features. Microsoft has released numerous updates, each introducing new features and enhancements to the Tool. This handy tool is the best option for users to capture screenshots quickly and flexibly. This application has various features, like highlighting, adding notes, and sending files via email.
You can launch the Snipping Tool from the taskbar or Start menu. To take a screenshot with it, open it and click the New button. You should save screenshots manually, as the tool doesn’t automatically do it. It also automatically copies your captures to the clipboard.

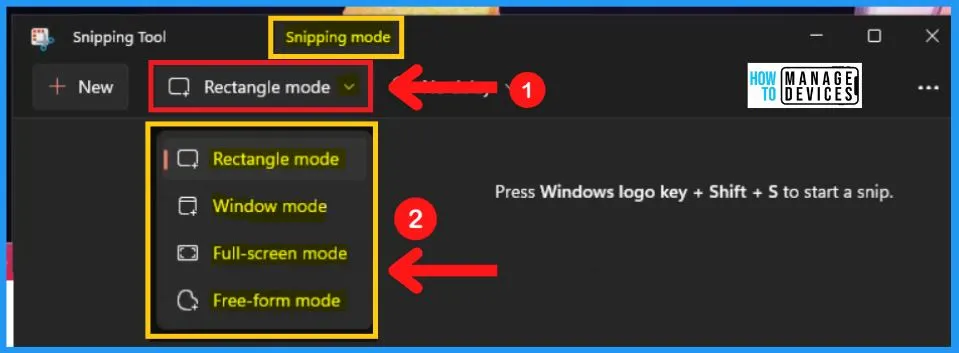
The default snip type is Rectangular Mode, but you can also use Window Mode, Full-Screen Mode, and Free-Form Mode.

- Generic Windows 11 Product Keys to test | How to Retrieve Windows 11 Product keys
- Free Generic Windows 10 Product Keys from Microsoft
- Top 75 Latest Intune Interview Questions and Answers
Snipping Tool Panel
The Snipping Tool is a helpful feature that helps you professionally capture, save, explain, and share screenshots of your entire screen or a selected area. Moreover, it offers the capability to record videos with the sound of Windows on your desktop. You can easily approach the Snipping Tool using the keyboard shortcut Windows key + Shift + S.
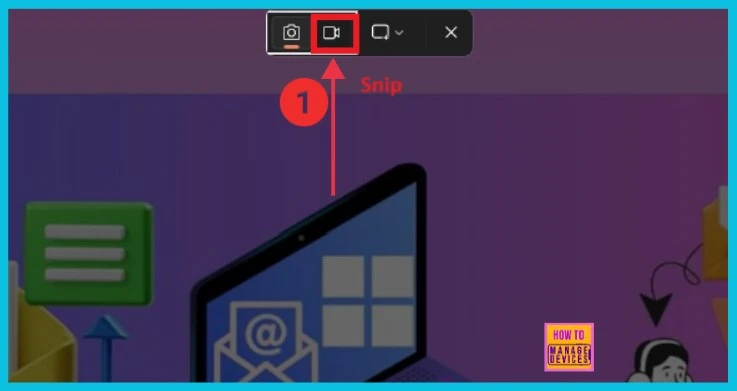
Now, with the snipping tool, recording a specific portion of a video or selecting any part of the screen is possible. The recorded session can be securely saved for future reference. To record your screen, follow the steps below:
| Steps for Record Screen with Snipping Tool |
|---|
| Open the snipping tool |
| Select the Record option |
| Choose the specific area you want to record |
| Save the recorded session in your preferred location for later use |

We are on WhatsApp. To get the latest step-by-step guides and news updates, Join our Channel. Click here –HTMD WhatsApp.
Author
Anoop C Nair has been Microsoft MVP for 10 consecutive years from 2015 onwards. He is a Workplace Solution Architect with more than 22+ years of experience in Workplace technologies. He is a Blogger, Speaker, and Local User Group Community leader. His primary focus is on Device Management technologies like SCCM and Intune. He writes about technologies like Intune, SCCM, Windows, Cloud PC, Windows, Entra, Microsoft Security, Career, etc.
