Let’s learn how to use the Snipping Tool to Record Your Screen in Windows 11. Screen Recording is an incredibly useful tool nowadays. The Snipping Tool is a built-in app that lets you capture and edit screenshots.
The snipping tool is part of Windows 11 and is available via the Microsoft Store. It is a popular screenshot application because it is simple to use. A snipping tool is a computer program that captures screenshots from your computer’s screen.
The snipping tool allows us to take pictures of areas on our screens and save them for future use. It will also enable us to take an image from our screens, but now it also allows us to select a portion of our screens and start video recording.
The snipping tool is also available as a keyboard shortcut. With a snipping tool, we can easily capture an area, which helps us share with our friends easily and quickly. This blog post will help us understand how to record screens or videos with the snipping tool app.
| Index |
|---|
| How to Use the Snipping Tool to Record Your Screen in Windows 11 |
- New Shapes Feature in Snipping Tool How to Use Guide
- ShareX on Windows | Snipping Tool Replacement
- Snipping Tool in Windows 11 Latest Features | Settings | Uninstall
- New Snipping Tool Calculator Mail and Calendar Apps with Windows 11
What are the Features of Snipping Tool?

The snipping tool has added many valuable functions to make taking screenshots more convenient and productive. Although different methods exist to capture screenshots in Windows 11, the Snipping tool is the most effective.
1. It helps copy information from an image without manually typing it.
2. It is a screenshot utility tool
3. To save important on-screen information
4. Basic Editing features
5. Easy and flexible to use
How to Use the Snipping Tool to Record Your Screen in Windows 11
Now, we can easily record the exact portion of a video or any part of the screen with the snipping tool. We can safely save the recorded session and use it later. The following steps are used to record the screen.
| Steps for Record Screen with Snipping Tool app |
|---|
| Press Win+Shift+S (Snipping Tool) |
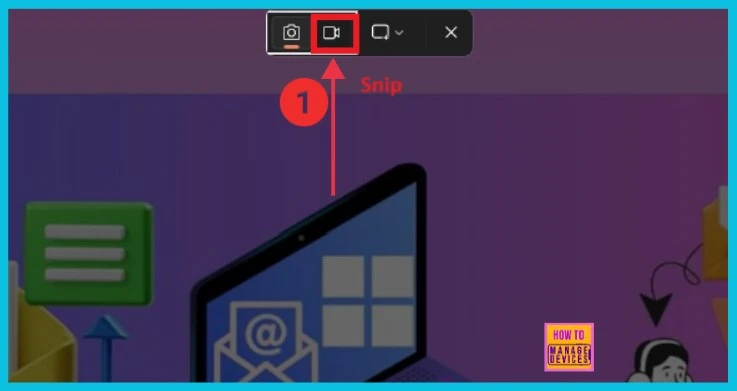
| Click the Snip option from the tab |

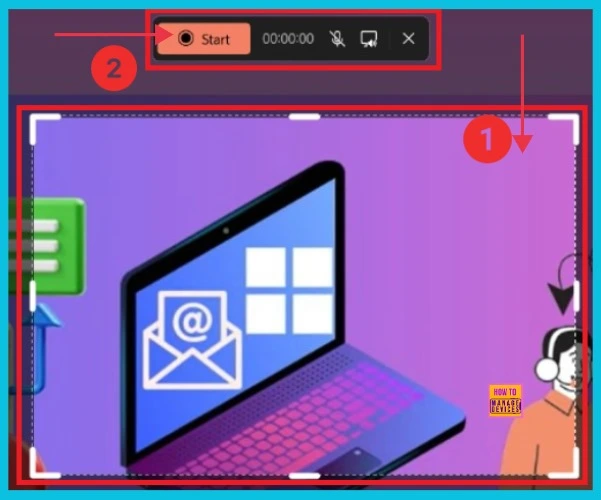
After clicking the snip option, you can see a + sign of Snip. Click to drag; a rectangle indicates the screen portion we want to record. Then press the Start button, and the time starts counting. The below screenshot gives the details.

After clicking the Start button, the timer starts to run. Here, we can choose the pause option and a Stop option. The Red button helps to stop recording. It clicks, and the recording has stopped. The list below shows different options in the Recording Snipping Tool tab.
- Pause Recording
- stop recording
- Timer
- Unmute microphone
- Mute system audio
- Discard Recording

- Methods to Change Mouse Pointer Size, Style and Color in Windows 11
- Process to Enable Disable Camera in Windows 11
- 6 Methods to Check Wi-Fi Network Signal Strength in Windows 11
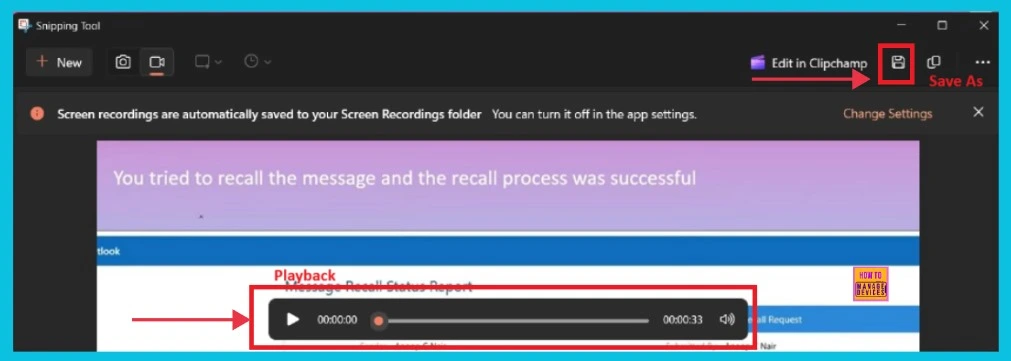
Now, we can get another window that helps to save the recordings; here, we can see the Playback option on the below portion and the “Save as” option on the above right side. Click here to save the recordings. The screenshot below gives a preview.

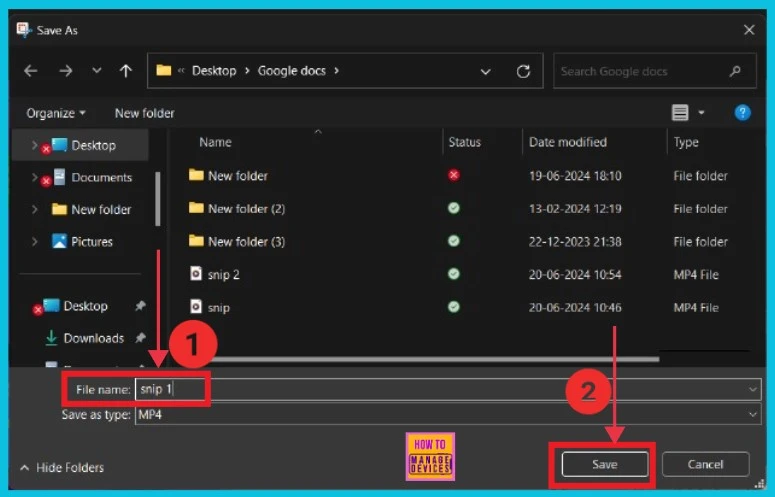
This is the last portion; it helps us save recordings in the File Explorer on our PC. We can choose the folder, give a filename, save as type MP4, and then save the recording. The screenshot below shows the picture after we click the Save As option.

We are on WhatsApp now. To get the latest step-by-step guides, news, and updates, Join our Channel. Click here – HTMD WhatsApp.
Author
Anoop C Nair is Microsoft MVP! He is a Device Management Admin with more than 20 years of experience (calculation done in 2021) in IT. He is a Blogger, Speaker, and Local User Group HTMD Community leader. His main focus is on Device Management technologies like SCCM 2012, Current Branch, and Intune. He writes about ConfigMgr, Windows 11, Windows 10, Azure AD, Microsoft Intune, Windows 365, AVD, etc.
