Let’s learn ShareX on Windows | Snipping Tool replacement. ShareX is a free source program developed for capturing screenshots and screencasts on Windows. This post helps the users to know more about ShareX on Windows.
Capturing screenshots and screen recording is very important for many reasons. ShareX is a multi-purpose application that allows users to capture screenshots, Screen records, Upload files, Editing, and many more.
ShareX is published under GNU General Public License. ShareX allows different modes of screenshot capturing and screen recording. ShareX provides many tools to help users modify the captured screenshot and videos.
Different versions of ShareX are available on the official website of ShareX. You can easily select the latest version of ShareX from the official Website Downloads – ShareX (getsharex.com) and from Microsoft Store.
What are the Features of ShareX on Windows 11 PC?

ShareX is an open-source program mainly used to capture screenshots in different modes. The following are the features of ShareX on Windows 11 PC.
1. Allows different types of screenshot capturing
2. Helps to upload captured screenshots easily
3. Provide many tools for editing
4. Allows Debugging
5. Allows customizable workflows
6. Allows opening, copying, and sharing URL
How to Install ShareX on Windows 11 PC
You can easily Install ShareX on Windows 11 PC. ShareX is designed for Windows, and it is very easy to capture different screenshots, including Full screen, Window, Monitor, Region, etc.
- Select Microsoft Store from the Start menu.
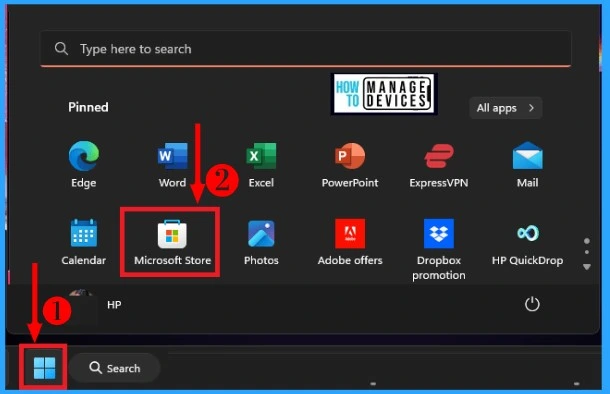
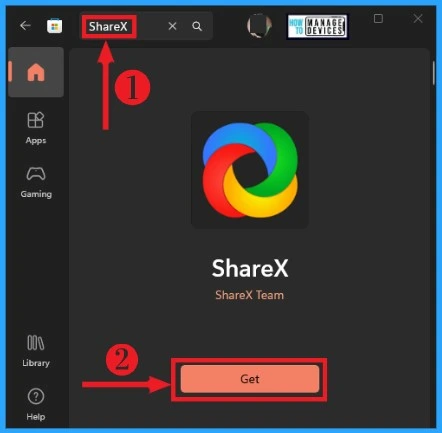
From the Microsoft Store, search ShareX in the search box. Click the Get button from ShareX to download ShareX on Your Windows 11 PC.
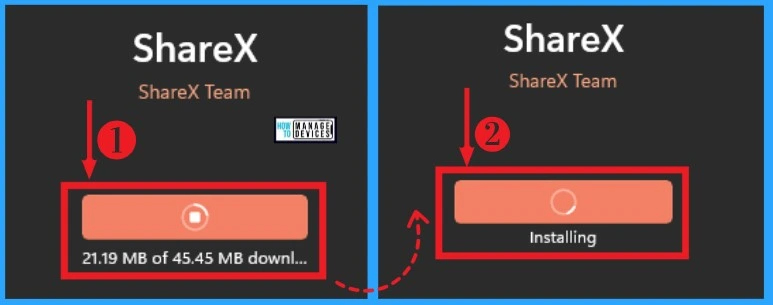
After clicking the Get button from ShareX, ShareX starts Downloading. It is very easy to Download ShareX on Windows 11 PC. The below screenshot shows ShareX successfully downloaded and Installed on Your Windows 11 PC.
The latest version of the ShareX app (ShareX 15.0) provides unique and useful features which enhance your capturing and also help to improve your editing skill. ShareX is the most popular capturing and editing app.
- Click Open to open ShareX on your Windows 11 PC
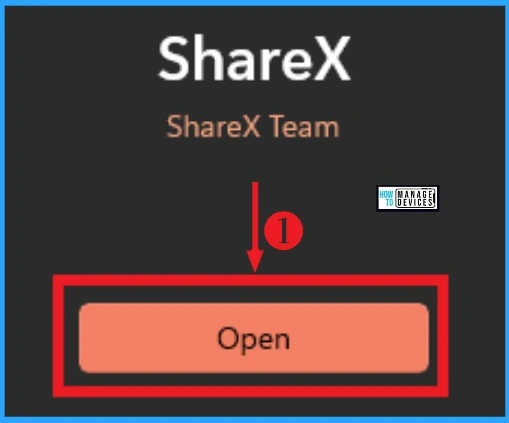
The Home Screen of ShareX of the App
ShareX is a popular screenshot and screencast program which allows you to capture images in different modes and also allows the whole process from capturing to editing. ShareX is available in different versions that give additional features.
Captured images are automatically exported as an image file and can be viewed in the image history of the ShareX app. ShareX app gives many shortcuts as hotkeys on the home screen of the ShareX app.
| Home screen Features | Used to |
|---|---|
| Capture | It helps to upload captured screenshots |
| Upload | It also shows other methods of capturing |
| Workflows | Enables to edit or modify captured screenshots |
| Tools | It helps to easily capture screenshots by using keyboard shortcuts |
| After capture tasks | It includes After capture tasks on ShareX |
| After upload tasks | Used to do after upload tasks on ShareX |
| Destination | It contains various application settings |
| Application setting | It has a Destination for uploading screenshots |
| Task Settings | Used to do task settings on ShareX |
| Hotkey settings | Used to upload screenshots in a separate folder |
| Screenshot folder | Allows to view all the history of the ShareX app |
| History | It helps to easily capture screenshot by using keyboard shortcuts |
| Image History | It helps to view all the images History |
| Debug | Used to detect errors on ShareX |
| Donate | Helps to promote Donation |
| Used to join the ShareX communication platform | |
| Discord | Used to access the official Twitter account of ShareX easily |
| About | It helps to show details about the ShareX app |
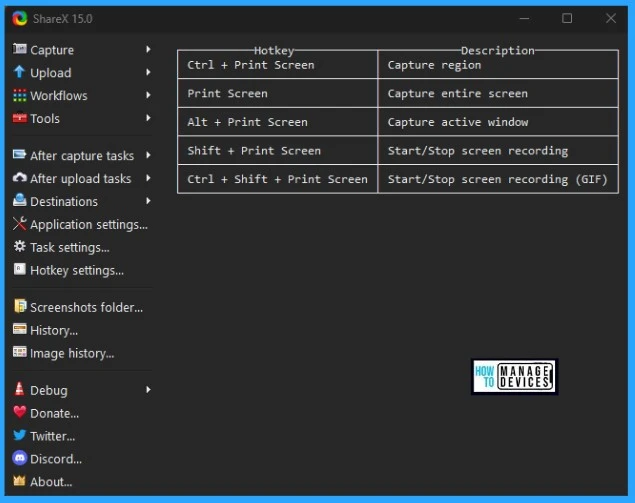
 ShareX on Windows | Snipping Tool replacement – fig.5
ShareX Features in Windows 11 PC
ShareX is an open-source program that provides some unique features that enhance the editing skill of each user. You can easily upload captured images in different formats. The below list shows features of ShareX on Windows 11 PC.
- Capture
- Upload
- Workflows
- Tools
- After capture tasks
- After upload tasks
- Destination
- Application settings
- Task settings
- Hotkey settings
- Screenshot folder
- History
- Image History
- Debug
- Donate
- Discord
- About
1. Capture Tab on Sharex
Capturing is the primary usage of the ShareX application that helps users capture screenshots differently. All the captured images can be viewed on the ShareX home screen.
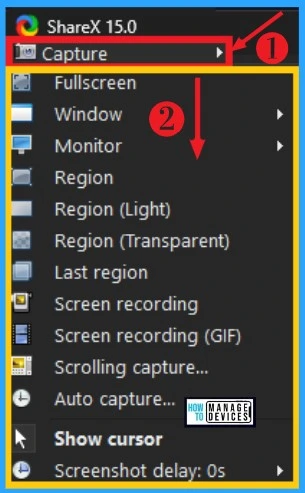
You can easily capture images in ShareX by opening the Sharex application on your Windows 11 PC. Select the Capture option from ShareX. The below list and screenshot show various options available in Capture Menu in ShareX.
- Full Screen – Helps to capture images in Full-screen mode
- Windows – Helps to choose a window from different running windows on your PC for capturing a screenshot
- Monitor – Helps to capture images according to the monitor size of your PC
- Region – Used to capture screenshots in a particular region in different region modes
- Region (Light) – Used to capture screenshots of an area by dragging and selecting a region
- Region (Transparent) – Helps to capture a Region transparent mode by selecting a region
- Last Region – Helps to Capture Last Region
- Screen recording – Used to Screen recording
- Screen recording (GIF) – Helps to record GIF
- Scrolling Capture – Used to capture a screenshot from a scrolling window
- Auto Capture – Used to automatically capture images by selecting a region
- Show Cursor – Used to show cursor
- Screenshot Delay – Helps to set screenshot delay time for capturing images
- Run Commands for Windows Update and Other Settings
- 10 Personalization Settings Run Commands for Windows
2. Upload Tab on ShareX
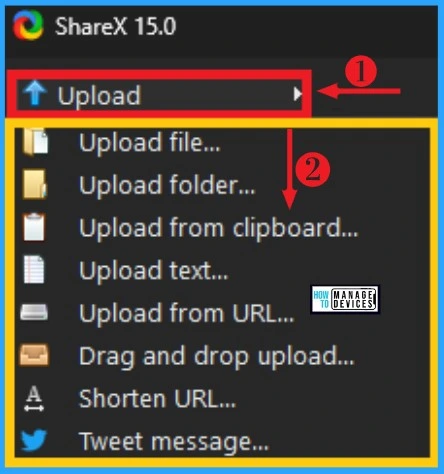
ShareX allows users to Upload images in different formats. You can easily upload files, folders, text, etc., from other resources. The below list shows how to select Upload Menu in ShareX.
- Open the ShareX app on your Windows 11 PC
- Select the Upload option from ShareX
| Upload Features | Used to |
|---|---|
| Upload file | Enables to upload a folder from your PC |
| Upload folder | It helps to Upload text |
| Upload from Clipboard | Used to upload images from Clipboard |
| Upload text | Allows to download and upload URL |
| Upload from URL | It helps to drag the window and drop it into the Drop Here box for Uploading. |
| Drag and drop Upload | Enables to upload Tweet Message |
| Shorten URL | Helps to shorten and upload URL |
| Tweet Message | Helps to upload Tweet Message |
3. Workflows Menu on ShareX
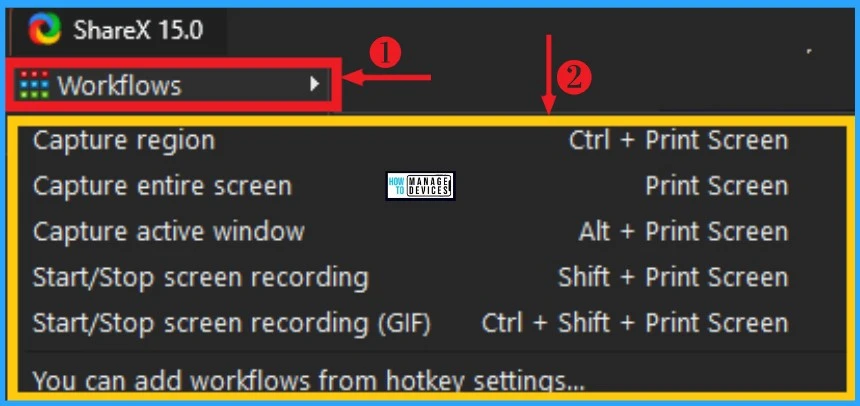
Workflows Menu shows different methods of Capturing screenshots in ShareX. You can easily choose any capture in ShareX. Workflows Menu also offers keyboard shortcuts for each capturing process.
You can easily select Workflows Menu by Opening the ShareX application and clicking on Workflows Menu. The below list and screenshot show options available in Workflows Menu.
- Capture region – Helps to Capture a region
- Capture entire screen – Used to Capture the whole screen
- Capture active window – Helps to Capture active window
- Start/ Stop screen recording – Used to Start and Stop screen recording
- Start/Stop screen recording (GIF) – Helps to Start and Stop screen recording
- You can add workflows from hotkey settings – Helps to add workflows from Hotkey settings
4. Tools Menu on ShareX
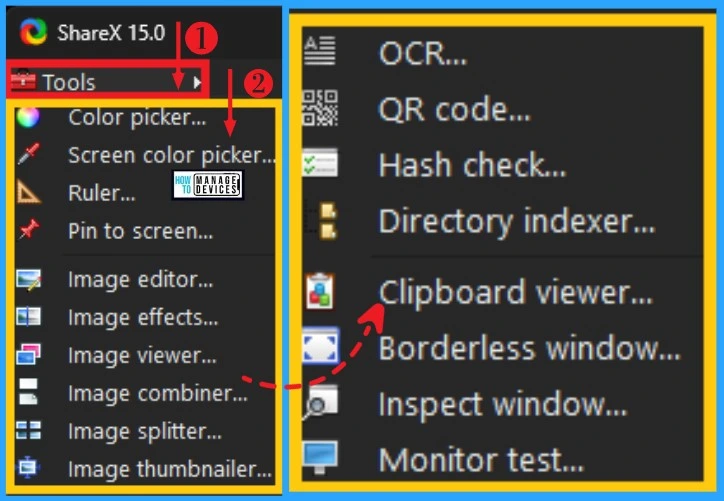
Tools Menu in ShareX helps the users to edit and modify captured screenshots in ShareX. ShareX supports many Tools that enhance the skills of ShareX users. You can easily change captured images into different types.
You can easily Select the Tools menu by Opening the ShareX app and selecting the Tools menu from it. The table and screenshot below show how to choose the Tools Menu on ShareX.
| Tools Features | Used to |
|---|---|
| Color picker | Used to select different colors |
| Screen color picker | Used to give screen colors |
| Ruler | It helps to split images |
| Pin to screen | Image Editor |
| Images Editor | Used to edit images |
| Image effects | It helps to split the image |
| Image viewer | Used to view images |
| Image Combiner | Used to combine images |
| Image Splitter | It helps to convert video |
| Image Thumbnailer | Used to provide a thumbnail |
| Video converter | Help to give a borderless window |
| Video Thumbnailer | Used to give thumbnails to video |
| OCR | It helps to choose and browse folders |
| QR code | Allow QR code scanning |
| Hash Check | Used to hash check on ShareX |
| Directory indexer | Help to give a borderless window |
| Clipboard viewer | Used to view clipboard items |
| Borderless window | Help to give borderless window |
| Inspect window | Helps to Inspect window |
| Monitor test | Used to test monitor |
5. After Capture Task Menu on ShareX
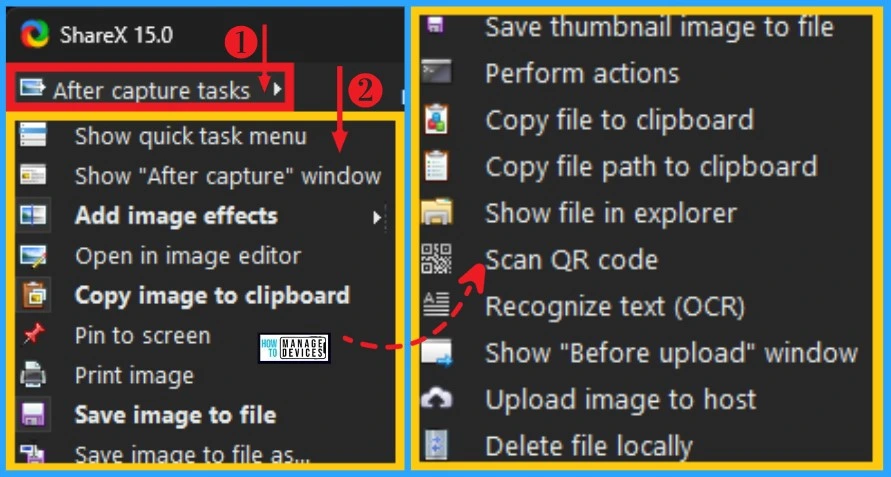
After Capture Task Menu is used to do different tasks after capturing Screenshots, it helps the users to do other things by using these captured Screenshots.
You can easily select the After-capture Task Menu by opening the ShareX application on your Windows 11 PC. The below list and screenshot show options available in the After Capture Task Menu on ShareX.
- Show quick task menu – Helps to show quick task menu in ShareX
- Show After capture window – Helps to show after capture window
- Add Image Effects – Used to give effects to images
- Open in Image Editor – Used to Open photos in an image editor
- Copy Image to Clipboard – Helps to copy the image to Clipboard
- Pin to Screen – Allow pin to screen
- Save Image to file – Allows to save images to file
- Save the Image to files as – Helps to keep pictures in different forms
- Save Thumbnails images to file – Helps to save Thumbnails to file
- Perform Actions – Allows different actions in ShareX
- Copy file to clipboard – Used to Copy files to the clipboard
- Copy file path to clipboard – Helps to copy a file path to the clipboard
- Show file in Explorer – Helps to show files in Explorer
- Scan QR code – Helps to scan QR code
- Recognize text (OCR) – Helps to Recognize text (OCR)
- Show Before upload window – Helps to show before upload window
- Upload Images to host – Helps to upload images to host
- Delete file locally – Helps to Delete files locally
6. After Upload Task Menu on ShareX
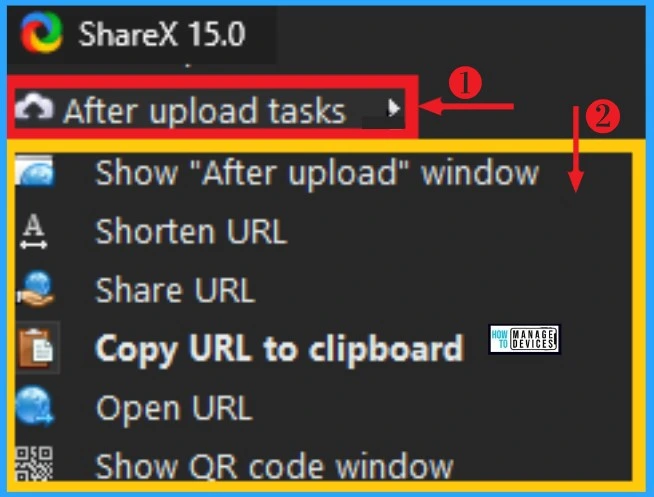
After Upload Task Menu on ShareX shows different tasks after Uploading images. You can easily view the After Upload Task Menu on ShareX by opening ShareX app on your Windows 11 PC.
After opening ShareX, select the After Upload Task Menu in the below table, and the screenshot show options available on the After Upload Task Menu on ShareX.
| After Upload Task Menu features | Used to |
|---|---|
| Show After Upload window | Used to show After upload window |
| Shorten URL | Helps to shorten URL |
| Share URL | Allows to share URL |
| Copy URL to Clipboard | Used to copy URL to clipboard |
| Open URL | Helps to Open URL |
| Show QR code window | Helps to show QR code window on ShareX |
7. Destination Menu on ShareX
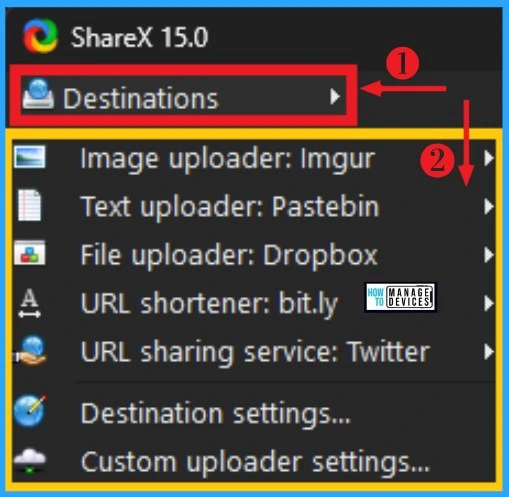
Destination Menu on ShareX helps the users to choose the destination for uploading screenshots. You can easily Select the Destination Menu on ShareX by opening ShareX app and selecting Destination Menu. The below list and screenshot show the destination option on ShareX.
- Image Uploader: Imgur – Allows Uploading images in different formats like Image Shack, Flicker, etc.
- Text Uploader: Pastebin – Helps to Upload text in various formats like paste2, sexy, etc
- File Uploader: Dropbox – Helps to Upload files in different formats like Dropbox, FTP, OneDrive, etc.
- URL shortener: bit.ly – Helps to shorten URL
- URL sharing services: – Helps to share services on social media
- Destination settings – Helps to set destination
- Custom uploader settings – Allows custom uploader settings
8. Application Settings
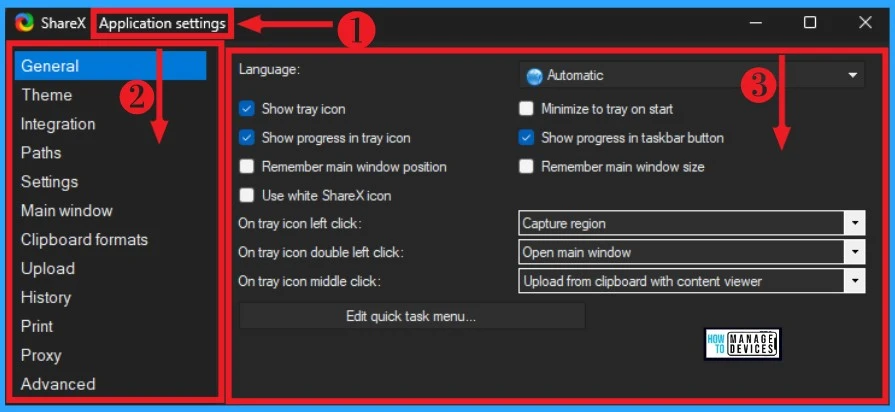
Application settings in ShareX help the users to do various settings on ShareX. You can easily set all the settings on ShareX in the Application settings. You can easily change the application settings at any time.
- Open the ShareX app on Windows 11 PC
- Select Application settings from ShareX.
The below screenshot shows the General option on the Application settings of ShareX. It includes language, showing the tray icon, Remembering the main window position, etc. The below list shows other options included in Application settings.
- Theme – Allows the users to add, remove, export, and import custom theme
- Integration – Helps the users to run ShareX when Window starts
- Paths – Used to select the path of the folder, subfolder, etc
- Settings – Helps the users to clean up backup files, old log files, etc
- Main window – It shows how the menu, show title, show columns, etc
- Clipboard formats – Used to show the Clipboard formats and also allows add, edit, and remove copied items
- Upload – It includes Simultaneous upload limit, buffer size, etc
- History -Used to show the ShareX history, recent tasks, etc
- Print – It has image print settings
- Proxy – It includes proxy configuration options such as manual, host, username, and password
- Advanced – The advanced option includes Binary Units, Browser path, DevMode, etc
- Clipboard Settings on Windows | Clear Clipboard Data | Group Policy Settings
- Find Folder Locations Using RUN Command in Windows
9. Task Settings Menu on ShareX
The Task Settings Menu on ShareX shows different tasks included in ShareX. Task Settings can be easily selected in the ShareX application. You can easily change task settings at any time on ShareX.
- Open the ShareX app on your Windows 11 PC
- Select Task Settings on ShareX
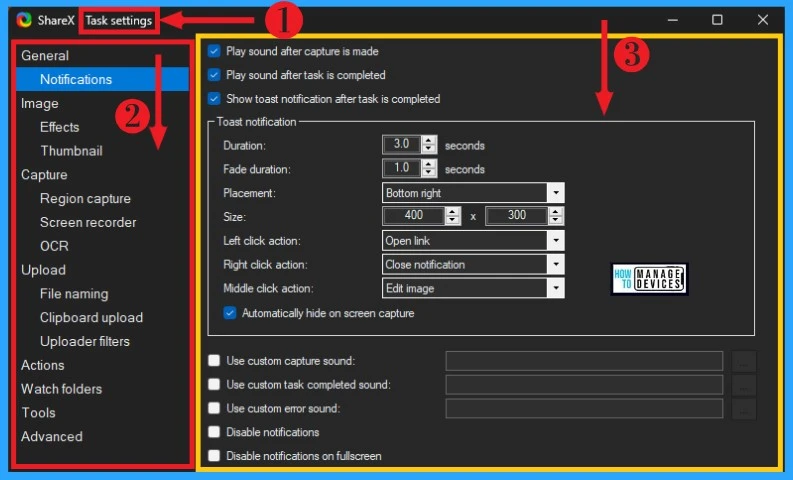
ShareX provides many Task settings that help users change the tasks. The below list and screenshot show options included in Task Settings. (The below screenshot is the notification option in the general option of Task settings).
- General – General option shows the general task settings of the ShareX app
- Notification – Notification includes toast notification, Disable notifications, etc
- Image – It shows image format, bit depth, JPEG quality, etc
- Effects – It helps to enable or disable image effects
- Thumbnail – Helps to show width, thumbnail name, etc
- Capture – Used to show cursor in screenshots, shadow offset, etc
- Region Capture – It helps to use multi-region mode, which will also allow moving regions
- Screen Recorder – It offers screen recording options such as duration, transparent region selection, etc
- OCR – It shows language, automatically copies results to a clipboard, etc
- Upload – Helps to show various uploading methods
- File Naming – It shows language, automatically copies results to a clipboard, etc
- Clipboard Upload – Helps to download, upload, shorten, share, etc., in the clipboard
- Upload filters – It shows the uploader location, extension filter, etc
- Actions – Helps to enable/disable action from after-capture tasks
- Watch folders – It helps to upload newly created file
- Tools – Helps to show different tools available on ShareX
- Advanced – It shows after Upload, capture, general, name pattern, etc
10. Hotkey Settings on ShareX
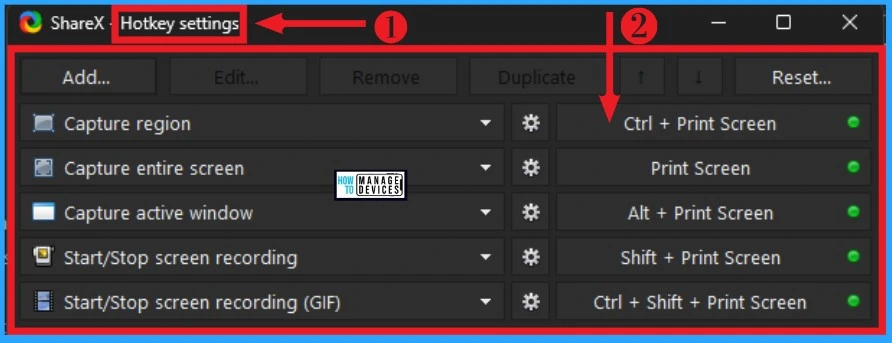
Hotkey Settings on ShareX shows various hotkeys available on ShareX. Hotkeys help the users to easily select different capturing by using keyboard shortcuts. You can easily choose Hotkey settings by Opening ShareX on your Windows 11 PC.
After Selecting the ShareX application, you can easily select Hotkey settings. The below table and screenshots show different capturing methods and hotkey settings on ShareX.
| Capturing Methods | Used to |
|---|---|
| Capture region | Used to capture screenshots of the whole screen |
| Capture entire screen | Used to capture screenshots of the entire screen |
| Capture active Window | Used to capture screenshots of the active window |
| Start/stop screen recording | Used to capture screenshots of the active window |
| Start/ stop screen recording (GIF) | Used to Start and stop screen recording of GIF |
11. Screenshots Folder Menu on ShareX
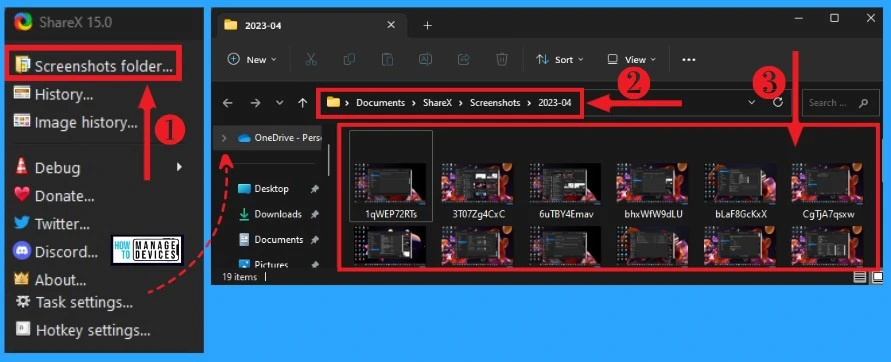
Screenshots Folder Menu on ShareX shows all the screenshots captured on the ShareX app. ShareX helps to upload all captured images to a folder automatically. You can easily select the Screenshot folder on ShareX by Opening the ShareX application.
After Opening the ShareX application Select Screenshot Folder on ShareX. It will be automatically shown all the screenshots captured by the ShareX app on your Windows 11 PC. The below window shows the Screenshot folder on ShareX.
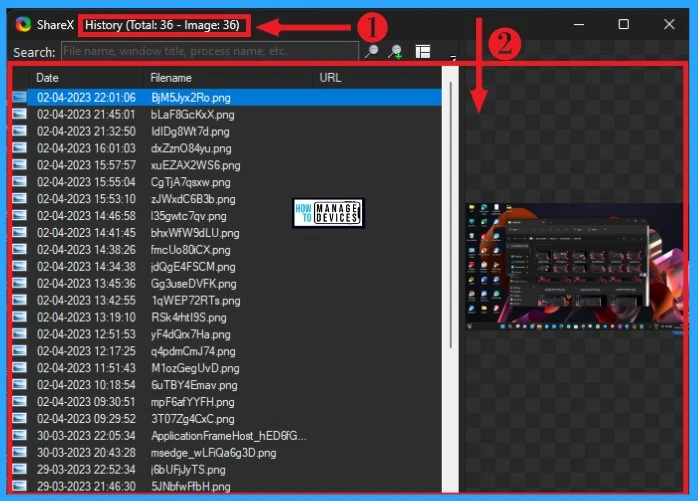
12. History Menu on ShareX
The History Menu on ShareX shows all the history of the ShareX app on your PC. All the history can be seen until it deletes locally on your ShareX. History Menu can be selected easily by Opening the ShareX app.
After that, you can easily select History Menu on ShareX. It will show all the history by date, filename, URL (if any), and image. The below screenshot shows History Menu on ShareX.
13. Image History Menu on ShareX
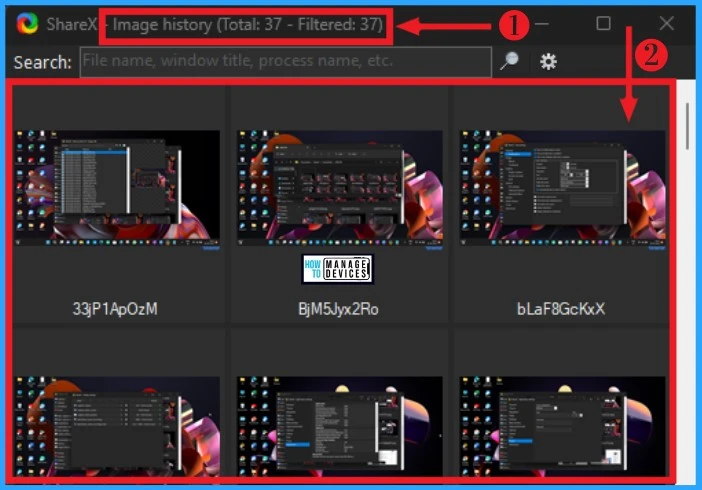
The Image History Menu on ShareX shows captured images history on ShareX. It can offer all the captured items in the Image History window of ShareX. You can easily search for captured images in the search box of Image History.
Opening the ShareX app on your Windows 11 PC can easily select the Image History Menu. After opening the ShareX app, select the Image History Menu. The below window shows the Image history Menu on ShareX.
14. Debug Menu on ShareX
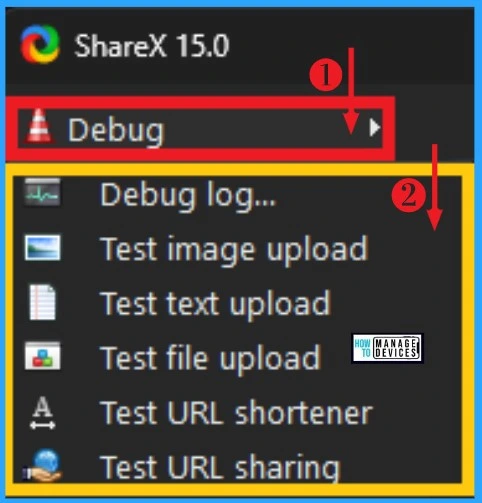
Debug Menu on ShareX helps the users to identify or detect errors in ShareX. You can easily see mistakes in uploaded images, text, files, etc. Debug Menu can be easily by opening ShareX app and selecting Debug Menu. The below list and screenshot show different options available on Debug Menu.
- Debug log – Help to debug the log
- Test Image Upload – Helps to test image upload
- Test Text Upload – Allows test text upload
- Test File Upload – Helps to push file Upload
- Test URL shortener – Helps to test URL shortener
- Test URL Sharing – Allows URL sharing
15. Donate Menu on ShareX
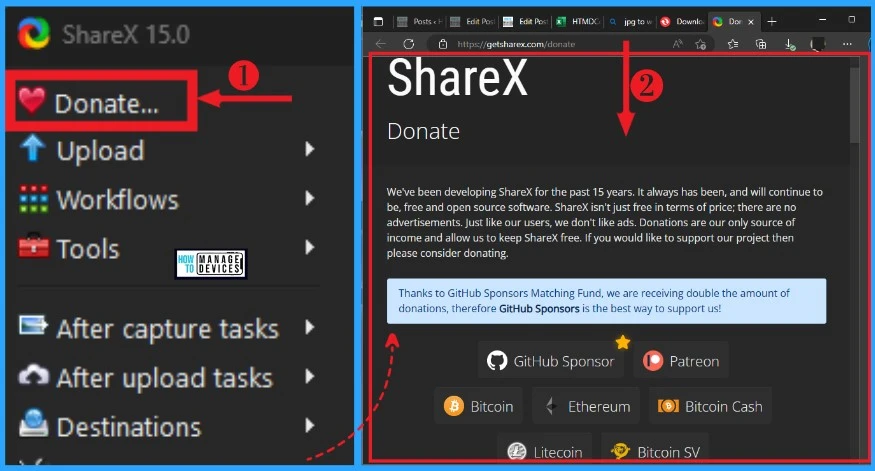
Donate Menu on ShareX helps to promote Donation among ShareX users. ShareX is a free and open source, so it will not earn money from users. Users can participate in the ShareX Donation process easily.
You can easily choose Donate Option on ShareX by Opening the ShareX application and selecting Donate Menu. After Clicking the Donate Menu, it will directly open the Donate page of ShareX. The below screenshot shows the Donate menu on ShareX.
16. Twitter Menu on ShareX
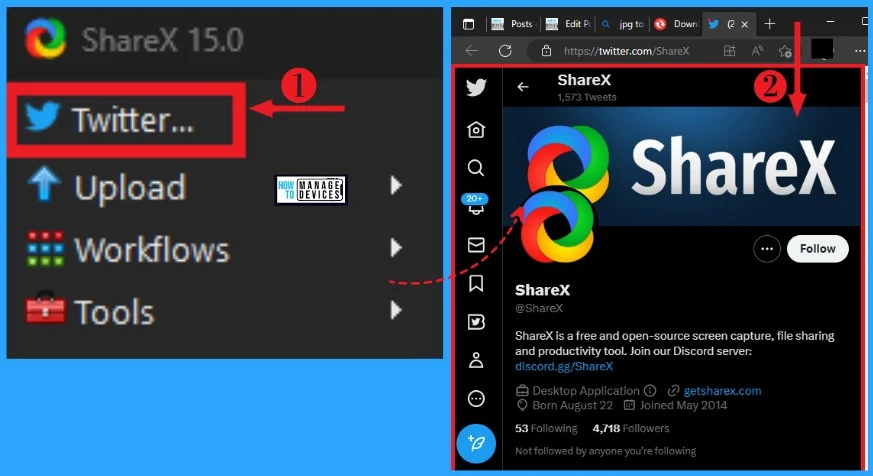
Twitter Menu on ShareX helps to show the official Twitter account of the ShareX Application on your Windows 11 PC. You can easily find the official Twitter account of the ShareX App from the ShareX app itself.
- Open ShareX App on Windows 11 PC
- Select Twitter Menu from the ShareX app.
After Clicking the Twitter Menu from ShareX, it will automatically open the Twitter account of the ShareX application. You can follow the Twitter account ShareX for further updates.
17. Discord Tab on ShareX
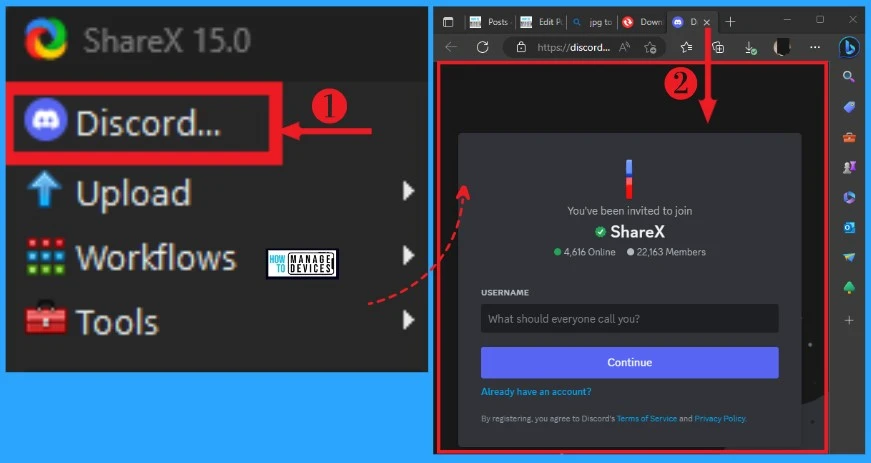
Discord on ShareX is used for instant messaging and private chat. You can easily enter Discord Menu By opening ShareX app and selecting Discord Menu. It will open a new window, and you can easily enter your username and Continue on Discord. The below screenshot shows Discord Menu on ShareX.
18. About Tab on ShareX
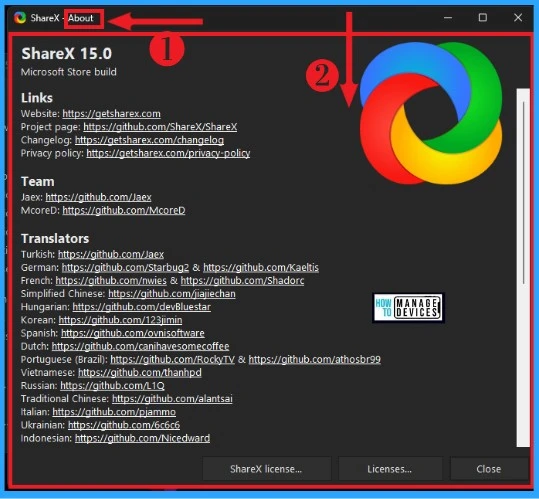
About Menu in ShareX shows all details about the ShareX application on your PC. It shows the Sharex Version and offers the details through various links. GitHub manages the project source code of ShareX.
ShareX ensured users’ privacy policy and did not collect personal data. You can easily visit the Privacy Policy page of Sharex by clicking the link provided in the About Menu of Sharex. The below list and screenshot show how to select the About Menu on ShareX.
- Open the ShareX app on your Windows 11 PC
- Select About Menu from the ShareX application
Tools Appear when Screenshot Capturing
ShareX provides many tools for editing screenshots. ShareX is the best app for editing screenshots and has some unique features. You can easily capture a screenshot in ShareX app by opening ShareX app.
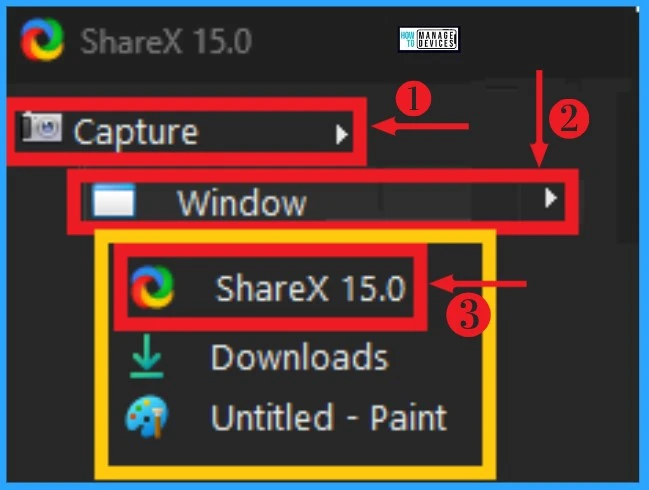
After opening the ShareX app, select the Capture menu and click on Window. From Windows, select ShareX 15.0 option. The below screenshot shows Capturing a screenshot on ShareX.
After selecting ShareX 15.0, the screenshot will be captured. ShareX provides many tools for editing the Captured Screenshot. The below table and screenshot show tools appearing when screenshot capturing.
| Used to continue the task | Used to |
|---|---|
| Apply changes & continue task | Helps to continue task by applying changes |
| Continue task | Used to cancel the task |
| Cancel Task | It enables editing the screenshot |
| Save Image | Used to save image |
| Save Image As | It is used to upload the image |
| Copy the Image to the clipboard | Used to copy images to a clipboard |
| Upload Image | It helps to save pictures in existing file |
| Print Image | Helps to print image |
| Select and move | It helps to edit the screenshot |
| Rectangle | Used to draw rectangles |
| Ellipse | It helps to save images in existing file |
| Freehand | Help to draw anything in freehand mode |
| Freehand arrow | Help to draw in freehand arrow mode |
| Line | Used to draw straight lines |
| Arrow | Used to draw arrows |
| Text outline | Helps to write text outline |
| Text Background | Use to write text background |
| Speech Button | Used to write letters |
| Step | Used to give numbers |
| Magnify | Used to zoom |
| Image (File) | Used to open image file |
| Image (screen) | Used to open image screen |
| Sticker | Used to remove Ellipse mode |
| Cursor | Used to draw Cursor |
| Small eraser | It helps to add stickers |
| Blur | It helps to edit the screenshot |
| Pixelate | Used to pixelate screenshot |
| Highlight | Used to highlight in screenshot |
| Crop Image | Helps to crop Image |
| Cut out | Used to cut image |
| Tools | Provide different tools |
| Edit | It helps to blur the screenshot |
| Image | It helps to erase items |
| Options | Provides more options |
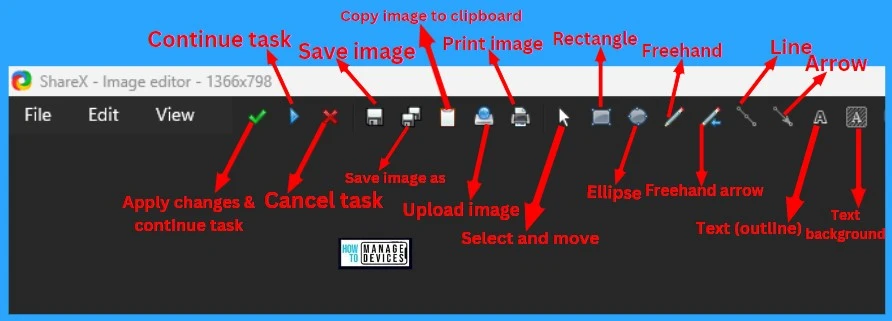
The below screenshot shows tools appearing when screenshot capturing. The Edit options provide more options such as undo, paste, image/ text, duplicate, delete, delete all, etc.
Image option includes new, open image file, insert an image file, insert an image from, screen, image size, canvas size, crop image, auto crop, rotate 90, etc.
The option includes editor start mode, zoom to fit on open, auto copy image to clipboard, close auto editor on task, show the position and size info, show magnifier, etc.

Author
Gopika S Nair is a computer enthusiast. She loves writing on Windows 11 and related technologies. She is here to share quick tips and tricks with Windows 11 or Windows 10 users.
