Let’s learn the Snipping Tool in Windows 11 and the latest features. Nowadays, the screen capture function is very useful for saving important on-screen information. There are different ways to capture the screen on Windows 11, but Snipping Tools is more flexible, free, and easy to access.
The Snipping Tool is a powerful and useful tool for most Windows computers. The Snipping Tool helps you to take a snapshot to copy words or images from all or part of your PC screen. Soon you will be able to record the screen using the snipping tool.
You can easily launch the Snipping Tool by pressing the Windows key + Shift + S. If you enable the Print screen feature in the Settings app, you can use the print screen button to open screen Snipping. More Windows 11 Keyboard shortcuts – New Windows 11 Keyboard Shortcuts – Updated List.
Snipping Tool is the Microsoft Windows screenshot utility; It helps you to take still screenshots of an open window, rectangular areas, a free-form area, or the entire screen. You can easily paste the screenshots as documents and store them as an image, an MHTML file, or an email.
- 4 Methods to Enable Credential Guard on Windows Devices
- Windows 11 KB5019961 and KB5019980 November 2022 Patch Tuesday
Video – Latest Snipping Tool Features – Extract Text from Images
Free Microsoft Tool to Extract Text from Images with the help of AI. Let’s discuss the Free Tool for Text Extraction from Images from Microsoft. Free Microsoft Tool to Extract Text from Images with the help of AI. This tool uses Windows 11 as an inbox application and AI integration.
What are the Advantages of the Snipping Tool in Windows 11?

Snipping Tool helps you quickly capture screenshots, photos, and other images with your pen, touch, or mouse and save, paste, or share with other apps. The Advantages of the Snipping Tool in Windows 11 are as follows.
1. To save important on-screen information
2. Basic Editing features
3. Mark up images with a pen, pencil, or highlighter
4. Save, copy to a clipboard, or share your creation
5. Helps to share and print snips
6. Eliminates the inconvenience of finding and opening files and documents
7. Shape and form modes feature
8. Easy and flexible to use
9. Eliminate visual clutter
10. Helps to set a Delay
How to Install and Use Snipping Tool in Windows 11
It is easy and simple to install and use the Snipping Tool in Windows 11. The below steps and screenshot show how to install and use the Snipping Tool in Windows 11.
NOTE! – All Windows PCs/Laptops come with Snipping Tool as default or Inbox application. So you don’t need to install the app from the store most of the time.
- Select Microsoft Store from the Start menu
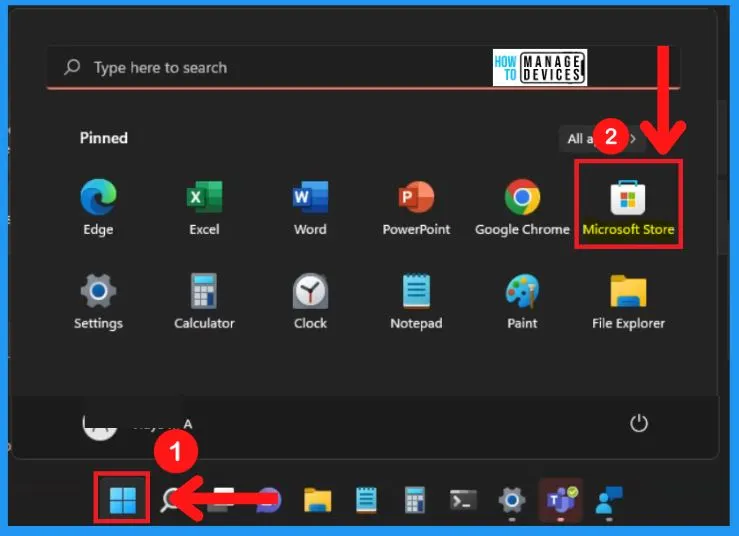
Microsoft Store, formerly known as Windows store, is a digital distribution platform operated to help you to buy and download Apps. It would be best if you searched for the Snipping Tool in the search box of the Microsoft store.
- Select Snipping Tool App from the Microsoft store
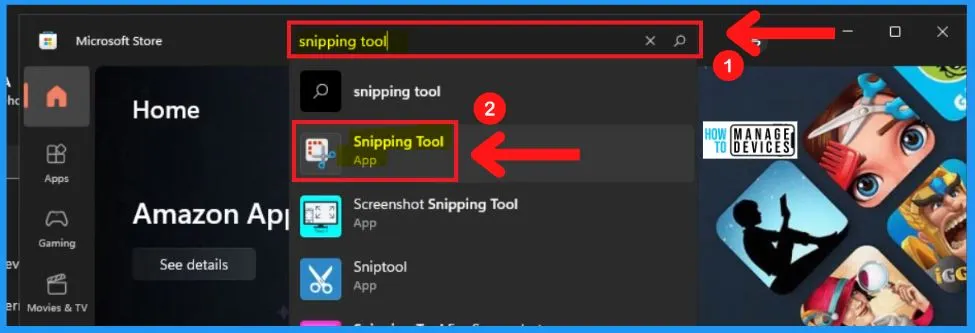
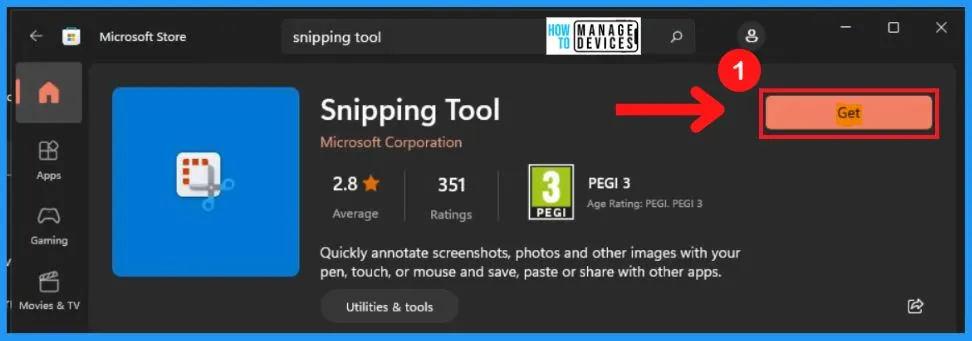
The Snipping Tool is a straightforward app that helps to take screenshots on Windows 11. To download the Snipping Tool app click the Get button from the Below screenshot.
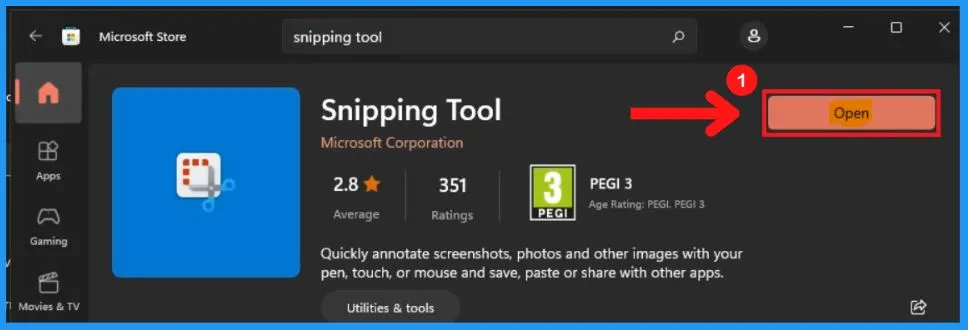
After clicking the Get button, Click the Open button from the below screenshot to open the Snipping Tool in Windows 11. Snipping Tool is the editing and screenshot tool developed by Microsoft.
Command Line tool to Install Snipping Tool
You can use the Command Line tool to Install Snipping Tool. The command line tool is Winget. The Winget tool help to install Microsoft store or Windows Package Manager applications programmatically. You can use the following command to search for the Snipping Tool app from MS Store and Windows Package Manager.
PS C:\Users\digit> Winget Search "Snipping Tool"
Name                          Id                          Version    Source
-----------------------------------------------------------------------------
Snipping Tool                 9MZ95KL8MR0L                Unknown    msstore
Screenshot Snipping Tool      9N9KCJ2F020J                Unknown    msstore
Snipping Tool For Screenshots 9P3K0BBHQ6G8                Unknown    msstore
Mathpix Snipping Tool         Mathpix.MathpixSnippingTool 03.00.0074 winget
The following Winget command with the INSTALL parameter helps to install the Snipping Tool application.
PS C:\Users\digit> Winget Install 9MZ95KL8MR0L
Found Snipping Tool [9MZ95KL8MR0L] Version Unknown
This package is provided through Microsoft Store. winget may need to acquire the package from Microsoft Store on behalf of the current user.
The publisher requires that you view the above information and accept the agreements before installing.
Do you agree to the terms?
[Y] Yes  [N] No: Y
Verifying/Requesting package acquisition...
Verifying/Requesting package acquisition success
Starting package install...
 100%
Successfully installed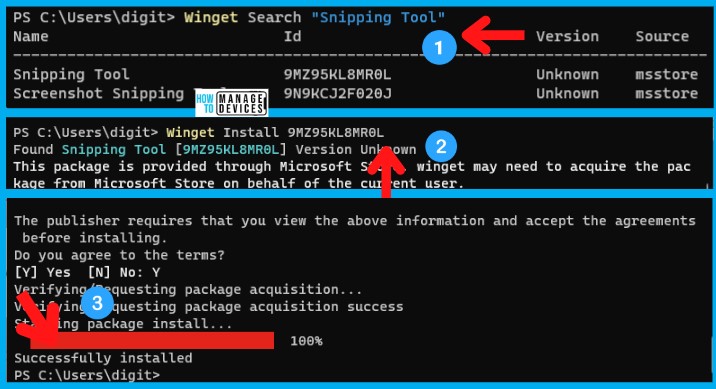
New Features of Snipping Tool
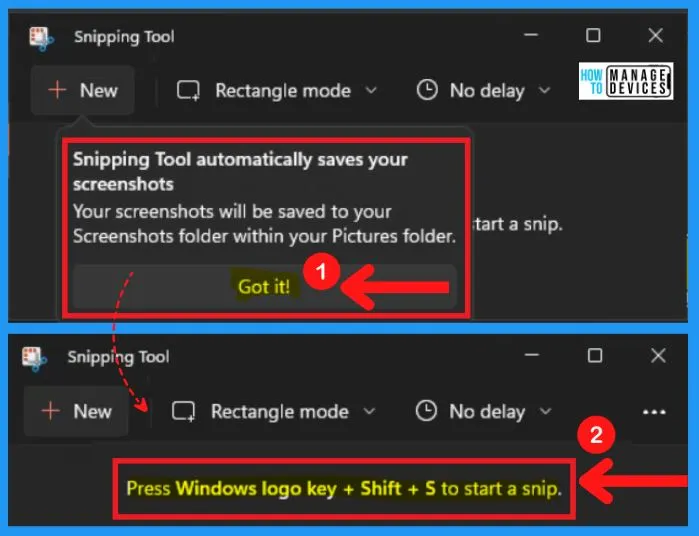
Snipping Tool automatically saves your screenshots; Your screenshots will be saved to your screenshots folder within your picture folder. The easiest and simple way to get to the Snipping Tool is by pressing Windows Key + Shift key + S.
- Select the “Got It” option from the below Snipping Tool window
- Microsoft Pluton Security Processor for Windows 11 and Enhancements
- Microsoft PC Manager Best Optimizer PC Cleaner for Windows 11 | Features
New Menu in Snipping Tool
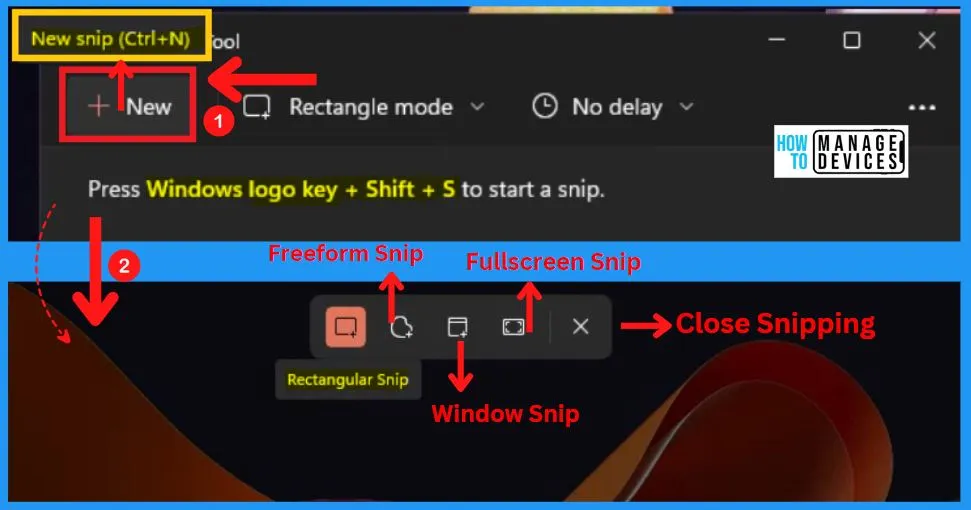
The New menu in the Snipping Tool helps you to take a snapshot to copy words or images from all or part of your computer screen. You can also use the Keyboard shortcut Windows logo key + Shift + S to start a snip.
The desktop will darken while you select an area for your screenshot, and a set of options will appear (See the below screenshot); it includes the following settings.
| New Button Settings | Uses |
|---|---|
| Rectangular Snip | It helps to take snips in Rectangular shapes. It is selected by default. |
| Freeform Snip | It helps to draw an irregularly shaped screenshot. |
| Window Snip | It helps to take a screenshot of an open window or menu on your screen. |
| Full-screen Snip | It helps to take a snip of the entire window. |
| Close Snipping | It helps to close the Snipping. |
Snipping Mode in Snipping Tool
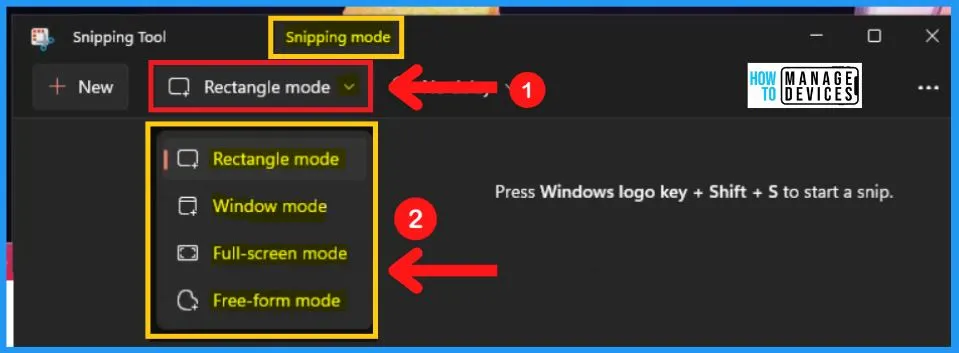
The Snipping mode in snipping tools includes a set of options such as Rectangular mode, window mode, full-screen mode, and freeform mode. The Rectangular method is selected by default. The steps and screenshot below show the Snipping Tool’s different snipping modes.
- Rectangular mode – It helps you to take a screenshot of a rectangular shape
- Window mode – It helps you to take a screenshot of an open window or menu on your screen
- Full-screen mode – It helps you to capture the entire screen like the function of the Print Screen key
- Free-form mode – It helps you draw an irregular shape with your mouse anywhere on the screen, capturing the selected area.
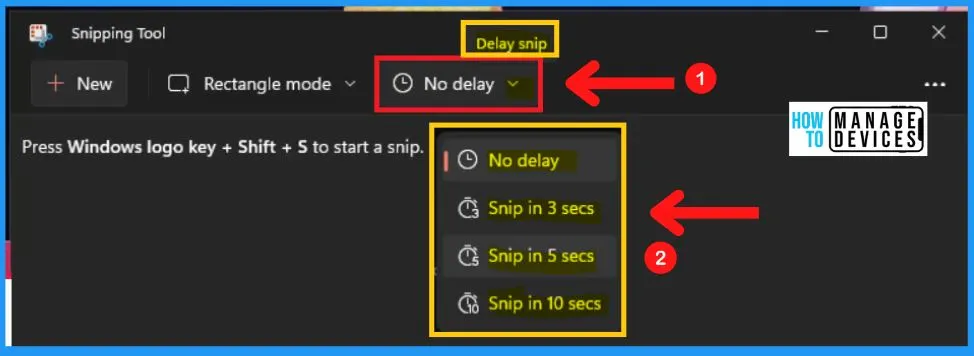
Delay Snip in Snipping Tool
Delay Snip in snipping tool helps you to delay the screen capture for up to 10 seconds. Please select one of the available options from its dropdown menu to set a delay for your screenshot.
The Snipping Tool features a built-in timer. You can easily set the delay for a few seconds and then hit the New button to start the countdown. No delay is selected by default, and the delay snip includes the following options.
- No delay – No delay to capture the snips
- Snip in 3 seconds – Helps to set 3 seconds to capture the snips
- Snip in 5 seconds – Helps to set 5 seconds to grab the snips
- Snip in 10 seconds – Helps to set 10 seconds to capture the snips
- 32 Privacy Settings for Windows 11 | 99 Intune Privacy Settings Policies
- Create Rufus Bootable USB Drive for Windows 11
See More in Snipping Tool
The “See more” 3 horizontal dots on the top right side of the snipping tool show options. The “See more” option in Snipping Tool includes the options such as an open file, send Feedback, and settings. The below steps and screenshot show the “see more” option in Snipping Tool.
- Open File – It helps you to open a file
- Send Feedback – Helps to send Feedback
- Settings – It includes shortcuts, Snipping, and appearance

The“Open File” Option in Snipping Tool
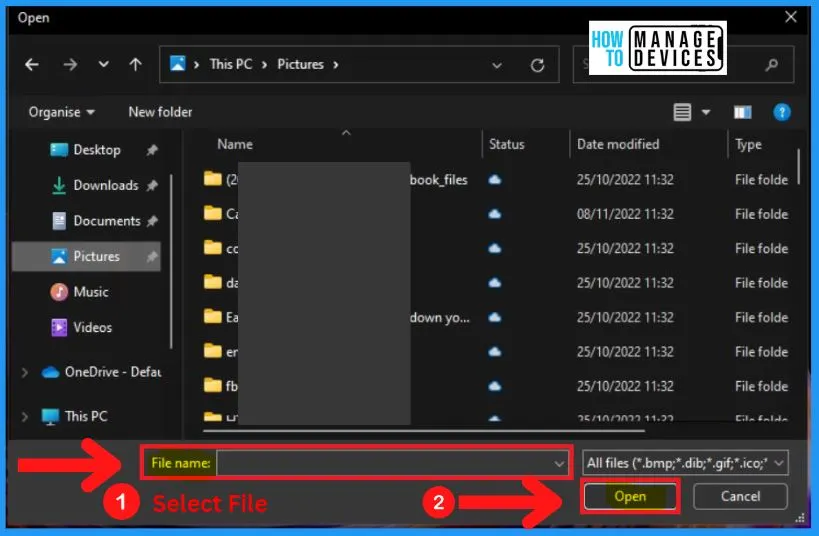
You can easily open files in Snipping Tool. Click “See more” in the 3 dots at the top right corner of the Snipping Tool window. Select the Open files option from the set of options. Select the File from the below screenshot and click Open.
- See more > Open File> Select File> Open
Feedback Hub
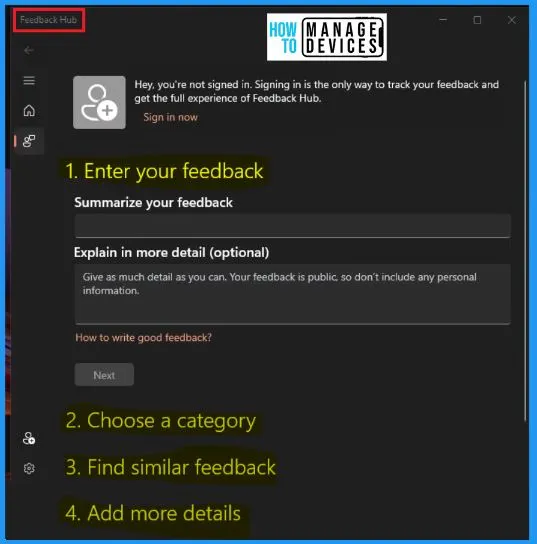
You can easily send any feedback through the Feedback Hub. You can send your experience and suggestions in the feedback Hub. The feedback Hub includes 4 steps, which are as follows.
- See more > Send Feedback
- Enter your Feedback – It helps to enter your Feedback
- Choose a category – Helps to choose a category
- Find similar Feedback – Helps to find other similar Feedback
- Add more details – Helps to add more information on the Feedback
Settings in Snipping Tool
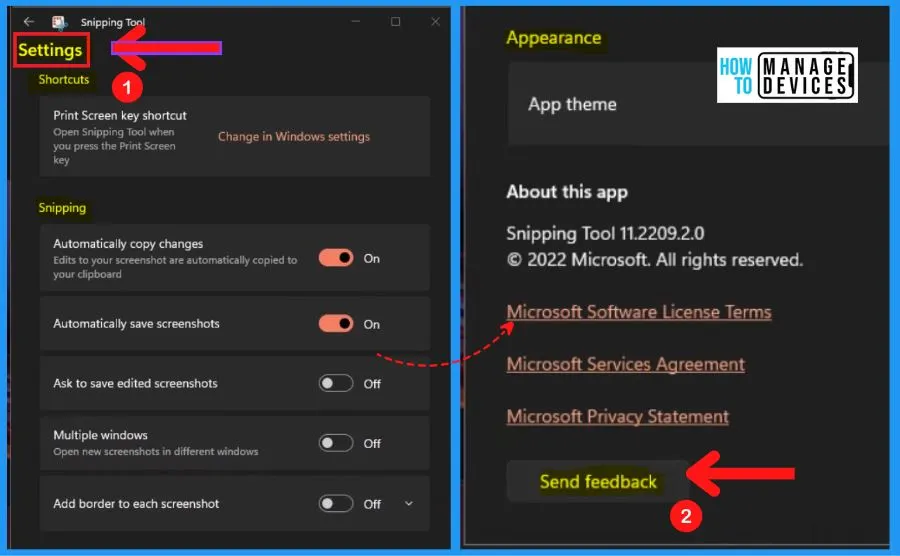
The settings in Snipping Tool include Shortcuts, Snipping, Appearance, and About this App. The shortcuts in settings show the print screen key shortcut. Open Snipping Tool when you press the Print screen key.
You can change windows settings by clicking the “Change in windows settings” option from the below screenshot. The Snipping option in settings shows the following.
| Snipping Settings | Enable | Disable |
|---|---|---|
| Automatically copy changes | Toggle to the Right side | Toggle to the Left side |
| Automatically save screenshots | Toggle to the Right side | Toggle to the Left side |
| Ask to save edited screenshots | Toggle to the Right side | Toggle to the Left side |
| Multiple windows | Toggle to the Right side | Toggle to the Left side |
| Add a border to each screenshot | Toggle to the Right side | Toggle to the Left side |
The Appearance settings in Snipping Tool help you to show the App theme. The “About this app” settings in Snipping Tool allow you to show the version of the Snipping Tool. It includes the send feedback settings that help you to send Feedback.
- Security Settings for Windows 11 Hardening options
- 4 Methods to Enable Edge Auto Delete Browsing History
Taking and Editing Snips
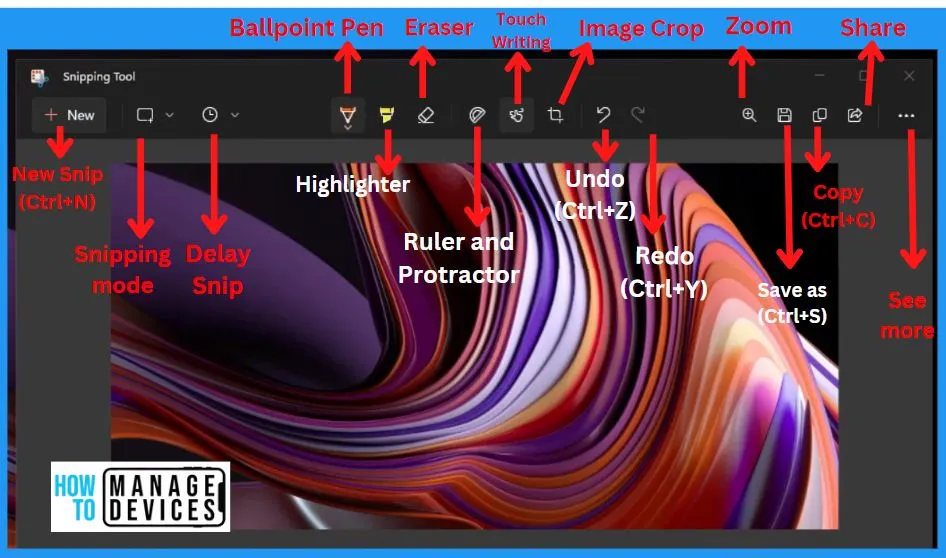
The below screenshot shows how to take and edit the snips. It includes a wide variety of options to edit the screenshot. They are as follows.
- New Snip – Helps to take a New Snip, alternatively use the Ctrl+N to take a new snip
- Snipping mode – Helps to change the mode of the snip
- Delay snip – Helps to set time to delay snip
- Ballpoint pen – A ballpoint pen is a writing tool, that helps you to write notes, create drawings, and annotations on your snip
- Highlighter – Highlighter allows you to use different colors to mark important things in your screenshot.
- Eraser – Helps to remove unwanted things from your snip
- Ruler and Protractor – Helps you to draw straight lines and circles
- Touch writing – Helps to draw freehand with a mouse or with a pen or finger on a touch screen
- Image crop – Helps you to crop the image
- Undo – Helps you to reverse a mistake
- Redo – Helps you to restore any actions that are previously undone using an undo
- Zoom – Zooming means enlarging an image which helps you make it more visible
- Save as – Helps you to save the image
- Copy – Helps you to copy the image
- Share – Helps you to share the image
- See more – Helps you to show a set of options such as an open file, send Feedback, etc
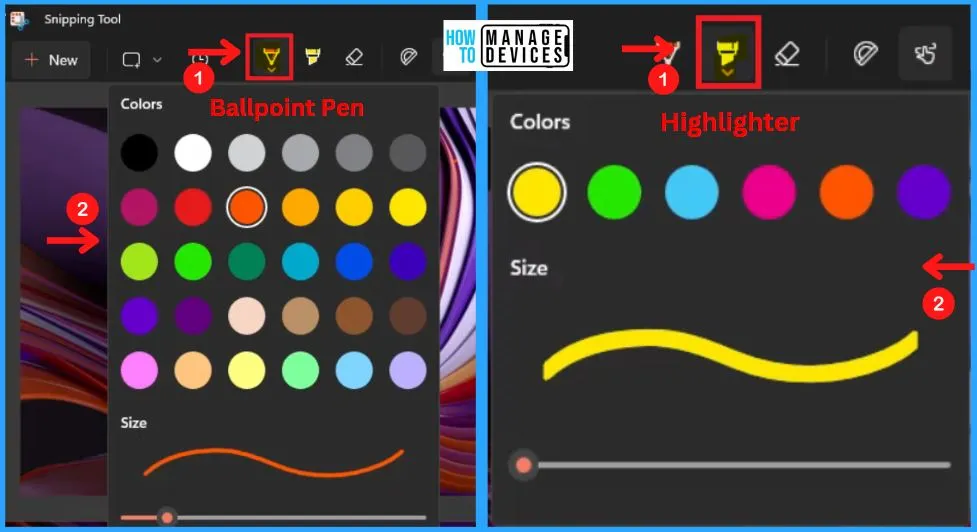
Ballpoint Pen and Highlighter in Snipping Tool
You can easily capture images using your cursor in whatever color you choose. It also helps you to write notes, create drawings, and annotations on your screenshot.
Highlighter is different from a ballpoint pen; it helps you to pop small important elements in your screenshot. It allows you to mark important things in your screenshot.
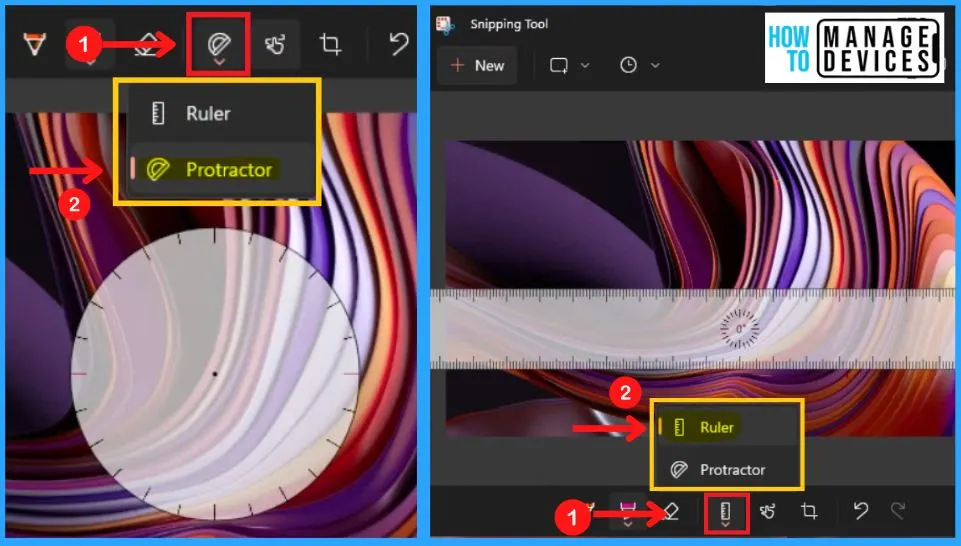
Snipping Tool Ruler and Protractor
The Ruler helps you to keep your lines straight. The Ruler will guide your lines if you are using the ballpoint pen or highlighter tool. A ruler and protractor help you draw straight lines and circles and allow you to measure.
You can easily rotate the scale or protractor to keep the mouse pointer over it and use the middle button of your mouse to change its angle.
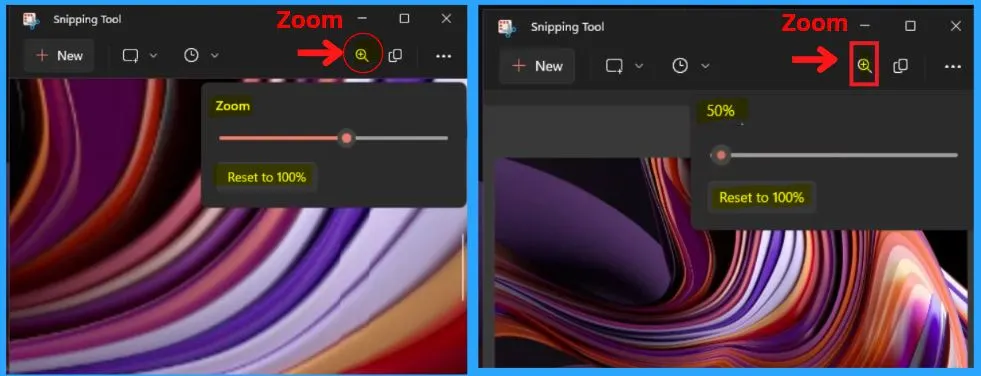
Snipping Tool Zoom in Options
You can easily zoom your screenshots using the Zoom option in Snipping Tool. Zooming means enlarging an image which helps you be more visible and clears the details of the picture.
- Zoom helps you to make the screenshot larger or closer
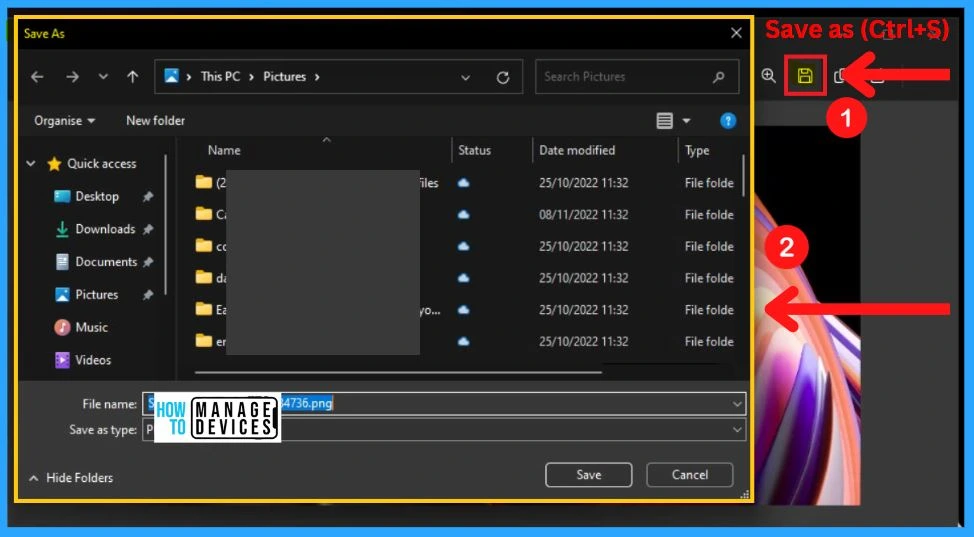
Save As in Snipping Tool
You can easily save your screenshot in Snipping Tool using the keyboard shortcut Ctrl+S. The Save as the button is located at the top right corner of the Snipping Tool edit window. After clicking the save button below the screenshot, do the following steps.
- Type the File name of the selected screenshot
- Select the save as type
- Click the Save button from the below window
Share Option in Snipping Tool
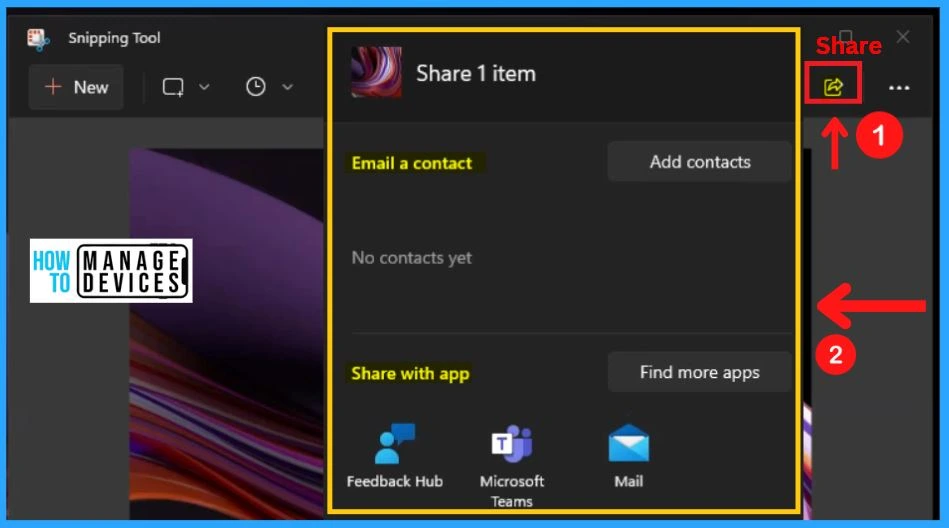
The share option in Snipping Tool helps you to share the edited screenshot. The sharing includes the “Email a contact” and “share with the app.” You can easily add a new contact by clicking the “Add contacts” option from the below screenshot.
- You can find more apps by clicking the “Find more apps” button from the below screenshot
See More
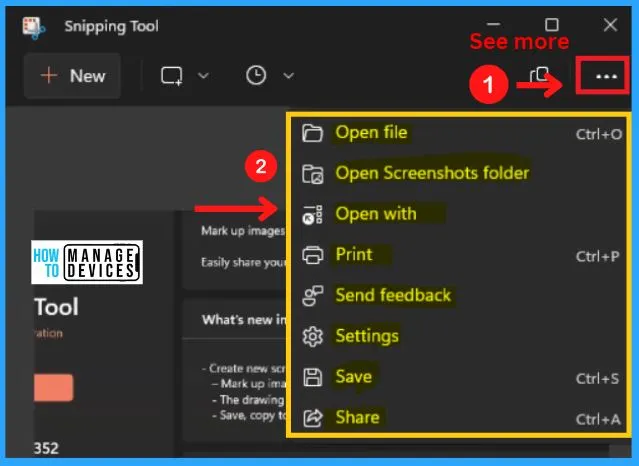
The “See more” option in the Snipping Tool edit window shows options such as Open File, Open screenshots folder, Open with, Print, Send Feedback, Share, etc. The steps below and the screenshot offer more settings options in Snipping Tool.
| See More Options | Uses |
|---|---|
| Open File | It helps to open files |
| Open screenshots folder | It helps to open the folder of the screenshot |
| Open with | It allows you to open a file with a program of your choice |
| Help to print the screenshot | |
| Send Feedback | It helps to send Feedback |
| Settings | It helps you to change the Snipping Tool Settings |
| Save | Allows you to Save the Snip |
| Share | Allows you to Share the Snip |
Right Clicking the Screenshot in Snipping Tool
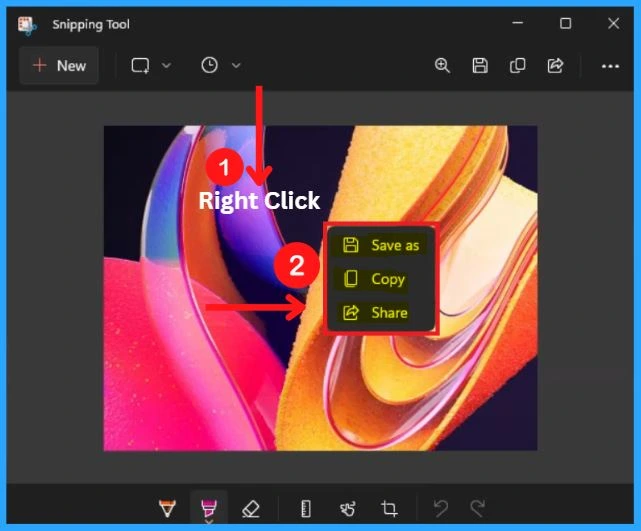
If you are right-clicking the snip in Snipping Tool, a context menu will appear, including a set of options such as save as, copy, and share. The “save as” option helps you to save the snip; the copy option allows you to copy the snip.
- Share – Helps you to share the snip
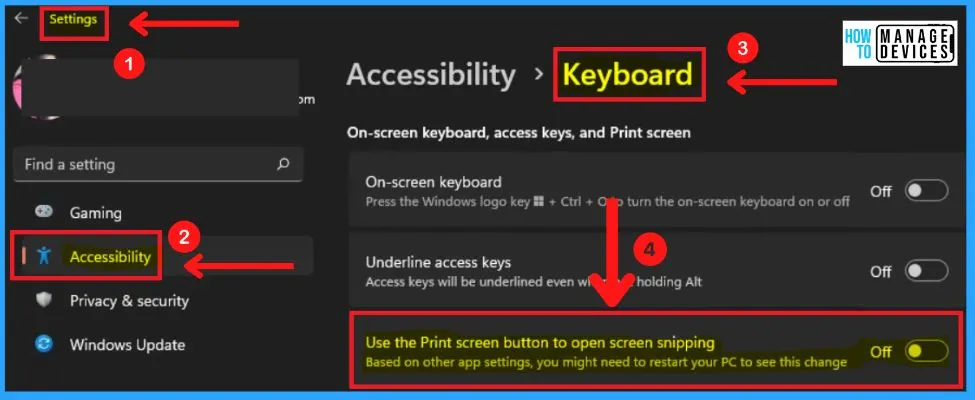
Windows 11 Settings to Use the Print Screen Button to Open Screen Snipping
Windows 11 Settings helps you to set Snipping Tool to Open When You Press the Print Screen Key. You can easily Enable or Disable this feature by toggling the “use the print screen button to open screen snipping” to the right and left sides.
Note! – After Enabling this feature, based on other app settings, you might need to restart your PC to see this change.
The below steps and screenshot show how to Enable and Disable the print screen button to open screen snipping.
- Start menu > Settings
- Select the Accessibility tab on the left side of the settings page
- Select the Keyboard option from the Accessibility page
- Enable this feature by toggling the “use the print screen button to open screen snipping” to the right side
- Disable this feature by toggling the “use the print screen button to open screen snipping” to the Left side
- How to Install and Use the WhatsApp App on Windows 11 PC | Detailed Review
- Latest Features of Notepad in Windows 11
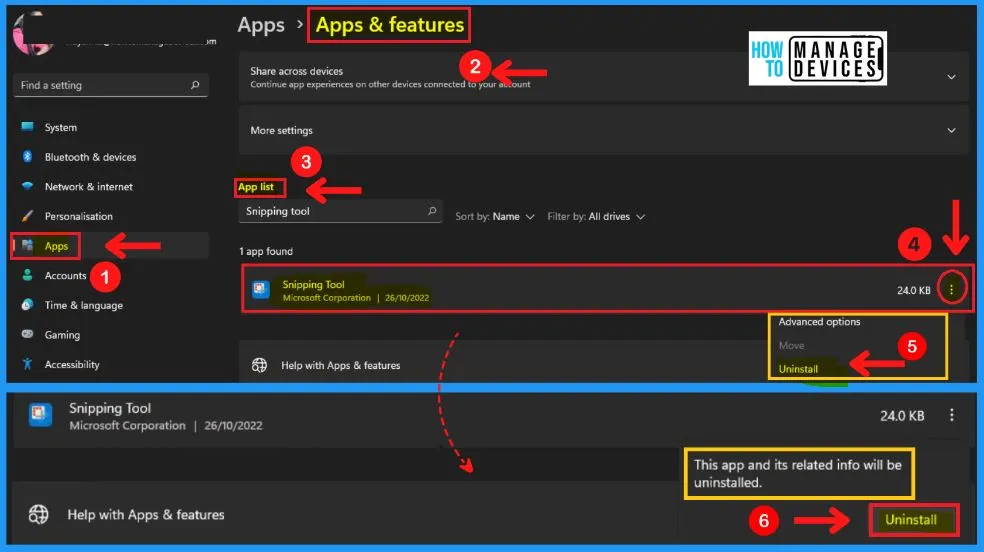
How to Uninstall the Snipping Tool in Windows 11
You can easily uninstall your Snipping Tool from Windows 11. The below steps and screenshot show how to uninstall the Snipping Tool in Windows 11.
- Start menu > Settings
- Select the App tab on the left side of the settings page
- Select App & features from the App page
- Search Snipping Tool from the App list
- Click the 3 vertical dots on the right side of the Snipping Tool
- Click Uninstall from the below screenshot
- A notification will appear and show ” This app, and its related info will be uninstalled” click the Uninstall option to uninstall the snipping Tool
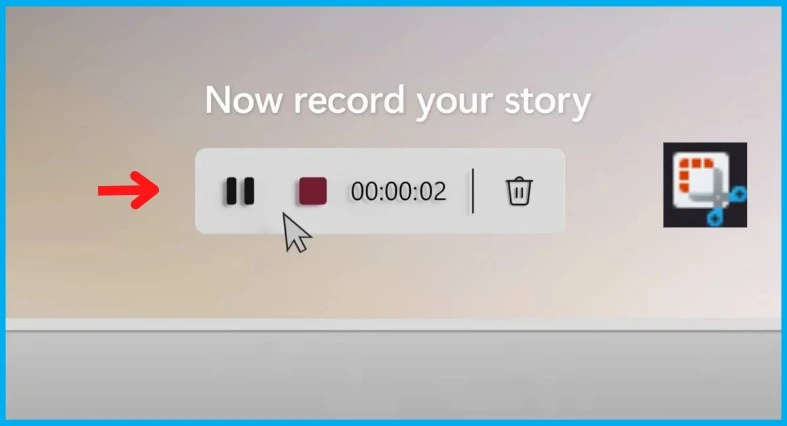
NEW Windows 11 Snipping Tool Screen Recording Option
Microsoft is planning to include a screen recording option in Windows 11 snipping tool. Microsoft has screen recording options with Powerpoint. Other platforms, such as Mac, have an inbox application to record the screen.
You can also use the Clipchamp video editing tool (now an inbox application with the latest Windows OS) for screen recording. But the Snipping Tool recording option would be great for a quick screen recording of Windows 11.
Print Screen Key Default Behavior Change
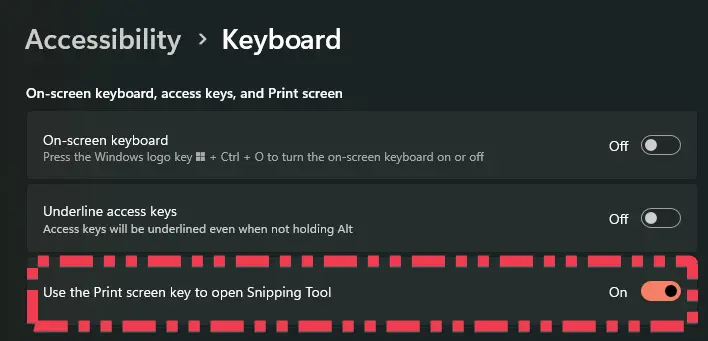
The default print screen (prt scr) key behavior is changed in the latest version of Windows 11 22H2 (June patches). When you press the print screen key will get the Snipping Tool opened by default.
You can turn off this setting from Settings > Accessibility > Keyboard. If you have previously changed this setting, Windows will preserve your preference.
Snipping Tool Gets AI-powered Perfect Screenshot and built-in Color Picker
The latest Snipping Tool update, version 11.2504.38.0, is now rolling out and introducing two powerful new features Perfect Screenshot and a Colour Picker. Designed to boost efficiency and accuracy, these tools enhance the screen capture experience, especially for those using Copilot+ PCs. With this update, Microsoft continues to blend AI into everyday utilities, making precise screen capturing and colour selection simpler than ever.
The highlight of this update is the new Perfect Screenshot feature that uses AI to help you capture exactly what you need. While using the Snipping Tool in rectangle mode, you can turn it on from the toolbar or just hold the Ctrl key while selecting a screen area. The tool will then automatically adjust the selection to match the content, so you don’t have to crop or edit it afterwards.
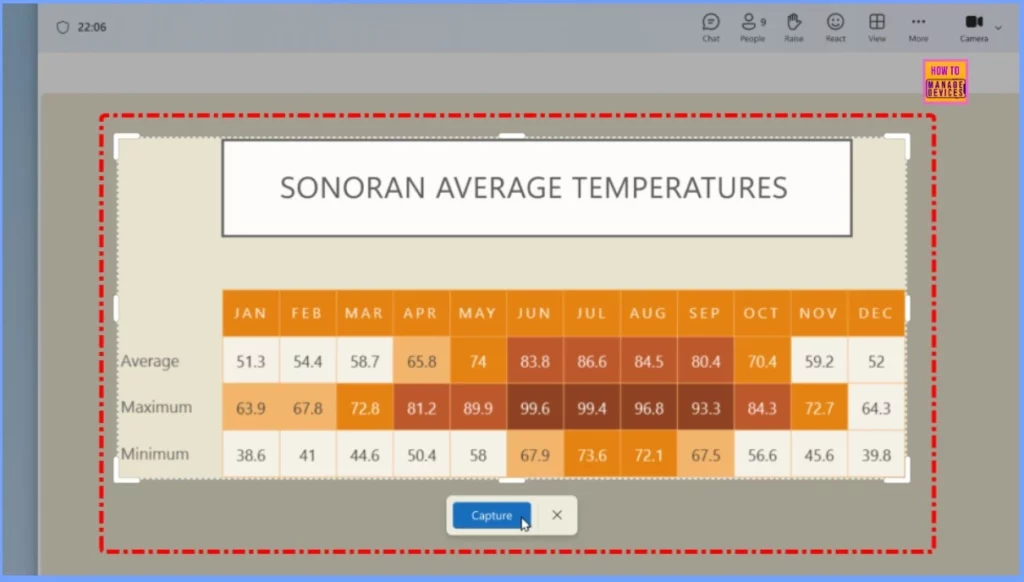
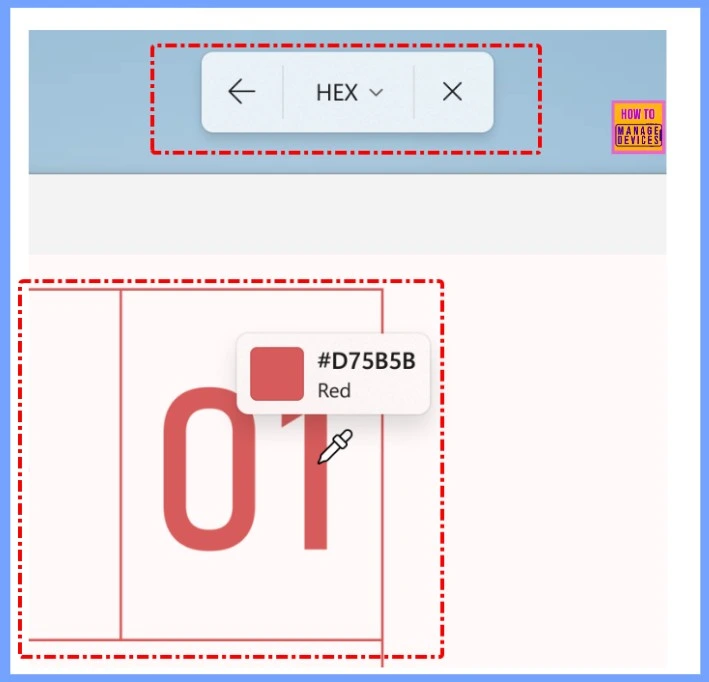
Color Picker for All – Perfect Screenshot Stays Exclusive to Copilot+ PCs
The update also includes a new Colour Picker tool that lets you easily pick and use colours from anything on your screen, perfect for design and creative work. This feature is available to all users, but remember that Perfect Screenshot is limited to Copilot+ PCs and is not available on standard Windows 11 machines.
Author
About Author – Vidya is a computer enthusiast. She is here to share quick tips and tricks with Windows 11 or Windows 10 users. She is also keen to find solutions to day-to-day tech problems and write about them.

One thing they took away from the Windows 10 Snipping Tool was multiple snip windows open at the same time. I used to snip multiple screen snips, opening each and editing them before saving. Now I have to auto save, and re-open them one by one. Much less productive. Microsoft continues to seem to have this issue with moving backwards and forwards at the same time.
How does one delete a picture or a screenshot in Windows 11? To delete unwanted material seems to have been an oversight in 11.
You just need to close the Snipping tool to get this deleted unless you saved it to some other place. The pictures taken with the snipping tool won’t get saved automatically.
How do you get the editing tool bar to the bottom of the Snipping tool window? When I want to add a shape, I cannot see or select anything from the menu. Same problem with some of the other editing tools. What can I do? All the YouTube videos showing how to use the Snipping tool show the editing tool bar at the bottom of the Snipping tool window. HELP!!!