Let’s learn the Create Rufus Bootable USB Drive for Windows 11 process. Rufus is an application to create a bootable use drive. This is useful whenever you need to recover, repair or install an operating system on your computer.
A USB bootable disk is used as a rescue disk whenever any error occurs in the operating system due to OS corruption or drive failure. Windows USB bootable drives are also the portable operating system, which means users can carry their own windows operating system on a USB drive and plug it into any computer.
This is the easiest process to create a bootable USB drive, which helps to use a blank computer with a bootable USB drive. It is still an advanced application and does not need any installation. Just download the Rufus application and double-click on it to continue.
In this post, you can see how to download the Rufus software and how to use it to create a bootable USB drive. However, users can boot a blank computer using a USB drive.
- How to Create Windows 11 Bootable USB Drive from ISO
- Security Settings for Windows 11 Hardening options
What is a Bootable USB Drive
A “bootable USB” is a normal USB storage device (like a USB stick (Pen drive) or external hard drive) that has an “ISO image” of an OS available on it. An ISO image is a library containing all the information on an optical device like CD or DVD.
When you turn on your computer, it boots from the OS on the hard drive. After creating a bootable USB, you can boot up your computer using the USB’s ISO image. Rufus (a reliable USB formatting utility) is a free utility for creating USB bootable drivers. Some of the key functionalities of Rufus are:
- Create a USB bootable device from an ISO file.
- You can install OS on a blank computer using a USB bootable drive.
- It can be used to flash BIOS.
- Running on a low-level OS.
Rufus is very easy to use with a user-friendly interface. Rufus is famous for its faster performance and the various key features:
- Free software with open source.
- Portable and available for all.
- Easy to create a bootable disk.
- Checking bad blocks on the USB drive.
How to Use Rufus to Create Bootable USB Drive
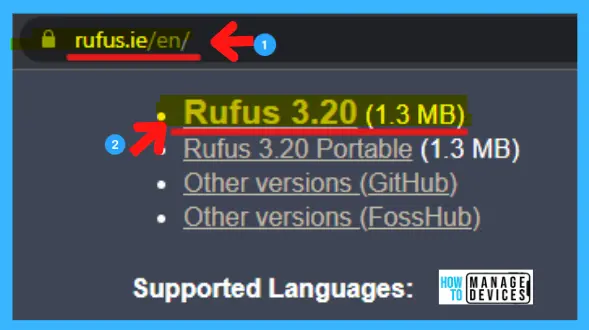
Visit the website of Rufus to download the software and Rufus to download the software, and you can also download it from Microsoft Store. Open the Rufus link given above and scroll down to download the desired file.
Microsoft Store Rufus USB Bootable Drive Creation App
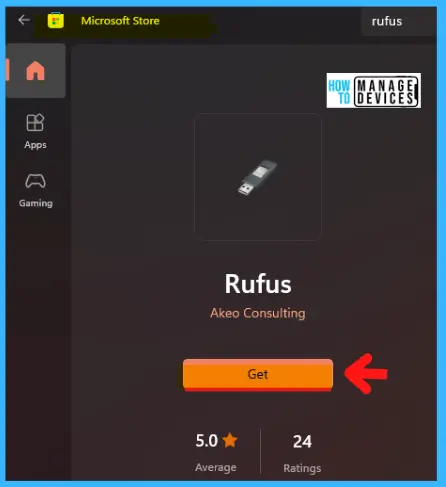
You can also download Rufus USB bootable device creation from Microsoft Store. Just launch Microsoft Store, type “Rufus” on the search bar, and the result brings the application click on Get to download the application and use it.
- How to Create Windows 10 Bootable USB Drive for Clean Install | Make USB Bootable Drive for Windows 10
- Generic Windows 11 Product Keys | How to Retrieve Windows 11 Product keys
Windows Package Manager WinGet option to Install Rufus
Let’s check the Windows Package Manager WinGet option to Install Rufus. You can search with the WinGet command to get the exact details, such as the Package ID for Rufus.
winget search rufus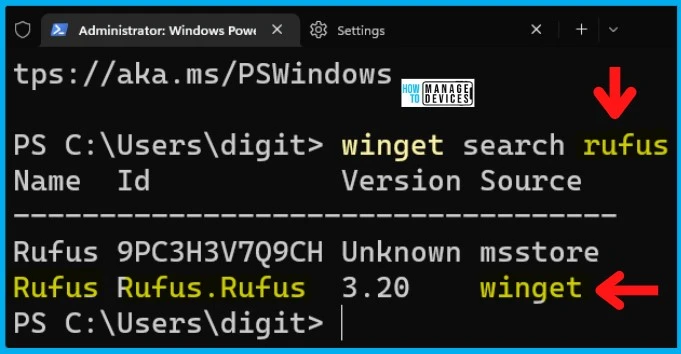
Try running the following command to install the Rufus Bootable USB creation app on Windows 11 device. In the below section, you can also see the Rufus package is getting downloaded from GitHub.
PS C:\Users\digit> WinGet install Rufus.Rufus
Found Rufus [Rufus.Rufus] Version 3.20
This application is licensed to you by its owner.
Microsoft is not responsible for, nor does it grant any licenses to, third-party packages.
Downloading https://github.com/pbatard/rufus/releases/download/v3.20/rufus-3.20p.exe
  1.33 MB / 1.33 MB
Successfully verified installer hash
Starting package install...
Path environment variable modified; restart your shell to use the new value.
Successfully installed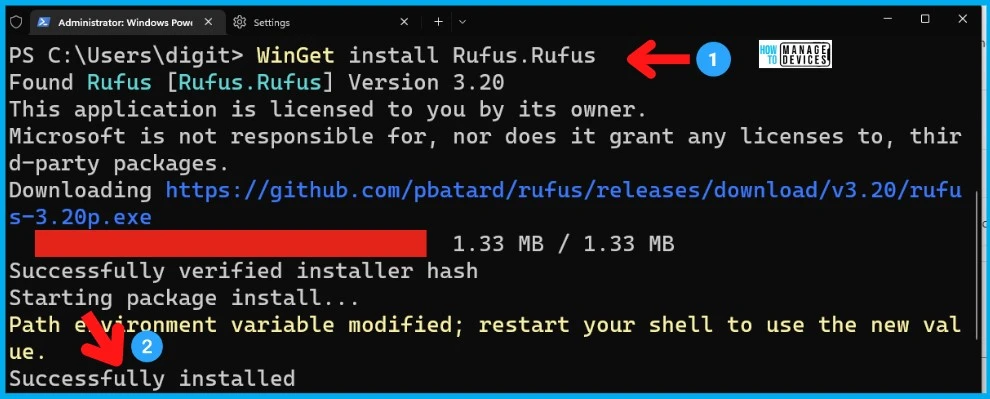
How to Create Rufus Bootable USB Drive for Windows 11
The downloaded files are stored in the Downloads folder; open the downloads folder and double-click on the Rufus application. The good thing about the Rufus application is that there is no need to install the software. Just download it and open it directly to use. And it needs Admin permission to make changes to the device.
You can also install Rufus from Microsoft Store or use the Winget Command-line tool. In the Rufus interface, three major options are available, under which all the modification is done for creating a bootable USB device, and the options are listed below:
- Drive Properties
- Format Options
- Status
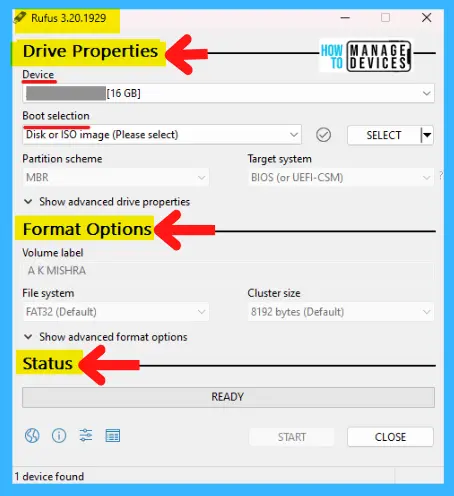
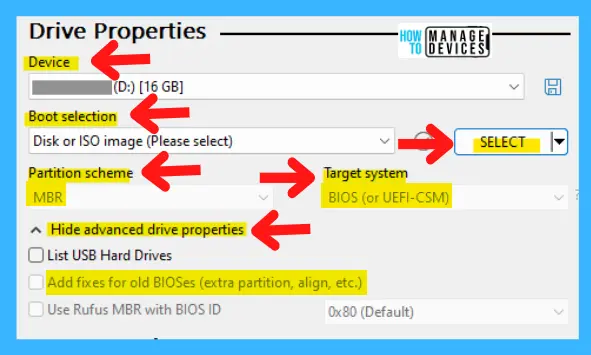
Under Drive Properties, some options are there to change/modify with the selections, such as
- Device – Indicates the drive to be selected as bootable.
- Boot Selection – select the proper booting process
- Select/Download – select the OS file or Download it directly
- Partition scheme – select MBR
- Target System – select BIOS (or UEFI-CSM)
- Advance drive properties – select Add fixes for old BIOSes (extra partition, align, etc.)
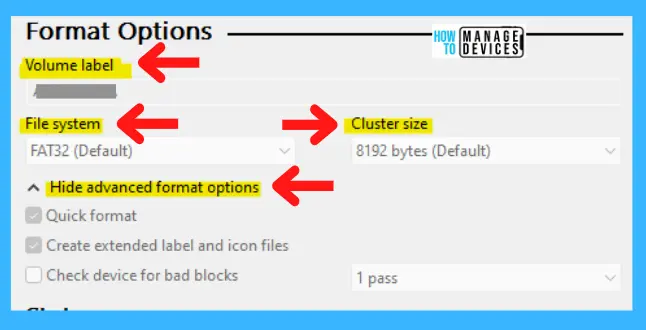
Under Format Options also have some sub-categories are there for selection and make any modifications according to the user as:
- Volume label – use to Rename Bootable Devices
- File System – Default (FAT32)
- Cluster Size – 8192 bytes (Default)
- Advance Format Option
Same as above, there is another option as Status. Under the Status option, it indicates to the user about the ready state of the process.
- READY – The process is ready
- START – Click here to Start
- CLOSE – Click here to terminate

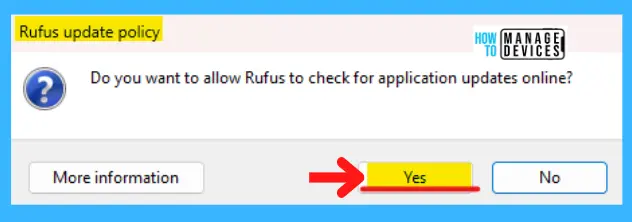
After getting permission from Admin to change or make modifications to the device, there is an option popped up named Rufus update policy. And it’s asking, Do you want to allow Rufus to check for application updates online? Click Yes to continue.
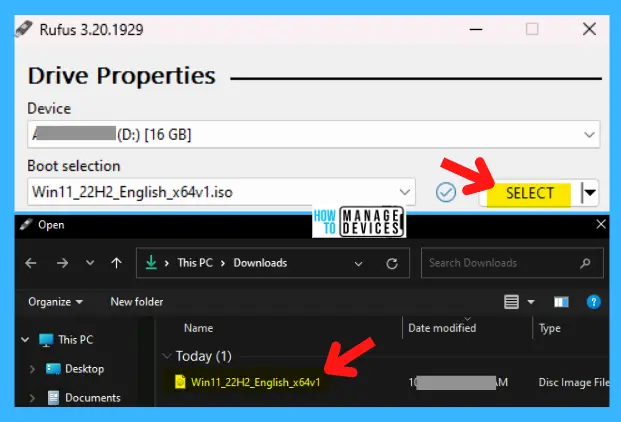
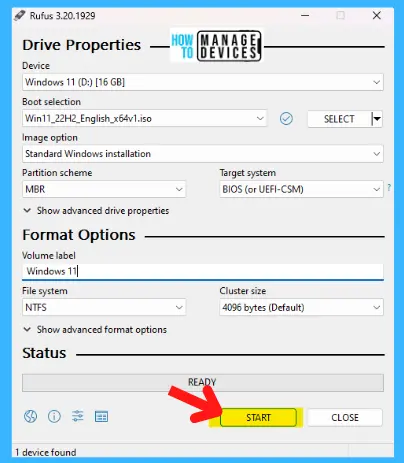
When you launch the Rufus application, the interface of the application is very easy. The first option is to select the USB device you want to convert into a bootable device. Then the Boot Section option is there; select Disk or ISO Image from the drop-down menu.
Besides the Boot Selection option, you can select the desired file to create a bootable USB by browsing it or downloading directly by choosing Download from the dropdown menu.

Now click SELECT and browse the ISO file to create a bootable device. After browsing the correct/desired ISO file, your system is ready for the creation of the bootable device.
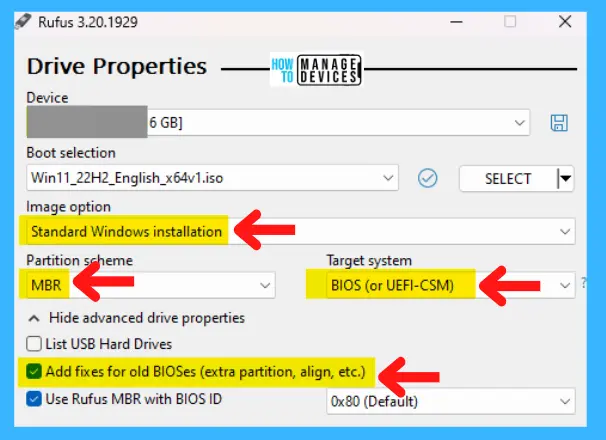
A few changes need to be made before creating a bootable USB drive. Below the Image Option, select Standard Windows Installation.
- Select MBR from the drop-down menu under Partition Scheme and BIOS (or UEFI-CSM) under Target System.
- And finally, remember to check the box Add fixes for old BIOSes (extra partition, align, etc.) under the Advanced drive properties.
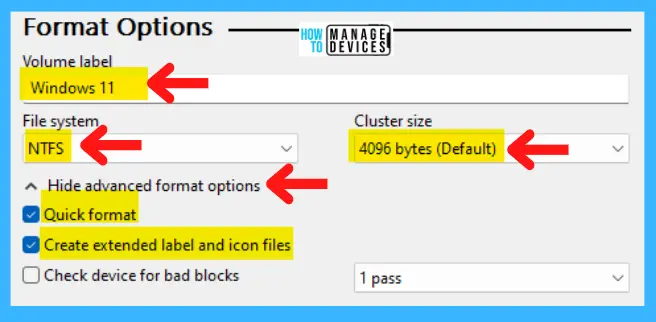
Next, in the Format Option, you can change the name using the Volume label text box. Other options are set by default; you don’t need to make any changes.
All the settings are now perfectly arranged according to requirements. Under the Status option, two buttons are available: START and CLOSE. Click Start to begin the process of creating a bootable device.
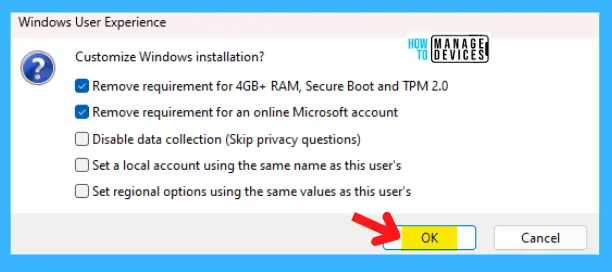
Immediately after clicking the Start button, a new window appears in Windows User Experience. These windows ask the user to customize the installation process with the options provided. You may be able to customize it according to your requirement or leave it as default. Then click Ok to continue the process.
NOTE! – Windows 11 has specific requirements such as Secure Boot and TPM 2.0. So make sure you follow those specific requirements while creating bootable USB for Windows 11 – How to Create Windows 11 Bootable USB Drive from ISO.
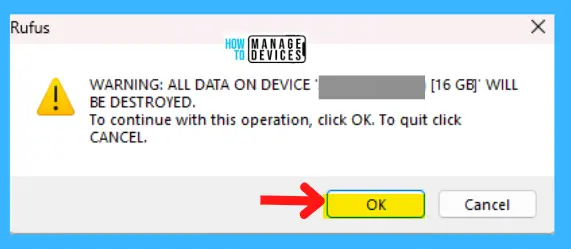
When the formatting starts, a warning message window will appear and says that all the data in the USB drive will be destroyed; press OK to continue or CANCEL to terminate the process.
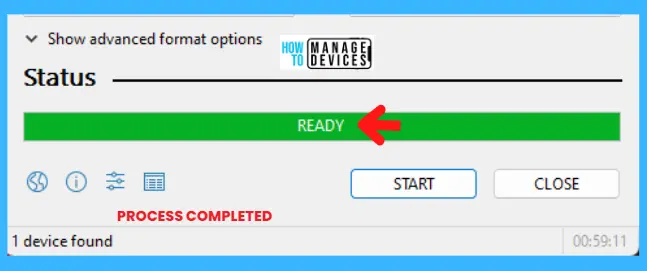
The formatting started as well; it will create a bootable USB Driver accordingly. This will take some time to complete. Relax and wait for the process to end.

The Rufus bootable USB creation process is completed for Windows 11 ISO. You can just close the RUFUS application and start booting the Windows devices from a bootable USB drive.
Use Rufus Bootable USB Drive with Windows 11
Let’s check how to boot into UEFI with Windows 11 PC with a RUFUS USB bootable drive. You can boot directly into the UEFI by using the shutdown command. This is not available for BIOS! Once in UEFI, you can select the USB drive to boot into.
- shutdown /r /fw /f /t 0 – Directly boot into UEFI
NOTE! – Sometimes you might get the following error while running the command if you try to run from Windows Terminal (when the default is set to run the POWERSHELL). The system could not find the environment option that was entered.(203)

You can select the Windows 11 boot order from the UEFI and select the USB drive to boot. Once booted from Rufus Bootable USB Drive for Windows 11, you can format the drives and install Windows 11.
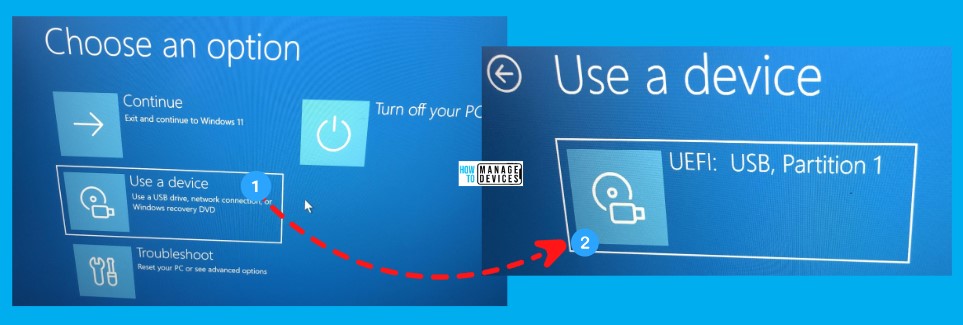
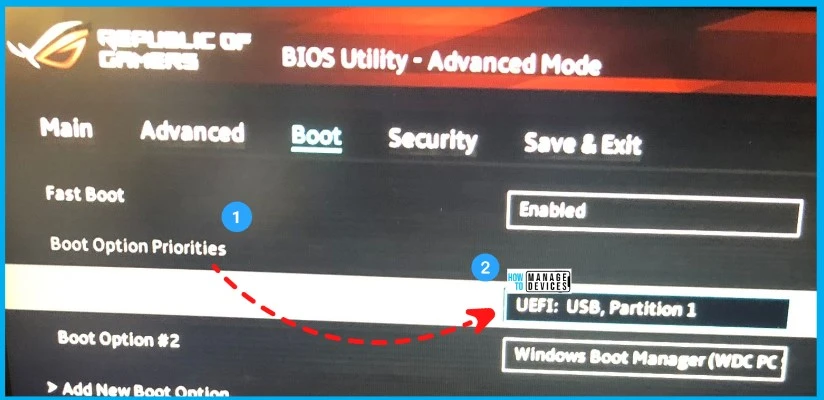
All the procedures are completed now; your selected USB is now a bootable USB drive. You can now use this on a blank computer to boot. From the UEFI, you can select the boot order -> USB.
- Navigate to BIOS Utility (UEFI) – Advanced mode -> Boot
- Boot Option Priorities -> Boot Option#1 and #2
- Boot Option #1 – UEFI: USB, Partition 1
Save and Exit the BIOS/UEFI utility and boot the device from the Rufus Bootable USB drive to Install Windows 11 operating system.
Please follow us on Twitter @HTMD Community and visit our website HTMD Community Forum if you like our content.
Author
Alok is a Master of Computer Applications (MCA) graduate. He loves writing on Windows 11 and related technologies. He likes to share his knowledge, quick tips, and tricks with Windows 11 or Windows 10 with the community.
