Install Uninstall Apps from Windows Package Manager using WinGet Tool and SCCM. Microsoft is not planning to have direct integration with Windows Package Manager service with Configuration Manager (aka SCCM), unlike Intune.
The SCCM deployment solution discussed in this post is one of the methods to deploy applications from the Windows Package Manager service using the WinGet tool. I think this is one of the methods you need to look into once Microsoft Store for Business (MSfB) is retired in early 2023.
The WinGet tool is supported for Windows 11 and Windows 10 devices. The first version of the command-line tool WinGet doesn’t have all the required enterprise features such as device-based deployment (device licensing or offline), Administrative permission requirements, etc. Some of them are already covered in the below section of this post.
Different app repositories for Windows Package Manager (aka WPM) are Microsoft Store. Hopefully, all the apps in Microsoft Store will be available in the WPM repository shortly. The WPM service provides tighter integration for automation, management, installation of apps similar to Chocolatey, etc.
The Windows Package Manager will be tightly integrated with store apps using Intune, Microsoft’s Unified Endpoint Management (UEM), the solution. This integration helps enterprise admins to install, update, and manage apps easily.
The WPM service will be integrated tightly with Intune to make all the applications available in the EndPoint Manager portal. I expect this would be similar to the current experience of MSfB apps and Intune. The following are important milestones in the integration between WPM service and Intune.
- Intune integration with Windows Package Manager service, your private app repository, and the new Microsoft Store: Public Preview (Expected H1 2022)
- Intune integration with Windows Package Manager service, your private app repository, and the new Microsoft Store: General availability (Expected H2 2022)
- Retirement of Microsoft Store for Business and Education for Windows 10: expected Q1 2023
Prepare the WinGet Command to Install Acrobat Reader on Windows 11 Devices
Let’s try to prepare the WinGet Command-Line to Install Acrobat Reader using SCCM on Windows 11 PCs. You can use the WinGet SEARCH command to find the app’s availability and unique App ID to help with installation and uninstallation parameters.
The following Search command gives you the details of available applications from the Microsoft Store and the WinGet (WPM) repositories (column heading = Source), as you see in the screenshot below.
winget search "adobe acrobat"For example, Adobe.Acrobat.Reader.64-bit is the App ID (Column heading = Id) for the 64-bit version of Adobe Acrobat Reader. This ID value is one of the main parameters for the Winget tool to install Acrobat Reader on both Windows 11 and Windows 10 devices.
Adobe Acrobat DC (64-bit) Adobe.Acrobat.Reader.64-bit 22.001.20085 Tag: adobe winget
Adobe Acrobat Reader DC Adobe.Acrobat.Reader.32-bit 22.001.20085 Tag: adobe winget

WinGet Installation Workflow
The following is the high-level Workflow of the App Installations from the Windows Package Manager service using the client command-line tool called WinGet.
I have not included UAC and local admin requirements in this below workflow. But those requirements come in-between points #5 and #6.
- License Check
- Accept Agreement (only applicable for Windows 10)
- Downloading
- Hash Verification
- Install the package
- Successfully installed
NOTE! – There are some local admin and UAC prompt dependencies or gotchas with the WinGet tool. These points are covered in the later section of this post.
Manual Install of Acrobat Reader using WinGet on Windows 11 PC
Let’s check the manual Install of Acrobat Reader using WinGet command-line tool on Windows 11 PC. Silent install is supported in this scenario. The command-line with the parameter called accept source agreements will be recommended for most scenarios (even for SCCM deployments).
WinGet Install Adobe.Acrobat.Reader.64-bitFound Adobe Acrobat DC (64-bit) [Adobe.Acrobat.Reader.64-bit] Version 22.001.20085
This application is licensed to you by its owner.
Microsoft is not responsible for, nor does it grant any licenses to, third-party packages.
Downloading https://ardownload2.adobe.com/pub/adobe/acrobat/win/AcrobatDC/2200120085/AcroRdrDCx642200120085_MUI.exe
Progress Bar to indicate the Download Status – 376 MB / 376 MB
Successfully verified installer hash
Starting package install…
Successfully installed

There is a more specific method, and I recommend the following command line with –id, –silent, and –accept-source-agreements parameter to install the application from Windows Package Manager.
This installation workflow is the same as before. Use the following command line to install Adobe Acrobat Reader 64 bit version.
Winget Install --id Adobe.Acrobat.Reader.64-bit
Winget Install --silent --id Adobe.Acrobat.Reader.64-bit
Winget Install --silent --accept-source-agreements --id Adobe.Acrobat.Reader.64-bit
Windows 10: Install Application from WPM (Windows Package Manager) using WinGet
Install Application from WPM (Windows Package Manager) using WinGet on Windows 10 PCs. There are some additional agreements required for Windows 10 devices. This is even after Microsoft Store for Business (MSfB) retirement.
NOTE! – It might still ask for the UAC confirmation because you must run this command from the user context. Do you know the parameter to override the UAC prompt with WInGet command-line tool?
I have used the following command parameter, –accept-source-agreements, to install Adobe Acrobat from Windows Package Manager (aka WPM) to accept the License Agreement.
Winget Install --silent --accept-source-agreements --id Adobe.Acrobat.Reader.64-bit
Uninstall Application using WinGet Tool on Windows 11
The WinGet uninstall command doesn’t support silent uninstall (by default, or this could be specific to Adobe Acrobat); you will need to have an additional command parameter, as explained below. The following are the two command-line options without silent parameters.
Winget UnInstall --id Adobe.Acrobat.Reader.64-bit
WinGet UnInstall Adobe.Acrobat.Reader.64-bit
The uninstall command shared above doesn’t support silent mode, and that is why you see the uninstall UI of Adobe Acrobat. I don’t recommend using this parameter for SCCM uninstall scenarios. The following is the uninstall workflow for the WinGet tool.
- Found Adobe Acrobat DC (64-bit) [Adobe.Acrobat.Reader.64-bit]
- Starting package uninstall…
- Successfully uninstalled

The following uninstall command with silent parameter is the recommended approach to uninstall the Windows Package Manager application using the WinGet command.
WinGet UnInstall --silent --id Adobe.Acrobat.Reader.64-bit
Uninstall Parameters for WinGet Tool for Windows 11 or Windows 10
The following are the supported parameters for the WinGet Uninstall command line. You can use the following command to get the latest and supported parameters of UNINSTALL command from the WinGet tool.
The Uninstall command line helps to uninstall the selected package, either found by searching the installed packages list or directly from a manifest. By default, the query must case-insensitively match the id, name, or moniker of the package. Other fields can be used by passing their appropriate option.
Winget UnInstall --help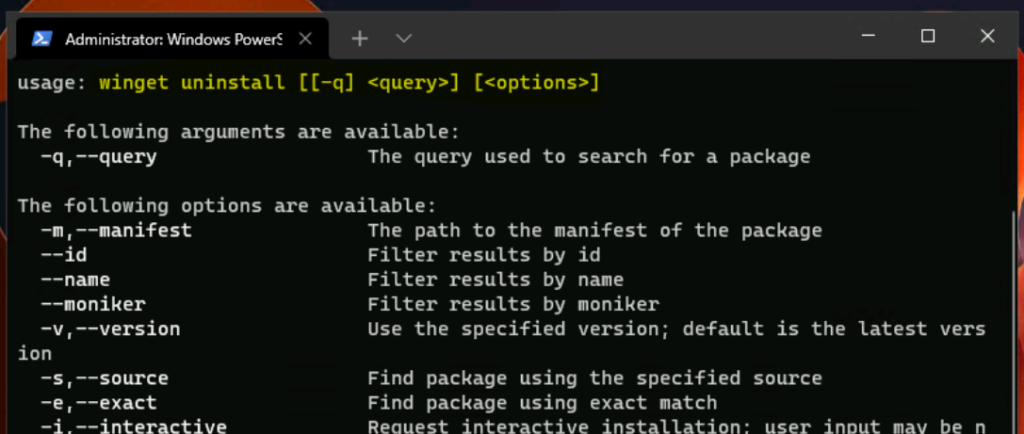
- -m,–manifest – The path to the manifest of the package
- –id – Filter results by id
- –name – Filter results by name
- –moniker – Filter results by moniker
- -v,–version – Use the specified version; default is the latest version
- -s,–source – Find package using the specified source
- -e,–exact – Find package using exact match
- -i,–interactive – Request interactive installation; user input may be needed
- -h,–silent – Request silent installation
- -o,–log – Log location (if supported)
- –header – Optional Windows-Package-Manager REST source HTTP header
- –accept-source-agreements – Accept all source agreements during source operations
Install Parameters for WinGet Tool for Windows 11 or Windows 10
The following parameter options are available for the WinGet Install command. You can use the following command to get the list of supported parameters.
The Install command installs the selected package, either found by searching a configured source or directly from a manifest. By default, the query must case-insensitively match the id, name, or moniker of the package. Other fields can be used by passing their appropriate option.
Winget Install --help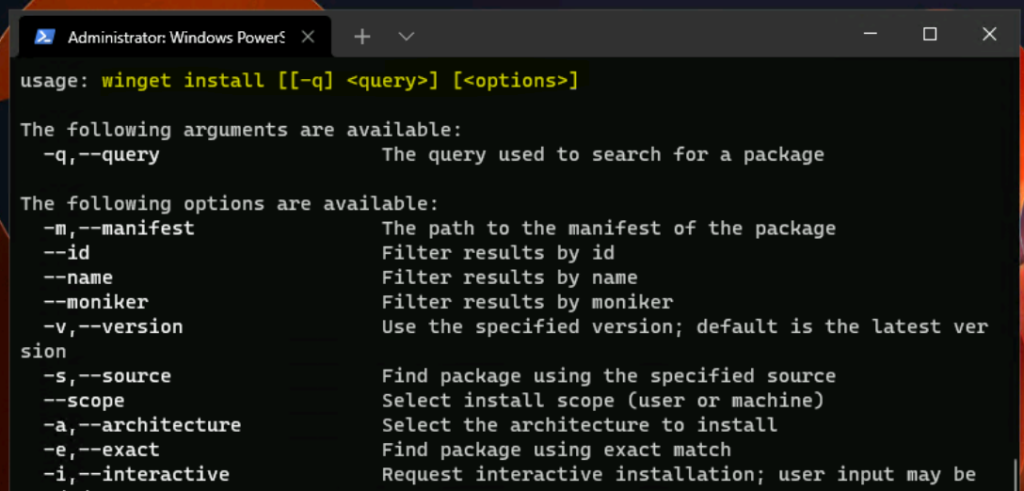
- -m,–manifest – The path to the manifest of the package
- –id – Filter results by id
- –name – Filter results by name
- –moniker – Filter results by moniker
- -v,–version – Use the specified version; default is the latest version
- -s,–source – Find package using the specified source
- –scope – Select install scope (user or machine)
- -a,–architecture – Select the architecture to install
- -e,–exact – Find package using exact match
- -i,–interactive – Request interactive installation; user input may be needed
- -h,–silent – Request silent installation
- –locale – Locale to use (BCP47 format)
- -o,–log – Log location (if supported)
- –override – Override arguments to be passed on to the installer
- -l,–location – Location to install to (if supported)
- –force – Override the installer hash check
- –dependency-source – Find package dependencies using the specified source
- –accept-package-agreements – Accept all license agreements for packages
- –header – Optional Windows-Package-Manager REST source HTTP header
- –accept-source-agreements – Accept all source agreements during source operations
Uninstallation Error with WinGet Tool on Windows PCs
Let’s try to understand Uninstallation Error with WinGet Tool on Windows PCs. The WinGet uninstall command doesn’t seem to work on Windows 10 devices. It failed with the following error – Uninstall failed with exit code: 1603.
C:\Users\anoop.MEMCM>Winget UnInstall –silent –id Adobe.Acrobat.Reader.64-bit
Found Adobe Acrobat DC (64-bit) [Adobe.Acrobat.Reader.64-bit]
Starting package uninstall…
Uninstall failed with exit code: 1603
The reason for the Exit Code error 1603 with the WInGet tool is Product: Adobe Acrobat DC (64-bit) — Error 1730. You must be an Administrator to remove this application. To remove this application, you can log on as an administrator or contact your technical support group for assistance.

WinGet Tool Limitations
The user needs administrative permission to uninstall the application Adobe Acrobat from Windows 10 PC. The WinGet tool works on user-context, and all the users can’t have local admin permissions on their PCs.
- Lack of device context (device-based) install options to help device management tools such as SCCM. This is how Microsoft Store for Business (MSfB) works.
- Lack of options to override UAC prompts during uninstall.
- Lack of options to manage local Admin permissions during uninstall of the applications using the WinGet Tool.
- Lack of device-based licensing option is not available.
- Lack of Offline install options are not available with the Windows Package Manager service and the WinGet tool.
Read More – Device-based license and Offline deployment options available with Microsoft Store for Business.
Install Apps from Windows Package Manager using SCCM
Let’s check how to Install Apps from Windows Package Manager using SCCM in this section of the post. I have taken the installation of Adobe Acrobat Reader using WinGet and SCCM (Configuration Manager) as one of the examples scenarios here.
Read More: Install Apps from Windows Package Manager using Microsoft Endpoint Manager (MEM) Intune.
There are different methods to install apps from Windows Package Manager using SCCM, mainly with current limitations (user context). The easiest way to test and install Adobe Acrobat Reader from Windows Package Manager is to:
- Use Classic SCCM Package to deploy the PowerShell script in user context (explained in this section)
- Use SCCM application model with the help of PowerShell App Deployment Tool Kit to deploy PowerShell script in user context.
NOTE! – Most of the Microsoft Store apps are available in the Windows Package Manager service. So you can easily use this WinGet method to install, uninstall, and manage Microsoft Store applications via the Windows Package Manager.
This command-line tool, WinGet, works only in the user context while writing this post. Microsoft might start supporting device-based installs for Windows Package Manager in future versions of the WinGet tool.
NOTE! – The Run Script option in SCCM won’t work in the logged-in user context; hence you can’t use that option to deploy applications from Windows Package Manager using the WinGet tool.
Let’s start creating the SCCM package for Adobe Acrobat installation from Windows Package Manager using the WinGet Command-Line tool.
- Navigate to \Software Library\Overview\Application Management\Packages.
- Click on Create Package button from Ribbon Menu.

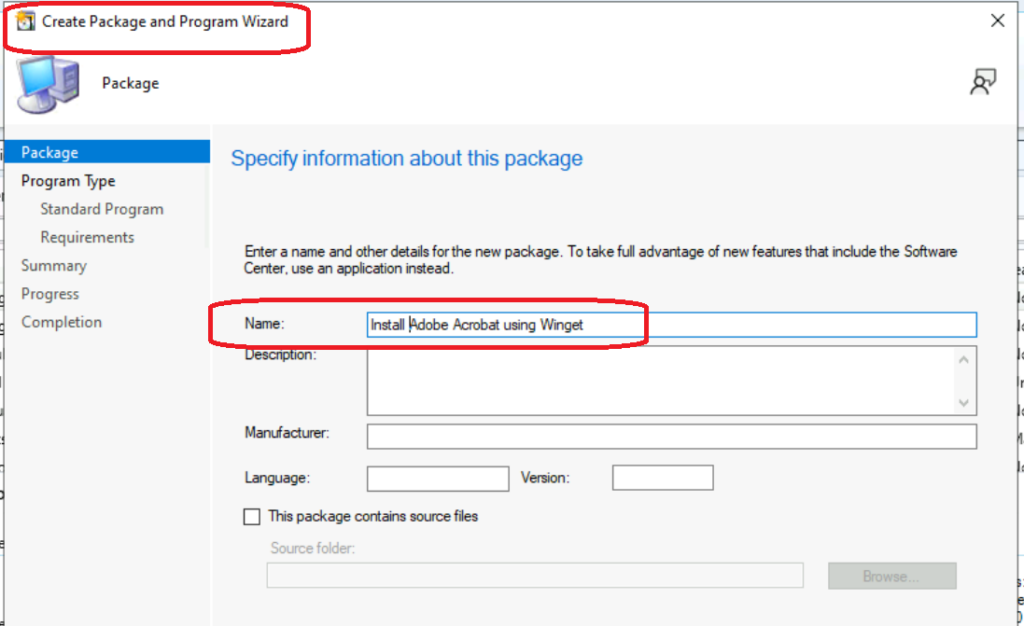
On the Create Package and Program Wizard, you need to enter the package’s name and other details such as Description, Manufacturer, Language, Version, etc.
NOTE! – This page gives a warning or tip that to take full advantage of new features that include the software center, use an Application Model instead.
- Enter the Name of the Package – Install Adobe Acrobat using WinGet.
- Enter the Description.
- Enter the Manufacturer.
- Enter the Language.
- Enter the Version.
- Click on the Next button to continue.
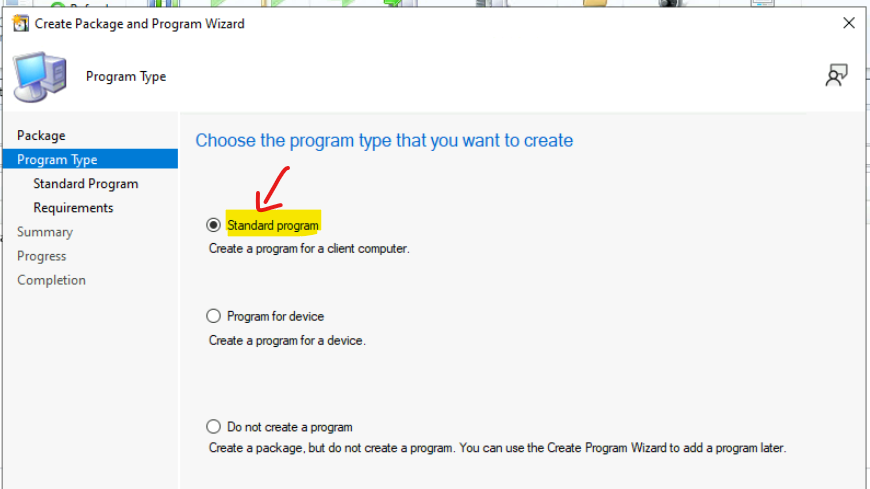
Choose the program type you want to create from the Program Type tab. Select the Standard Program – create a program for a Windows client computer.
- Select Standard Program.
- Click on the Next button.
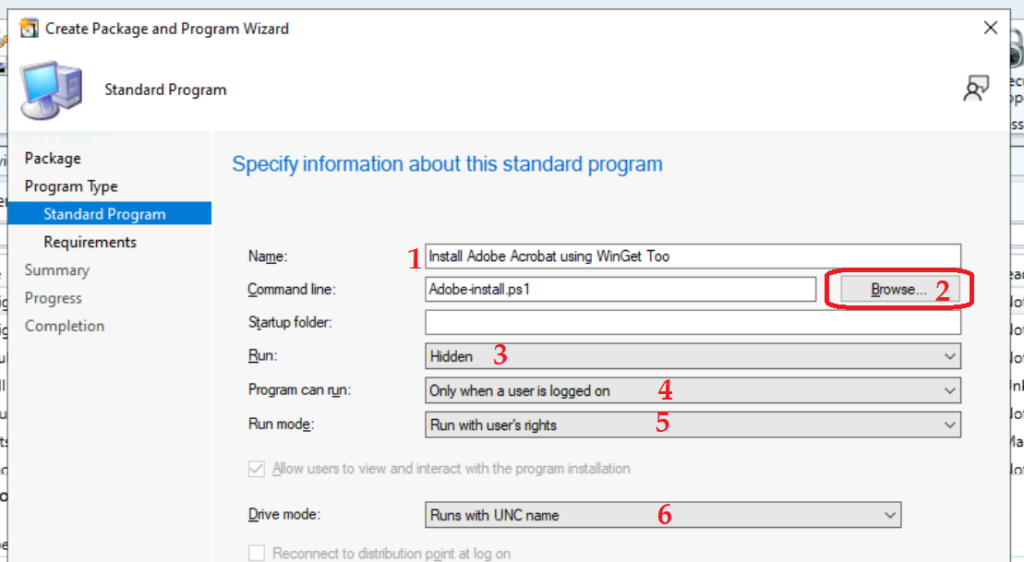
On this page, you are going to create the program for this SCCM package with command line parameters and other details.
From the Standard Program tab, You need to enter the details listed below. Before completing the standard program, ensure that you have created Adobe-install.ps1 with the following PS command.
Winget Install --silent --accept-source-agreements --id Adobe.Acrobat.Reader.64-bit- Enter the Name: Install Adobe Acrobat using WinGet Too
- Select the PowerShell script using the Browser button to select Command Line as Adobe-install.ps1.
- Select Run: Hidden
- Select Program can run: Only when a user is logged on
- Select Run Mode: Run with user’s rights
- Select Drive Mode: Runs with UNC name
- Click on the Next button to continue
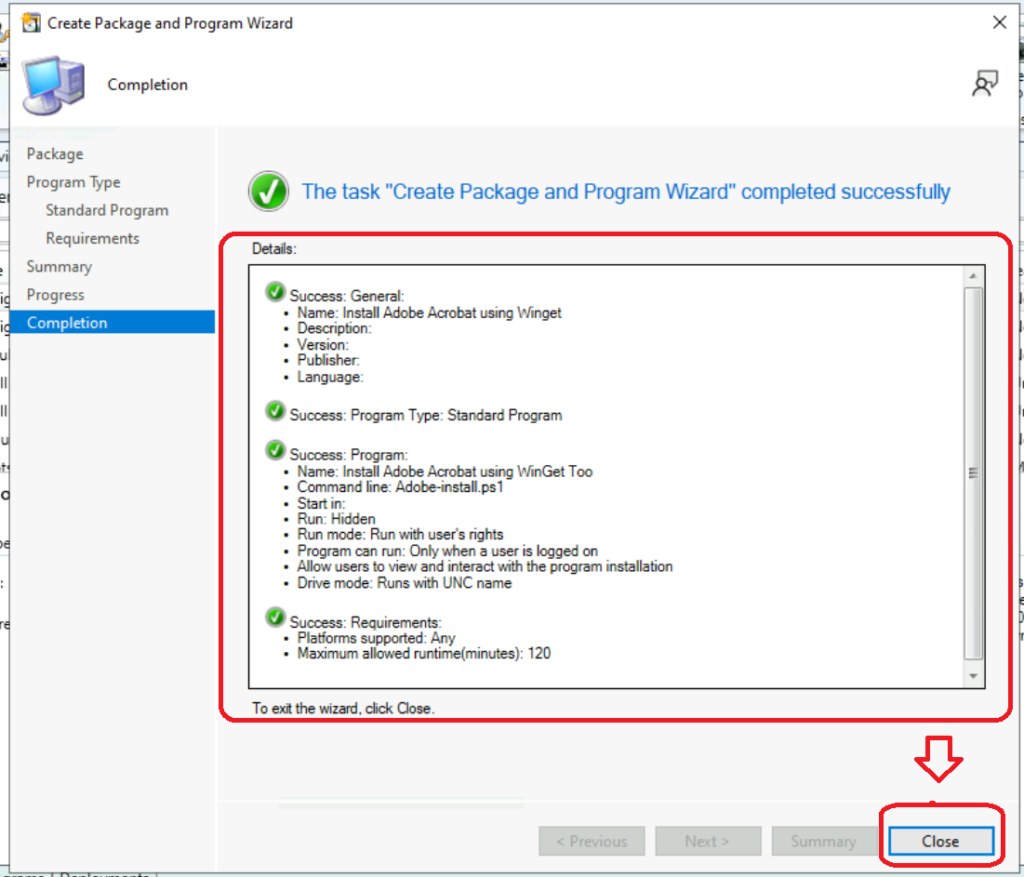
Program Type: Standard Program Program:
• Name: Install Adobe Acrobat using WinGet Too
• Command line: Adobe-install.ps1
• Start in:
• Run: Hidden
• Run mode: Run with user’s rights
• Program can run: Only when a user is logged on
• Allow users to view and interact with the program installation
• Drive mode: Runs with UNC name
On the requirements page, you can specify the requirements for this standard program. I have selected this program that can run on any platform from platform requirements.
- Select This program can run on any platform from Platform requirement.
- Enter the Estimated disk space requirements.
- Enter the Maximum Allowed run time (minutes) requirements.
- Click on the Next button to continue.
Requirements:
• Platforms supported: Any
• Maximum allowed runtime(minutes): 120

From the Summary tab, you can confirm the settings on the Create Package and Program Wizard. Click on the Next and Close buttons to complete the process of creating the Abode Acrobat package using the WinGet tool.
Data Source Configuration for SCCM Package
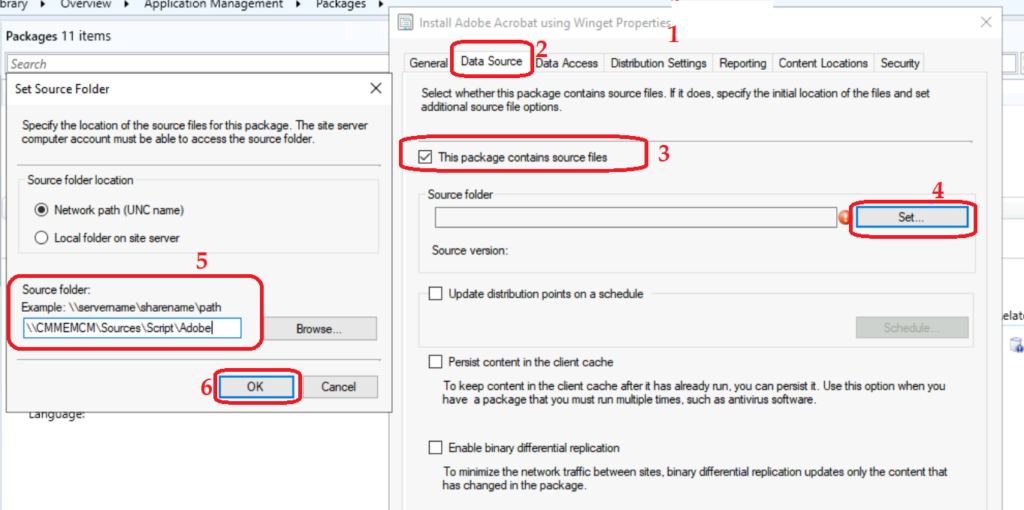
You need to select the source path of the PS1 script (Adobe-install.ps1) that is used in the above section.
- You need to select the package that you created above and select properties.
- Select Data Source tab from the properties.
- Enable the following option called “This Package contains source files.”
- Click on the SET button.
- From Set Source Folder window and Select Network path (UNC) for Adobe-install.ps1 file.
- Click OK and OK to complete the process.
Deploy Adobe Acrobat SCCM Package | WinGet Tool
Let’s try to deploy the Adobe acrobat SCCM package (the WinGet tool) that you created above. This is where you distribute the content to DPs and assign the package to the collection.
- Select the SCCM package created above and Click on the Deploy button from the ribbon menu.

You need to select the Collection from the General tab from Deploy Software Wizard.
- Click on the Browse button to select the device collection.
- Click on the Next button to continue.

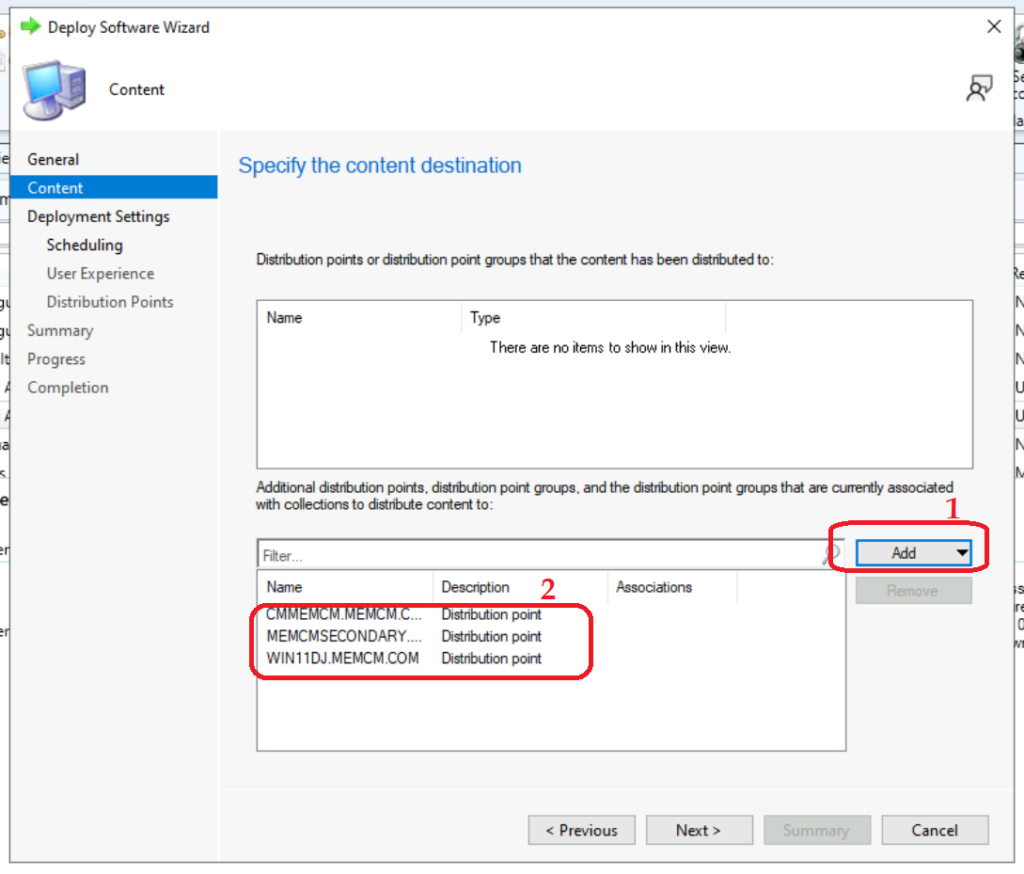
From the Content tab, you need to distribute the content (PS1 script in this case). You can use the Add button to distribute the content to DPs.
- Click on Add – Add Distribution Points.
- Select the DPs from the list.
- Click on the Next button to continue.
SCCM Package General Settings:
• Software: Install Adobe Acrobat Reader using WinGet and SCCM (Install Adobe Acrobat using Winget)
• Collection: HTMD Static Collection (Member Count: 1)
• Use default distribution point groups associated with this collection: Disabled
• Automatically distribute content for dependencies: Disabled
From the Deployment settings tab, specify settings to control this deployment.
- Select Action: Install.
- Select Purpose: Purpose.
- Click on the Next button to continue.
SCCM Deployment Settings:
• Action: Install
• Purpose: Required
• Pre-deploy software to the user’s primary device: Disabled
• Send wake-up packets: Disabled
• Allow clients to use a metered Internet connection to download content: Disabled

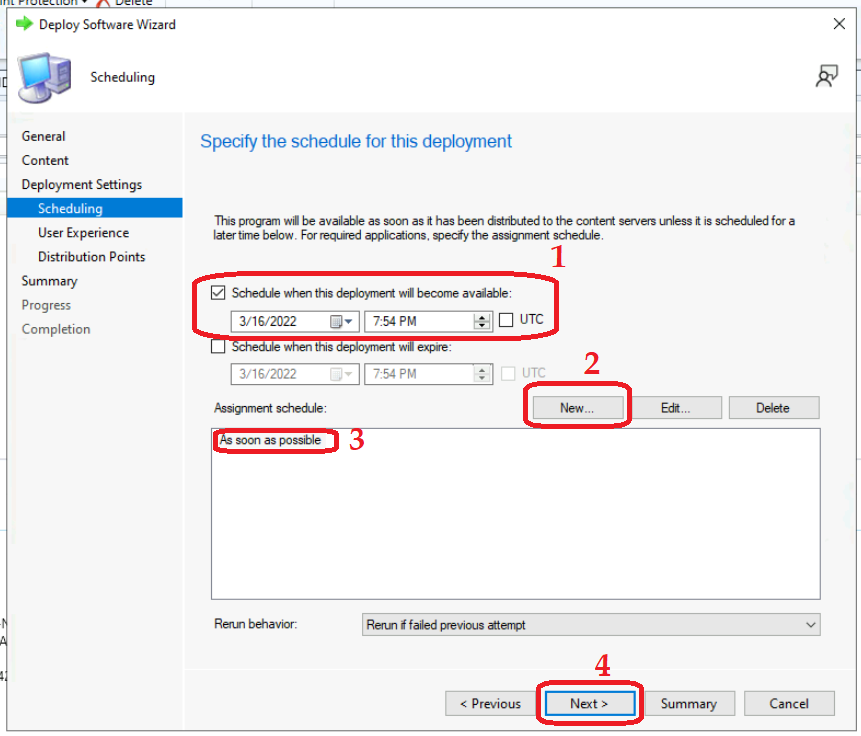
From the scheduling tab, specify the schedule for this deployment as explained in the screenshot below.
- Configure Schedule when this deployment will become available option as per your requirement. This is to make the software available for users.
- Click on the New button to make Assignment schedule – I have selected As soon As Possible for this scenario.
SCCM Package Scheduling options:
• Schedule when this deployment will become available: 3/16/2022 7:54:15 PM (Local)
• Schedule when this deployment will expire: Disabled
• Assignment schedule: As soon as possible;
• Rerun behavior: Rerun if failed previous attempt
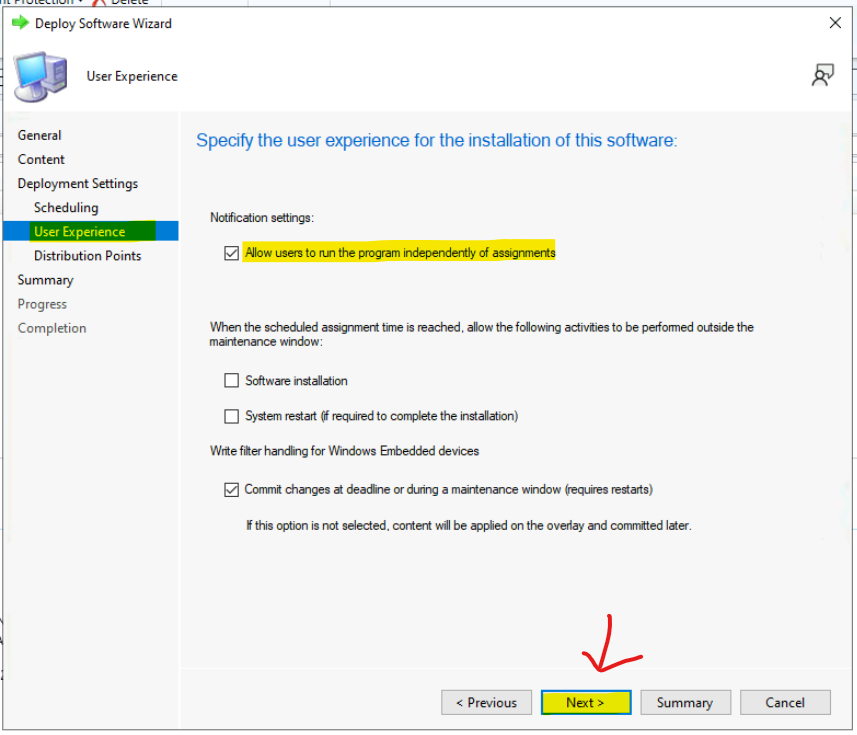
From the User Experience tab, you need to go either with the default option or customize it as per your requirement. I have selected the following options, as shown in the screenshot below.
- I have configured Notification Setting for the Abode Acrobat Winget package to Allow Users to run the program independently of assignments.
- Click on the Next button to continue.
SCCM User Experience:
• Allow users to run the program independently of assignments: Enabled
• Software installation: Disabled
• System restart (if required to complete the installation): Disabled
• Allow task sequence to run for a client on the Internet: Disabled
• Commit changes at the deadline or during a maintenance window (requires restarts): Enabled
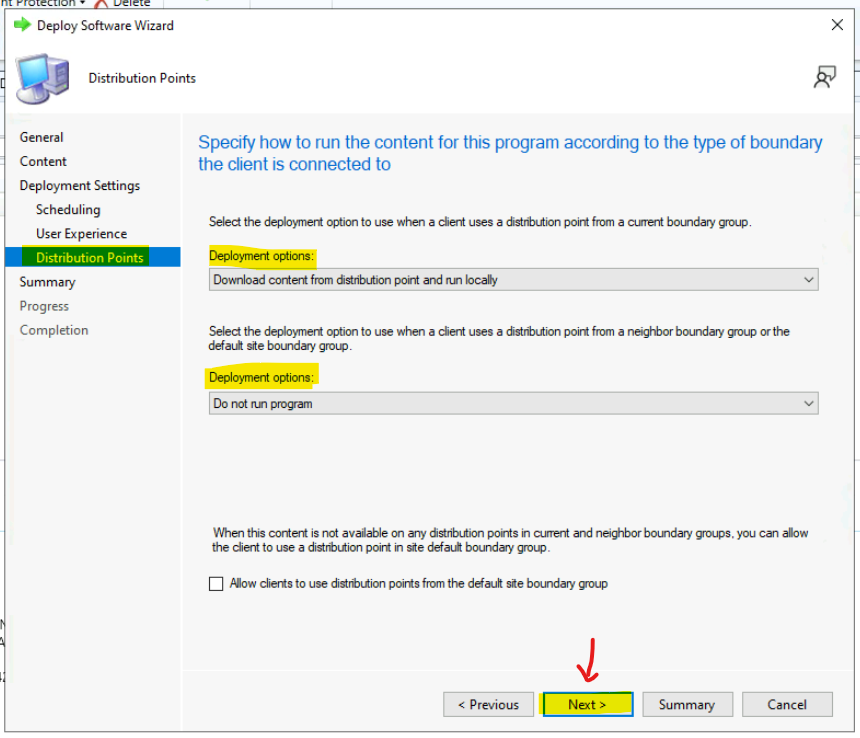
From the Distribution tab, Specify how to run the content for this program according to the type of boundary the client is connected to.
- Select Deployment Options when the client is within the current Boundary Group– Download Content from Distribution Point and locally.
- Select the deployment option to use when a client uses a DP from a neighbor boundary group or default site boundary group – Do not run program.
- Click on the Next button to continue.
Distribution Points
• Select the deployment option to use when a client uses a distribution point from a current boundary group.: Download content from distribution point and run locally
• Select the deployment option to use when a client uses a distribution point from a neighbor boundary group or the default site boundary group.: Do not run the program
• Allow clients to use a fallback source location for content: Disabled
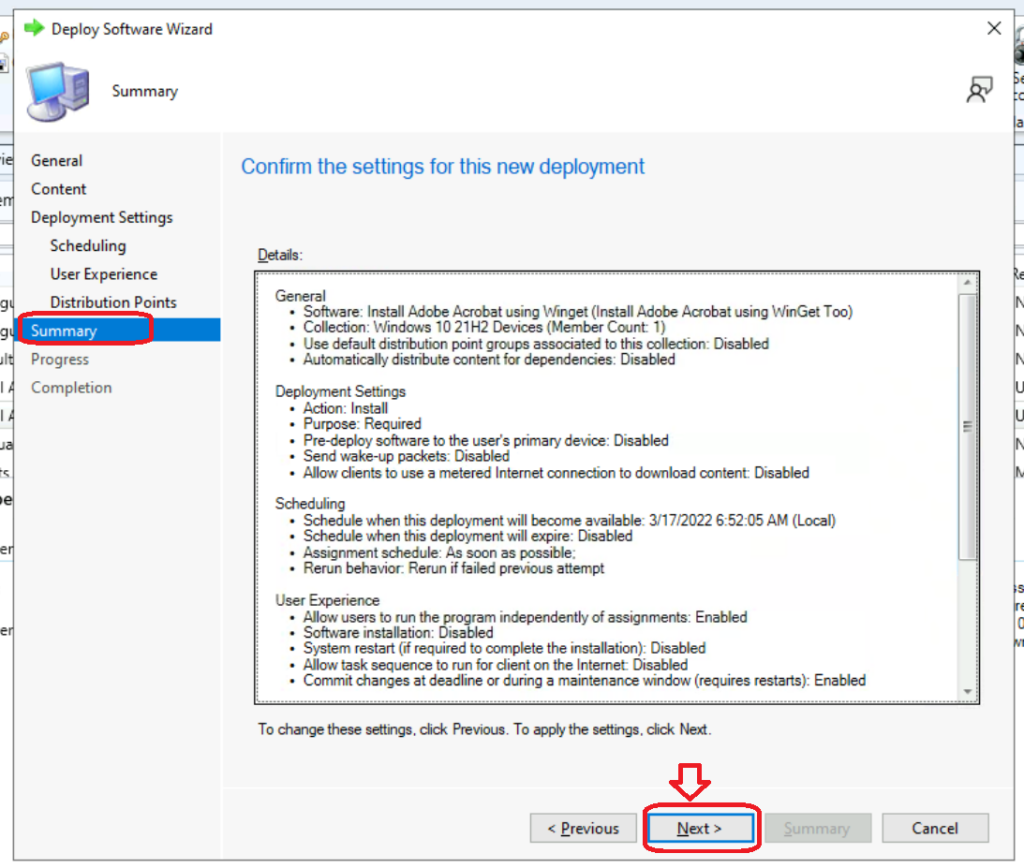
From the summary tab of SCCM Deploy Software Wizard, confirm the setting for this new deployment.
- Click on the Next button to continue.
On the Completed page, you can check the deploy software wizard status and confirm whether everything is OK. Click the Next.
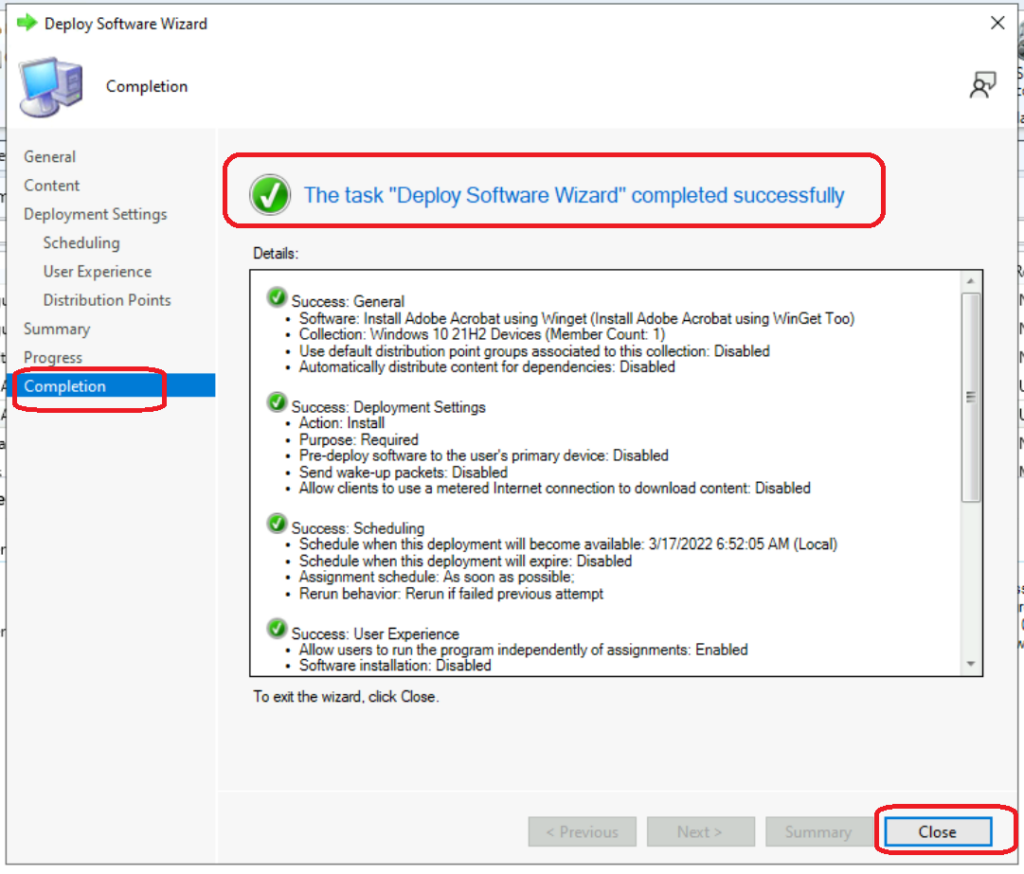
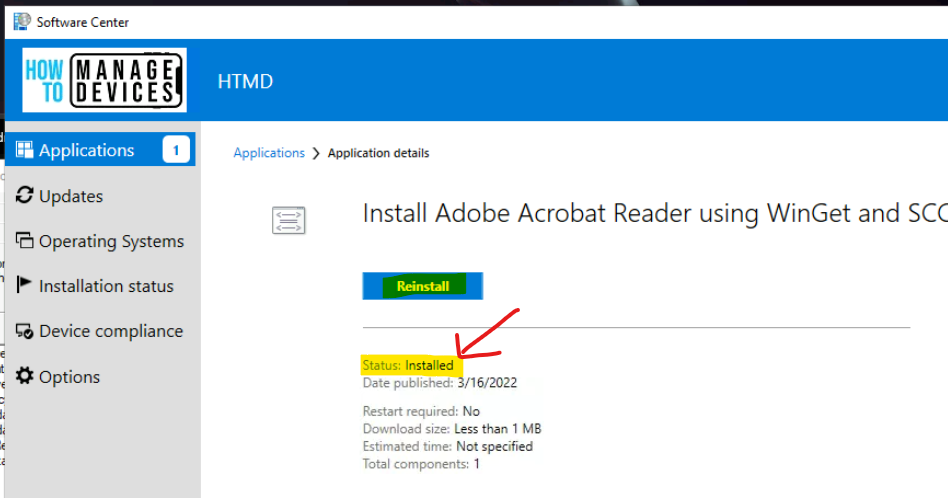
Results – Adobe Acrobat is Installed Successfully on Windows 11 using WinGet Tool and SCCM
You can confirm the successful installation of Adobe Acrobat on a Windows 11 device using the WinGet PS script and SCCM classic package. You can check the Software Center to ensure the successful installation of the software.
You can check on Start Menu – All Apps from Windows 11 device to confirm and launch the Adobe Acrobat app.

Resource
Evolving the Microsoft Store for Business and Education – Microsoft Tech Community

Do you have pre-req script to enable Windows package manager for devices that may not have the correct apps to enable use Winget?
This tool is so beutifuly simple and dumn in the same time. You said it has been installed, but how? The Acrobat DC needs to have elevated rights to install, and you’ve setup the deployment with user rights. When the install kicked in you’ve authenticate yourself with a different admin account, and this suppose to be the way? If you have 100k computers each and every time when we’d like to install something we must release it user rights and type in the admin password, 100k times?
This tool could be so powerfull for a Devops or a Sysadmin, whom would like to install / update / uninstall all of the machines software with a nice little script, and this defenetly would able to do it, but you cannot because the application cannot run in system context, or without log in with an admin user to the machine. WTF MS?!?!?
This tool is beutiful and simple,
but it’s dumn,
and stupid.
I was trying to uninstall firefox using winget and it shows successful on PowerShell/cmd but the uninstallation UI came up and I had to do it manually even if I used –silent. So why it showed success when it actually did not.
Great write-up!
I’d have added a requirement of Windows 10 or 11 only, as these are the only supported options for WinGet according to Microsoft.
I’m curious about the options you chose for the DP locations. Why not allow it to run from a neighboring Boundary group or the default? If it’s only a one-line PowerShell script as the payload, it would be a minimal impact. Is it just a best practice you are following?