Let’s learn Security Settings for Windows 11 and Hardening options. Nowadays, Safety and security are very important. Security is challenged in all aspects of our daily lives; It is also challenging that our window system is secure; Windows security is included in Windows 11, which provides the latest antivirus protection.
Windows 11/10 hardening options are listed in the CIS best practices. In this post, I explained the Windows settings and Group Policy settings for Windows security in Windows 11. Microsoft Defender policies are also part of Windows security policies. You can check out more details on Microsoft Defender antivirus policies.
Windows security is built-in to Windows; It includes an antivirus program called Microsoft Defender Antivirus. Suppose you installed another antivirus app on your PC and turned it ON. In that case, the Microsoft Defender antivirus will turn OFF automatically, and if you uninstall the app, the MS Defender Antivirus is turned on automatically.
Windows Security is the computer home that helps you manage the tools that protect your device and data. Windows security includes the features such as Account Protection, App and browser protection, Device performance and health, Device security, and Enterprise customization.
- 3 Ways to Configure Microsoft Defender Antivirus Policies for Windows 11 using Group Policy Intune Policy
- 4 Methods Disable Enable Edge Browser Autofill Inputs
What are the Features of Windows Security in Windows 11
Microsoft’s Windows Security is formerly known as Windows Defender. It includes antivirus scans, ransomware protection, and parental controls. The following are the features of Windows security in Windows 11.
1. It helps to detect the latest threats
2. It helps to access sign-in options and account settings
3. It Manage firewall settings
4. It Update settings for Microsoft Defender SmartScreen
5. It protects your device from attack
6. Helps to view status info about your device’s performance and health
Windows Security in Windows 11 – Windows Settings
Windows security in Windows 11 helps you monitor your device’s threats, run scans, and get updates to help detect the latest threats. The following are the steps to understand and customize Windows security features.
- Select Settings from the Start menu
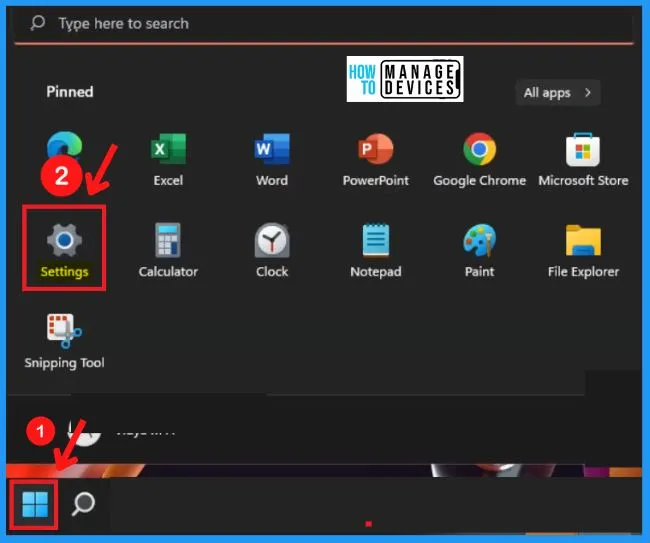
Privacy refers to the user’s ability to control, access, and regulate personal information. Security refers to the system that protects that data from getting into the wrong hands.
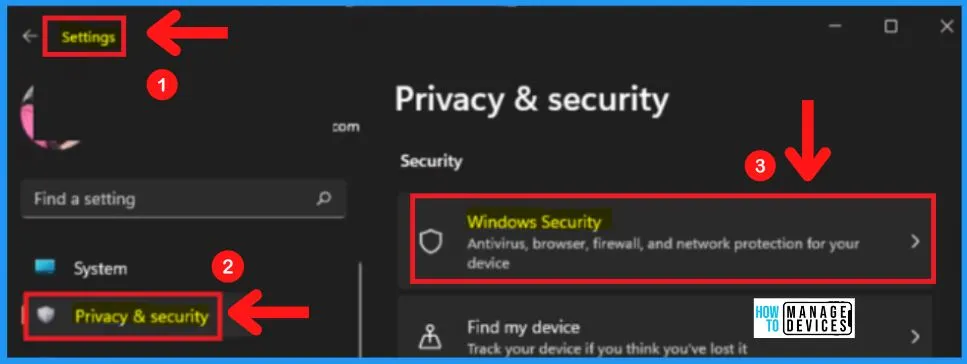
- Select Privacy & security tab from the settings page
- The privacy & security tab shows the Windows security
- Select Windows security from the below screenshot
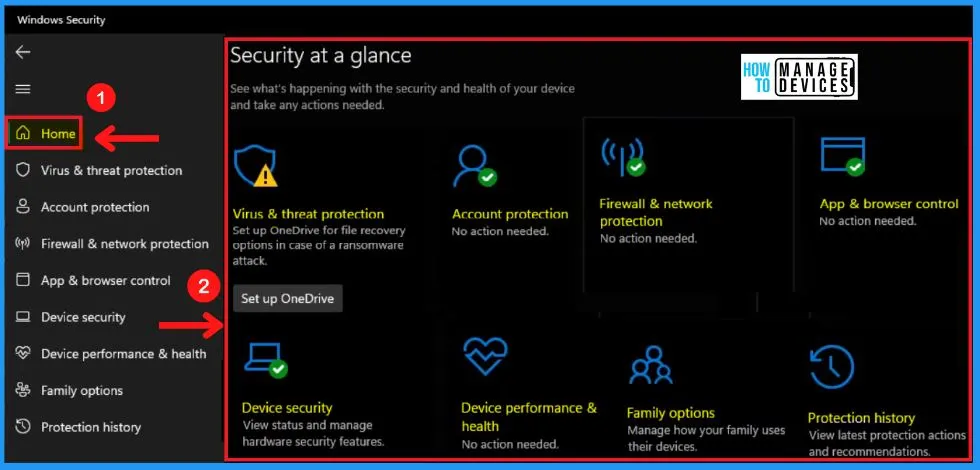
Windows security includes the settings such as Virus & threat protection, Account protection, Firewall & Network Protection, App & browser control, Device security, Device performance & health, Family options, and Protection History. The below screenshot and table show the Windows security in Windows 11.
A detailed explanation of windows security in Windows 11 is in the “3 Ways to Configure Microsoft Defender Antivirus Policies for Windows 11 using Group Policy Intune Policy” post.
| Windows Security | Uses |
|---|---|
| Virus and Treat protection | It helps to monitor threats to your device and run scans. It also allows you to detect the latest threats. Virus & threat protection in Windows Security includes the Current threats, Virus & threat protection settings, updates, and Ransomware protection. |
| Account Protection | It helps you to access sign-in options and account settings. It allows the protection of your device by scanning for malware, viruses, and security threats. |
| Firewall and network protection | It helps you manage firewall settings and monitor what’s happening with your networks and internet connections. |
| App and browser control | It helps you to help protect your device against potentially dangerous apps, files, sites, and downloads. |
| Device security | It helps you to protect your device from attacks by malicious software. |
| Device performance and health | It helps to View your status info about your device’s performance health. It keeps your device clean and up to date with the latest version of Windows. |
| Family options | Help you keep track of your kids’ online activity and the devices in your household. |
| Protection History | It helps you to view the latest protection actions and recommendations from Windows security |
- Unlock Windows 11 Files using Lock Hunter Application
- Best Ways to Change Keyboard Layouts in Windows 11
Group Policy Settings – Microsoft Windows Security
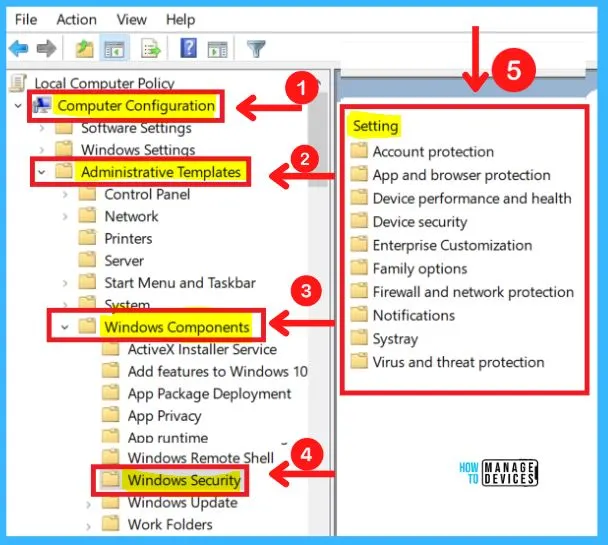
Let’s check the Group Policy settings options for windows security in Windows 11. You can use GPEIDIT.MSC from the run box to manage group policy settings. Group policy settings help you to prevent users from accessing specific resources, running scripts, and performing simple tasks.
Microsoft Defender policies are also part of Windows security policies. You can check out more details on Windows Defender antivirus policies in the following post – 3 Ways To Configure Microsoft Defender Antivirus Policies For Windows 11 Using Group Policy Intune Policy.
Group Policy settings provide a centralized place for administrators to manage and configure operating systems, applications, and users’ locations. Windows security settings options using the group policy editor are available for Windows 11 as listed below:
- Account Protection
- App and browser protection
- Device performance and health
- Device security
- Enterprise customization
- Family options
- Firewall and network protection
- Notifications
- Systray
- Virus and Treat protection
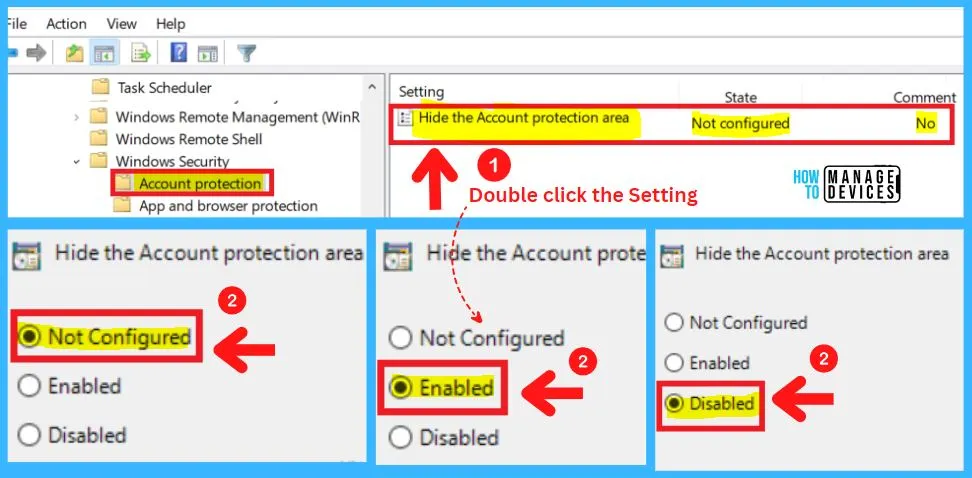
1. Group Policy Account Protection
You can choose from three settings to hide the Account protection in Windows Security. The below steps and the screenshot shows the Hide the Account protection area in Windows security of enabled, disabled, and not configured options.
- Enabled – The Account protection area will be hidden
- Disabled – The Account protection area will be shown
- Not configured – Same as Disabled
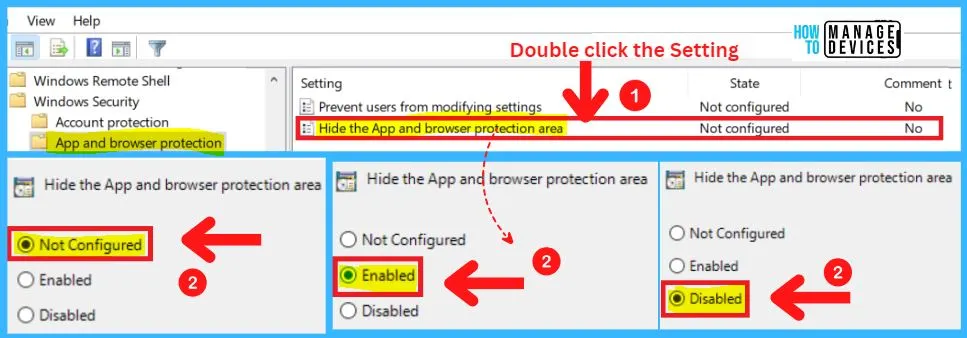
2. App and Browser Protection
The App and browser protection includes the settings such as “Hide the App and browser protection area” and the “Prevent users from modifying settings.”You can choose from three locations to hide the App and browser protection in Windows Security. They are as follows.
- Enabled – The App and browser protection area will be hidden
- Disabled – The App and browser protection area will be shown
- Not configured – The App and browser protection area will be shown: same as Disabled
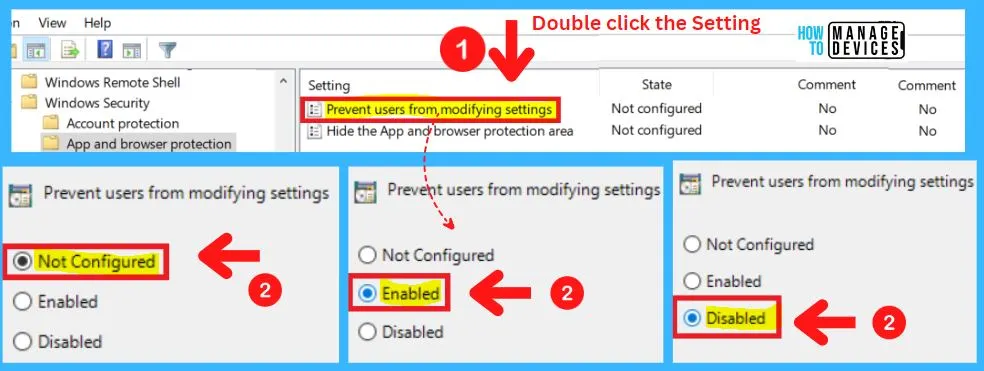
Preventing users from modifying settings in Windows security helps you to Prevent users from making changes to the exploit protection settings area in Windows security.
- Enabled – Local users can not make changes in the exploit protection settings area
- Disabled – Local users are allowed to make changes in the exploit protection settings area
- Not configured – Local users are allowed to make changes in the exploit protection settings area : same as Disabled
3. Device Performance and Health
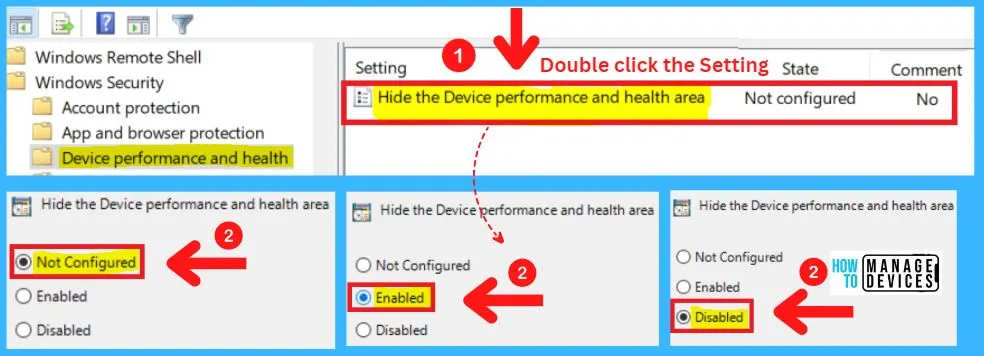
You can choose from three settings to Hide Device performance & health from Windows Security. Hide the Device performance and health area in Windows security including enabled, disabled, and not configured settings.
- Enabled – The Device performance and health area will be hidden
- Disabled – The Device performance and health area will be shown
- Not configured – Default, the same as Disabled
The below screenshot shows the device performance and health settings for enabled, disabled, and not configured.
4. Device Security
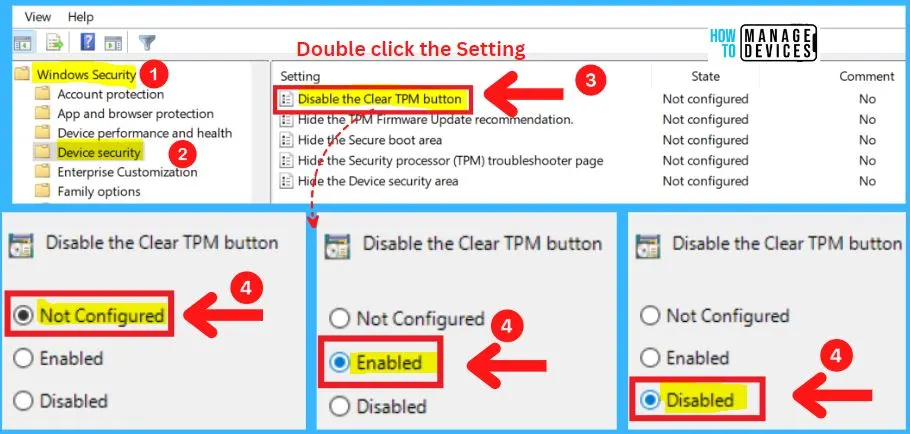
Group policy setting of Windows security includes Device security. Device security is used to disable the clear TPM button in Windows security. The Device security in group policy consists of the following settings.
- Disable the clear TPM button
- Hide the TPM firmware update recommendation
- Hide the secure boot area
- Hide the security processor(TPM) troubleshooter page
- Hide the Device security area
The below screenshot shows the “Disable the clear TPM button” settings in Device security. The Device Security in Windows security includes enabling, disabling, and not configuring settings.
- Enabled – The clear TPM button will be unavailable for use
- Disabled – The clear TPM button will be available for use
- Not configured – Default, the same as Disabled
2. Hide the TPM Firmware Update Recommendation
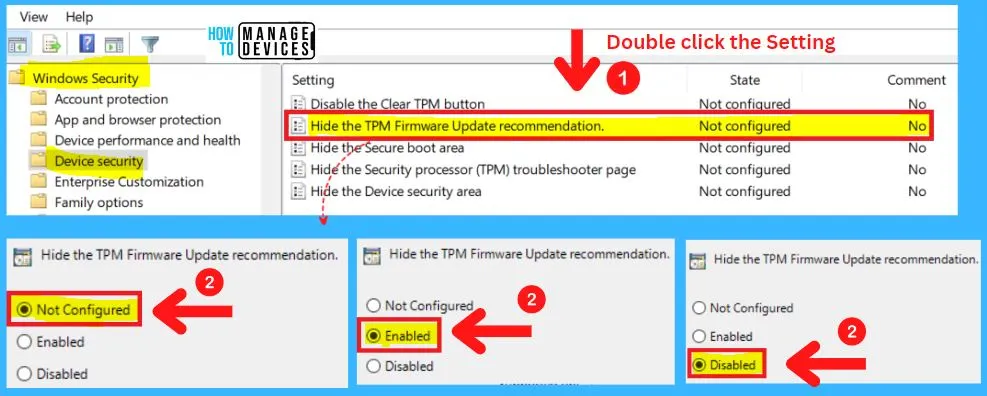
Hide the TPM firmware update recommendation in device security helps you to hide the recommendation to update TPM firmware when vulnerable firmware is detected. You can easily choose from three settings to hide the TPM firmware update recommendation in Windows Security. They are as follows.
- Enabled – Users will not be shown a recommendation to update their TPM firmware
- Disabled – Users will see a recommendation to update their TPM firmware if Windows security detects the system contains a TPM with vulnerable firmware
- Not configured – Default, the same as Disabled
3. Hide the Secure Boot Area
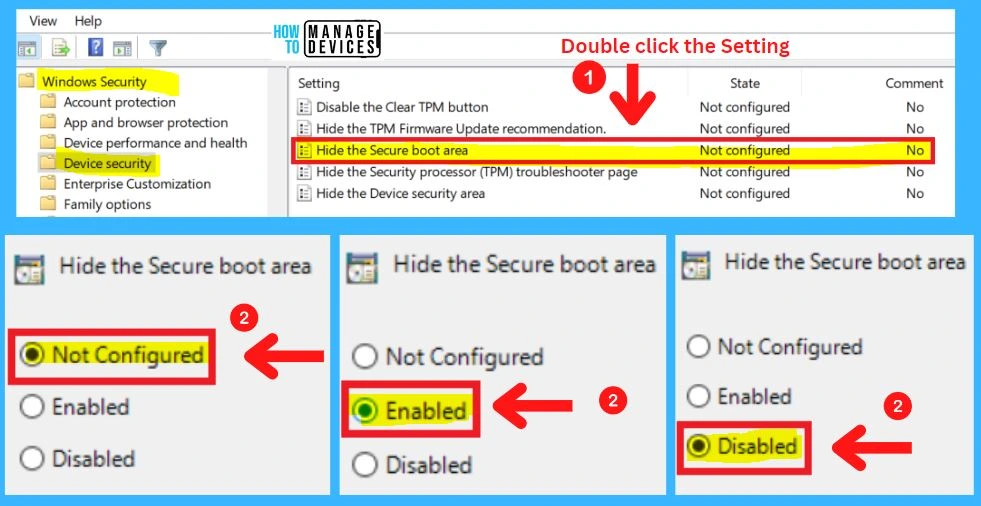
Hide the secure boot area in Device security helps you to hide the secure boot area in Windows security. There are three settings to hide the secure boot area in Windows security. The below steps and screenshot show the 3 settings to hide the certain boot area in Windows security.
- Enabled – The secure boot area will be hidden
- Disabled – The secure boot area will be shown
- Not configured – Same as disabled
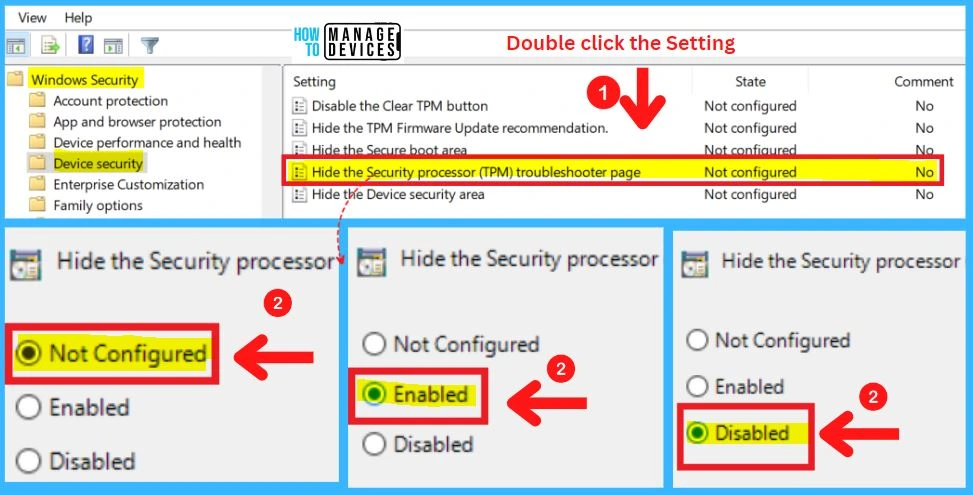
4. Hide the Security Processor(TPM) Troubleshooter Page
These Windows security settings help you hide the security processor (TPM) troubleshooting area in Windows security. You can choose 3 settings to hide the security processor troubleshooter page in Windows security. They are as follows.
- Enabled – The security processor (TPM) troubleshooting area will be hidden
- Disabled – The security processor (TPM) troubleshooting area will be shown
- Not configured – Same as disabled
5. Hide the Device Security Area
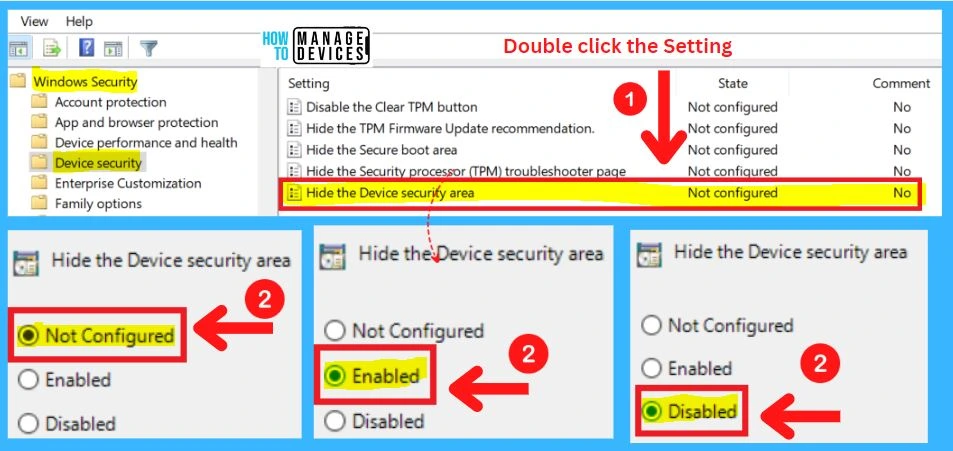
Hide the Device security area settings in Windows security helps you to hide the Device security area in Windows security. You can choose the 3 settings to hide the Device security area in Windows security. The following are the settings to hide the Device security area in Windows security.
- Enabled – The Device security area will be hidden
- Disabled – The Device security area will be shown
- Not configured – Same as disabled
5. Enterprise Customization
Enterprise customization is part of Windows security. Enterprise customization helps to provide a controlled and specialized experience. It includes the following settings.
- Specify the contact company name
- Specify the contact email address or email ID
- Configure customized notifications
- Configure customized contact information
- Specify contact phone number or Skype ID
- Specify contact website
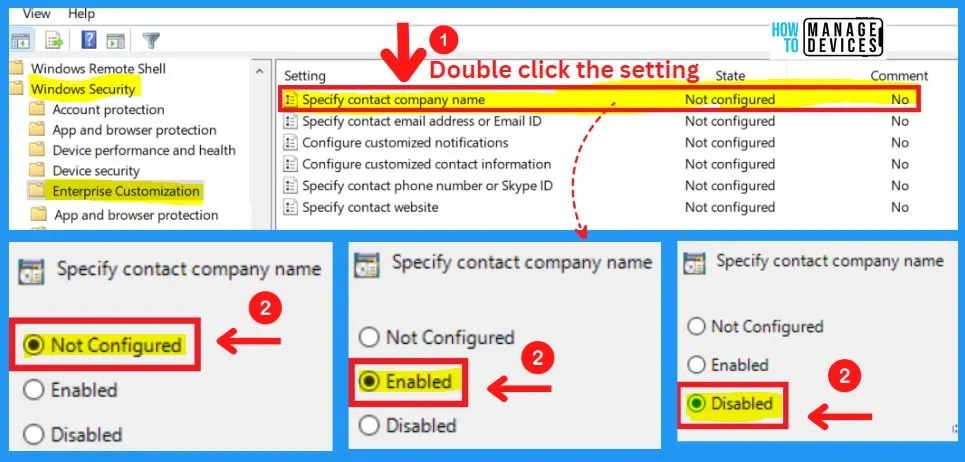
Specify contact company name is the first setting in Enterprise customization. Specify the company name that will be displayed in Windows Security and associated notifications. This setting must be enabled for any contact information to appear.
- Enabled – Enter the company name in the Options section
- Disabled – Company information will not be shown at all in either Windows Security or any notifications that it creates
- Not configured – Same as Disabled
2. Specify Contact Email Address or Email ID
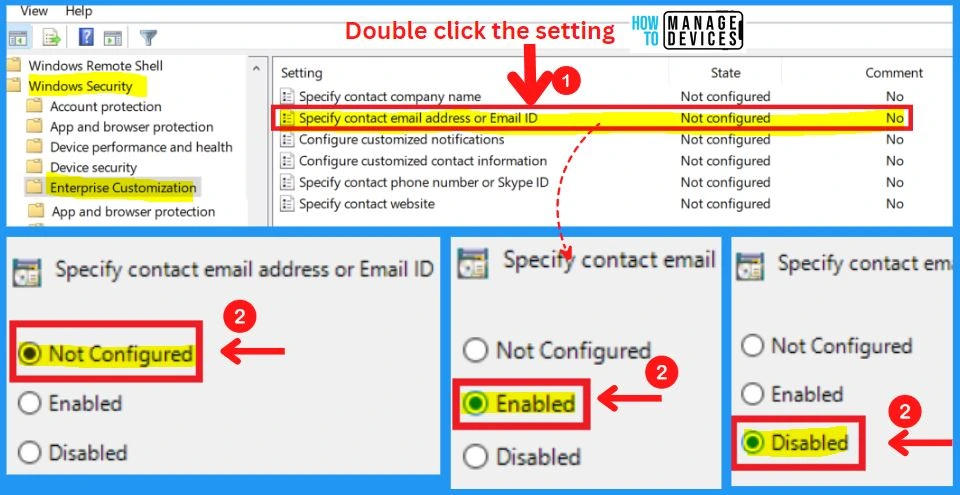
Specify the email address or email ID that will be displayed in Windows Security and associated notifications. Users can click on the contact information to create an email that will be sent to the specified address. The default email application will be used.
- Enabled – Enter the email address or email ID in the Options section
- Disabled – A contact email address or email ID will not be shown in either Windows Security or any notifications it creates
- Not configured – Same as Disabled
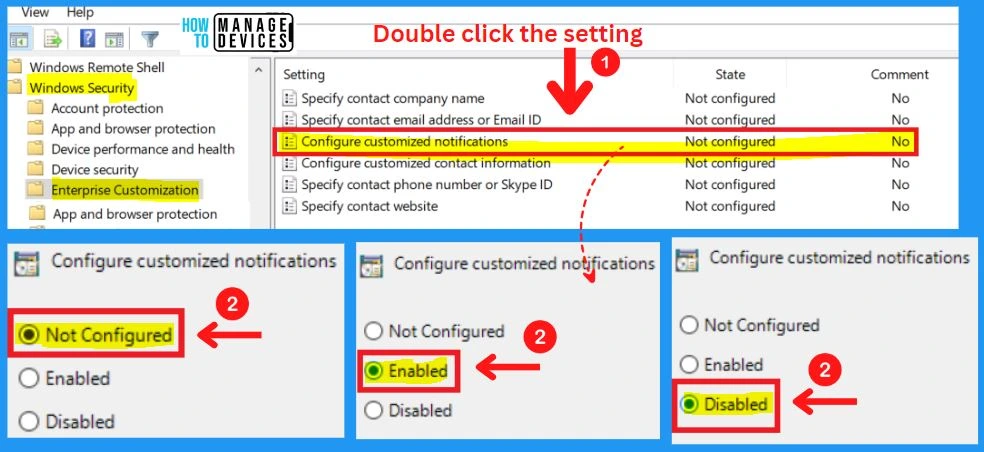
3. Configure Customized Notifications
Display specified contact information to local users in Windows Security notifications. You can choose the 3 settings to configure customized notifications in Windows security. They are as follows.
- Enabled – Your company contact information will be displayed in notifications that come from Windows Security
- Disabled – No contact information will be shown on notifications
- Not configured – Same as Disabled
After setting this to Enabled, you must configure the Specify contact company name GP setting and at least one of the following GP settings.
- Specify contact phone number or Skype ID
- Specify the contact email number or Email ID
- Specify contact website
Note! Sometimes, we will limit the contact options displayed based on the available notification space.
4. Configure Customized Contact Information
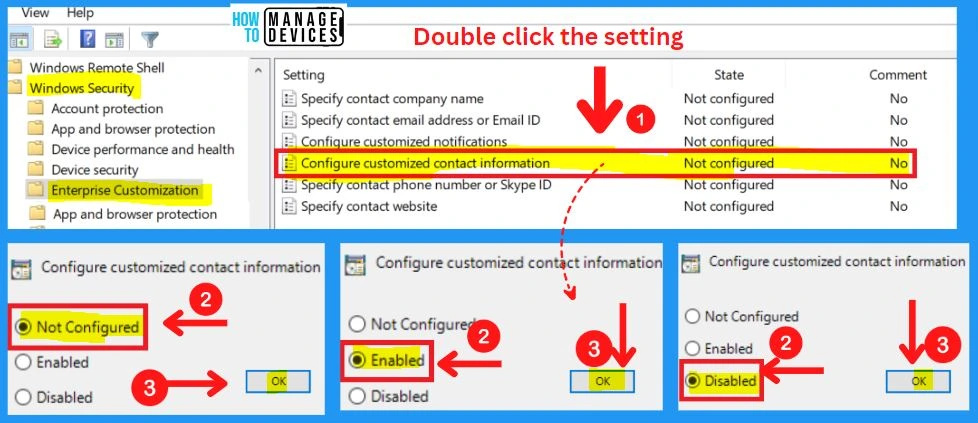
Display specified contact information to local users in a contact card flyout menu in Windows Security. You can choose the 3 settings enabled, disabled, and not configured to configure customized contact information in Windows security. They are as follows.
- Enabled – Your company contact information will be displayed in a flyout menu in Windows Security
- Disabled – No contact information will be shown in Windows Security
- Not configured – Same as Disabled
After setting this to Enabled, you must configure the Specify contact company name GP setting and at least one of the following GP settings.
- Specify contact phone number or Skype ID
- Specify the contact email number or email ID
- Specify contact website
5. Specify Contact Phone Number or Skype ID
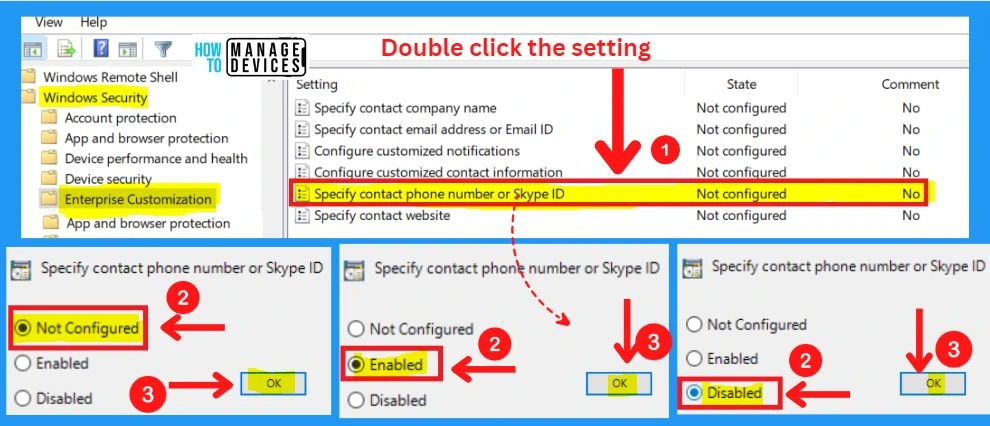
Specify the phone number or Skype ID that will be displayed in Windows Security and associated notifications. Users can click on the contact information to automatically call the supplied number. Skype will be used to initiate the call.
- Enabled – Enter the phone number or Skype ID in the Options section
- Disabled – A contact phone number or Skype ID will not be shown in either Windows Security or any notifications it creates.
- Not configured – Same as Disabled
6. Specify Contact Website
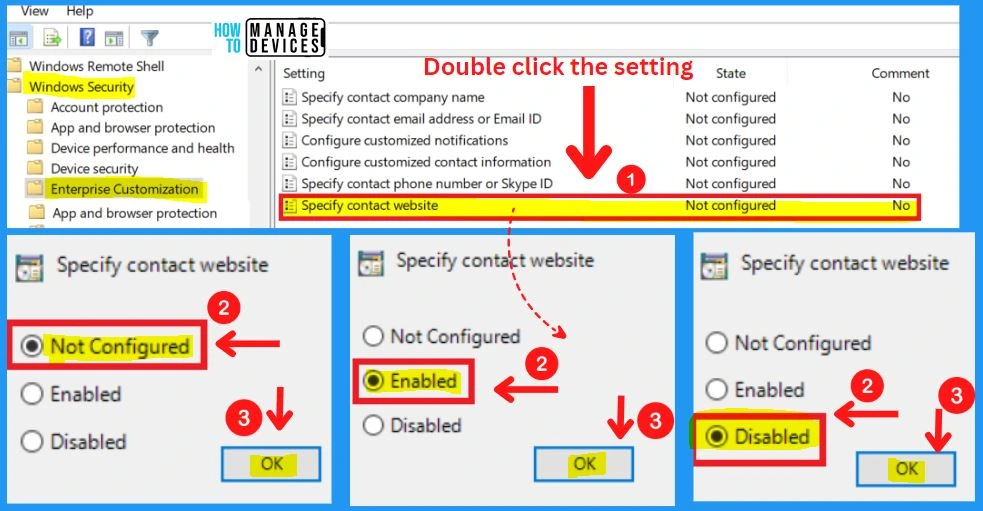
Specify the URL that will be displayed in Windows Security and associated notifications. Users can click on the contact information to visit the specified website. The default web browser will be used.
- Enabled – Enter the URL in the Options section
- Disabled – A contact website URL will not be shown in either Windows Security or any notifications it creates
- Not configured – Same as Disabled
- How to Install Additional Language in Windows 11| Keyboard Layout
- Windows 11 Enhanced Password Phishing Protection
Family Options in Windows Security
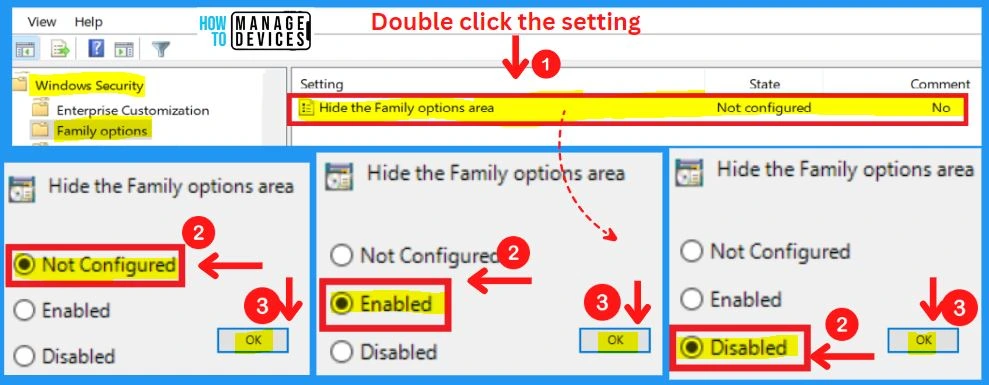
Family options are one of the important security areas in Windows security. Family options in Windows security show the hide the family options area setting. The following are the 3 settings to Hide the family options area in Windows security.
- Enabled – The Family options area will be hidden
- Disabled – The Family options area will be shown
- Not configured – Same as Disabled
Firewall and Network Protection
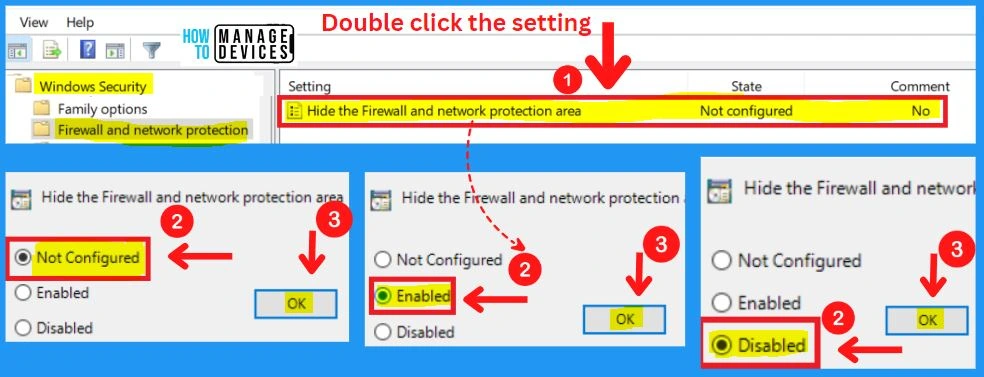
Firewall and network protection in Windows security include the “hide the firewall and network protection area” setting. You can use the following 3 settings to hide the firewall and network protection area.
- Enabled – The Firewall and network protection area will be hidden
- Disabled – The Firewall and network protection area will be shown
- Not configured -Same as Disabled
Notifications
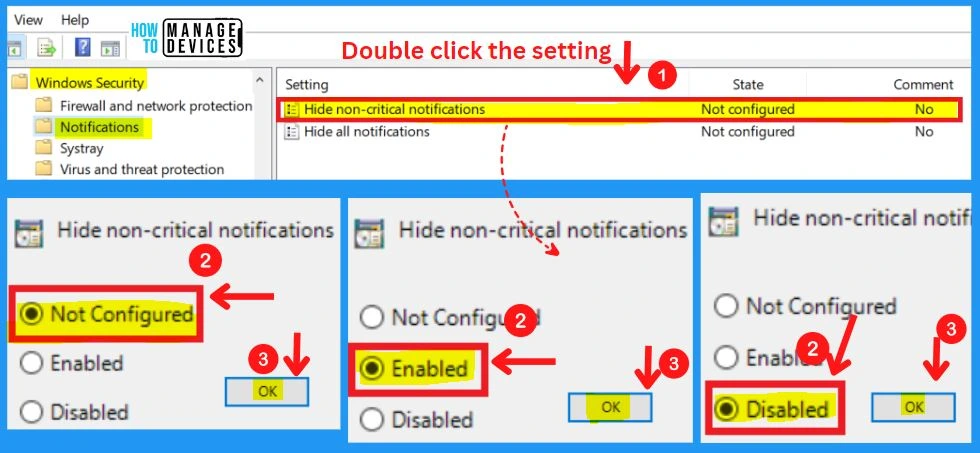
Notifications include 2 settings options: Hide non-critical notifications and Hide all notifications. Only show critical notifications from Windows Security. If the Suppress all notifications GP setting has been enabled, this setting will have no effect.
- Enabled – Local users will only see critical notifications from Windows Security. They will not see other types of notifications, such as regular PC or device health information
- Disabled – Local users will see all types of notifications from Windows Security
- Not configured – Same as Disabled
Hide All Notification
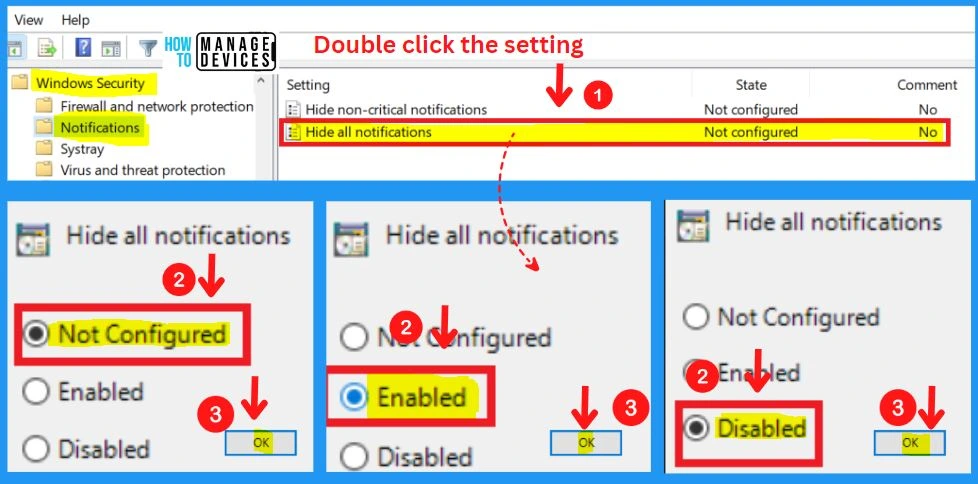
Hide notifications from Windows Security. If the settings is Enabled – Local users will not see notifications from Windows Security. And if it’s Disabled – Local users can see notifications from Windows Security.
- Not configured – Same as Disabled.
Systray – Security Settings for Windows 11 Hardening options
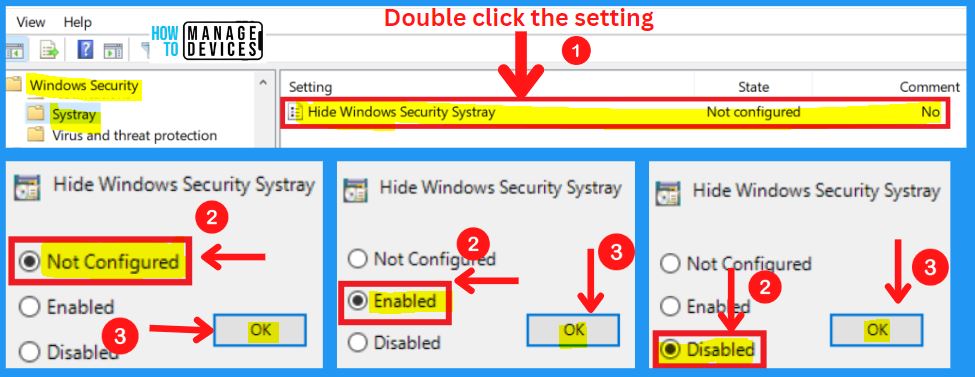
This policy setting hides the Windows Security notification area control. The user needs to either sign out and sign in or reboot the computer for this setting to take effect.
- Enabled – Windows Security notification area control will be hidden
- Disabled – Windows Security notification area control will be shown
- Not configured – Same as Disabled
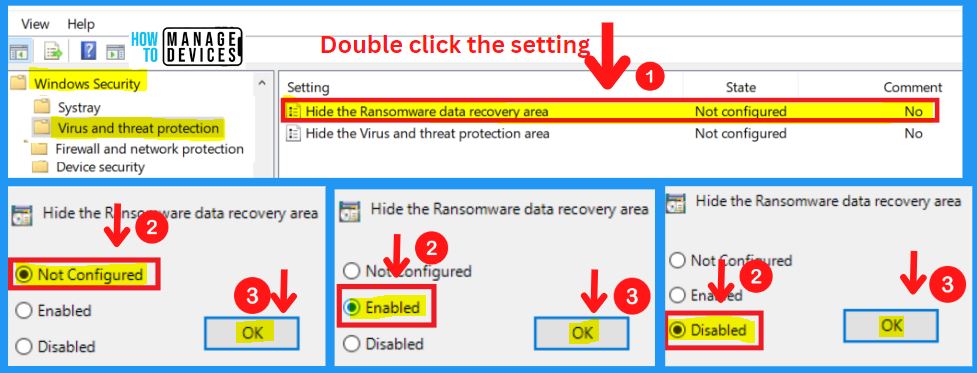
Hide the Ransomware data recovery area in Windows Security. Enabled -The Ransomware data recovery area will be hidden, Disabled – The Ransomware data recovery area will be shown; Not configured – Same as Disabled.
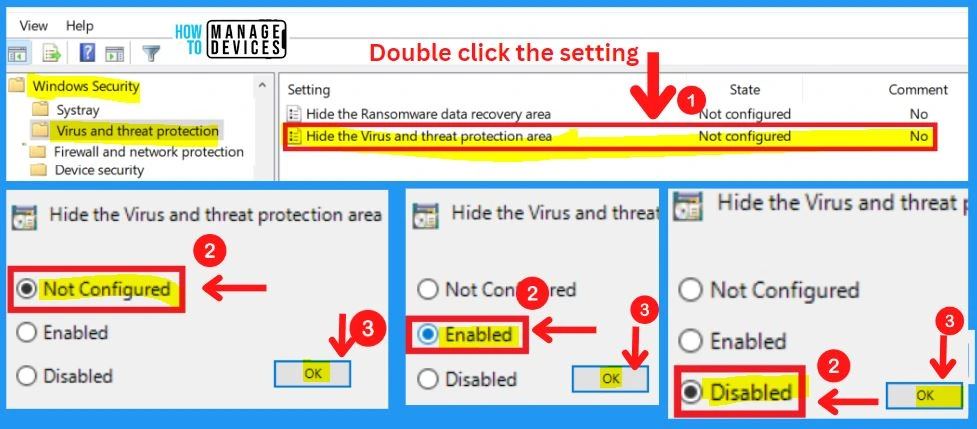
Intune Policies – Security Settings for Windows 11 Hardening options
Let’s now check the Intune Policies – Security Settings for Windows 11 Hardening options. The Windows 11 hardening options are not only the ones mentioned in the above section and Microsoft Defender policies but need many other policies explained by CIS.
Let’s look at Intune policy options to Enable or Disable Windows Security related policies mentioned in the CIS documentation. We have already seen 2 methods to do this in this post and the Intune settings catalog method achieves the same.
- Search with “Microsoft Defender” in the Settings picker search box.
- Select any of the following categories “Microsoft Defender/Device Guard/Firewall/Local Policies Security Options.”
- Keep the policy’s settings DISABLED or ENABLE if you want to.
- Repeat the above steps with the search keyword Device Guard, Firewall, Local Policies Security Options
NOTE! – More details on Intune settings catalog guide – Create Intune Settings Catalog Policy.
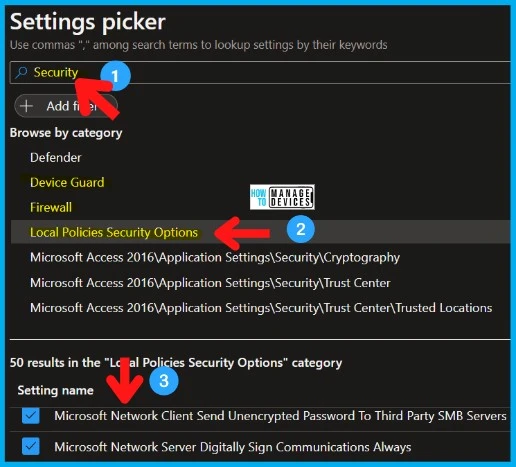
With the settings catalog, you can choose which settings you want to configure. Click on Add settings to browse or search the catalog for the settings you want to configure. 50 results in the “Local Policies Security Options” category.
| Security Settings for Windows 11 Hardening options – Local Policies |
|---|
| Interactive Logon Smart Card Removal Behavior |
| Microsoft Network Client Digitally Sign Communications Always |
| Microsoft Network Client Digitally Sign Communications If Server Agrees |
| Microsoft Network Client Send Unencrypted Password To Third Party SMB Servers |
| Microsoft Network Server Digitally Sign Communications Always |
| Microsoft Network Server Digitally Sign Communications If Client Agrees |
| Network Access Do Not Allow Anonymous Enumeration Of SAM Accounts |
| Network Access Do Not Allow Anonymous Enumeration Of Sam Accounts And Shares |
| Network Access Restrict Anonymous Access To Named Pipes And Shares |
| Network Access Restrict Clients Allowed To Make Remote Calls To SAM |
| Network Security Allow Local System To Use Computer Identity For NTLM |
| Network Security Allow PKU2U Authentication Requests |
| Network Security Do Not Store LAN Manager Hash Value On Next Password Change |
| Network Security LAN Manager Authentication Level |
| Network Security Minimum Session Security For NTLMSSP Based Clients |
| Network Security Minimum Session Security For NTLMSSP Based Servers |
| Network Security Restrict NTLM Add Remote Server Exceptions For NTLM Authentication |
| Network Security Restrict NTLM Audit Incoming NTLM Traffic |
| Network Security Restrict NTLM Incoming NTLM Traffic |
| Network Security Restrict NTLM Outgoing NTLM Traffic To Remote Servers |
Author
About Author – Vidya is a computer enthusiast. She is here to share quick tips and tricks with Windows 11 or Windows 10 users. She is also keen to find solutions to day-to-day tech problems and write about them.
