Let’s learn the 6 Methods to Check Wi-Fi Network Signal Strength in Windows 11. Wi-Fi is a Wireless networking technology that allows devices such as computers, mobile devices, and other equipment to interface with the Internet.
Wi-Fi is a family of wireless network protocols commonly used for local area networking of devices and Internet access. Wi-Fi is a wireless local area network (WLAN) technology and standard that uses high-frequency radio waves to provide wireless Internet and network connections to your Windows device.
A weak Wi-Fi signal can lead to slower speeds, dropouts, and disconnection. The further away the device is from the router, the weaker the signal can get. Even our wall materials, concrete or brick, may weaken or block a wi-fi signal.
Wireless networks are essential for business today, offering constant connectivity, flexibility, and real-time data access. It allows nearby digital devices to exchange data by radio waves.
- 11 Best Fixes for Windows 11 WiFi Connection Issues in 2024
- Enable Flash Screen During Audio Notifications in Windows 11
- How to Find Wi-Fi Network Password in Windows 11
- Reset Network Adapters in Windows 11 FIX Connection Issues
- Microsoft Vs Palo Alto Networks XDR and EDR Vendors as per Forrester
- Network and Internet Settings options in Windows 11
- How to Share Files Folders on Network in Windows 11
What are the Features of a Wi-Fi Network?

A Wi-Fi network is an internet connection shared with multiple devices in a home or business via a wireless router. Wi-Fi establishes an internet connection for individual and public use. Some important features are given below.
1. It provides Internet access with wireless routers
2. It encrypts the radio signal through WPA encryption
3. It helps to transmit data at high speed
4. It allows devices to connect to a network without physical cables.
5. It protects against unauthorized access and hacking.
6 Methods to Check Wi-Fi Network Signal Strength in Windows 11
We can use different methods to check the Wi-Fi network signal strength. The table below shows the details.
| Different Methods Used to Check Wi-Fi Signal Strength |
|---|
| 1. Check Wi-Fi Network Signal Strength on Taskbar Corner |
| 2. Check Wi-Fi Network Signal Strength in Quick Settings |
| 3. Check Wi-Fi Network Signal Strength in Settings |
| 4. Check Wi-Fi Network Signal Strength in Task Manager |
| 5. Check Wi-Fi Network Signal Strength in the Network and Sharing Center |
| 6. Check Wi-Fi Network Signal Strength Percentage using Command |
1. Check Wi-Fi Network Signal Strength on the Taskbar Corner
This is the first and easiest way to check the Wi-Fi network signal strength. We can see the signal in the Taskbar corner. The screenshot below gives details about where the signal strength is shown.

2. Check Wi-Fi Network Signal Strength in Quick Settings
Quick Settings is the second method to check the strength of the Wi-Fi network signal. To check this, click the Taskbar corner Wi-Fi options and the connected Wifi symbol’s arrow (next to the Wi-Fi symbol).
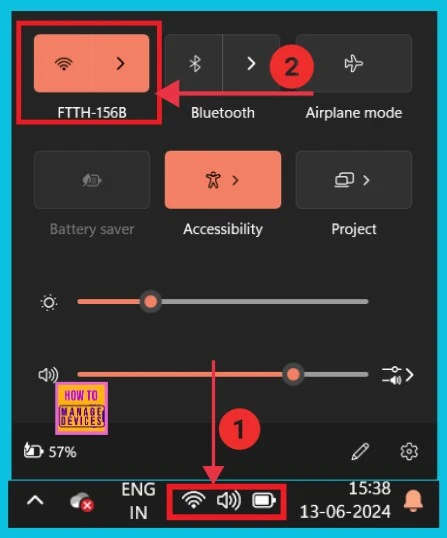
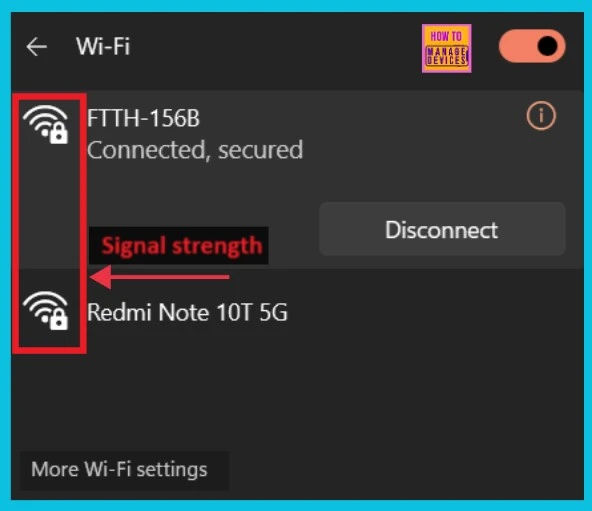
After clicking the arrow mark, we can see all the Wi-Fi or hotspots and their signal strength, connected or near them.
- How to Show Details Pane in File Explorer of Windows 11
- Turn On or Off Facts Tips Tricks Notification on Lock Screen in Windows 11
3. Check Wi-Fi Network Signal Strength in Settings
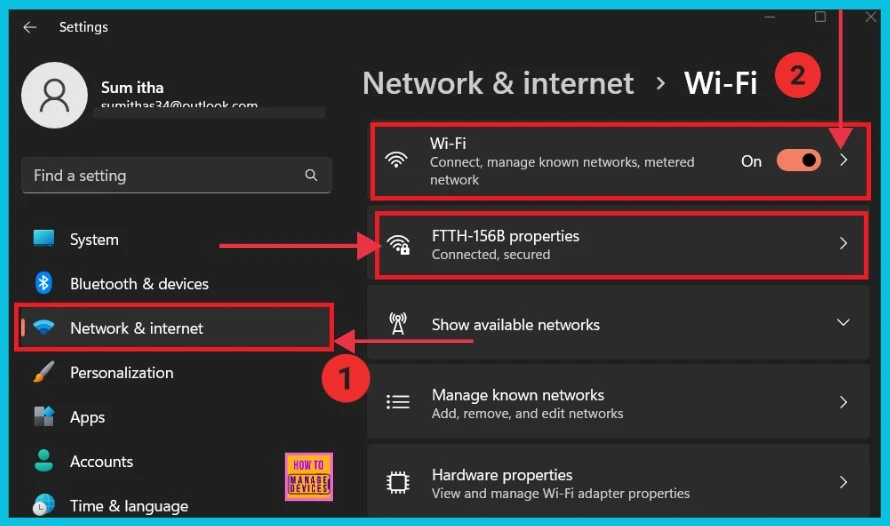
The Settings App is the third method for checking the Wi-Fi network signal strength. First, open Settings (Win+I). Click Network & Internet from the settings option. Then click the Wi-Fi arrow on the right side. Here, we can Connect to and manage known networks and metered networks. We can see the connected network name under the Wi-Fi options by clicking the arrow.
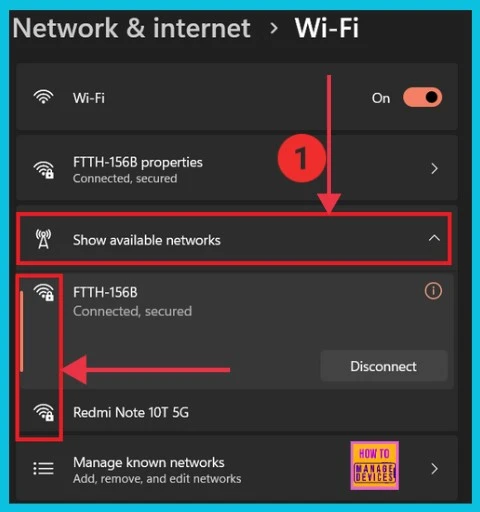
If we want to see all available networks on our PC, click the Show Available Networks option. The screenshot below gives details of connected and available networks.
4. Check Wi-Fi Network Signal Strength in Task Manager
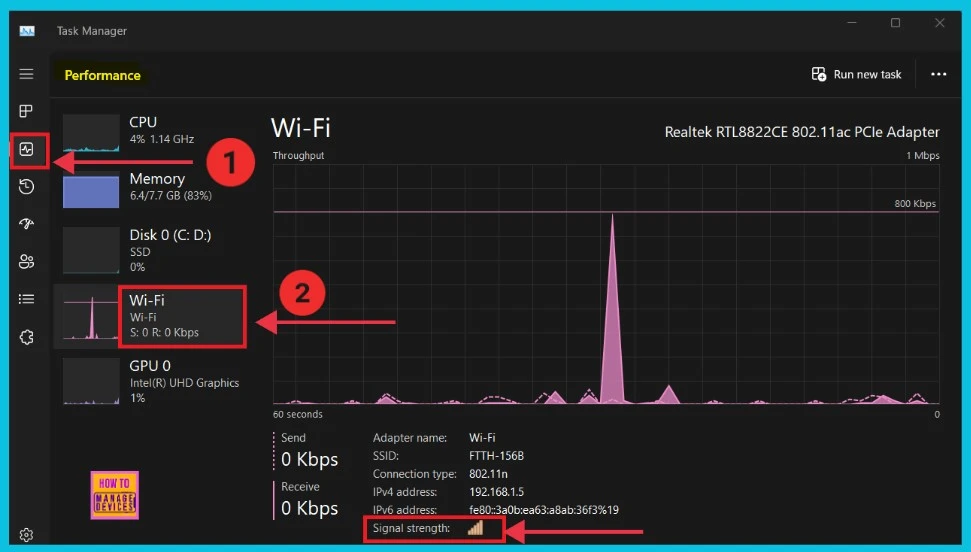
Using Task Manager, we can check the Wi-Fi network signal strength. To do so, follow the following steps.
- Open Task Manager(Ctrl+Shift+Esc)
- Click the Performance tab
- Select Wifi from the left options
- Now we can see the signal strength option at the bottom(the maximum number of lines shows the stronger signal strength)
5. Check Wi-Fi Network Signal Strength in the Network and Sharing Center
The following method checks the strength of the Wifi network signal using the Network and Sharing Center. First, you take the Control Panel from the start button to use this.
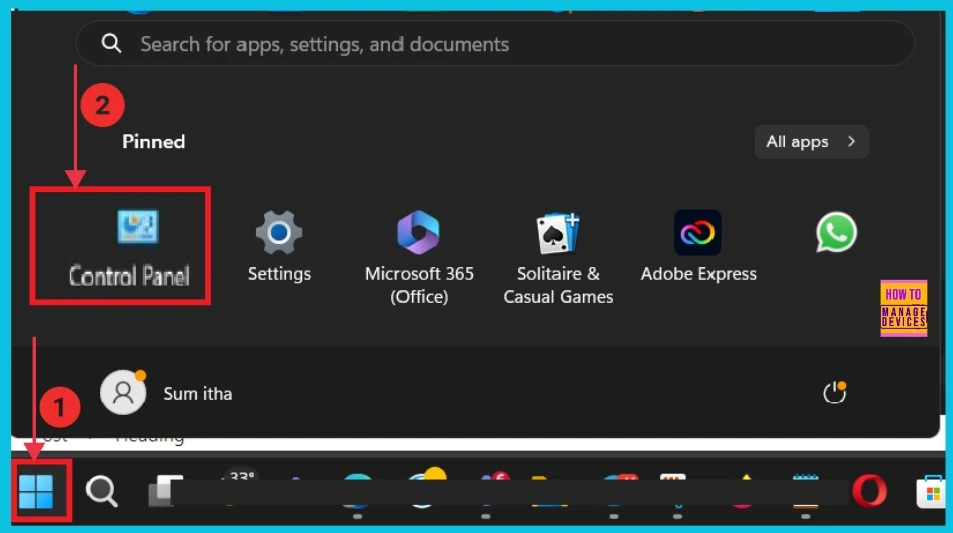
Now, we can open the Control Panel window and see All Control Panel Items. Select Network and Sharing Center to continue.
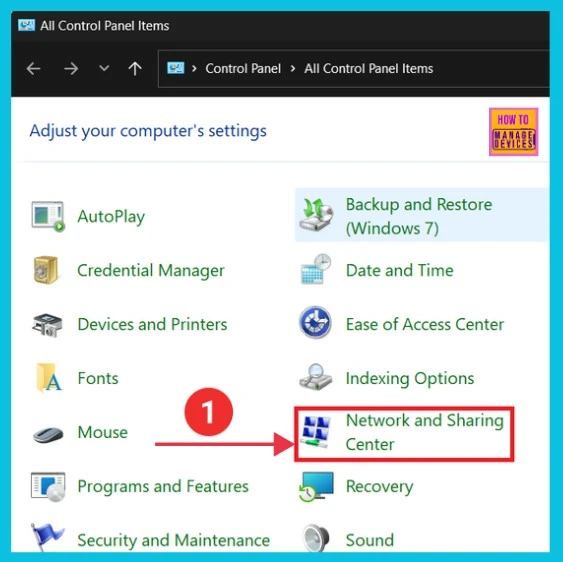
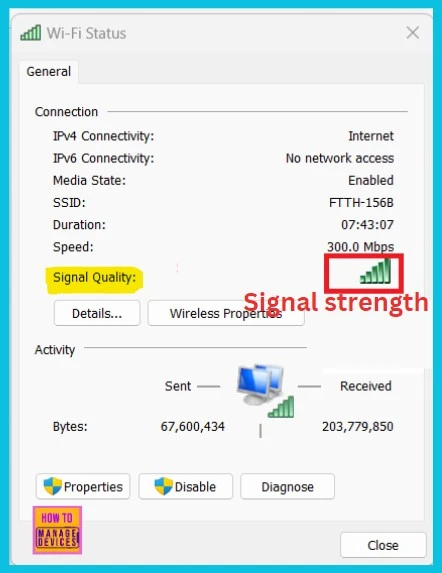
After opening the Network and Sharing Center window, we can view our basic network information and set up connections. Here, we can also view the active network’s name, connections, and Signal strength. Click the Connections.
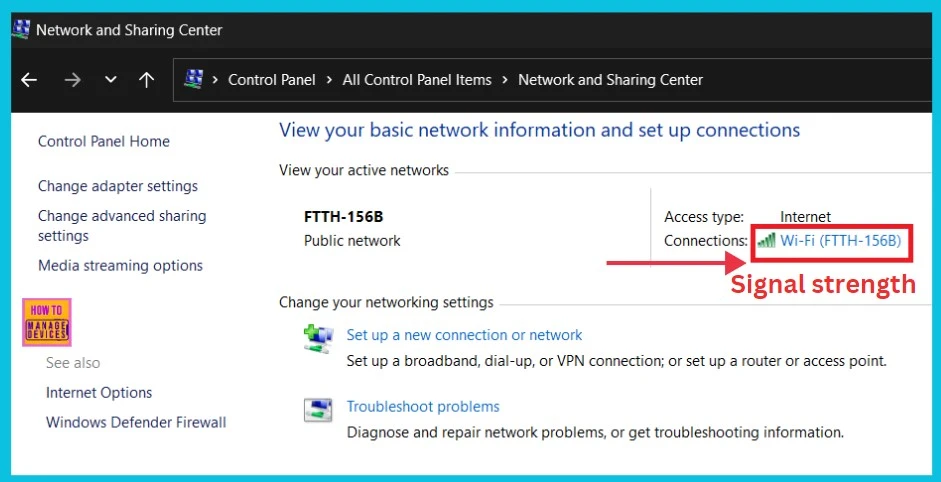
After clicking Connections, we can get the full details of Wi-Fi network connections. Here, we can see Connectivity details, media state, SSID, Duration, Speed, and Signal Quality. We can also see the strength of Wi-Fi connections.
6. Check the Wi-Fi Network Signal Strength Percentage using Command
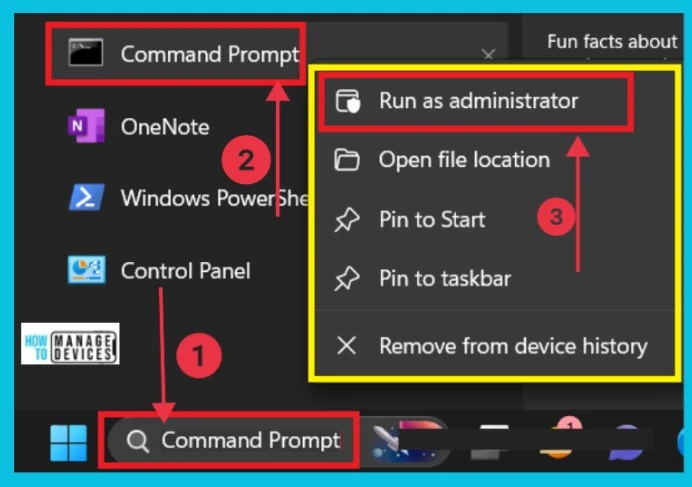
The sixth method for checking the Wi-Fi network signal strength percentage is to use a Command Prompt. To do this, search for Command Prompt in the Taskbar. Then open it as Run as administrator.
- Best Way to Turn On or Off Allow Wake Timers in Windows 11
- Manage to Enable Disable Devices to Wake Computers in Windows 11
Now, we can open the Command prompt window and apply the command to see the Wi-Fi network percentage. Then, click enter to see the full description of wifi at the bottom of the page.
netsh wlan show interfaces
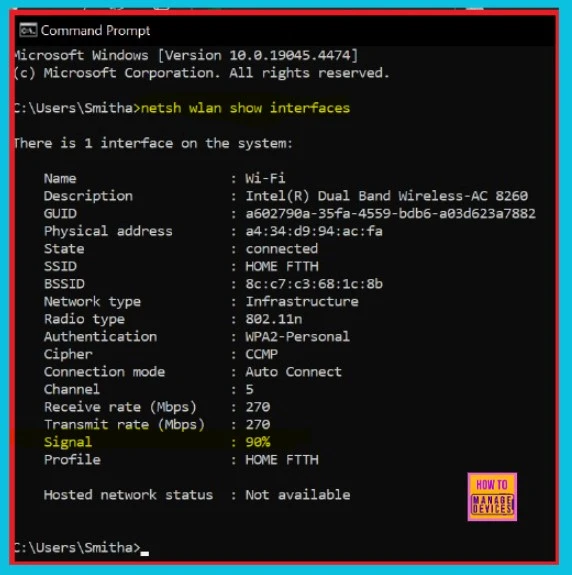
If we only want signal strength details, we can use another command. The screenshot below gives the details; then click enter. It can show the Signal strength percentage of our current wireless network connection.
powershell (netsh wlan show interfaces) -Match ‘^\s+Signal’ -Replace ‘^\s+Signal\s+:\s+’,”

We are on WhatsApp now. To get the latest step-by-step guides, news, and updates, Join our Channel. Click here – HTMD WhatsApp.
Need Further Assistance or Have Technical Questions?
Join the LinkedIn Page and Telegram group to get the latest step-by-step guides and news updates. Join our Meetup Page to participate in User group meetings. Also, Join the WhatsApp Community to get the latest news on Microsoft Technologies. We are there on Reddit as well.
Author
Sumitha was introduced to the world of computers when she was very young. She loves to help users with their Windows 11 and related queries. She is here to share quick news, tips and tricks with Windows security.
