Let’s learn the 11 Best Fixes for Windows 11 WiFi Connection Issues in 2024. Wi-Fi (Wireless Fidelity) is a networking technology used to connect to the Internet. If your Wi-Fi is not working on your computer, there could be a complex problem.
Various modern electronic devices, including computers and smartphones, support Wi-Fi. It uses radio waves to transmit data wirelessly. Wi-Fi connection issues mainly affect you in different situations.
Factors such as distances and obstacles can affect the strength of Wi-Fi. Slow-speed frequent disconnections are common issues affected by Wi-Fi, which provides wireless broadband internet access for many modern devices. There are different ways to fix the problems if Wi-Fi is not seen on your PC.
Wi-Fi issues affect users in different scenarios. This post helps users solve problems and work appropriately by outlining various ways to fix Wi-Fi problems on Windows 11 computers. The missing Wi-Fi icon on your Windows PC is another problem discussed in the section below.
- FIX Windows 11 WiFi Internet Connection Issue
- New Hotfix Released KB5014666 to Fix Unable to connect to Internet using WiFi hotspot feature
- Setup Wi-Fi Profile for macOS devices using Intune
What are the Features of a Wi-Fi Connection?

A wireless network, commonly known as a Wi-Fi network, is a type of network that operates without the need for cables or wiring. It provides the following features:
1. It allows wireless connectivity
2. It provides highspeed
3. It allows Dual-band Wi-Fi
4. It provides WPA Enterprise
5. It allows guests to access a wireless network
11 Best Fixes for Windows 11 WiFi Connection Issues in 2024
If you see the Wi-Fi connected icon in the taskbar, your device is linked to another laptop or mobile device. Many methods are used to fix the Windows 11 Wi-Fi connection method. The below table shows the details.
| Different Methods for Fixing Wi-Fi Connection Issues |
|---|
| Disable the Airplane mode |
| Turn on or off Wi-Fi mode |
| Diagnose Network method |
| Manage known networks |
| Run the Network and Internet Troubleshooter Method |
| Disable and Enable Network Adaptor |
| Reset Network |
| Fix socket API Errors and Reset IP logos |
| Select Auto IP and DNS Configuration |
| Check the Proxy Server and Restore the Internet Settings |
| Power Flush |
1. Disable the Airplane Mode
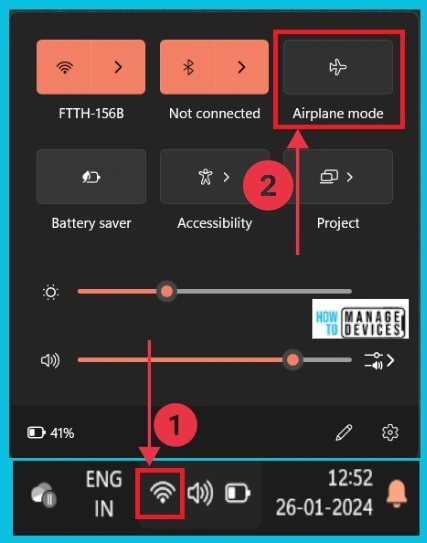
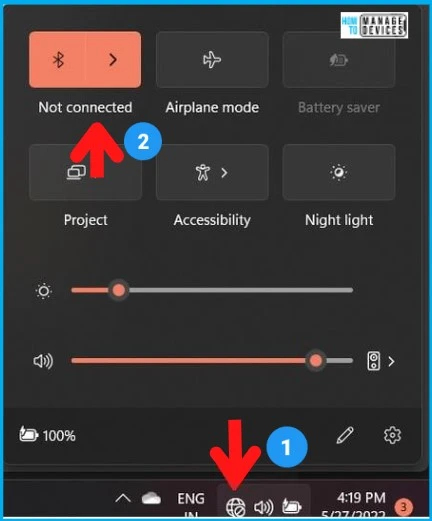
If your Wi-Fi connection is not working correctly, you should check that your Airplane mode is not enabled. When you use Wi-Fi, aeroplane mode is disabled. The screenshot below shows how to turn off the Airplane mode.
2. Turn On or Off Wi-Fi Mode
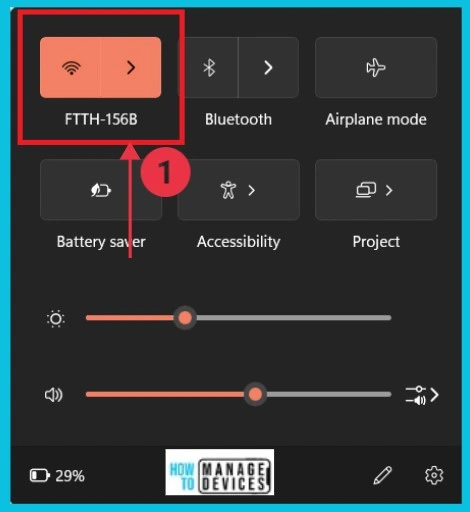
If your Wi-Fi connection is not working correctly, check whether it is connected. If it is connected, it shows the Wi-Fi details. The screenshot below gives the details.
3. Diagnose Network Problems
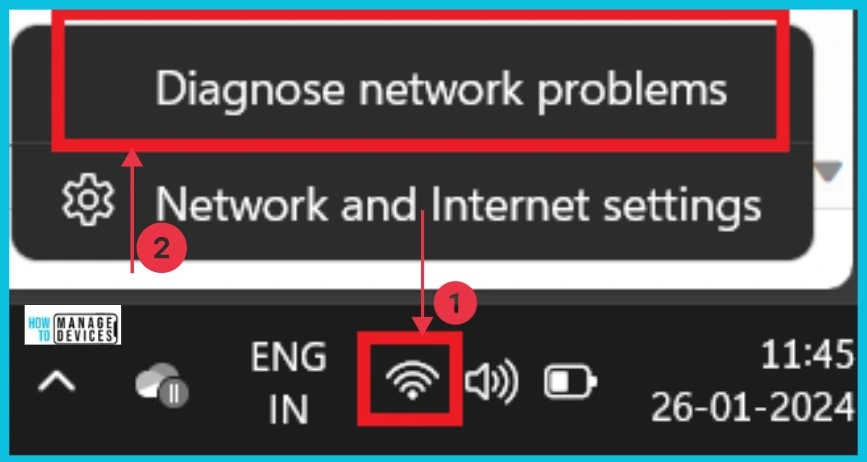
You can discover the Wi-Fi’s current state by clicking Diagnose network problems. First, right-click the Wi-Fi icon in the taskbar, then click Diagnose network problems.
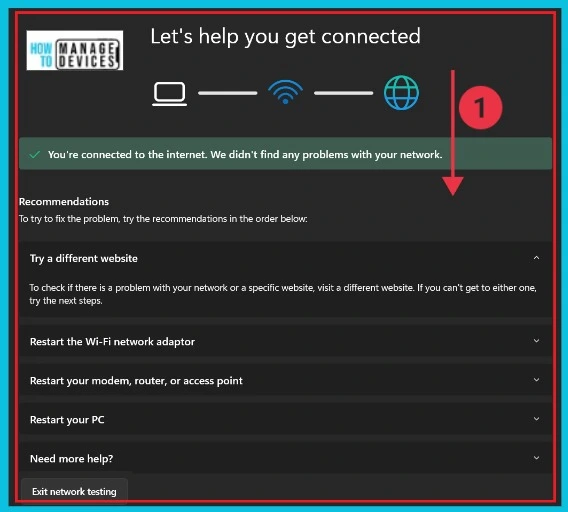
After clicking Diagnose network problems, a new window will appear to help connect Wi-Fi to users. There are different options for getting Wi-Fi quickly.
4. Manage Known Networks
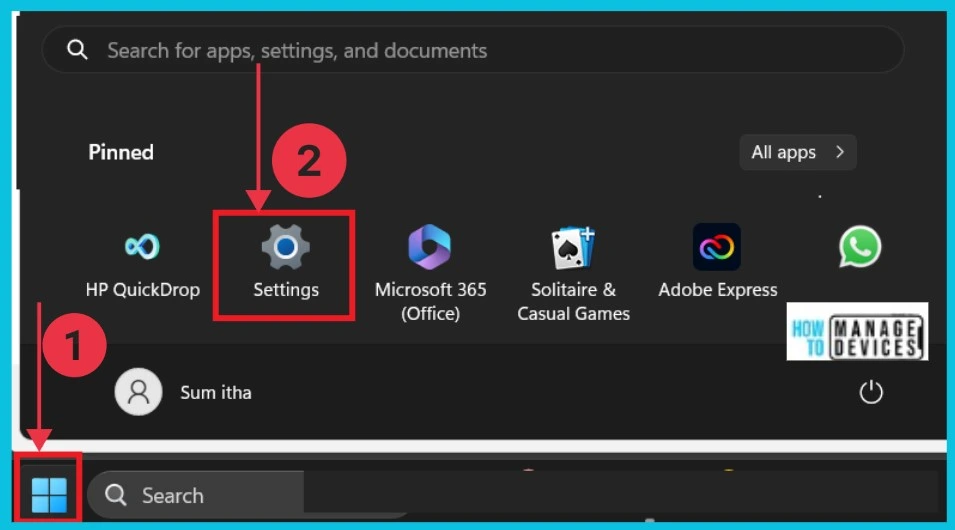
With this method, you can easily manage your Wi-Fi networks. You can easily access Manage Known Networks from the Settings application. The following screenshots give the details.
- Select Settings from the Start button
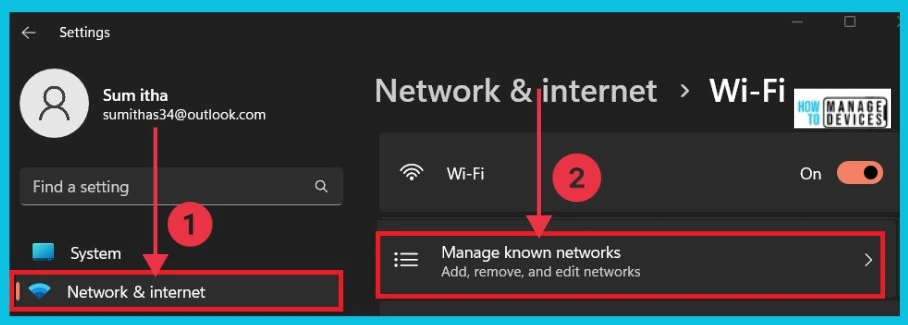
After selecting settings, select Network and Internet from the left side of the window. Select the Manage known networks options from Network & internet.
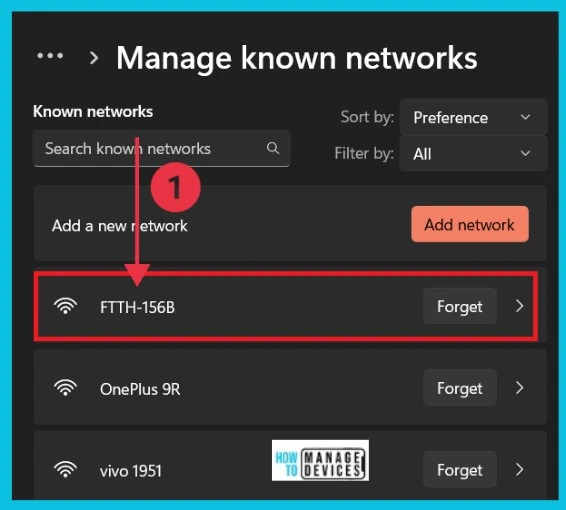
After clicking Manage Known Networks, a new window will open with all the networks you used before. Click the forget option in the currently used network. Then, type Your Wi-Fi name again, connect to it, and check the connection.
5. Run the Network and Internet Troubleshooter Method
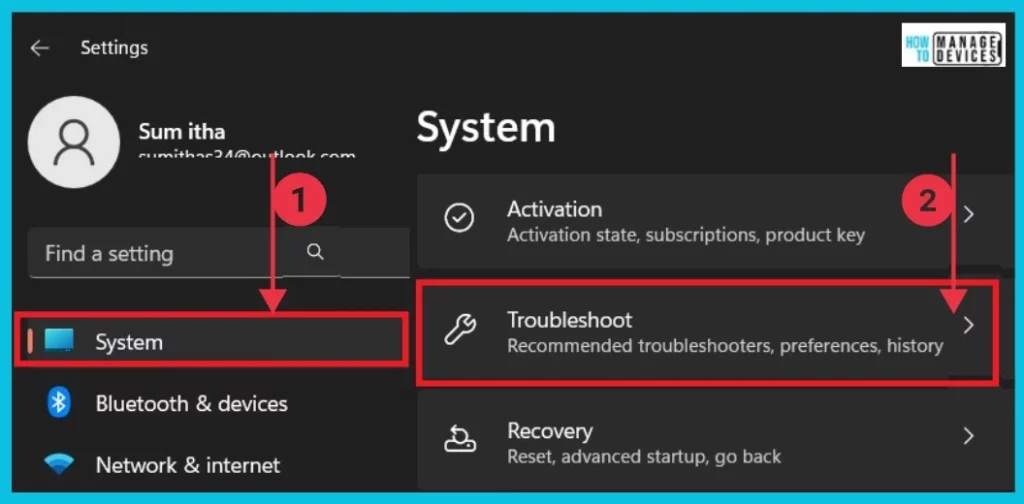
This is the other method to solve Wi-Fi problems on your PC. To fix the problem, first, you select the Settings app from the start button. To restore the Wi-Fi problem, choose the System from the settings app. To continue, click the arrow on the right side of troubleshooting.
- Reset Network Adapters in Windows 11 FIX Connection Issues
- FIX Outlook Error Cannot Move the Items using OWA
Click Other troubleshooters from the below window and click the Run option in Network and Internet. The screenshot below shows the details.
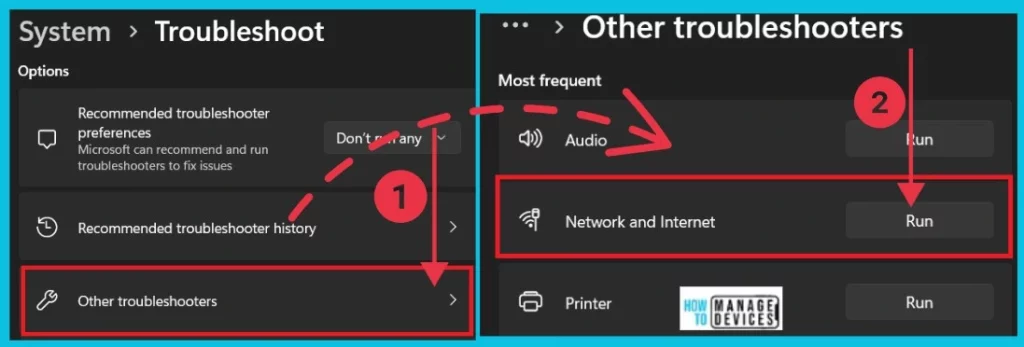
After clicking the Run option in Network and Internet, your device is ready to check the connection. The screenshot below details the Wi-Fi connection and some instructions for improving it.

6. Disable and Enable Network Adaptor
Another method to fix the Wi-Fi connection problem is to turn the network adaptor on and off. To do this, first select Control Panel from the Start button.
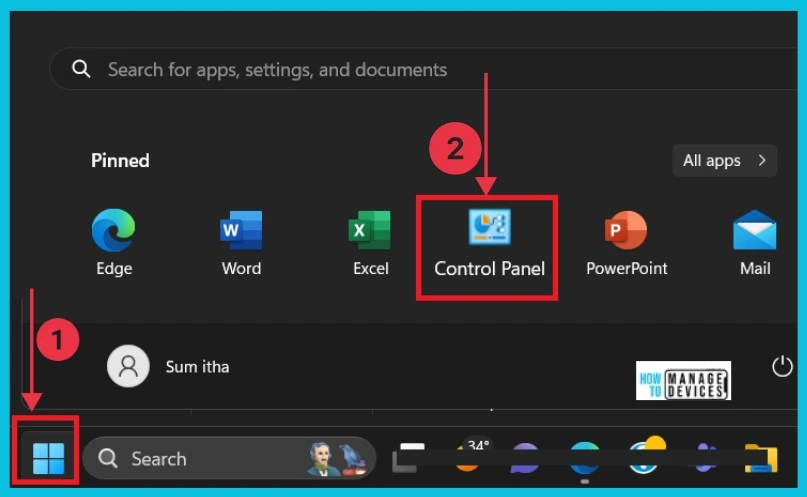
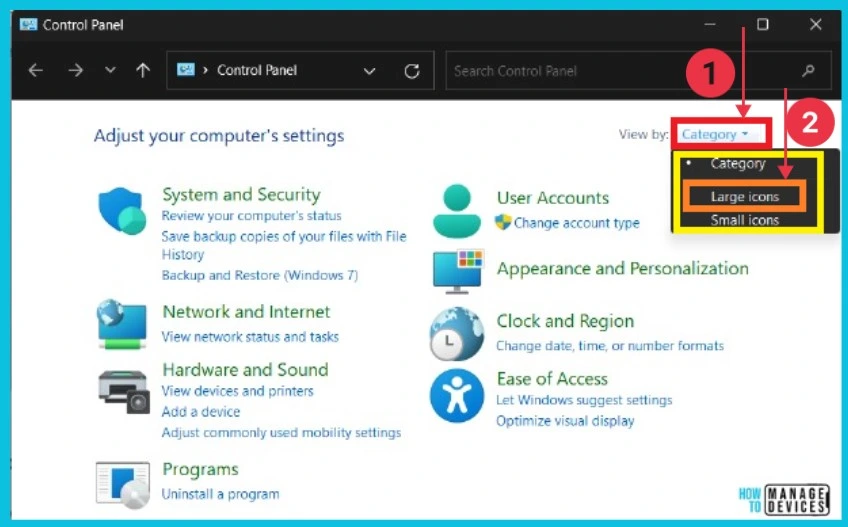
The screenshot below shows what happens when you click the control panel. To continue, click on the dropdown arrow of the Category option. Then select the Large icons option from Categories.
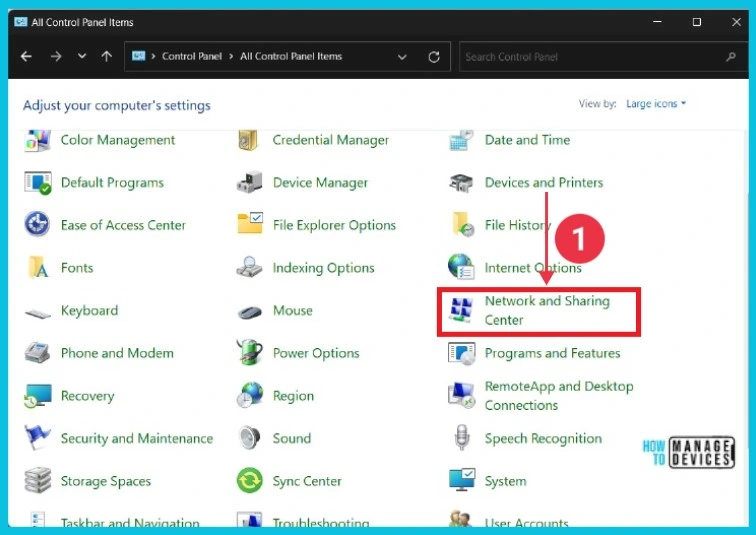
Next, you must select Network and Sharing Center to continue. This option is on All Control Panel Items. The screenshot gives the details.
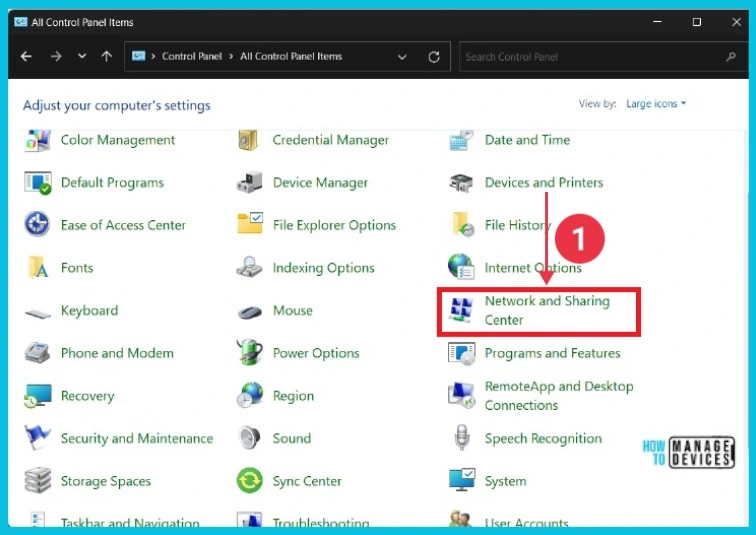
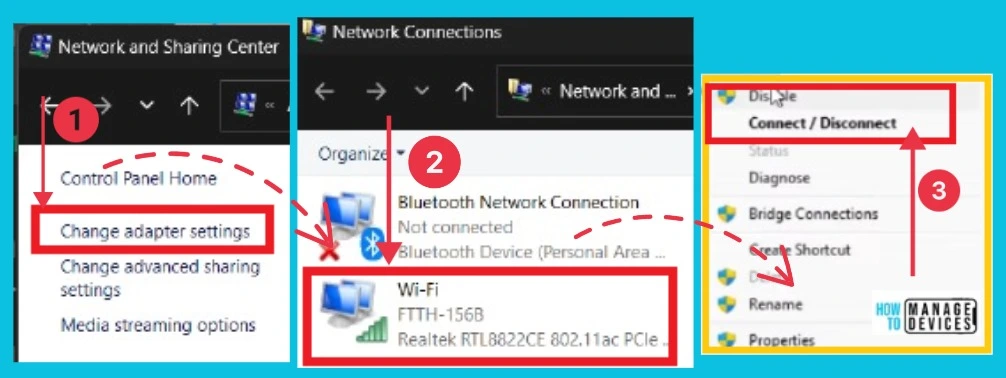
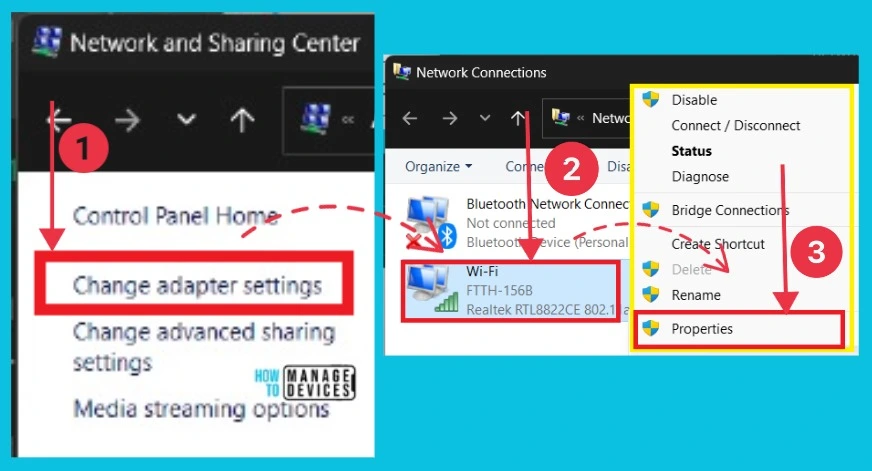
After clicking Network and Sharing Center, a new window appears on the screen. Select Change Adapter settings from it and then right-click the Wi-Fi option. Here, you can click the disable option to disconnect the Wi-Fi. After that, enable it to connect to it and check the connections.
7. Reset Network
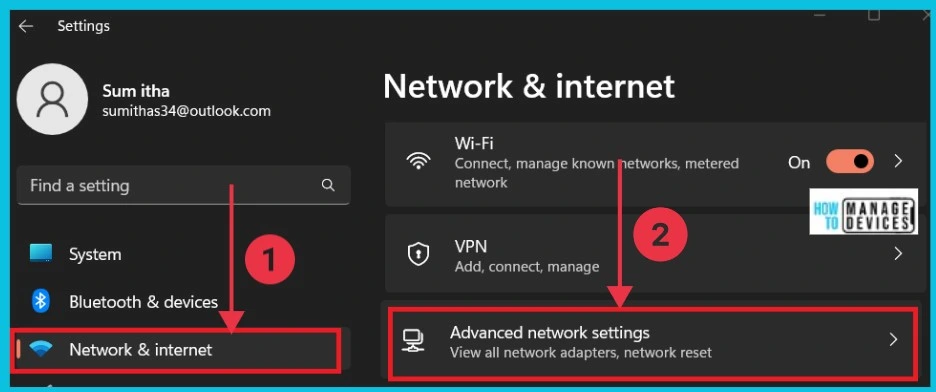
This is another method for fixing the Wi-Fi connection. You can easily use this to fix the problem by resetting your Wi-Fi Network. Select Settings from the Start menu. Choose Network and Internet from Settings, then click the arrow next to the Advanced network settings option.
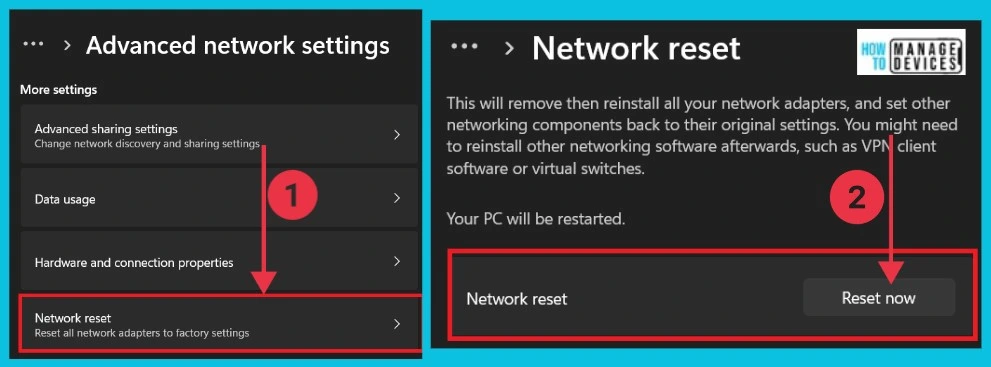
Here, you can see the option Network reset; it will reset all network adapters to factory settings. After clicking this, you can see another window. Click the option Reset now, and you will get a confirmation box. Click yes, and your network will reset successfully. Then restart your PC and check the connection.
8. Fix Socket API Errors and Reset IP Logos
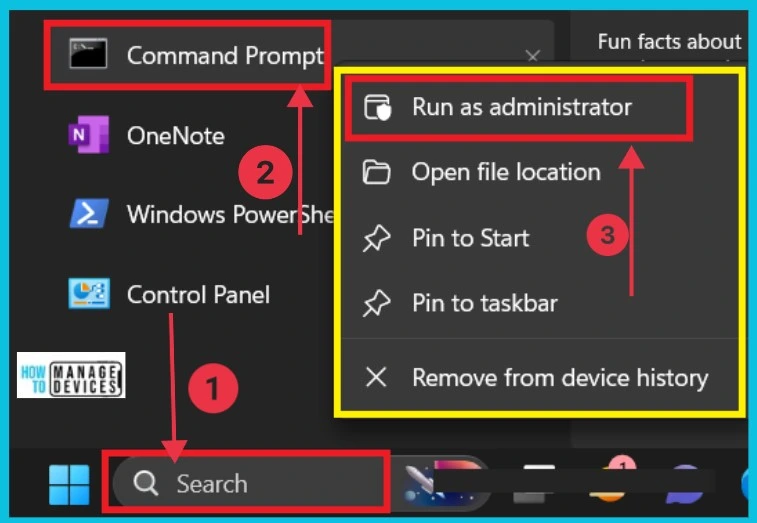
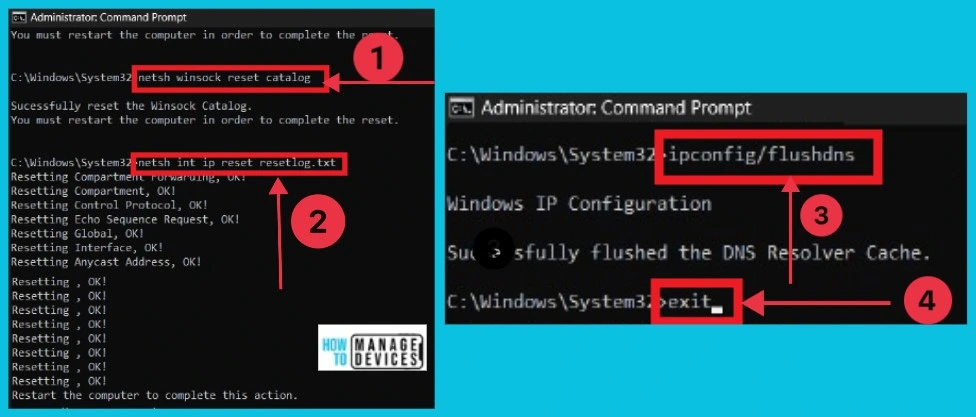
The following method for fixing a WI-Fi connection is to fix socket API errors and reset IP logos. To do this, Use the Command Prompt. Search for Command Prompt in the search option, then right-click on it. Click Run as administrator to continue.
Many commands are available on Windows 11 PCs to resolve Wi-Fi network problems. To do so, type the following commands in the Command Prompt.
- Typenetsh winsock reset catalog
- Type netsh int ip reset resetlog.txt
- Type ipconfig/flushdns
- Type exit
After finishing all these Commands, you should Restart your PC. Your Wi-Fi will be solved only after the Restart. After restarting the PC, check the Wi-Fi connection.
9. Select Auto IP and DNS Configuration
The following method for fixing Wi-Fi issues is to select Auto IP and DNS Configuration. To apply this, first open the Control Panel from the Start button. After opening the Control Panel, you can see a window selecting Network and Sharing Center.
Select Change adaptor settings from the Network and Sharing Center. You should now see the Wi-Fi option. Right-click on it, then select Properties.
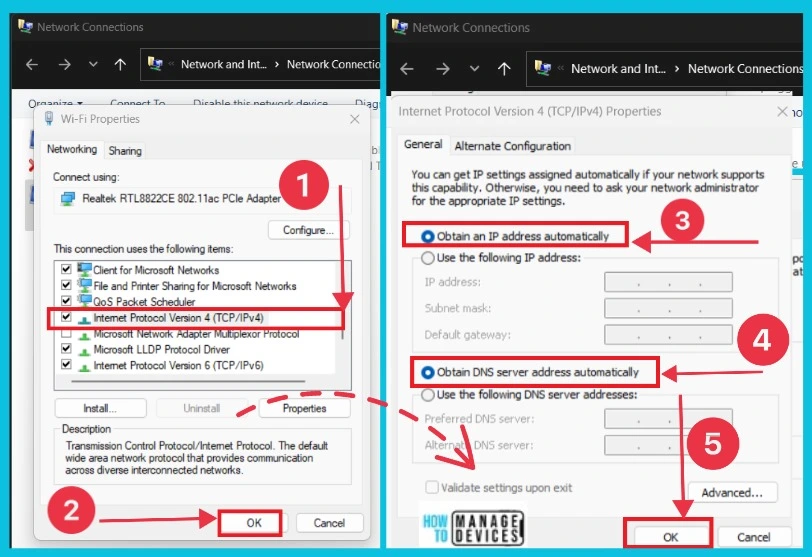
You can see many options here. Select Internet Protocol version 4 (TCP/IPv4) and click OK. From the 2nd window, select the options Obtain DNS server address automatically and Obtain an IP address automatically, then select OK. Then restart your PC and check the connection.
10. Check Proxy Server and Restore Internet Settings
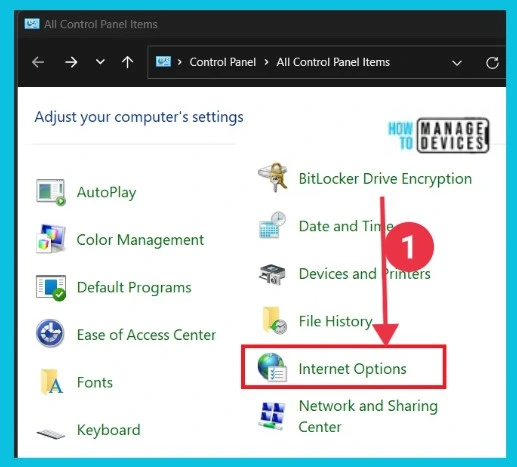
This method fixes Wi-Fi connections through the Control Panel. First, you open the Control Panel from the Start button. After opening the control panel, you can see the below window. Here, you should select the Internet options.
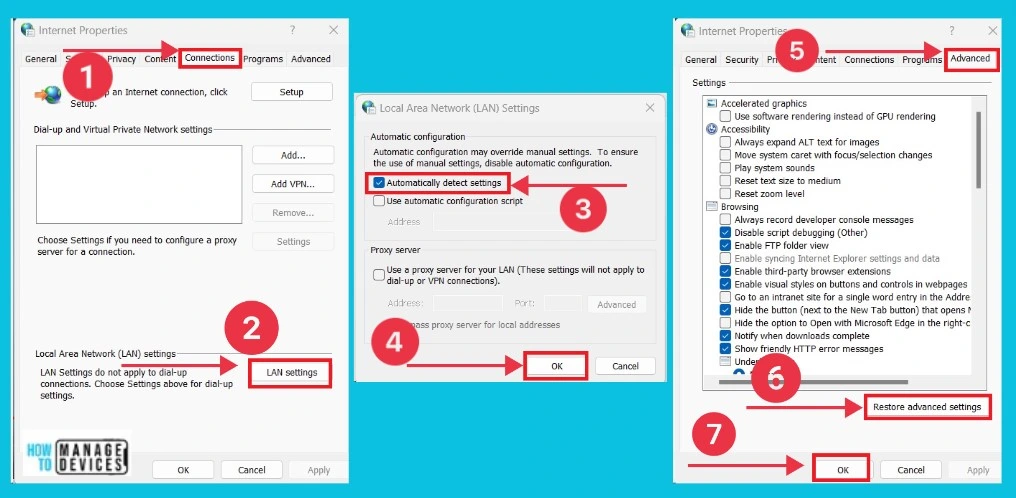
The screenshot below shows what happens when you click the Network options. Select Connections from the 1st window, then click LAN settings. Now open the Local Area Network Settings, select Automatically Detect Settings, and click OK.
Again, Choose Advanced from the 3rd window. Click Restore Advanced Settings at the bottom, then click Apply and ok.
11. Power Flush
Power flushing is the last method if the above methods do not fix the Wi-Fi connection. To do this, shut down your computer, remove all power cables, disconnect all power supplies, and press and hold the Power key for 30 seconds. Now, you can flush out all the power remaining in it. Then, connect all connections and check.
If you use the laptop, you can use power flush to fix the Wi-Fi connection. First, you turn off the computer and remove all power supplies. First, you take out the laptop’s battery, press and hold the power key for 30 seconds, put the battery back, and start your computer. It fixes the wi-fi problem on your computer.
Missing Wi-Fi icon on your Windows PC
If you can’t find the WiFi icon on your Windows 11 laptop, the WiFi feature is turned off or disabled. WiFi is the primary way to connect to the internet for most laptops, allowing you to go online wirelessly. If you cannot see the WiFi icon, you won’t be able to connect to WiFi networks and access the internet until the issue is resolved.
In one of our posts, we discussed the issue of the WiFi icon being missing on Windows 11 laptops. We explained the potential causes of this issue, explored troubleshooting steps, and provided insights into its implications for users’ productivity and overall experience with their Windows 11 devices.
Read more – FIX Windows 11 WiFi Internet Connection Issue
Reference
Fix Wi-Fi connection issues in Windows – Microsoft Support
We are on WhatsApp now. To get the latest step-by-step guides, news, and updates, Join our Channel. Click here. HTMD WhatsApp.
Author
Sumitha was introduced to the world of computers when she was very young. She loves to help users with their Windows 11 and related queries. She is here to share quick news, tips and tricks with Windows security.
