Let’s learn how to Enable or Disable Voice Access in Windows 11. Voice access is a new experience that started with Windows 11 build 22518. It enables everyone, including people with mobility disabilities, to control their PC and use text only in their voice without an internet connection.
Voice access allows you to open and switch between apps, browse the web, and read. It contains a list of supported languages on your device. If it finds that your display language is not in the supported list of languages, it also allows you to launch voice access in English (US). It depends on the user whether you can proceed or disable voice access.
From Windows 11 build 26058 with the versions Canary and Dev, press the Win + Ctrl + S hotkey to open voice access instead of Windows Speech Recognition. Windows 11 is transitioning from Windows Speech Recognition to voice access.
A user can choose to autostart voice access the next time they sign in to their device in settings. Users can also use voice commands or keyboard shortcuts Alt + Shift + C and Alt + Shift + B to control whether voice access is listening or not listening. A detailed guide on voice access is available at New Voice Access for Windows 11 | Best Guide.
Table of Contents

- New Voice Access for Windows 11 | Best Guide
- Turn Off Online Speech Recognition Using Intune MEM
- Microsoft Clipchamp Speech Audio to Video Editing Feature
Process to Enable or Disable Voice Access in Windows 11
You can enable or disable voice access in Windows 11. The methods for enabling and disabling the settings are listed below.
- Enable or Disable Voice Access Using Shortcut Keys
- Enable or Disable Voice Access on Sign-in Screen
- Enable or Disable Voice Access Using Settings
- Disable Voice Access from the Toolbar
Enable or Disable Voice Access Using Shortcut Keys
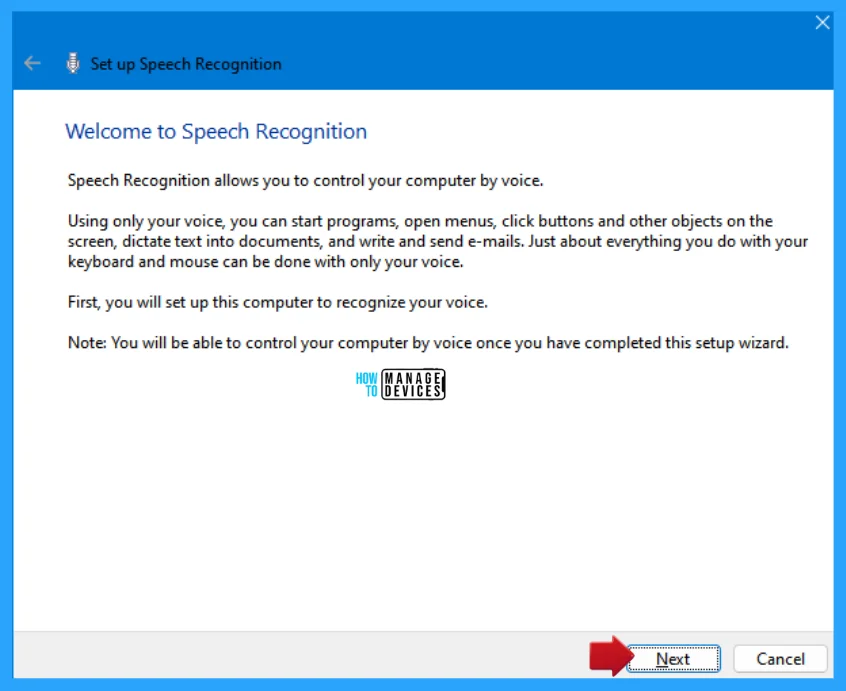
You can enable or disable voice access using the shortcut keys. To do so, press Win + Ctrl + S hotkey to open voice access. The Set up Speech Recognition window. Speech Recognition allows you to control your computer by voice.
Using only your voice, you can start programs, open menus, click buttons and other objects on the screen, dictate text into documents, and write and send e-mails. Just about everything you do with your keyboard and mouse can be done with only your voice. First, you will set up this computer to recognize your voice. Click the Next button to continue.
NOTE: You will be able to control your computer by voice once you have completed this setup wizard.
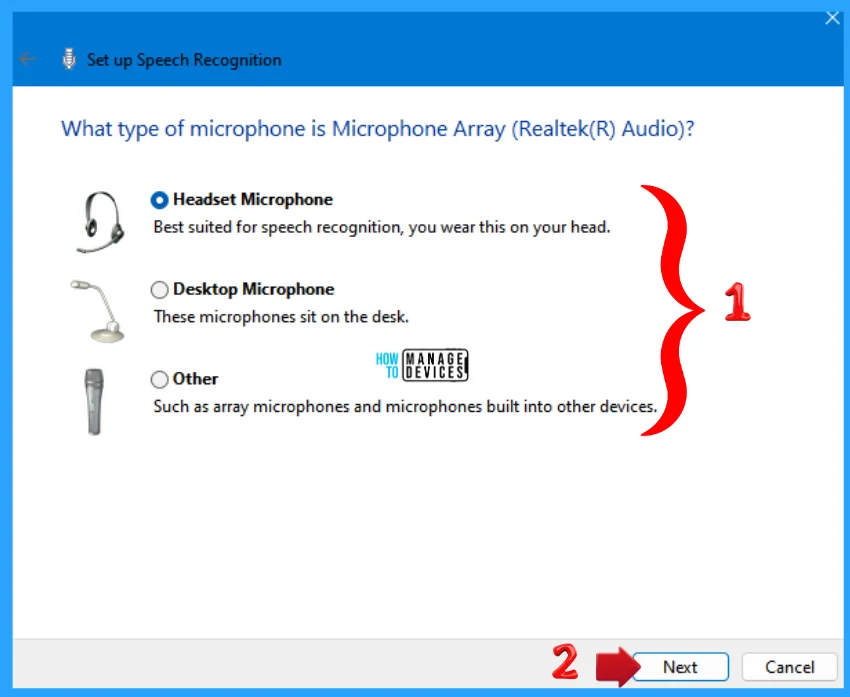
When you click on next, the next pop-up will appear and ask you to select the type of microphone in the microphone array. The following options appear select the appropriate option and click on Next.
- Headset Microphone: Best suited for speech recognition, you wear this on your head.
- Desktop Microphone: These microphones sit on the desk.
- Other: Such as array microphones and microphones built into other devices.
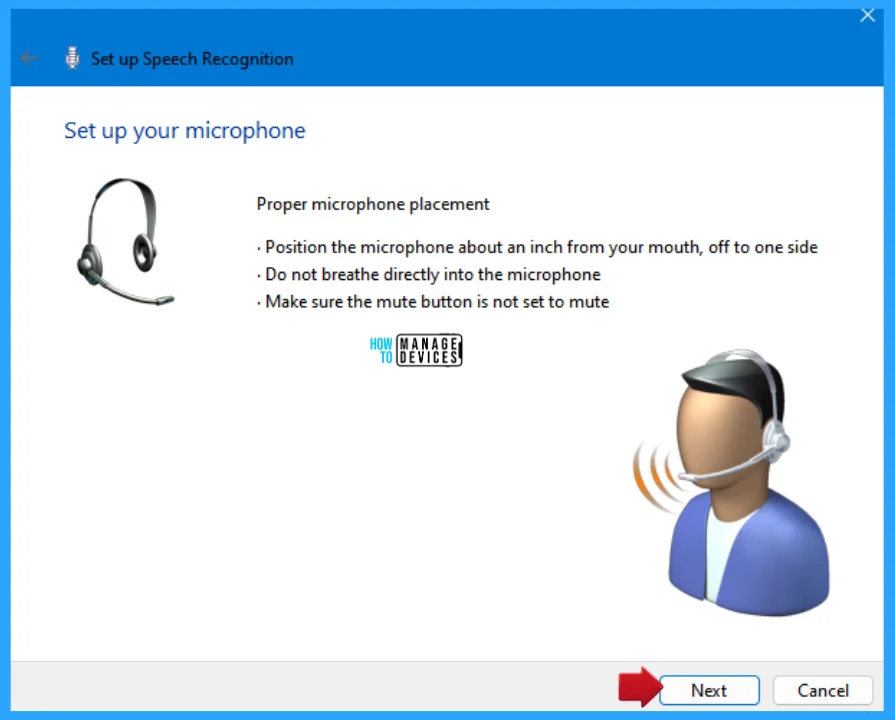
After selecting your proper channel, press the Next button. The next pop-up appears to set up your microphone. This pop-up helps ensure proper microphone placement; check the information below and click on the Next button to continue.
- Position the microphone about an inch from your mouth, off to one side.
- Do not breathe directly into the microphone.
- Make sure the mute button is not set to mute.
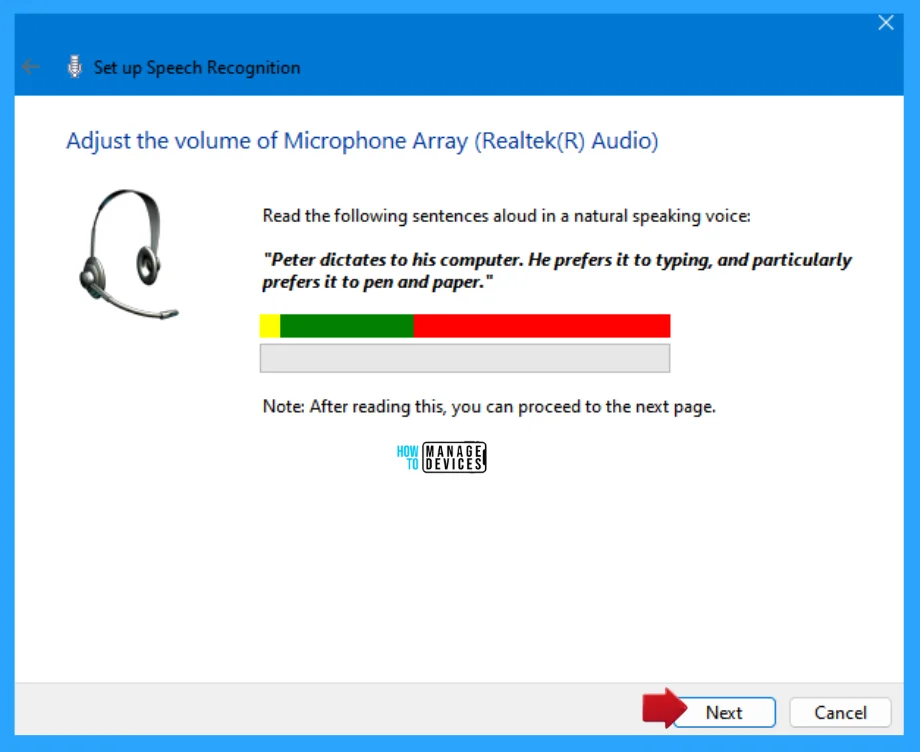
The next window allows you to adjust the volume of the Microphone Array. To do so, read the following sentences aloud in a natural-speaking voice, and then click Next to continue. The phase is shown in the image below.
NOTE: After reading this, you can proceed to the next page.
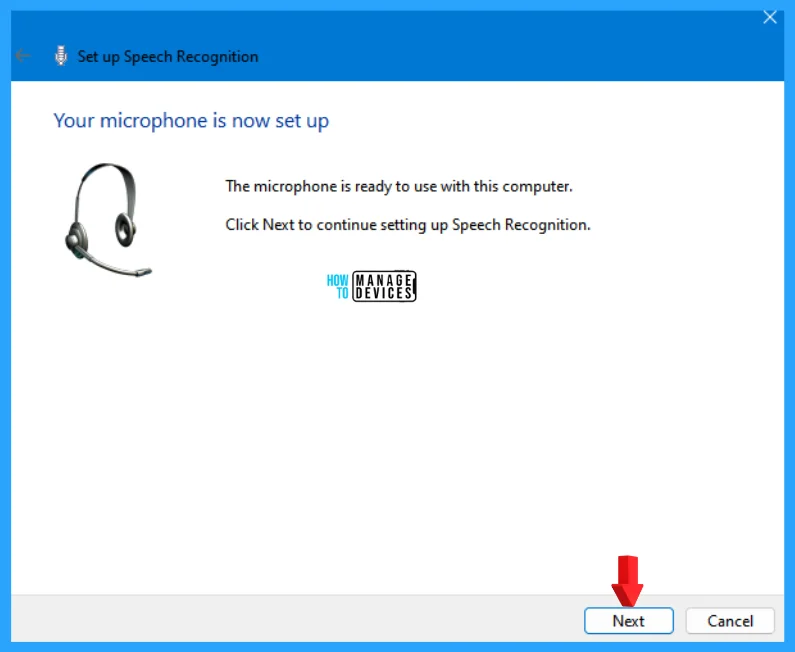
The next window will prompt you about your microphone setup. This microphone is ready to use with this computer. Now click Next to continue setting up Speech Recognition.
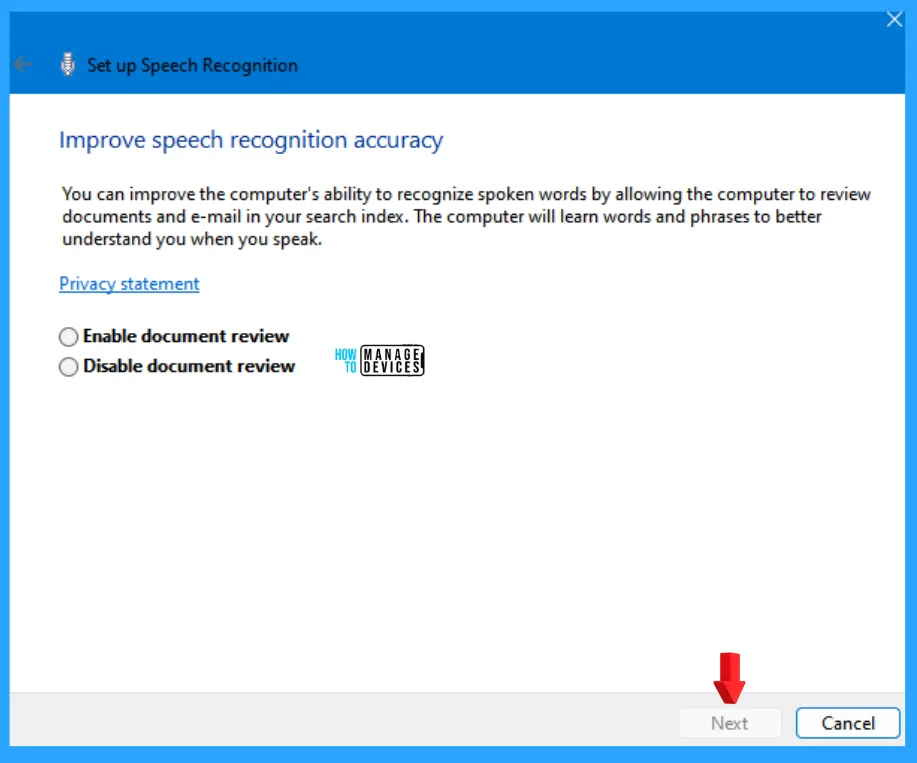
Improving speech recognition accuracy is the next window. You can improve the computer’s ability to recognize spoken words by allowing the computer to review documents and e-mail in your search index. The computer will learn words and phrases to understand you better when you speak. Select one option from the following and click on Next to continue.
- Enable document review
- Disable document review
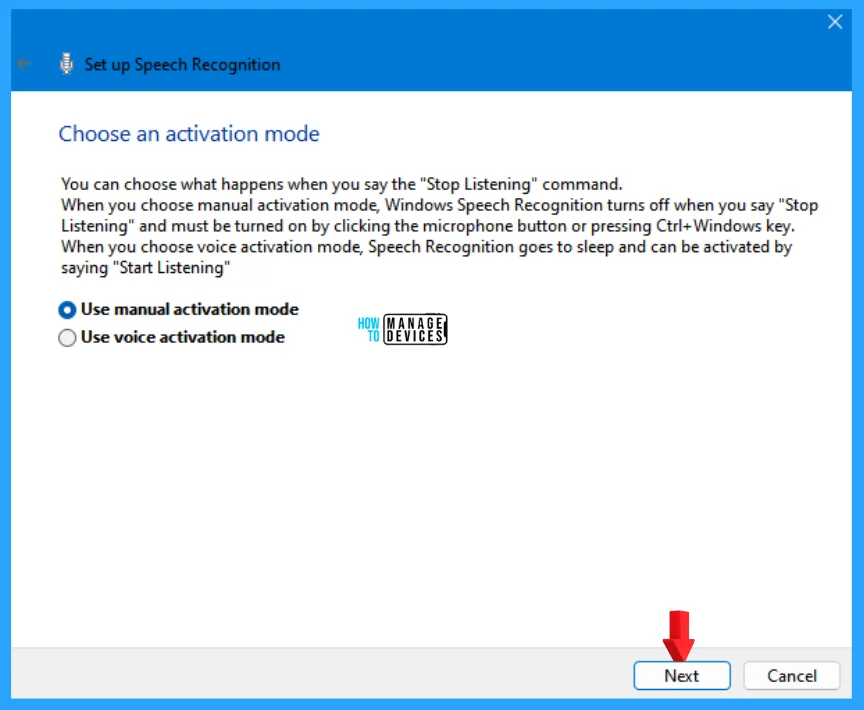
Next, you have to choose an activation mode. You can choose what happens when you say the “Stop Listening” command. When you choose manual activation mode, Windows Speech recognition turns off when you say “Stop Listening” and must be turned on by clicking the microphone button or pressing Ctrl + Windows key.
When you choose voice-activation mode, Speech Recognition goes to sleep and can be activated by saying “Start Listening“. Select the option from the following and then click on Next to continue.
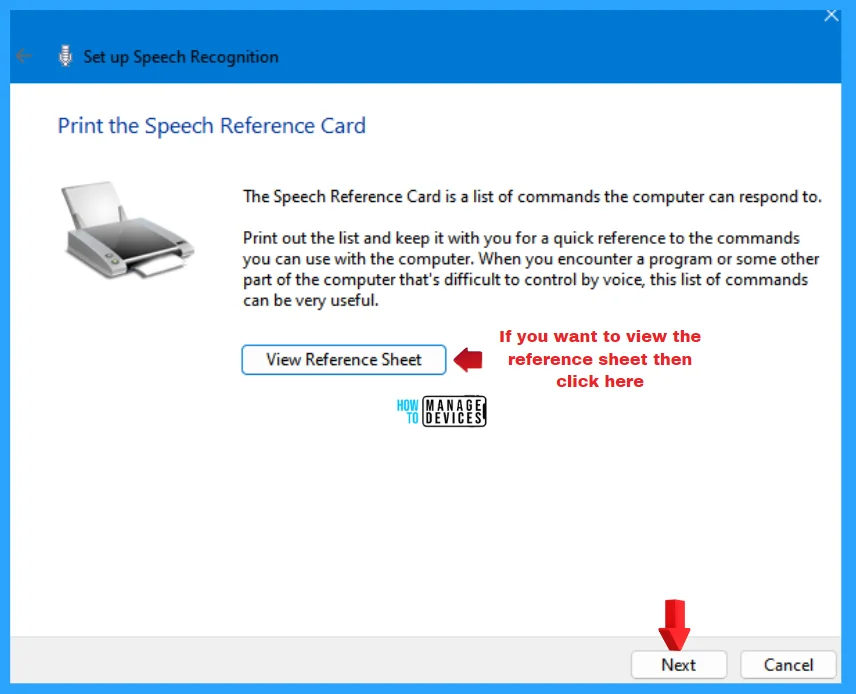
The next window is the Print Speech Reference Card. The speech reference card lists commands the computer can respond to. Print out the list and keep it with you for a quick reference to the commands you can use with the computer. When you encounter a program or some other part of the computer that’s difficult to control by voice, the list of commands can be very useful.
The View Reference Sheet button is optional; click on it if you want to know the commands. Otherwise, click on Next to continue.
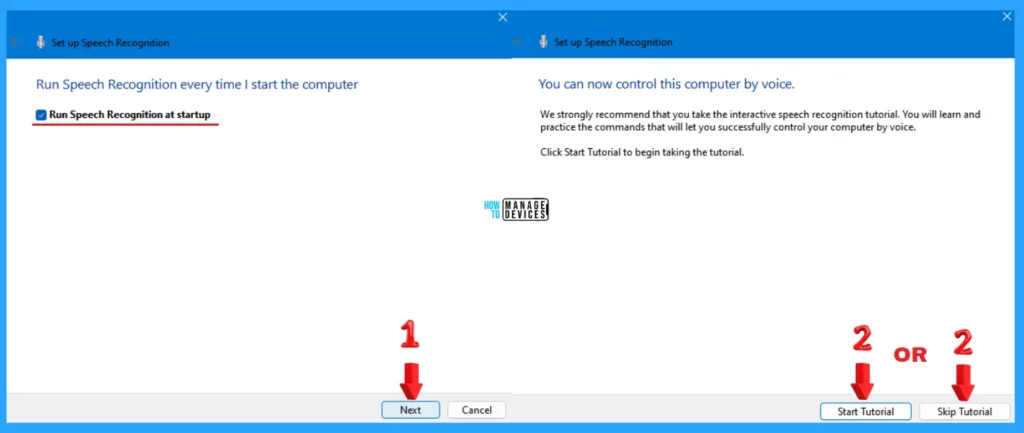
The Run Speech Recognition every time I start the computer, which is the next prompt window. The Run Speech Recognition at startup is selected by default. Now click on Next.
In the next window, you can now control this computer by voice. It is strongly recommended that you take the interactive speech recognition tutorial. You will learn and practice the commands that will let you successfully control your computer by voice. So, it is up to the user to click Start Tutorial or Skip Tutorial.
Enable or Disable Voice Access on Sign-in Screen
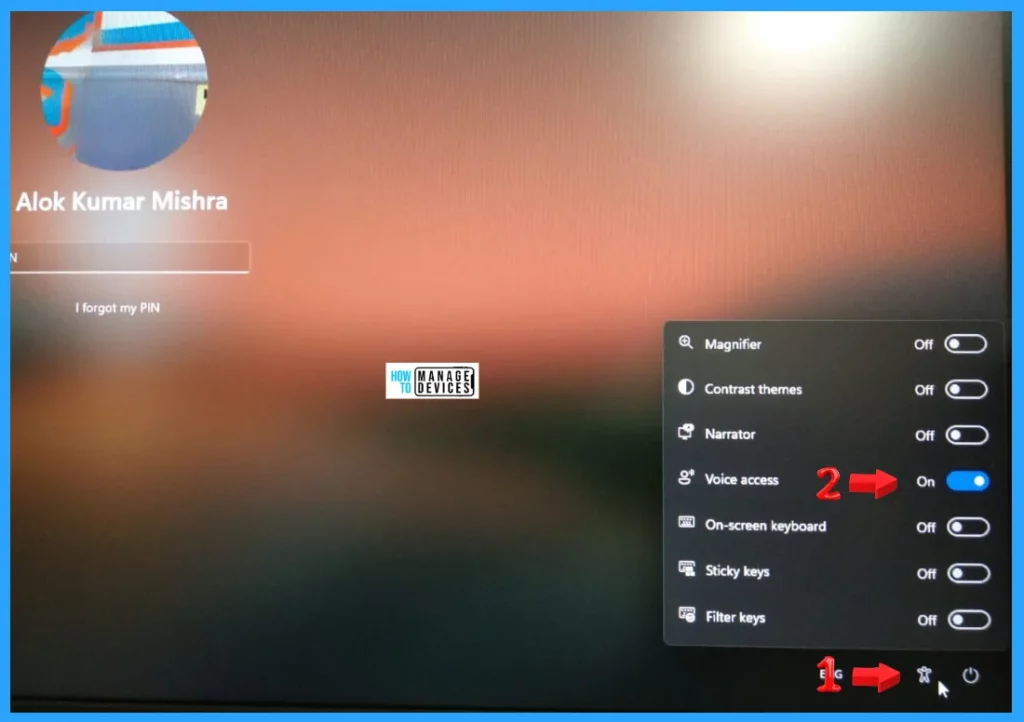
There is another method to activate voice access. When you turn on the computer, you can find an accessibility option in the lower right corner, as shown in no.1 in the figure below. Then, choose the Voice Access option and toggle the button on or off.
NOTE: By default, the voice access option is turned off.
Enable or Disable Voice Access Using Settings
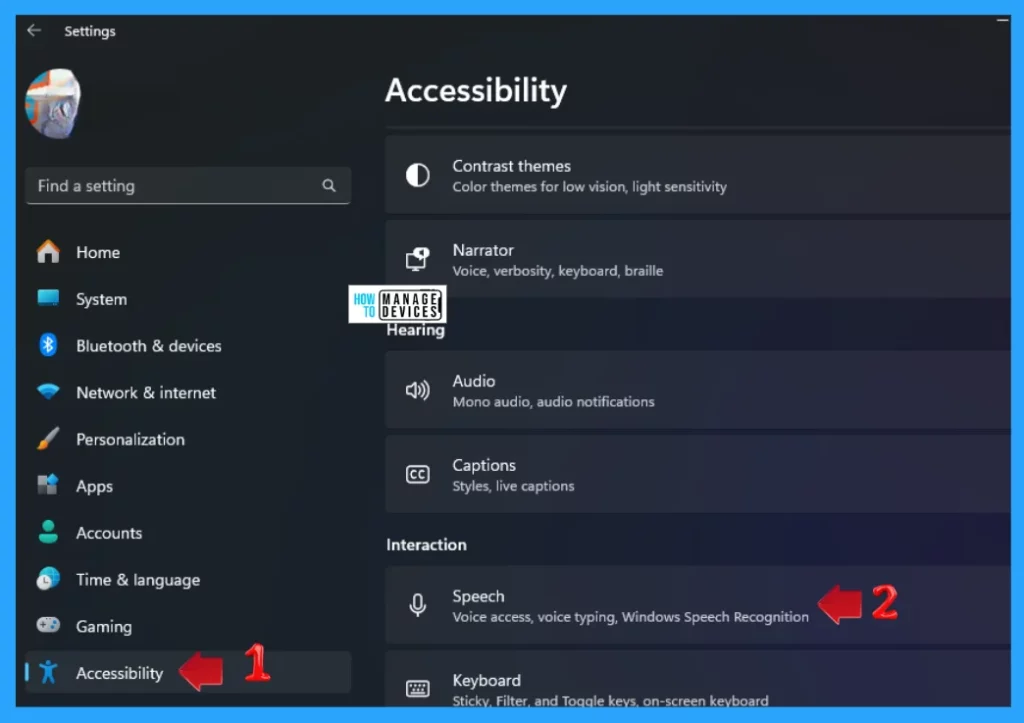
You can use Windows Settings to Enable or Disable Voice Access. Click the Windows button, select Settings, or press Win Key + I to open settings directly.
Then, under settings, click on the Accessibility option on the left panel, scroll down to find the Speech (used to avail voice access, voice typing, Windows Speech Recognition) in the right panel and click on it.
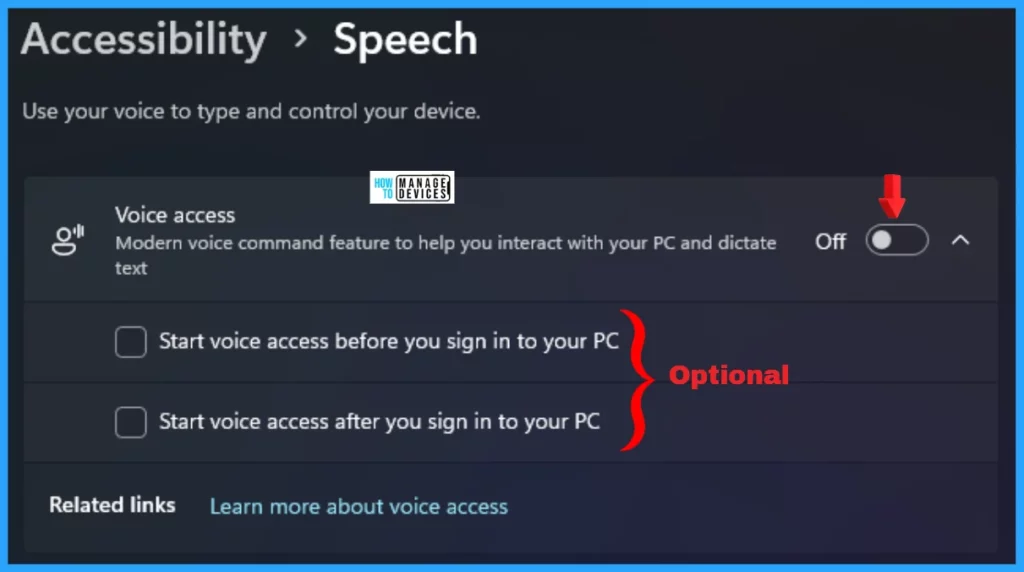
When the selected option menu opens, you can see the Accessibility option. This option allows you to use your voice to type and control your device. Voice access, a modern voice command feature, helps you interact with your PC and dictate text. Toggle the button to enable and disable it. Other options are available there, which you can select if you want.
- Voice access: Modern voice command feature to help you interact with your PC and dictate – text = Off
- Start voice access before you sign in to your PC
- Start voice access after you sign in to your PC
Disable Voice Access from the Toolbar
When the voice access option is enabled, a voice access bar appears at the top of your screen. To disable voice access, click on Settings (the gear icon) and then on Turnoff voice access.

I hope the information on How to Enable or Disable Voice Access in Windows 11 is helpful. Please follow us on the HTMD Community and visit our website, HTMD Forum, if you like our content. Suggest improvements, if any, and we would love to know which topic you want us to explore next.
Sources
- Use voice access to control your PC & author text with your voice
- Set up voice access
- Get started with voice access
- Use voice recognition in Windows
- Windows Speech Recognition commands
We are on WhatsApp. To get the latest step-by-step guides and news updates, Join our Channel. Click here – HTMD WhatsApp.
Author
Alok graduated with a Master of Computer Applications (MCA) degree. He loves writing on Windows 11 and related technologies. He likes to share his knowledge, quick tips, and tricks with Windows 11 or Windows 10 with the community.
