Hola! I’m back with another important post. Today, let’s learn “how to Enforce Multifactor Authentication MFA for Users“. In our previous blogs, we have discussed and learned some of the security features that can be used from Microsoft Defender. Today, we will discuss the security features of Microsoft Azure.
When we analyze the hacked accounts data, 99% of these accounts do not have multifactor authentication, as per Microsoft. Multifactor Authentication is an added step/layer of protection for any user account, which acts as a second form of authentication.
When MFA is enforced, users must provide approval for MFA in either SMS, Phone Call or a Code from the application. If your organization has only a password as authentication, this can lead to a very strong entry point for a Cyberattack.
In this article, we will discuss Azure Active Directory Multifactor Authentication. Azure AD MFA helps safeguard corporate data access by adding an extra authentication layer in addition to the user credentials. Microsoft Azure provides supports various types of MFA methods.
- Microsoft Authenticator App
- SMS
- Voice/Phone cal
- OATH software token
- OATH Hardware token
- Windows Hello for Business
- Authenticator Lite (in Outlook)
After MFA is implemented, this will increase security as it will enforce a second form of authentication. Even if the user’s credentials are compromised, the attackers cannot hack into the systems as it requires an additional layer of authentication.
- Easiest Method to Enable MFA for Admins using Azure AD Conditional Access
- Microsoft 365 Defender Attack Simulation to Educate Users about Phishing Emails – Part 1
License Requirements to Enforce Multifactor Authentication
Microsoft provides basic multifactor authentication features with M365 and Azure Active Directory subscriptions without additional cost. If you require to enforce MFA for all users and Admins, we need to upgrade the MFA with additional security features. Microsoft offers various ways to purchase Azure AD MFA.
You can purchase a license with Azure Premium P1, M365 or EMS E3 and EMS E5, and We can use Azure AD MFA and Conditional access policies to prompt users to use MFA and some other basic features. With Azure Premium P2 license, we get additional features like risk-based conditional access, the strongest security position and improved user experience.
With O365 and Azure AD subscriptions, we can utilize free MFA by enabling security controls to prompt users for multifactor authentication as needed. This doesn’t have granular control over the user and required scenarios.
Enforce Multifactor Authentication using Security Defaults
As we discussed, MAF enforced by Security Defaults has basic features and can be used by Organizations using the free tier of Azure Active Directory licensing. These days, Microsoft is making these settings pre-configured while setting up the tenant. If you use an older tenant, let’s see how to enable Security Defaults.
- Login to the Azure portal
- Search for Azure active directory
- Click on Overview > Properties
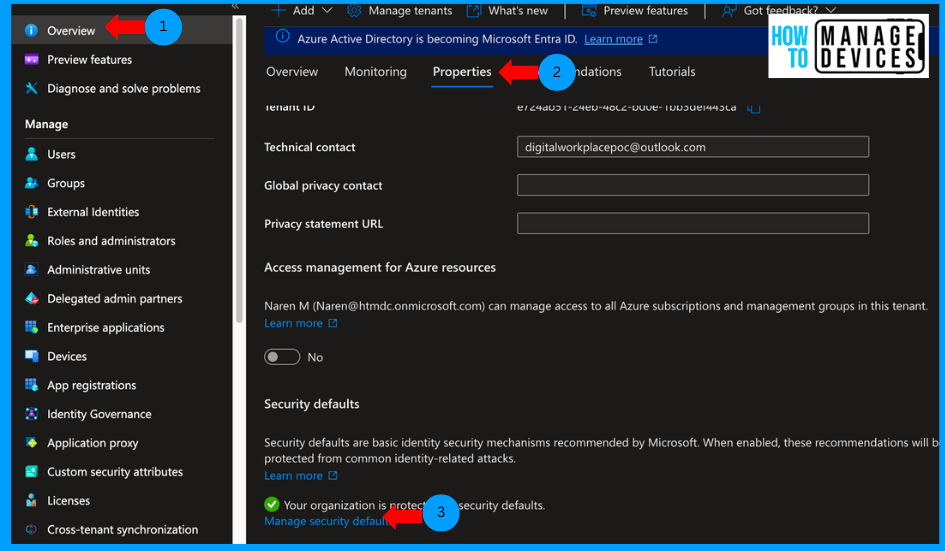
Scroll to the bottom to Security Defaults and click on Manage Security Defaults. You will see the enable or disable option. If you have an old tenant, you will see the option disabled selected. Click on Enable, and click on Save. This will force all users to register to MFA.
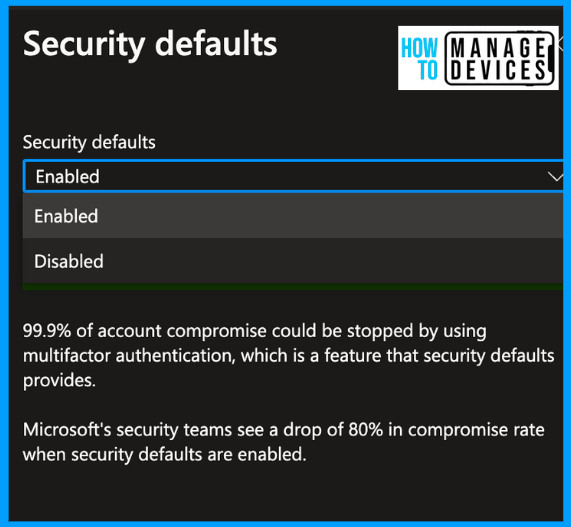
If your tenant already has subscribed for Conditional access policies and has some Conditional Access policies configured, clicking manage Security defaults gives you CA policies that are configured. To configure the settings, a user should have at least a Security Administrator role or higher role assigned in Azure.
Enforce Multifactor Authentication using Per-User MFA
We can enforce MFA per user to implement this, and we need to purchase additional licenses. In the above scenario, we do not have granular control over users or groups to enforce MFA. With Per-User MFA, we can deploy MFA for all users or a few users as per organizational requirements. Let’s see how we can enforce MFA in the Per-user method in the below steps.
- Login to the Azure portal
- Search for Azure active directory
- Click on Users
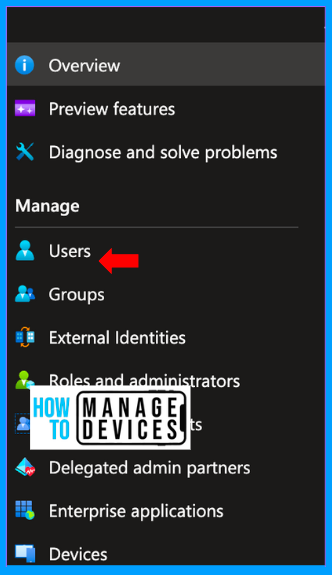
Under the All Users tab, click on Per-User MFA. This will redirect you to Active Directory user management, where you can configure the MFA for a single user or multiple users.

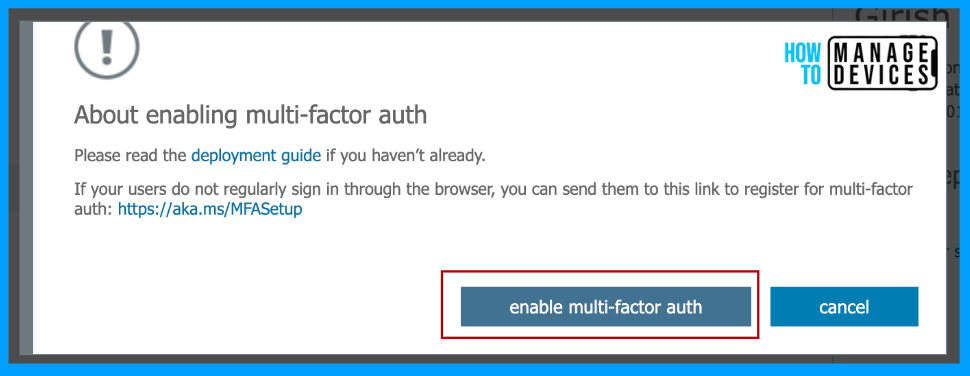
Sign in to the User Management portal. After a successful login, you will be shown all the users available in your organization. Now select a user and click on Enable under Quick Steps. Once you click Enable, you will be prompted with a message in the image below.

Click on enable multifactor auth to enable MFA for selected users, and this will force the user to set up MFA on the next login. Now that we enforced MFA, users can skip the MFA for 14 days. After 14 days, users are forced to configure MFA.
The 14-day timer is triggered from the first time the user tries to log in after enforcing the MFA. It doesn’t calculate from the policy creation date. This way, we can ensure all users get 14 days of time to configure MFA. Even if users are on vacation, they will get 14 days of time.
User Experience and Setting Up Microsoft Authenticator
Now that we have successfully enforced Multifactor authentication let’s see the end-user experience after MFA is enforced. To check the behaviour, I have chosen the Outlook web app. After the user enters credentials, the user is presented with a message to set up MFA, and the user can skip it for 14 days, as mentioned above, by clicking on Ask Later.
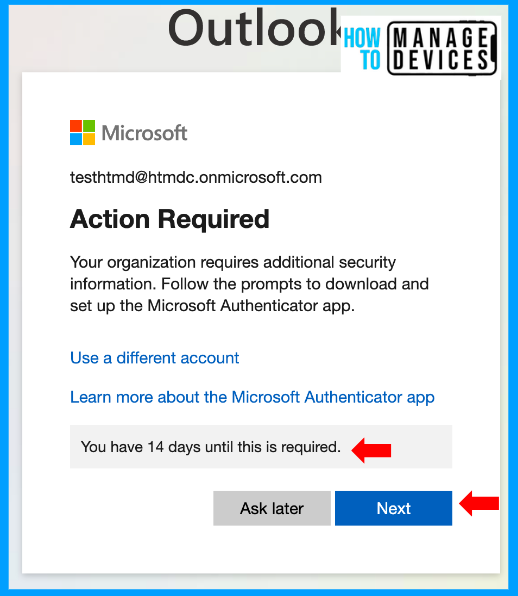
If the user wishes to set up now and then, click on Next. This will take you through a series of steps. The first step prompts the user to download the Microsoft Authenticator app. Download the app from the Play Store or App Store based on your device model and click on Next.
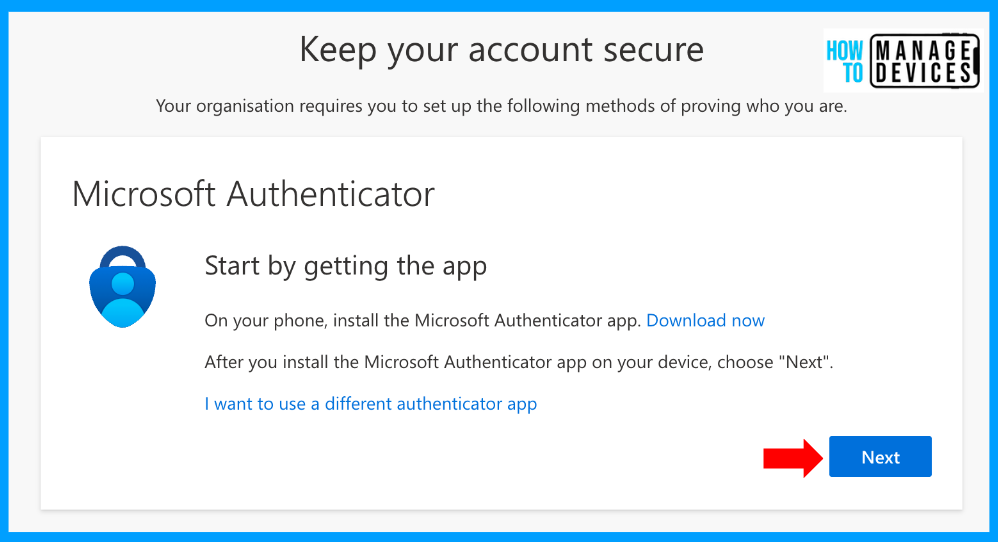
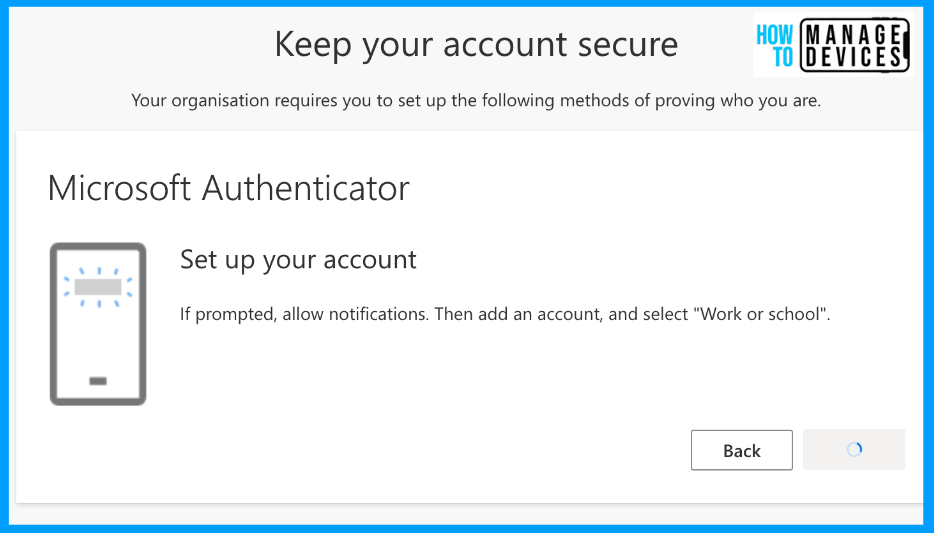
Alternatively, users can use third-party MFA by clicking on “I want to use a different authenticator app“. For our discussion, I have chosen Microsoft Authenticator. In the next screen, the user is prompted to select the account type as work or school account, select the same in the app and click on Next.
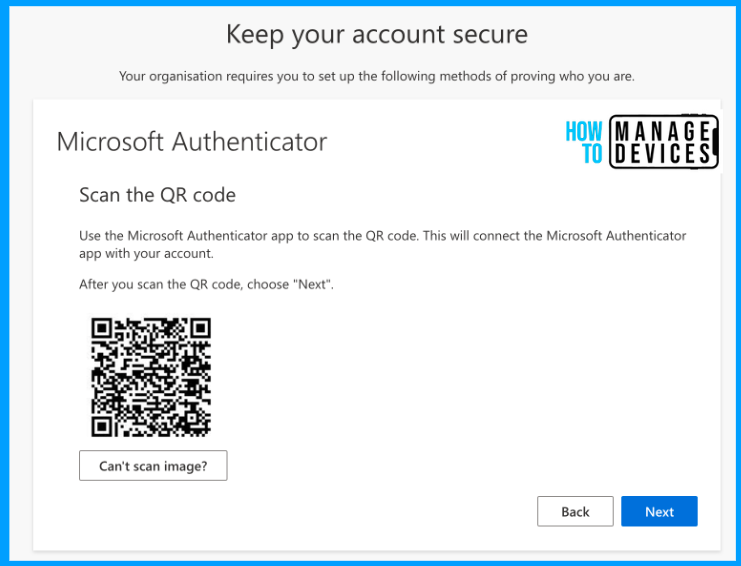
Now, the user needs to open the Authenticator app >> Click on the + button on the top right corner, choose Work or School account and select the QR code option to scan the QR code displayed on the screen. Once scanned, your account will be added to the app and click on Next. This will add your MFA account to the Authenticator app, and this will complete the configuration of the Microsoft Authenticator app.
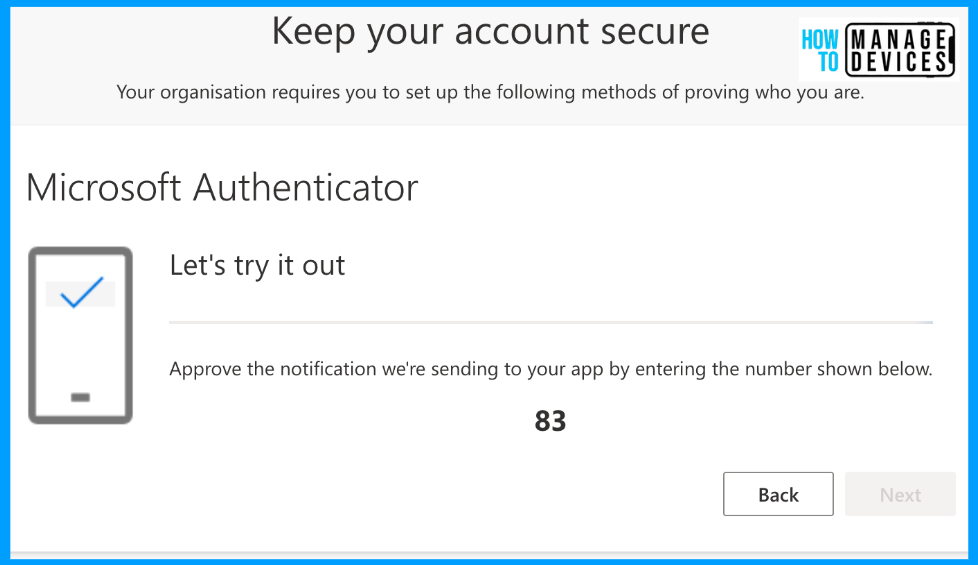
The user will be prompted to approve the code displayed on the screen. Once the user approves, the user can log in to the app that the user is trying to access. From now on, whenever the user tries to access the application, the user will be prompted with MFA.
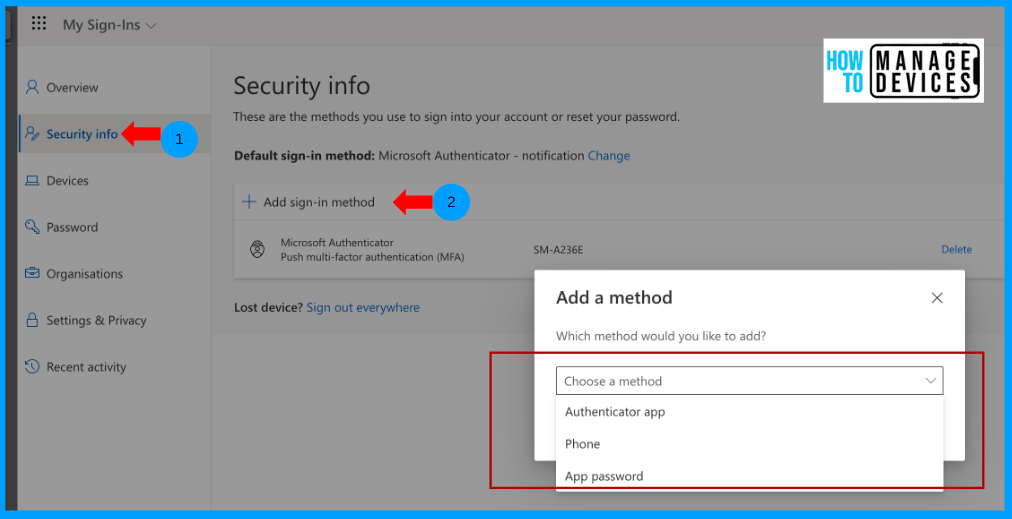
Users can access or modify their authentication method by logging into the My signin page, then clicking on Security Info, clicking on Add Sign-in method, and choosing the Phone to add your Phone number or Authenticator app to add another device.
Due to security reasons on the Authenticator app, I could not capture the screenshots from mobile devices. I have also explained the respective steps to configure the authenticator app on mobile.
Conclusion
This way, you can force users to configure Multifactor authentication for their accounts. We have a few other methods to force MFA to end users. One other popular way many organizations use is using Conditional Access Policies. We will discuss it in another topic. I hope in this article, we discussed something new that you can use to implement in your organization as per your requirements.
Author
About Author – Narendra Kumar Malepati (Naren) has 11+ years of experience in IT, working on different MDM tools. Over the last seven years, Naren has been working on various features of Intune, including migration from different MDMs to Intune. Naren mainly focuses on Android, iOS, and MacOS.
