Let’s learn to Try 10 Secret Tricks for Command Prompt options in Windows 11. As we all know, there are many commands in the command prompt for doing many works. As the DOS is an ancient operating system, Microsoft still carries this feature in every version of Windows.
The command prompt is used in most sensitive cases to hide some folders, documents, etc. Command prompt holds endless possibilities. A person may be the expert of the command prompt, or you can use it to show off. It can trace the data packet used by any website in a modern OS.
The command prompt is not as powerful as Unix commands, but many tricks make the command prompt helpful to have with OS. The Command Prompt (aka CMD) can let you do some tasks that can not be done by the GUI interface. Check out the 53 Most Common Run Commands for Windows.
This article discusses some secret tricks of command prompts in detail. The usage of the command is described clearly, and also sharing some tricks to remember. This shows the history check option, Hide RAR files, use of Telnet, Tracert, etc.
What are the Secret Tricks for Command Prompt in Windows 11
There are many secret tricks to know about them. Some of the tricks are listed below for reference. These are discussed in detail.
- Open Command Prompt Inside a Directory
- Command Line History Check
- Customize Command Prompt
- Hide RAR files
- Find Information About Any Command
- Open Command Prompt Always in Administrator
- Microsoft Telnet Client
- Telnet Telehack.com
- Play RPG Games Using Command Prompt
- Tracert
Let’s take a look in detail at the above command prompt tricks. These are described in detail and the usage step-by-step.
1. Open Command Prompt Inside a Directory
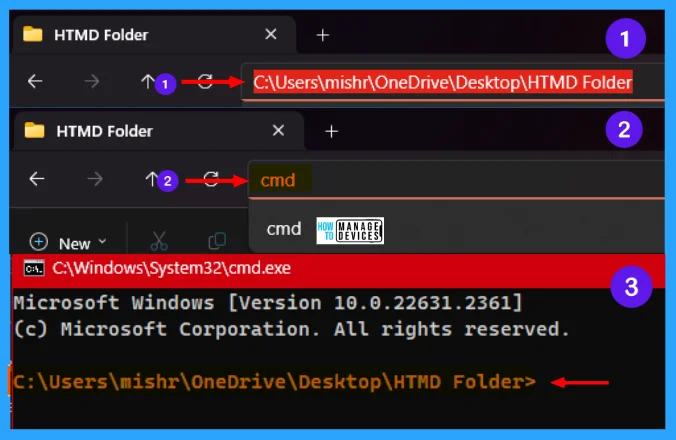
Sometimes, people can not reach a location in the command prompt. Windows handles changing directories using the cd command. It is very typical to understand everyone. But there is a simple way to open the Command Prompt inside a directory, which helps users reach their desired location in the command.
This is a very nice trick, especially if the folder you want to access is buried deep inside the filesystem. To execute the command, go to the folder you want using File Explorer, when you reach your destination, type CMD in the address bar and hit Enter. Then you get the location at the Command Prompt, as illustrated below in the image.
2. Command Line History Check
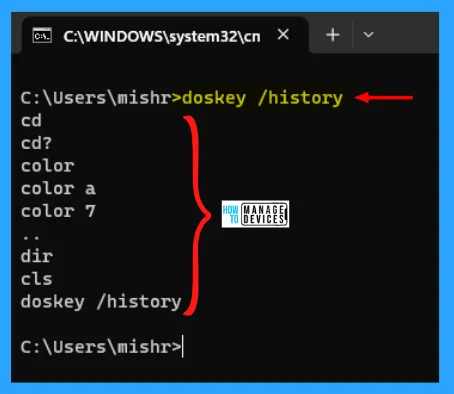
In the command prompt, users only know the UP arrow key to see the command entered by the user previously. However, the problem is that the user is unable to trace the command executed earlier. There is a command to check all your executed commands in a chronological list.
The command is doskey /history. Here you can not select the commands and execute them, rather, you have to type them manually. So this command is good to know the commands you executed earlier. But not a good solution.
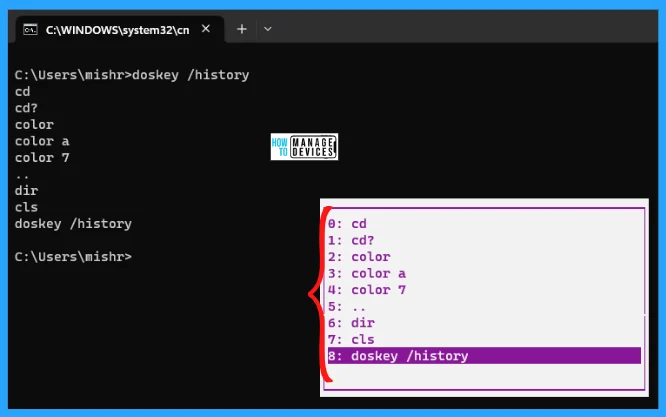
Further, there is a solution to that problem. If you want to run any previously used command you used without typing, then after you execute your commands, just press F7 from your keyboard. In the case of a laptop, you need to press Fn + F7 to get the result. Then select your desired command and be ready to execute it, as shown in the image below.
3. Customize Command Prompt
This is another trick to customize your command prompt window. To customize, open the command prompt, right-click on the Title bar, and then click on Properties. The image shows the Properties window and the subtabs listed below.
- Options
- Font
- Layout
- Colors
- Terminal
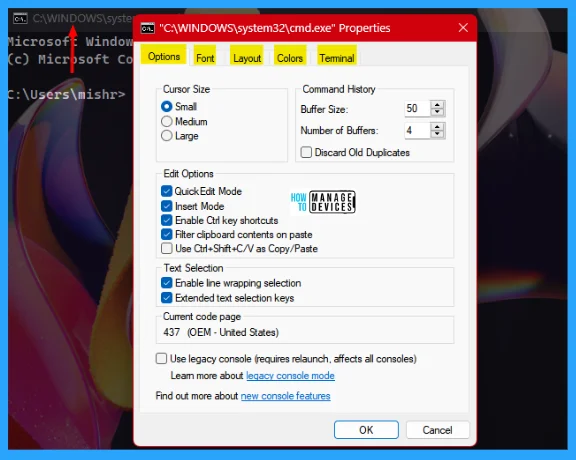
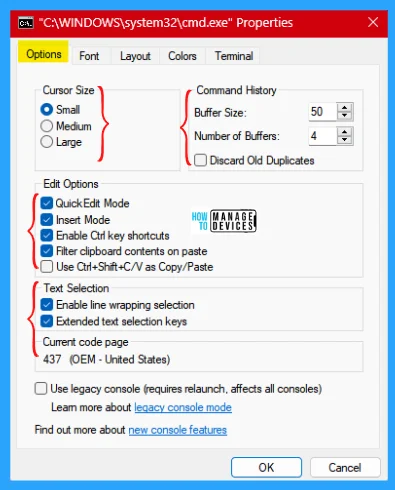
Options
The options tab is the default tab that opens first when entering into the property of the command prompt. From here, you can custom Cursor Size, Command History, Edit Options, and Text Selection as illustrated below.
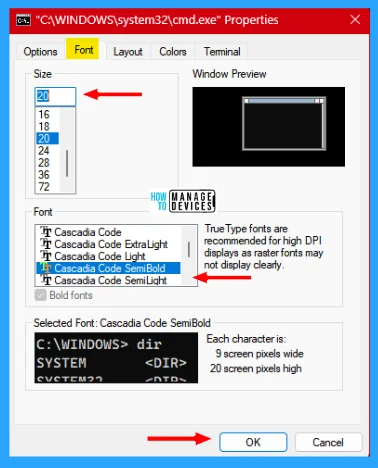
Font
The Font is the second tab of the properties window of the Command prompt. Under the font tab, you can increase or decrease the size of the fonts. You can change the style of the font from the given font options. True type fonts are recommended for high DPI displays as raster fonts may not display clearly.
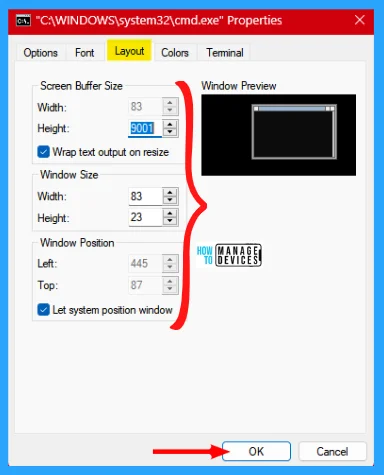
Layout
Under the Layout tab, the user is able to set the screen buffer size and allows text output to wrap in. Also, set the Width and height to manage Window size, and the user can set the window position of the command prompt manually or let the system position the window for auto size adjustment.
Colors
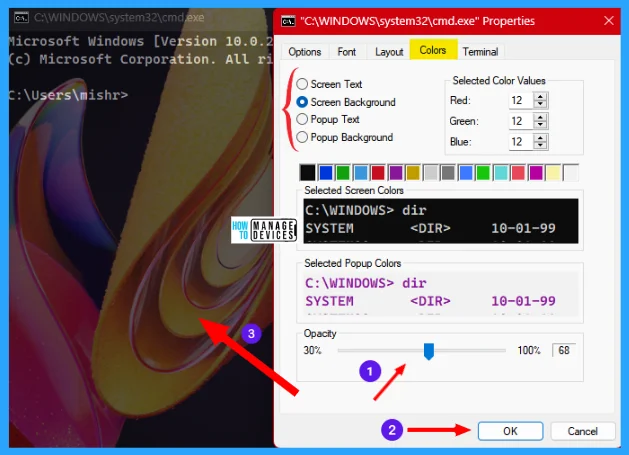
Under the Colors tab, the user can change the background and foreground color using the options. The colors can be changed using some commands, click the Link to learn how to change color by executing some commands.
The trick under the color tab is, the user can make the background transparent. Under the Color tab, there is a sub-option available as Opacity. As illustrated below, the more you decrease the opacity value, the more transparent the background becomes.
Terminal
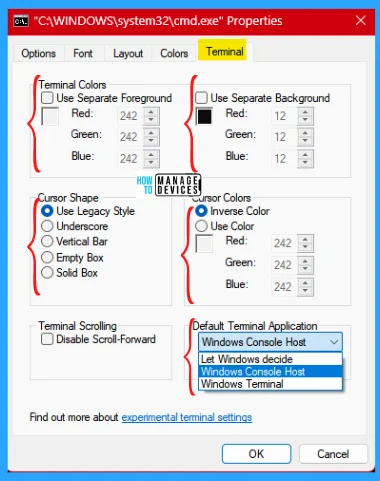
Under the Terminal tab, the user can change the Terminal Colors and Use a separate background color. The user can adjust the cursor by selecting different designs available there. Here user can set the Default terminal Application.
Windows Console Host is the original way to open the command prompt window. Window Terminal is used to open the command prompt in Terminal Application. Let Windows decide if selected, then it decides how to open the command prompt, randomly, it chooses the latest application to open the command prompt.
4. Hide RAR files
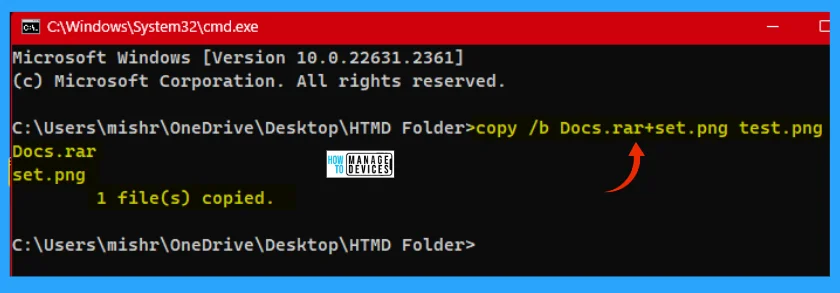
The Command Prompt facilitates a command that lets you attach two files into a single file. This command merges the content of basic file types such as TXT or CSV. Also, it is used to hide RAR files with image files or text files.
Open the directory, where you want to perform the task. As shown in serial 1 (one), open the command prompt from there. There is a specific command to achieve, follow the command below.
copy /b rar_filename.rar+image_filename.extension result_filename.extension
The resulting file is test.png, the PNG file displays as a normal image file, but it needs to open using WINRAR or any file extractor tool. Then you can able to find the hidden file under the image. This is how you can save and hide your sensitive data from others.
5. Find Information About Any Command
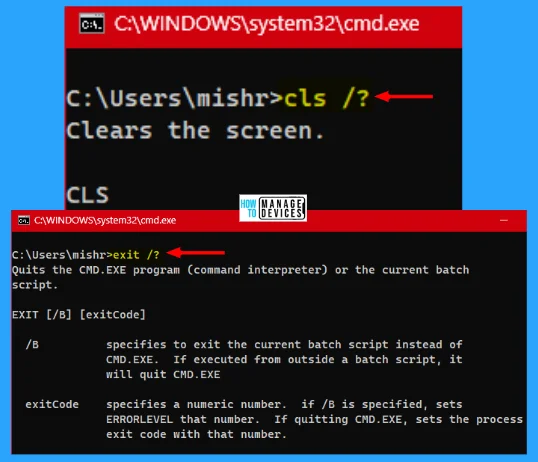
In the command prompt, there are many commands to use. However, the user uses commands without knowing much about the commands. Luckily a command is available to know the details about any commands. Command prompt provides you with a better overview of the command usage and syntax.
In the command prompt, type any command, give one space, and add /? (Backslash with question mark symbol), and hit Enter. Now it will show the details about the command that is illustrated below.
6. Open Command Prompt Always in Administrator
Those users who deal with system files and applications know they must always open the command prompt window with Administrator privileges. By default command prompt opens with a normal account. This makes user to difficult to access Admin privileges in the middle of any operations.
To avoid this type of situation, there is a provision that you can change the default behavior of the command prompt. This allows you to always open the command prompt with Admin privileges. Click on the Link to learn the process of changing the default setting.
7. Microsoft Telnet Client
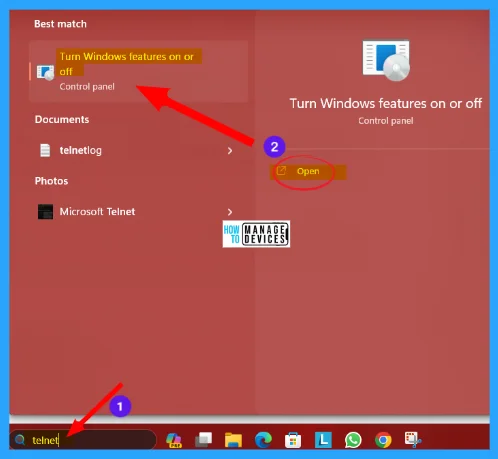
There is a process to access the Microsoft Telnet Client version in Windows by installing it on your system. To do so, press Win key + Q and type telnet. The Turn Windows features on or off options appear under the Control Panel, click on it to open.
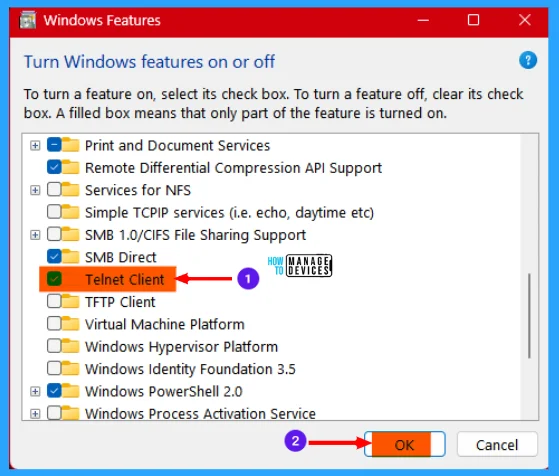
Now the Windows Features window is open. Scroll down for the options under it, when you find the Telnet Client option, check the box near it and press OK to turn the feature on.
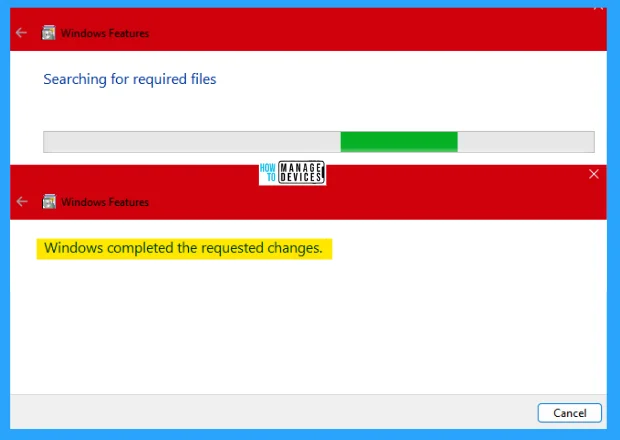
Now Windows searches for required files for the feature to work properly and install the needed files. After completion, it shows Windows completed the requested changes and click close.
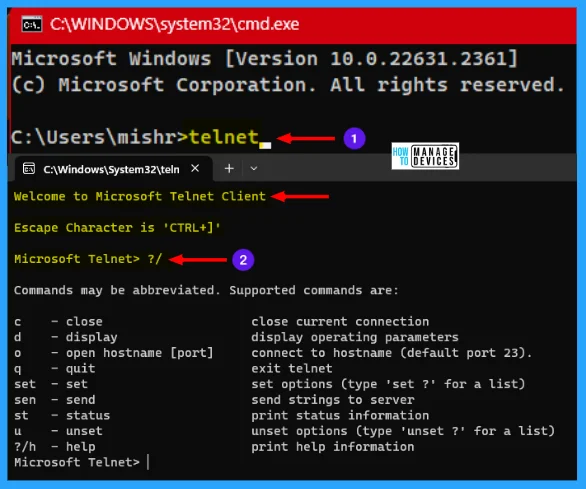
Open the command prompt window, type telnet, and hit Enter. It moves to the Microsoft Telnet Client window and the console address as Microsoft Telnet. When the telnet opens, type ?/ or ?/h to know the command which is used under it. The commands are shown in the table & image below.
| Commands | Meaning | Description |
|---|---|---|
| c | close | Close current connection |
| d | display | Display operating parameters |
| o | Open hostname [port] | Connect to hostname [default port 23] |
| q | quit | Exit telnet |
| set | set | Set option |
| sen | send | Send strings to server |
| st | status | Print status information |
| u | unset | Unset options |
| ?/ or ?/h | help | Print help information |
To know more about the set command, you need execution the set command followed by the question mark (?), and then you get detailed information about the particular command.
| Commands | Descriptions |
|---|---|
| bsasdel | Backspace will be sent as Delete |
| crlf | New line mode – causes return key to send CR & LF |
| delasbs | Delete will be sent as backspace |
| escape x | x is an escape character to enter telnet client prompt |
| localecho | Turn on localecho |
| logfile x | x is current client log file |
| logging | Turn on logging |
| mode x | x is console or stream |
| ntlm | Turn on NTLM authentication |
| term x | x is ansi, vt000, vt52, or vtnt |
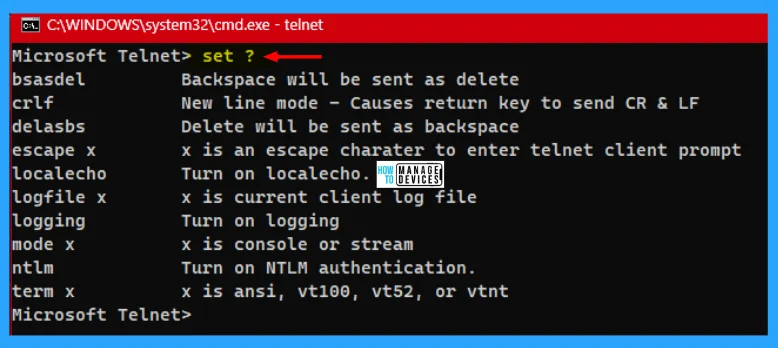
To know more about the sen command, you need execution the sen command followed by the question mark (?), and then you get detailed information about the particular command.
| Commands | Descriptions |
|---|---|
| ao | Send telnet command ‘Abort Output’ |
| ayt | Send telnet command ‘Are You There’ |
| brk | Send telnet command brk |
| esc | Send current telnet escape character |
| ip | Send telnet command ‘Interrupt Process’ |
| synch | Send telnet command synch |
NOTE: Any other string will be sent as it is to the telnet server.
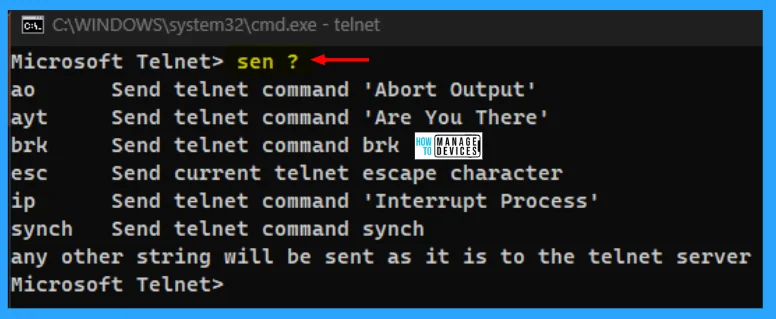
To know more about the u command, you need execution the u command followed by the question mark (?), and then you get detailed information about the particular command.
| Commands | Descriptions |
|---|---|
| bsasdel | Backspace will be sent as backspace |
| crlf | Line feed mode – causes return key to send CR |
| delasbs | Delete will be sent as delete |
| escape | No escape character is used |
| localecho | Turn off localecho |
| logging | Turn off logging |
| ntlm | Turn off NTLM authentication |
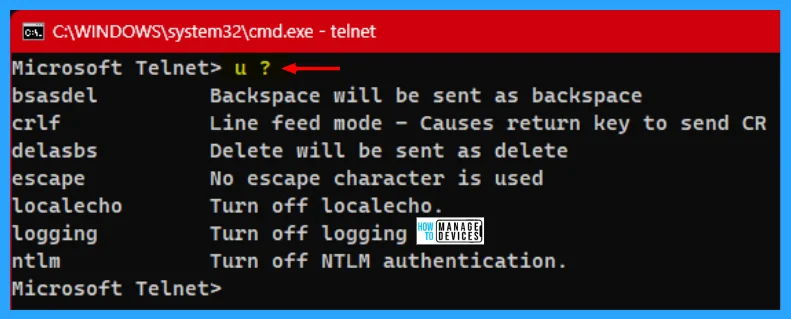
8. Telnet Telehack.com
From the above, you learn how to install telnet in Windows 11. Now open the command prompt, type telnet telehack.com, and hit Enter. It connects you to the TELEHACK port 216 and shows many commands to achieve.
These commands are common commands for all users. More commands are available after you log in. To create a new account, you need to type NEWUSER.
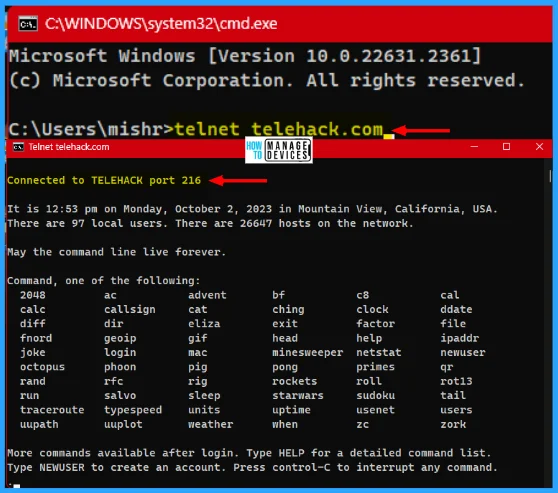
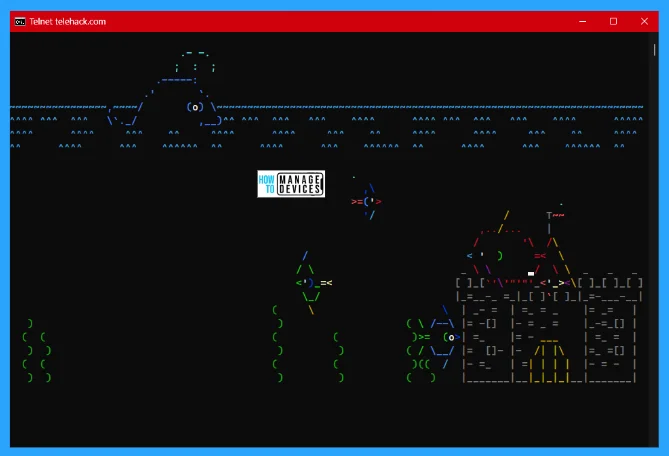
You can find many games amazing things under the telnet telehack command. Type aquarium and hit Enter, you can see there is text aquarium appears and create an illustration of an aquarium.
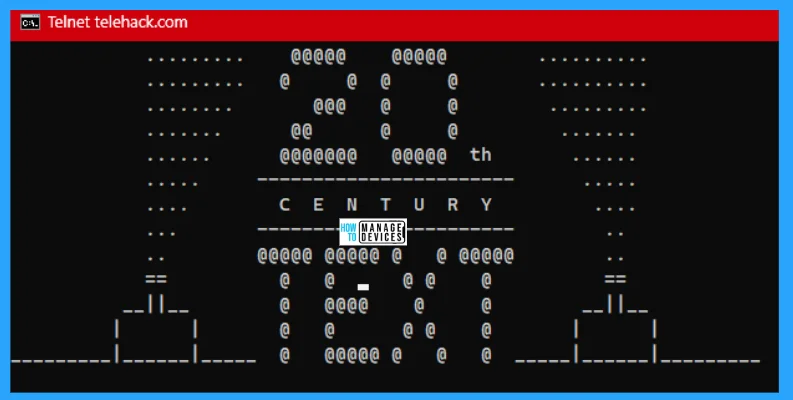
As you can see, the fun fact about telnet is that there is another, you can watch text starwars on the command prompt. In the telnet telehack.com window type starwars and hit Enter. Now you can see the movie starts as shown in the image below.
9. Play RPG Games Using Command Prompt
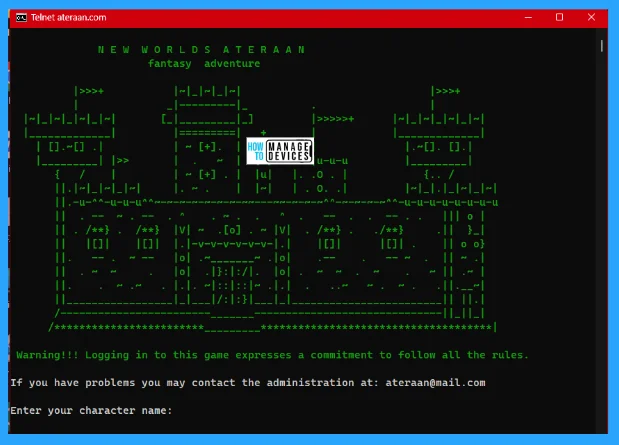
If you like to play role-play games, then you should try the Ateraan, it is a text-only role-play game that can be played only in the command prompt on your PC.
To play the game, you have to type telnet ateraan.com 4002 in the command prompt and hit Enter. This will connect with the Ateraan server with the connected port 4002. After connecting the game launches, you have to create your character and start your journey in the role-playing game.
10. Tracert
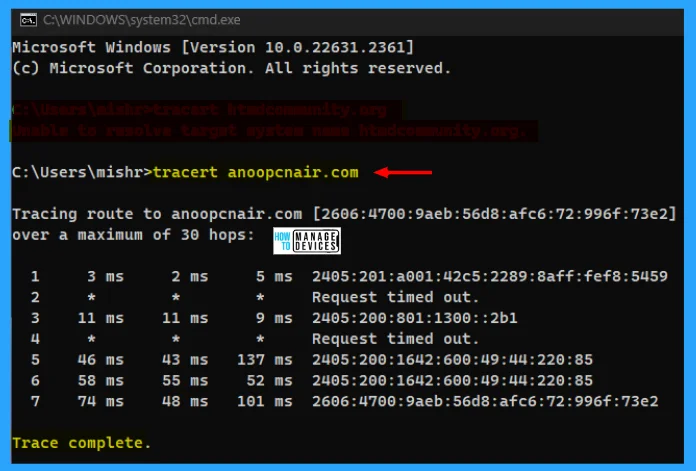
TRACERT (Trace Route), is a command-line utility that you can use to trace the path that an Internet Protocol (IP) packet takes to its destination. It is the way to trace your data packets’ route through the internet. Each modern OS can trace the route.
If you start Traceroute, tell the website or server you want to trace. You have to put a website URL to reach, but on the other hand, you can use an IP address also.
When you initiate the traceroute, it sends packets from your system to the selected destination. Then the packets travel and send the information back to your PC, and the information is in front of you.
To perform in the command prompt, type tracert <Website URL> or <IP Address> and hit Enter. It takes some time to produce the result.
I hope the information on the Try 10 Secret Tricks for Command Prompt options in Windows 11 is helpful. Please follow us on the HTMD Community and visit our website HTMD Forum, if you like our content. Suggest improvements, if any, and we love to know which topic you want us to explore next.
Author
Alok is a Master of Computer Applications (MCA) graduate. He loves writing on Windows 11 and related technologies. He likes to share his knowledge, quick tips, and tricks with Windows 11 or Windows 10 with the community.
