Let’s learn the best methods to change Screen Brightness on Windows 11 using various methods. Windows 11 provides different ways to control the brightness. We will discuss different types of methods in this post.
When you Turn On Dark Mode, the screen brightness on Windows 11 will automatically change. The theme also helps to adjust the brightness of the screen. Even the applications and website interfaces change the screen brightness on Windows 11.
You can use some other features available in Windows 11, such as Night Light mode, to adjust the screen’s brightness. The Night Light mode helps to reduce the Blue Light while using a laptop.
Windows 11 Transparency Effects can also help adjust the screen brightness differently on laptops and desktops. The transparency effects feature it slightly transparent while accessing the Settings menu, Start, and taskbar.
If you spend a lot of time around your device, you must know the best option to change the Windows 11 screen brightness. Your Laptop’s brightness level constantly varies based on the lighting conditions to provide the best experience while using PCs.
Why Adjust the Screen Brightness on Windows 11?
Adjusting the Windows 11 display brightness improves visibility, saves energy, especially when on battery mode, and helps the user avoid eye strain.
When your Windows 11 laptop or desktop is situated near the window or outdoor, you might need to adjust the display brightness throughout the day according to the brightness of your surroundings.
With new improvements, If a person adjusts their display brightness, that brightness will now be remembered as their preferred brightness whether they are on battery or connected to a charger. This new behavior results in a more consistent and battery-friendly experience.
This does not affect battery saver mode settings; if a person has opted to lower the screen brightness in battery saver mode, their display will still dim when the battery is below the selected threshold.
Quickly Change Screen Brightness from Quick Settings
Windows Quick Settings is the place for you to manage common PC settings quickly and easily. In this scenario, Let’s change the brightness of the Windows 11 laptop from Quick Settings.
- Click on a set of status icons (Internet, volume, or battery) Quick Settings button in the lower-right corner of the screen or Press the Keyboard shortcut (Windows Key + A) to access Quick Settings.
- Here you move the Brightness slider to adjust the brightness

Change Screen Brightness from Windows Settings
Let’s follow the steps to adjust your brightness from Windows 11 Settings.
- On Windows 11 device, Select the Start button, and then select Settings.
- In Settings, Select System > Display.

Move the Change brightness slider to adjust the screen brightness on Windows 11.

Change Screen Brightness using PowerShell
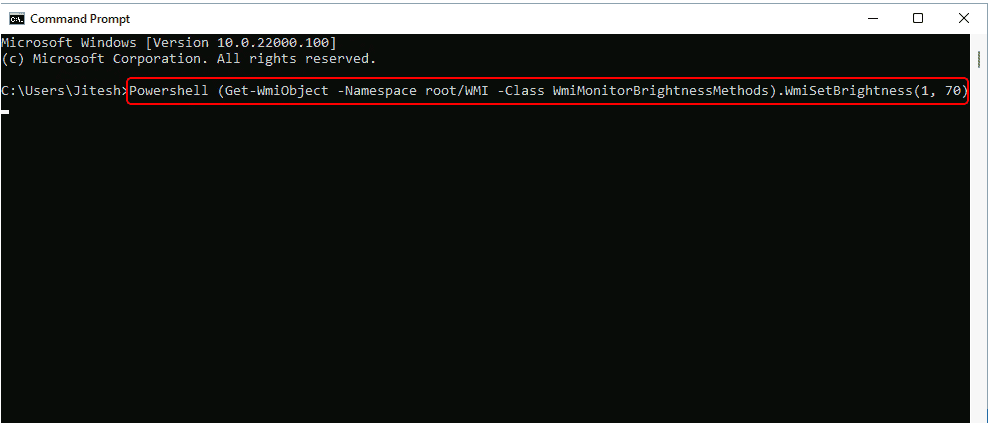
Here’s how you can use PowerShell to change the brightness level in Windows 11. You can start PowerShell or Windows Terminal with the PowerShell command below to adjust screen brightness on Windows 11 devices.
(Get-WmiObject -Namespace root/WMI -Class WmiMonitorBrightnessMethods).WmiSetBrightness(1, Add Brightness level Percentage)You can increase or decrease the brightness level percentage value from 0 to 100. Here we adjusted to a 70% brightness level.

Change Screen Brightness using Command Prompt
Here’s how you can use Command Prompt to change the brightness level in Windows 11.
- Open Command Prompt.
- Type the command below into the command prompt and press Enter.
Powershell (Get-WmiObject -Namespace root/WMI -Class WmiMonitorBrightnessMethods).WmiSetBrightness(1, Add Brightness level Percentage)You can increase or decrease the brightness level percentage value from 0 to 100. Here we adjusted to a 70% brightness level.
Turn On or Off Transparency Effects using Personalization Settings
If you have transparency turned on, When you open the Start menu, it appears with the blur effect. A full-screen Start will become more transparent to see the desktop background behind it. This helps to adjust the screen brightness on Windows 11 laptop.
Let’s check the quick option to Disable Transparency using the context menu.
- Right-click on your Desktop. Select Personalize in the context menu.
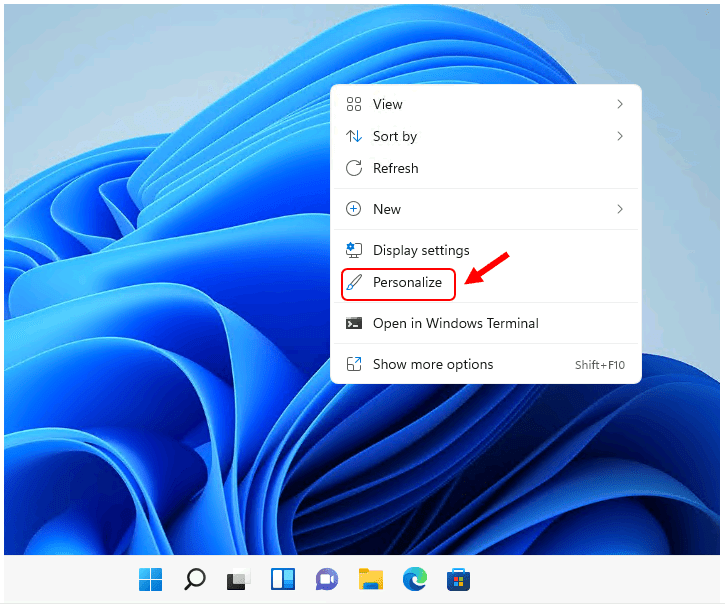
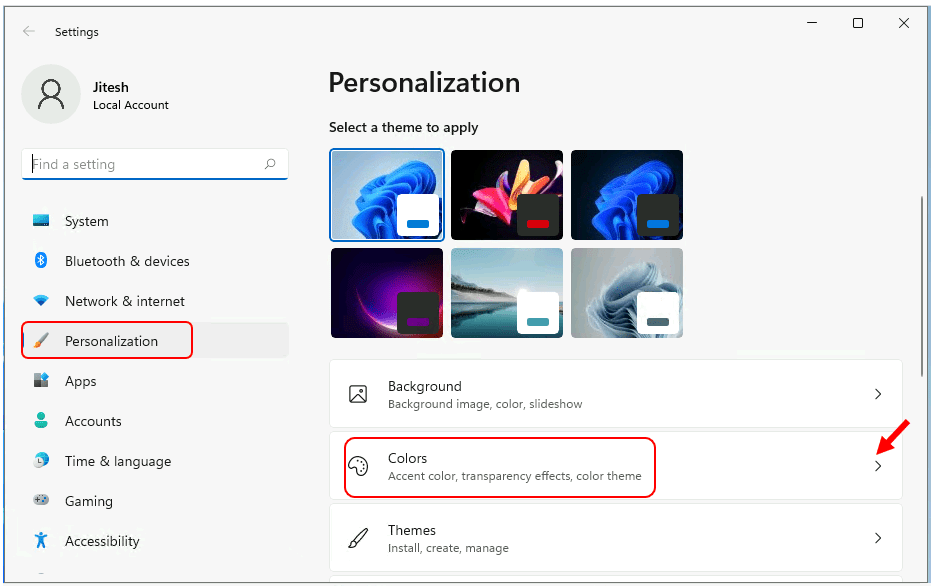
You can Right Click on Desktop and select Personalize. You will be redirected to Personalization settings. Now, you need to select the Colors option.
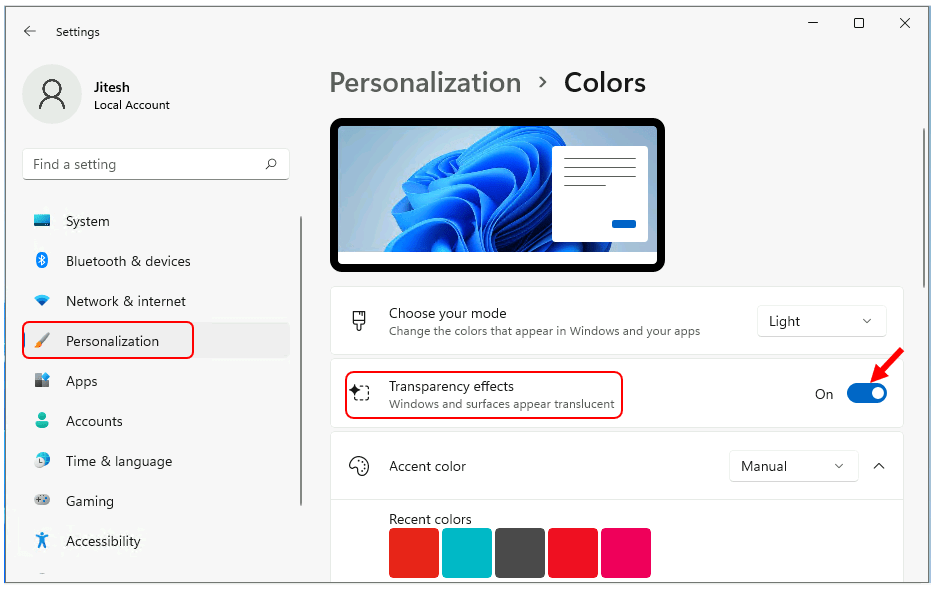
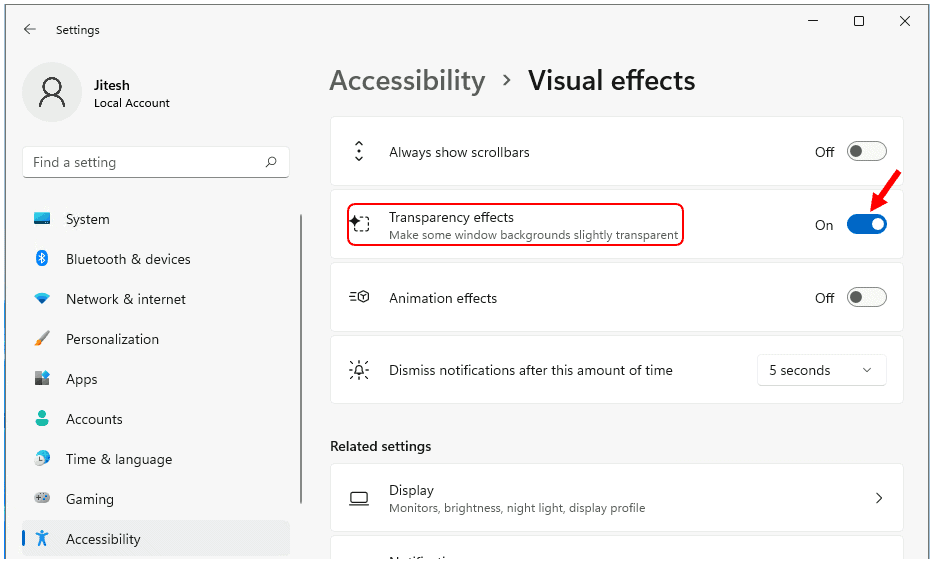
Toggle the switch to turn On or Off Transparency effects on the right side. Windows and surfaces appear translucent with this setting. This setting will have some effect on the brightness of the screen.
Turn On Transparency Effects using Accessibility Settings
To turn on the transparency effects, let’s follow the steps below. This helps to adjust Windows 11 screen brightness using the transparency effect using Accessibility Settings.
- Click on the Start button, and then select Settings.
Press the Windows + I keyboard shortcut to directly open Windows Settings.
- Click on Accessibility on the left side, and click on Visual effects on the right side.
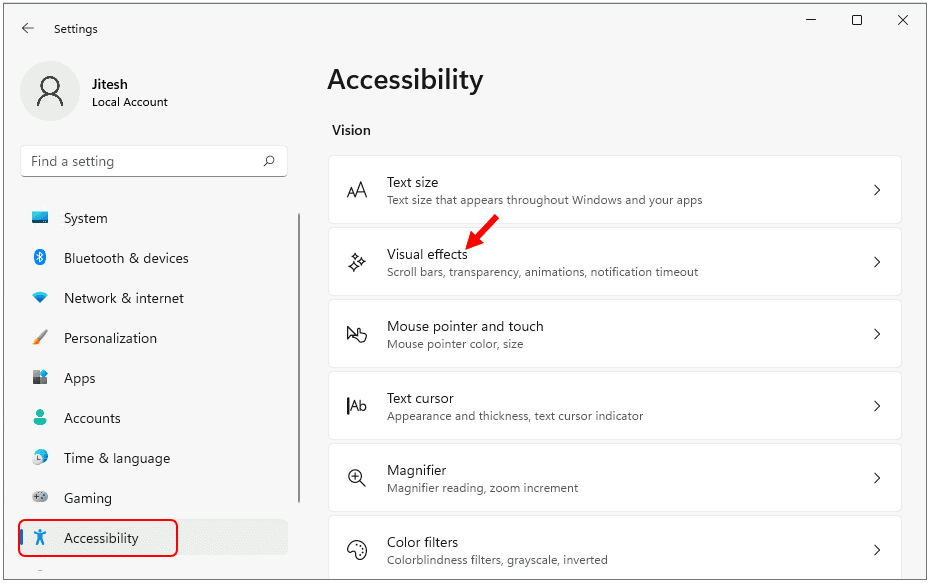
Toggle the switch to turn On or Off Transparency effects on the right side. This helps to adjust the screen brightness of the Windows 11 laptop.
Turn On Night Light in Quick Settings
Night Light mimics the sun setting and the darkness of night that has ambient light qualities. We all know how important it is to protect our eyes from harmful rays, and It protects your eyes from the feeling drain when working in the dark.
You can use Quick Settings to Turn Off or ON Night Light on Windows 11 laptop. The quick settings menu is the place for you to manage common PC settings quickly and easily.
- Click on a set of status icons (Internet, volume, or battery) Quick Settings button in the lower-right corner of the screen or Press the Keyboard shortcut (Windows Key + A) to access Quick Settings.
- Click on Night Light to toggle it On or Off.
- To quickly open settings, you can right-click on the Night Light button and select Go to Settings.

Turn On Night Light from Windows Settings
You can turn On the Night light on Windows 11 to adjust the screen brightness settings. Let’s follow the steps below to turn on the Night Light from the settings app.
- On Windows 11 device, Select the Start button, and then select Settings.
- In Settings, Select System > Display.
Press the Windows + I keyboard shortcut to directly open Windows Settings.

Toggle switch to turn On or Off Night Light on the right side.

Here you can move the Strength slider to adjust from 1 to 100. Click on the Turn on now or Turn off now button to Show warmer colors on your display to help you sleep.
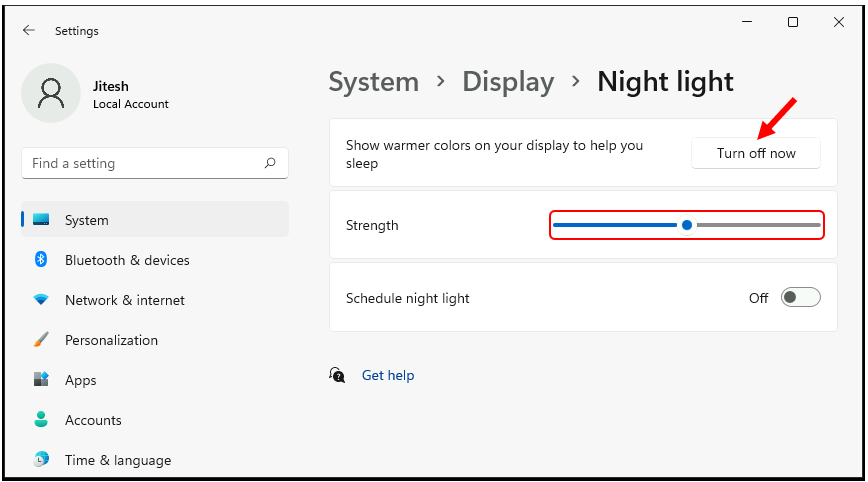
Under Schedule, toggle Schedule night light to On. Then, select Sunset to sunrise or select Set hours and enter custom times for the night light to turn on and off.
- Sunset to sunrise – Windows will set a schedule depending on the sunset and sunrise times in your current location; the time will adjust every day automatically.
- Set hours – You can use this option to customize times when to activate Night hours.
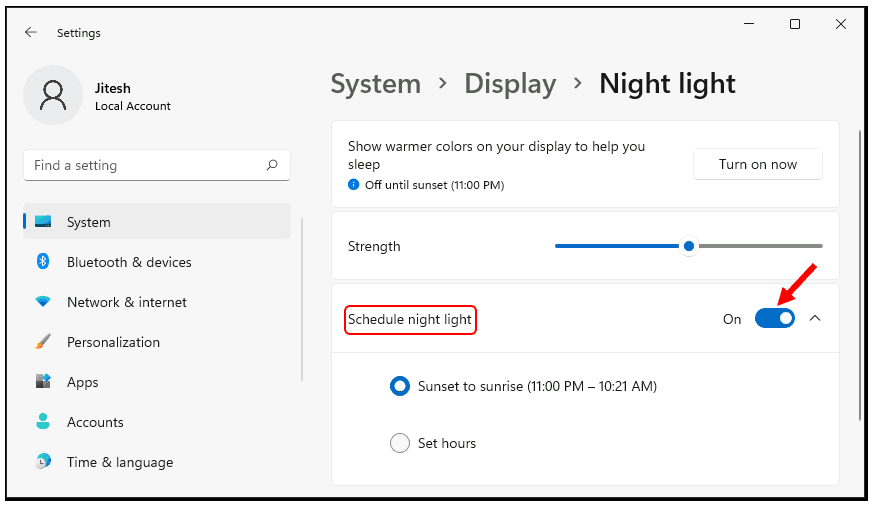
The Night light will enable on your device. If you’re doing this during the day, you’ll notice that it’ll remain turned off until nighttime using the default settings. This intern helps to adjust the Windows 11 screen brightness settings.
