Let’s learn how to access Windows Device Portal in Windows 11. The Windows Device Portal (WDP) is a web server included with Windows devices that lets you configure and manage the settings for the device over a network or USB connection (local connections are also supported on devices with a web browser).
WDP also provides advanced diagnostic tools for troubleshooting and viewing the real-time performance of your Windows device. It is a device management and debugging tool that lets you configure and manage device settings and view diagnostic information from your PC over HTTP from a web browser.
Each device family provides a version of the WDP, but features and setup vary based on the requirements of a device. You should enable Developer Mode to enable the Windows Device Portal on your device. If you are using your computer for ordinary day-to-day activities (such as gaming, web browsing, email, or Office apps), then there is no need to activate Developer Mode.
If you are writing software with Visual Studio on a computer for the first time, you must enable Developer Mode on both the development PC and any devices you use to test your code. In this post, you are provided a general description of the Windows Device Portal.

Windows Device Portal
Windows Device Portal (WDP) is a device management and debugging tool that lets you configure and manage device settings and view diagnostic information over HTTP from a web browser. You can use the WDP for the following:
- Manage device settings (similar to the Windows Settings app)
- See and manipulate a list of running processes
- Install, delete, launch, and terminate apps
- Change Wi-Fi profiles, view signal strength, and see ipconfig details
- View live graphs of CPU, memory, I/O, network, and GPU usage
- Collect process dumps
- Collect ETW traces
- Manipulate the isolated storage of sideloaded apps
How to Set up Windows Device Portal in Windows 11
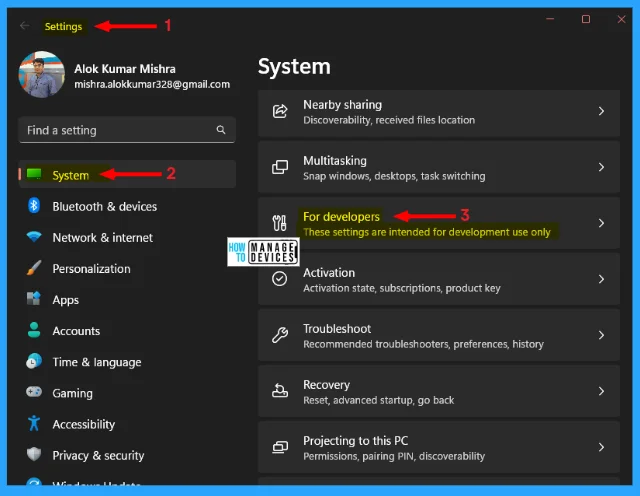
Each device family provides a version of the WDP, but features and setup vary based on the requirements of a device. You can enable WDP in the For Developers section of Settings. To do so, go to settings by pressing Win Key + I, then under the System menu, scroll down, and click on For Developers (these settings are intended for development use only).
NOTE! In some devices, the path is open Settings> Privacy & Security > For Developers.
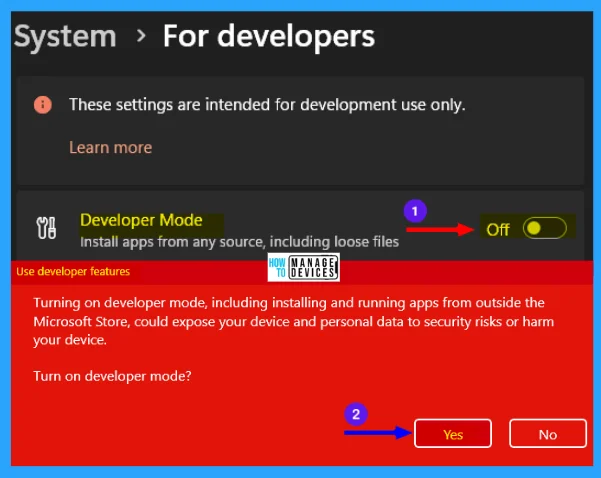
Under the For Developers option, you can see the option Developer Mode toggle the button ON to enable Developer Mode. To enable the Device Portal, you must turn on the Developer Mode. A user message pops up when you toggle on the button.
Turning on developer mode, including installing and running apps from outside the Microsoft Store, could expose your device and personal data to security risks or harm your device. Here click on YES to turn on the Developer Mode.
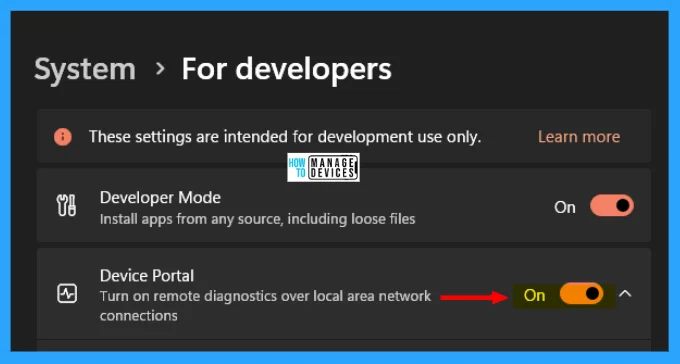
Now that the Device Portal option is there toggle the button ON to enable the Device Portal to turn on remote diagnostics over local network connections. Then click on Device Portal to expand.
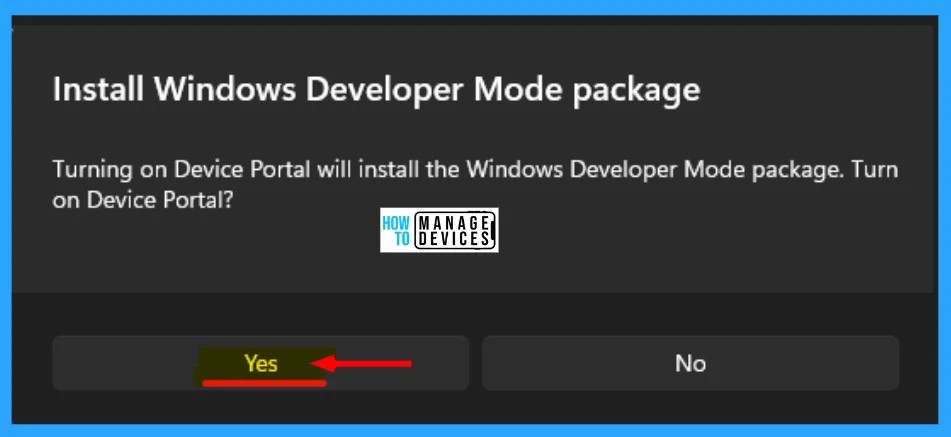
When you toggle the button ON, the Install Developer Mode package pop-up appears. It says Turning on Device Portal will install the Windows Developer Mode package. Turn on the Device Portal, click Yes to continue, and expand the Device Portal option for further process.
When the Device Portal is expanded, toggle the button ON to enable Authentication. Then there is a feature such as Provide a username and password, click on the Edit button next to it.
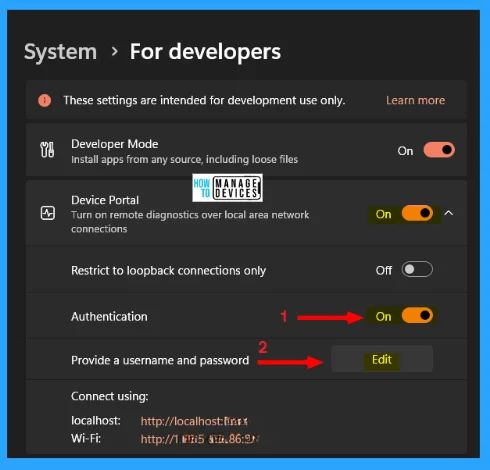
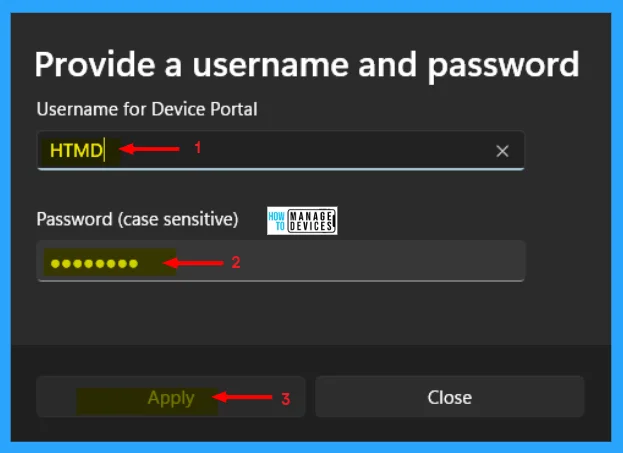
Now the Provide a Username and Password is open, here, mention a Username for Device Portal and Password, which is case sensitive, then click Apply.
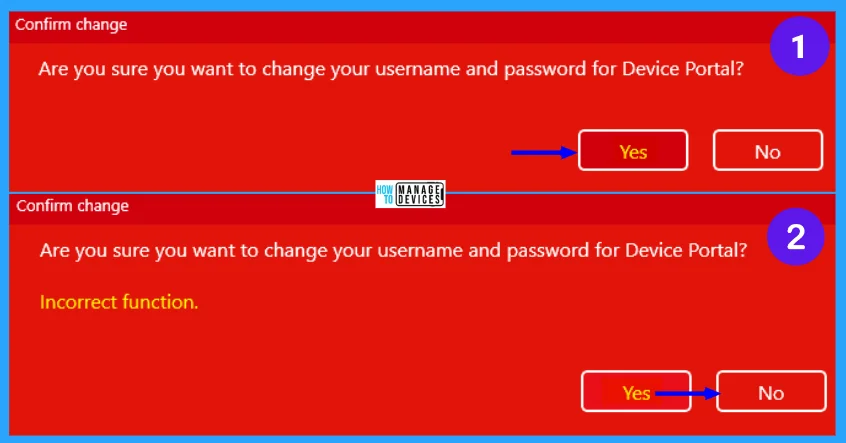
Next, the Confirm Change window opens, where it asks Are you sure you want to change your username and password for the Device portal. (1) If you provided your credentials following the guidelines, then click on Yes to continue, (2) If the given credential does not match with the guideline, then it shows Incorrect Function, as shown in the image below.
How to Access Windows Device Portal
Once WDP is enabled, you will see web links at the bottom of the section. Take note of the port number appended to the end of the listed URLs: this number is randomly generated when WDP is enabled but should remain consistent between reboots of the desktop.
These links offer two ways to connect to WDP: over the local network (including VPN) or through the local host. To connect through the local host, open a browser window and enter one of the URIs shown here (based on your connection type).
- Localhost: http://127.0.0.1:<PORT> or http://localhost:<PORT>
- Local Network: http://<IP Address of the Device>:<PORT>

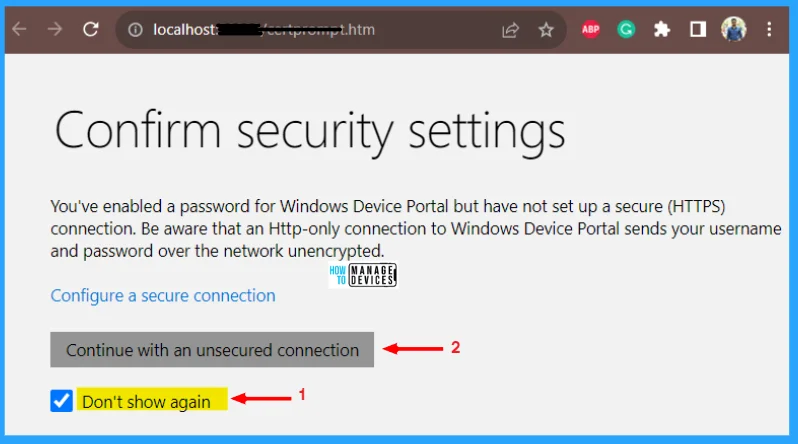
When you click on the link, it opens in the default browser. The Confirm Security Settings is the first screen that appears. You have enabled a password for Windows Device Portal but have not set up a secure (HTTPS) connection. Be aware that an Http-only connection to Windows Device Portal sends your username and password over the network unencrypted.
Under it, checkmark the box against Do not show again and then click on Continue with an unsecured connection.
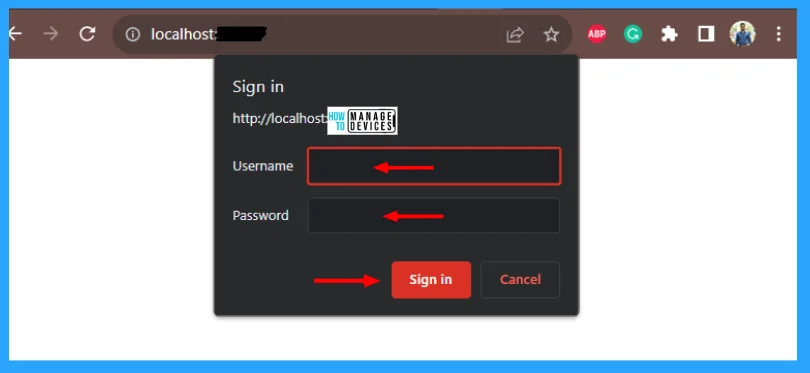
Then here it asks for the username and password, provide the Username and password you created, and click on Sing-in to enter into the Windows Device Portal.
Use the links in the navigation pane along the left side of the page to navigate to the available management and monitoring tools for your device. Tools that are common across device families are described here. Other options might be available depending on the device. The toolbar at the top of the page provides access to commonly used features.
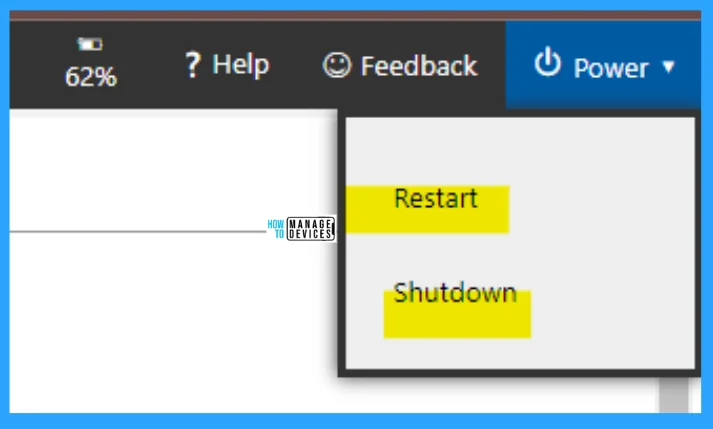
- Power: Access power option as (1) Shutdown– Turns off the device & (2) Restart– Cycles power on the device.
- Help: Opens the help page.
- Feedback: Open the feedback page, where the user can give any complaints, suggestions, etc.
HTTPS is required for authentication and secure communication. If you are using WDP in a protected environment, for example, in a test lab where you trust everyone on your local network, have no personal information on the device, and have unique requirements, you can disable the Authentication option.
This enables unencrypted communication and allows anyone with the IP address of your computer to connect to and control it. WDP provides the following set of pages.
- Apps manager
- Xbox Live
- File explorer
- Running Processes
- Performance
- Debug
- ETW (Event Tracing for Windows) logging
- Performance tracing
- Device manager
- Bluetooth
- Networking
- Crash data
- Features
- Mixed Reality
- Streaming Install Debugger
- Location
- Windows Manager
- System Power Report
- Registry Reader
- USB4 Domains
- Scratch
Apps Manager
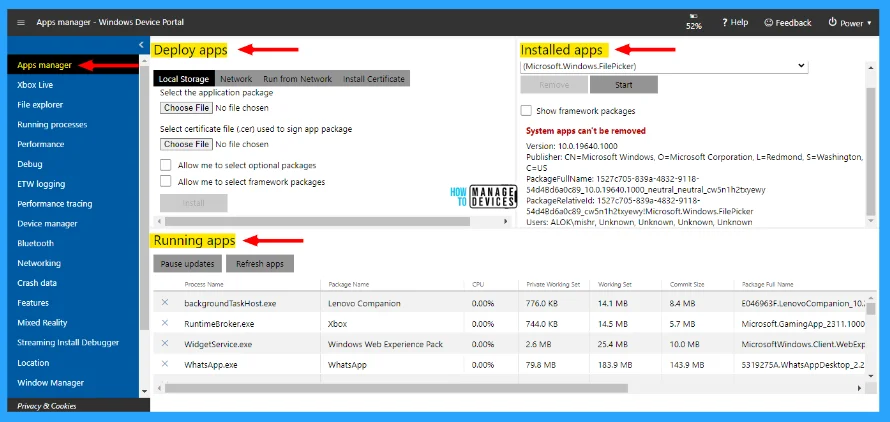
The Apps Manager provides install/uninstall and management functionality for app packages and bundles on the host device.
- Deploy apps: Deploy packaged apps from local, network, or web hosts and register loose files from network shares.
- Installed apps: Use the dropdown menu to remove or start apps that are installed on the device.
- Running apps: Get information about the currently running apps and close them as necessary.
File explorer
This page allows you to view and manipulate files stored by any sideloaded apps. You can add, edit, remove, export, and import the task here.
Running processes
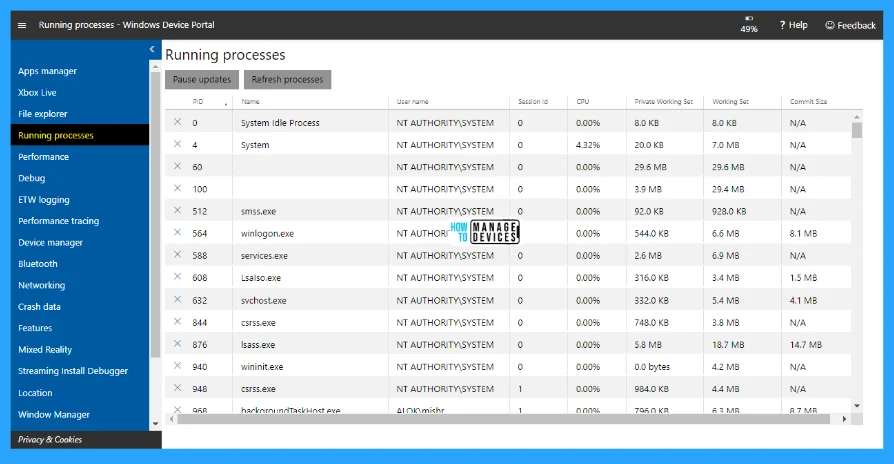
This page shows details about processes currently running on the host device. This includes both apps and system processes. You can terminate processes on some platforms (Desktop, IoT, and HoloLens).
Performance
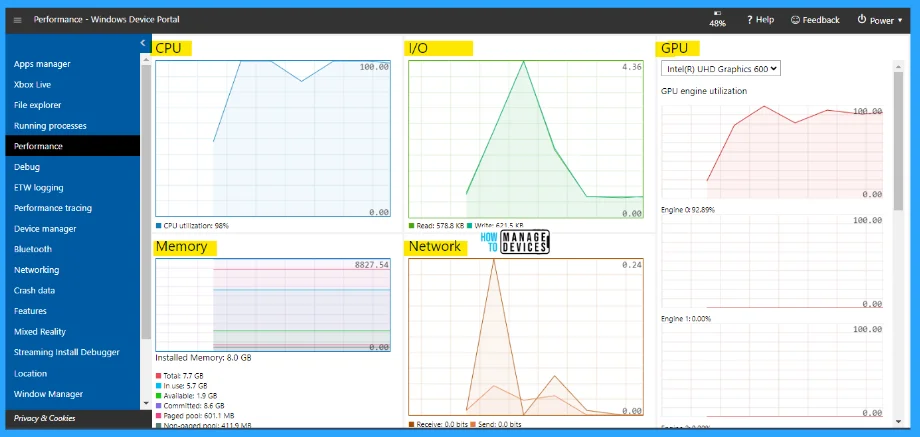
The Performance page shows real-time graphs of system diagnostic info like power usage, frame rate, and CPU load. These are the available options.
- CPU: Percent of total available CPU utilization
- Memory: Total, in use, available, committed, paged, and non-paged
- I/O: Read and write data quantities
- Network: Received and sent data
- GPU: Percent of total available GPU engine utilization
Event Tracing for Windows (ETW) logging
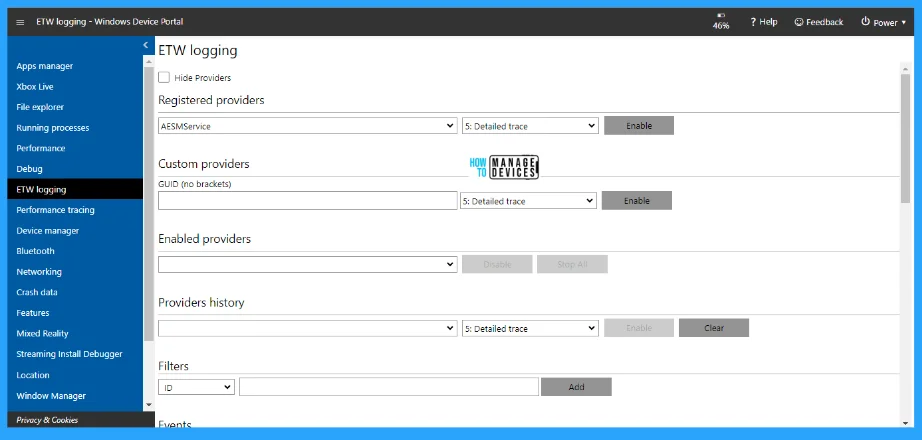
The ETW logging page manages real-time Event Tracing for Windows (ETW) information on the device. Checkmark Hide providers to show the Events list only.
- Registered providers: Select the event provider and the tracing level. The tracing level is one of these values (1) Abnormal exit or termination, (2) Severe errors, (3) Warnings, (4) Non-error warnings, (5) Detailed trace. Click or tap Enable to start tracing. The provider is added to the Enabled Providers dropdown.
- Custom providers: Select a custom ETW provider and the tracing level. Identify the provider by its GUID. Do not include brackets in the GUID.
- Enabled providers: This lists the enabled providers. Select a provider from the dropdown and click or tap Disable to stop tracing. Click or tap Stop All to suspend all tracing.
- Providers history: This shows the ETW providers enabled during the current session. Click or tap Enable to activate a provider that was disabled. Click or tap Clear to clear the history.
- Filters / Events: The Events section lists ETW events from the selected providers in table format. The table is updated in real-time. Use the Filters menu to set up custom filters for which events will be displayed. Click the Clear button to delete all ETW events from the table. This does not disable any providers. You can click Save to file to export the currently collected ETW events to a local CSV file.
Performance tracing
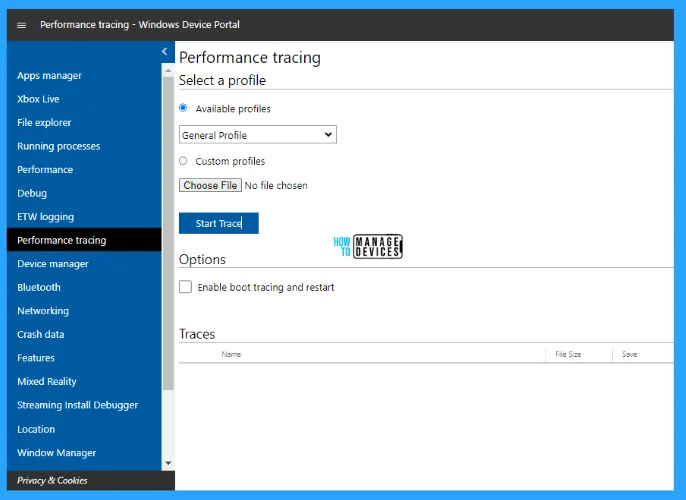
The Windows Performance Toolkit includes the Performance Tracing page, which allows you to view the Windows Performance Recorder (WPR) traces from the host device.
- Available profiles: Select the WPR profile from the dropdown, and click or tap Start to start tracing.
- Custom profiles: Click or tap Browse to choose a WPR profile from your PC. Click or tap Upload and start to start tracing.
To stop the trace, click Stop. Stay on this page until the trace file (.ETL) has finished downloading. Captured. ETL files can be opened for analysis in the Windows Performance Analyzer.
Device Manager
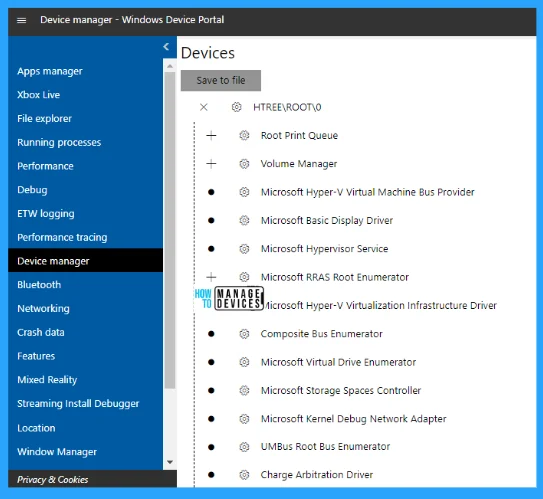
The Device Manager page enumerates all peripherals attached to your device. You can click the settings icons to view the properties of each.
Bluetooth
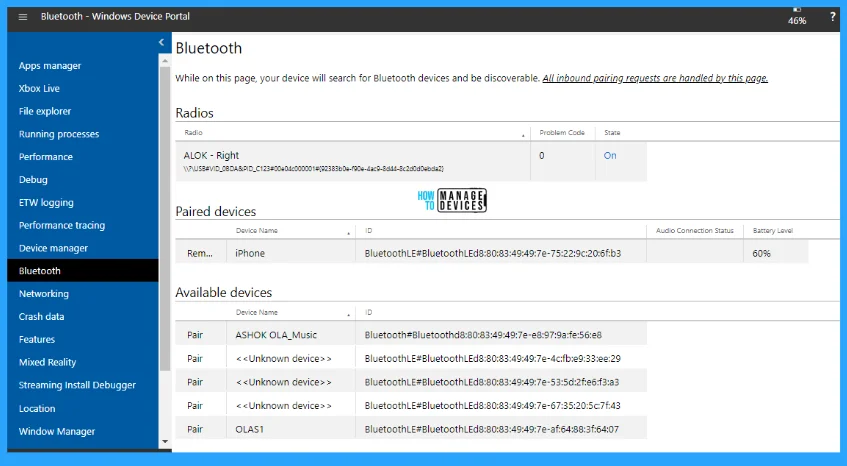
While the user is on this page, your device will search for Bluetooth devices and be discoverable. This page handles all inbound pairing requests.
Networking
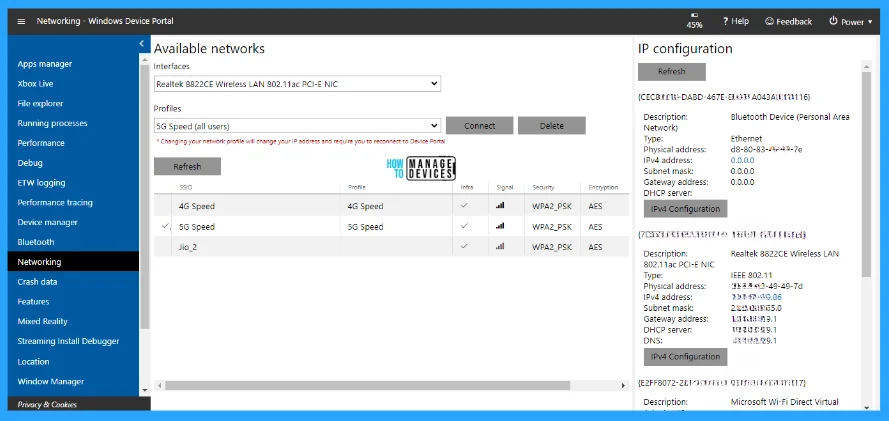
The Networking page manages network connections on the device. Unless you are connected to the Device Portal through USB, changing these settings will likely disconnect you from the Device Portal.
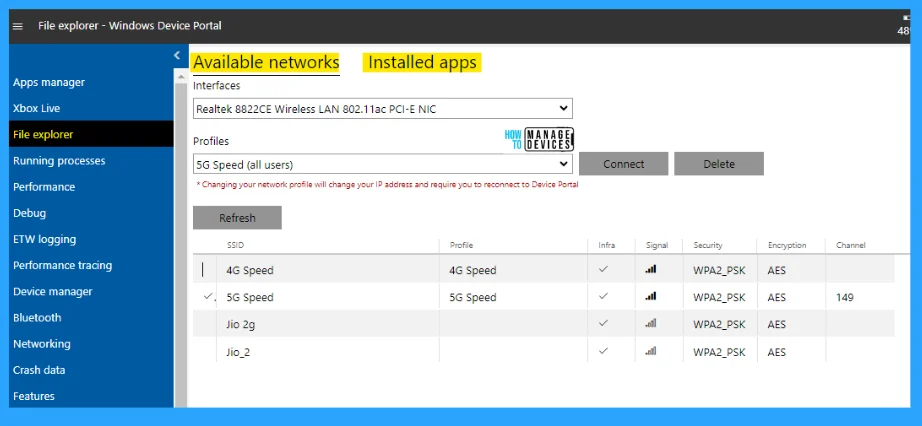
- Available networks: Shows the WiFi networks available to the device. Clicking or tapping on a network will allow you to connect to it and supply a passkey if needed. Device Portal does not yet support Enterprise Authentication. You can also use the Profiles dropdown to attempt to connect to any of the WiFi profiles known to the device.
- IP configuration: Shows address information about each of the host device’s network ports.
Mixed Reality
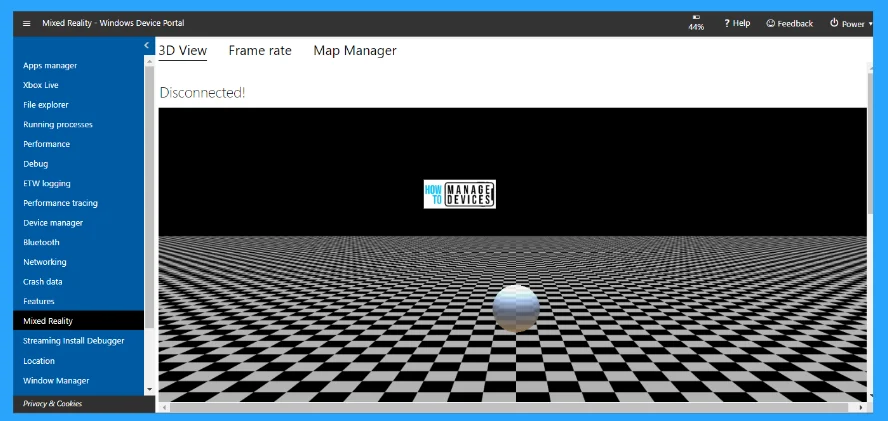
Mixed Reality Portal is a Universal Windows Platform app that serves as a front-end for Windows Mixed Reality. It features a 3D environment that users can explore, and customize with application shortcuts and virtual desktops
I hope the information on An Overview of Windows Device Portal in Windows 11 is helpful. Please follow us on the HTMD Community and visit our website HTMD Forum, if you like our content. Suggest improvements, if any, and we love to know which topic you want us to explore next.
We are on WhatsApp. To get the latest step-by-step guides and news updates, Join our Channel. Click here – HTMD WhatsApp.
Author
Alok is a Master of Computer Applications (MCA) graduate. He loves writing on Windows 11 and related technologies. He likes to share his knowledge, quick tips, and tricks with Windows 11 or Windows 10 with the community.
