Let’s learn How to Improve Settings to Protect Privacy on Windows 11. Microsoft adds unnecessary background services, running active telemetry to track your activities. Bloatware was added to the system. After the release of Windows 10, Microsoft started collecting more and more user data.
Privacy involves your right to manage your personal information, and security is protecting this information. Privacy and security are essential features of Windows 11 PCs. There are several new features in this settings app to protect your policies.
The privacy and security settings in Windows 11 are related to device security. It asks permission to enter any new steps. In this app settings, you can access the different options. The details are described in the Privacy and Security Settings in Windows 11.
Privacy and security options are very helpful for users to secure PCs. You will get complete guidance on 33 Privacy and Security Settings Run Commands for Windows.
How to Protect Privacy on Windows 11
There are different ways to protect your privacy on Windows 11. Let’s check out the privacy settings listed below that help protect your privacy on Windows 11.
- Modify General Privacy & Security Settings
- Turn Off Online Speech Recognition
- Disable Diagnostics & Feedback
- Disable Activity History
- Limit Location Permission
- Limit Camera Permission
- Limit Microphone Permission
- Switch to Local Account
Modify General Privacy & Security Settings
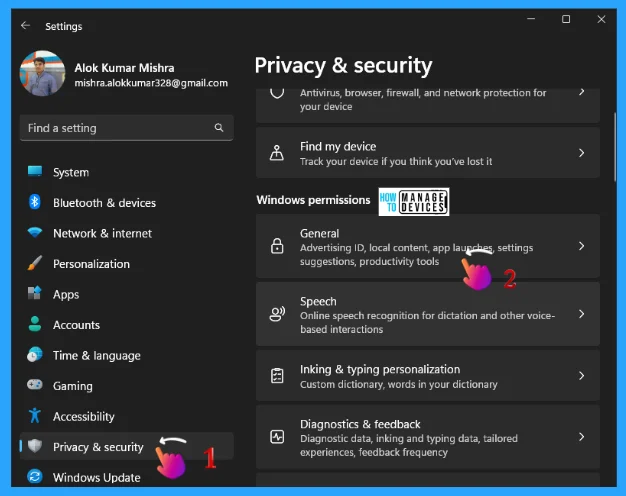
First, start with the General settings, press the keyboard shortcut Win Key + I to open the Settings app. Now, go to Privacy & Security from the left panel and click on General under Windows permissions in the right panel.
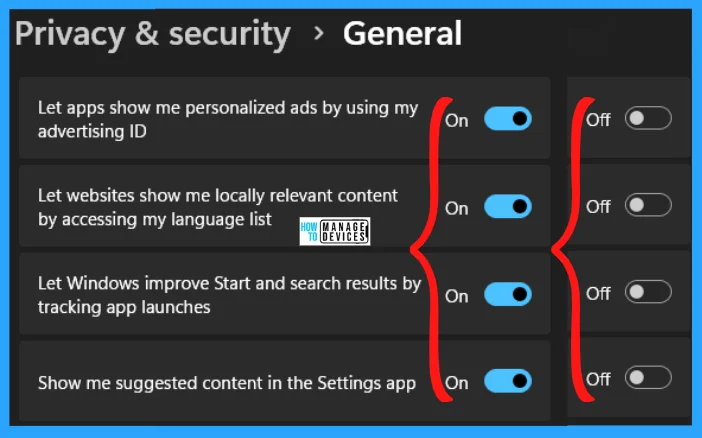
When you enter into the General option, turn off all the toggles. It prevents Microsoft from tracking your app launches, learning about your interests, and showing personalized ads. It will also block websites from accessing your default language. The items to disable are listed below:
- Turn Off – Let apps show me personalized ads by using my advertising ID
- Turn Off – Let websites show me locally relevant content by accessing my language list
- Turn Off – Let Windows improve Start and Search results by tracking app launches
- Turn Off – Show me suggested content in the Settings App
Turn Off Online Speech Recognition
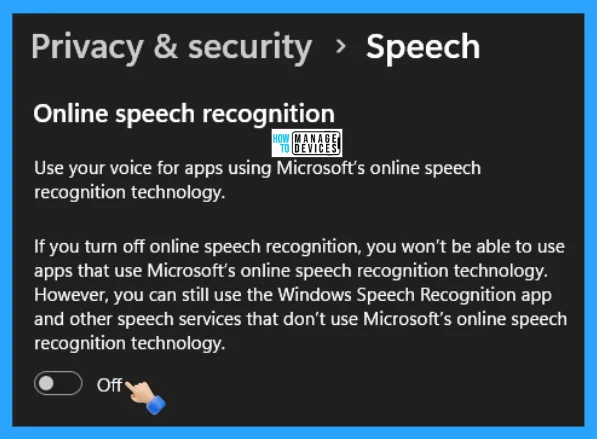
With the new features like Voice Typing and Voice Access that use Microsoft’s online speech recognition, you can turn it off, if you do not want to use them. This stops Microsoft from sending your voice data to the cloud, and it preserves your privacy.
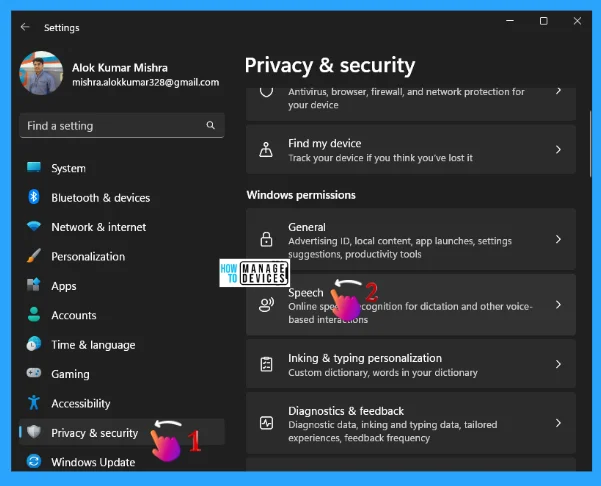
To do so, Go to Privacy & Security in the settings, then click on the Speech under Windows Permissions. Online speech recognition for dictation and other voice-based interactions are made under the Speech option.
This uses your voice for apps using Microsoft’s online speech recognition technology. If you turn off online speech recognition, you won’t be able to use apps that use Microsoft’s online speech recognition technology. However, you can still use the Windows Speech Recognition app and other speech services that don’t use Microsoft’s online speech recognition technology. Turn it off.
Disable Diagnostics & Feedback
To keep Windows 11 secure and up to date, Microsoft sends a limited amount of diagnostic data, which is required by default. But, there is a set of optional diagnostic data, which lets Microsoft access your browsing history, how you use an app or a feature, and track other regular behavior of the user. If you do not want to send the optional diagnostic data then follow the steps.
Press the keyboard shortcut Win Key + I to open the Settings app. Now, go to Diagnostics & feedback from the left panel and click on General under Windows permissions in the right panel.
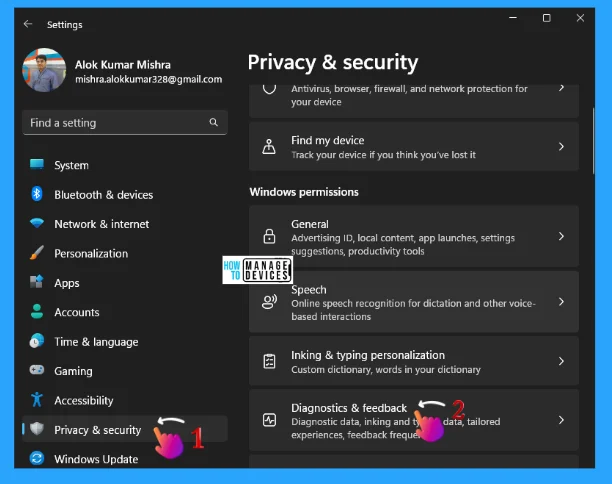
This helps to improve Windows and keep it secure, up-to-date, and working as expected. As a part of using Windows, your device sends Microsoft a limited set of data that is necessary to keep your device and operating system secure, up-to-date, and working as expected.
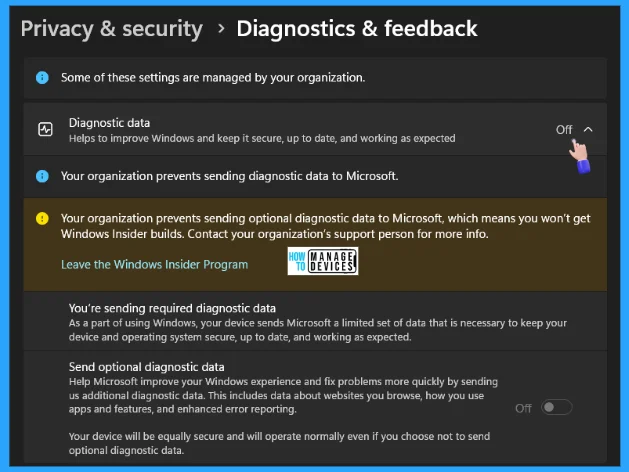
The optional diagnostic data help Microsoft improve your Windows experience and fix problems more quickly by sending us additional diagnostic data. This includes data about websites you browse, how you use apps and features, and enhanced error reporting.
Your device will be equally secure and will operate normally even if you choose not to send optional diagnostic data. Turn it off.
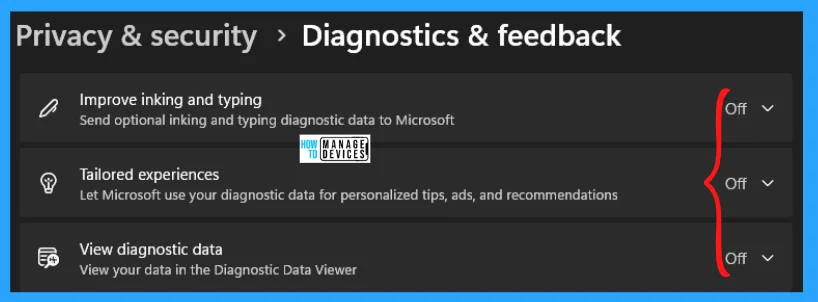
Then after that turn off other features under the diagnostics & feedback option, Turn off the Improve inking and typing that sends optional inking and typing diagnostic data to Microsoft.
Turn off Tailored Experiences let Microsoft use your diagnostic data for personalized tips, ads, and recommendations, and turn off View diagnostic data that views your data in the diagnostic data viewer.
This will stop Windows 11 from using your diagnostic data to display personalized tips and recommendations. It prevents Windows 11 from sending your inking and typing diagnostic data to Microsoft.
Disable Activity History
Microsoft introduced the Timeline feature on Windows that keeps track of all your activity on the PC, that renamed as Activity History. In Windows 11, it does not show the timeline of your tasks and activities, but, Microsoft still stores all your activities. If you want to protect your privacy on Windows 11 and stop Microsoft from keeping track of all your activities, follow the steps below and disable this feature.
Press the keyboard shortcut Win Key + I to open the Settings app. Now, go to Activity History from the left panel and click on General under Windows permissions in the right panel.
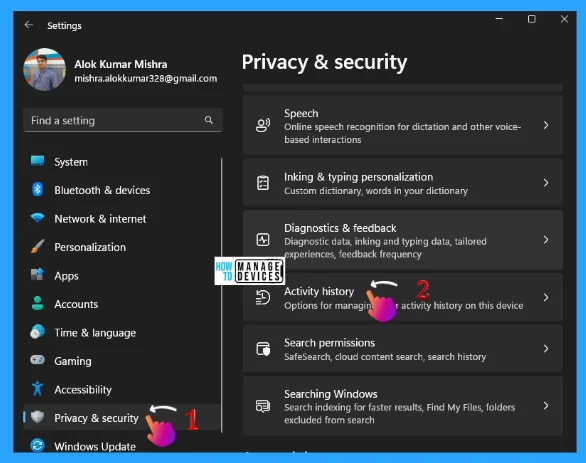
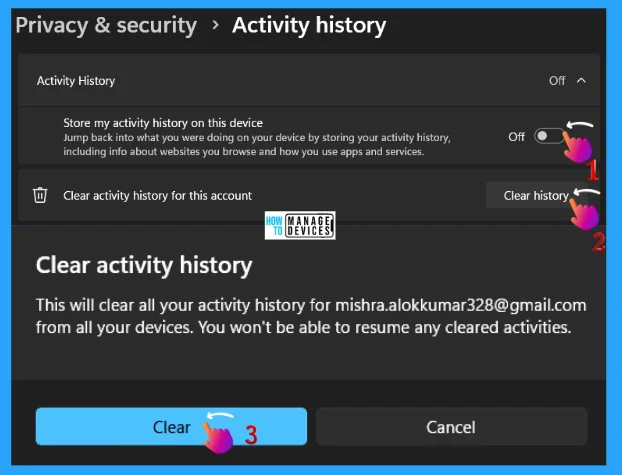
Now turn off the Activity History, which stores all on the device, Jump back into what you were doing on your device by storing your activity history, including info about websites you browse and how you use apps and services.
Then Clear activity history for this account by clicking the Clear History button. This will clear all your activity history for the user from all your devices. You won’t be able to resume any cleared activities and click on Clear, as illustrated in the image below.
Limit Location Permission
If you do not want apps to access your location on Windows 11, you can block access with a single click. Disabling location services altogether on Windows 11 will also prevent you from finding your device in case of theft. To avoid it is suggested to allow location permission to only select the needy apps.
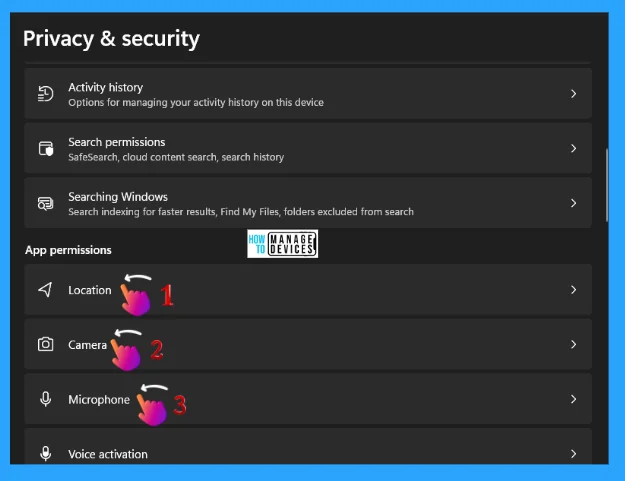
Press the keyboard shortcut Win Key + I to open the Settings app. Now, go to Privacy & Security from the left panel and click on Location, Camera, and Microphone under App permissions in the right panel.
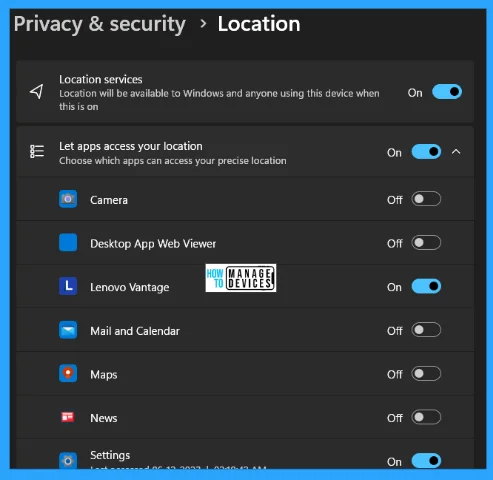
Location will be available to Windows, and anyone using this device, when this is on, you can turn it off if you want to allow a limited group of applications, the location permission by removing unnecessary app permission, as shown in the image below.
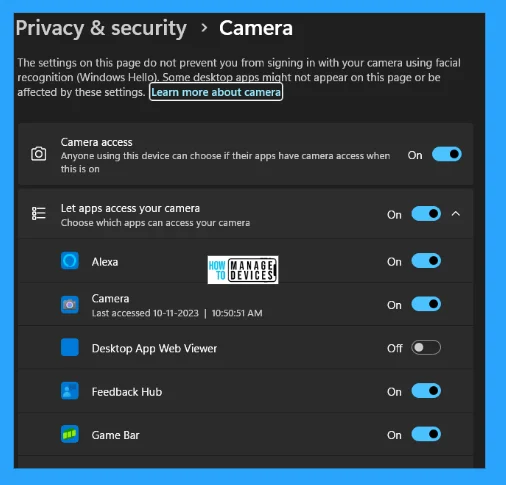
Limit Camera Permission
The settings on this page do not prevent you from signing in with your camera using facial recognition (Windows Hello). Some desktop apps might not appear on this page or be affected by these settings. Anyone using the device can choose if their apps have camera access when this is turned on.
If you want to disable the webcam or camera on your Windows 11 PC, turn off the Camera access and toggle. In case you want to grant the camera permission to a selected app, make sure to review the list of apps and disable access to unnecessary apps.
Limit Microphone Permission
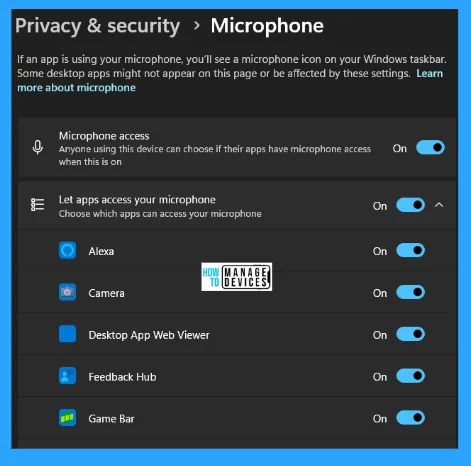
You will see a microphone icon on your Windows taskbar if an app uses your microphone. Some desktop apps might not appear on this page or be affected by these settings.
Switch to Local Account
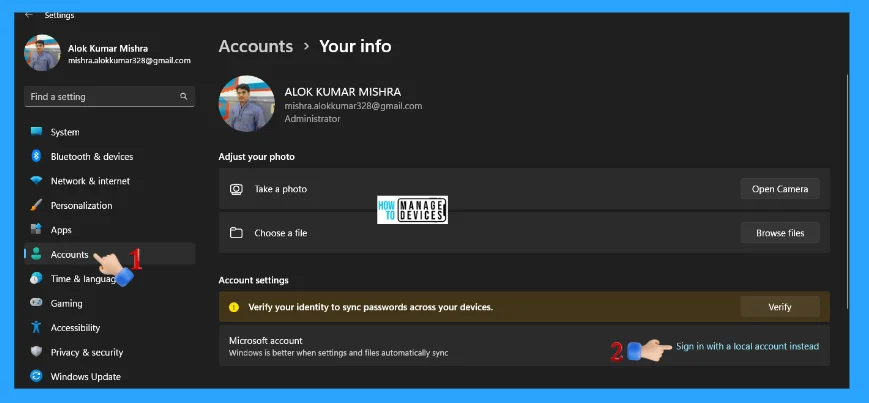
It is known to all that Microsoft is pushing users to opt for an online Microsoft account instead of a local account on Windows 11. And some recent news, Microsoft targets to bring the online account requirement to Windows 11 pro users too. These changes are made to collect more user data, build a monetizable profile of users, and target customers with personalized ads.
The online account requirement allows Microsoft to track your usage and build an online profile tied to your Microsoft account. So it is suggested to switch to a local account.
I hope the guide on How to Modify Settings to Protect Privacy on Windows 11 is helpful. Please follow us on the HTMD Community and visit our website HTMD Forum, if you like our content. Suggest improvements, if any, and we would love to know which topic you want us to explore next.
We are on WhatsApp. To get the latest step-by-step guides and news updates, Join our Channel. Click here –HTMD WhatsApp.
Author
Alok is a Master of Computer Applications (MCA) graduate. He loves writing on Windows 11 and related technologies. He likes to share his knowledge, quick tips, and tricks with Windows 11 or Windows 10 with the community.
