Let’s discussHow to Install Druva InSync App using Intune Enterprise App Catalog. As you may know, Microsoft Intune is a cloud-based service with essential features for administrators. One of its key features is the Enterprise App Catalog, an easily manageable tool for deploying applications within an organization.
The Enterprise App Catalog is a prepackaged solution designed to simplify management for IT administrators. In today’s post, we will discuss how to install the Druva inSync App. Druva inSync is a cloud-based solution known for its user-friendly features.
This application is used for data protection, safety, and device management. This is one of the best secure backup file-sharing and data recovery solutions. This application is very useful for organizations because it is a data-protecting device that helps prevent accidental deletion, hardware failure, and cyber threats.
This application was founded in 2008 to protect data on devices. It syncs data across PCs, Macs, Linux, and mobile devices. In this post, we can look at how to install the Druva inSync App through the Enterprise app catalog app and the important steps for that.
Table of Contents
What is Druva Application?

The Druva inSync App is a solution for data protection and management. It offers secure backup, cross-device sync, file sharing, and strong security. The Druva inSync App securely backs up important files, emails, photos, and videos to the Druva Cloud. It also uses strong encryption to protect data during transit.
How to Install Druva InSync App using Intune Enterprise App Catalog
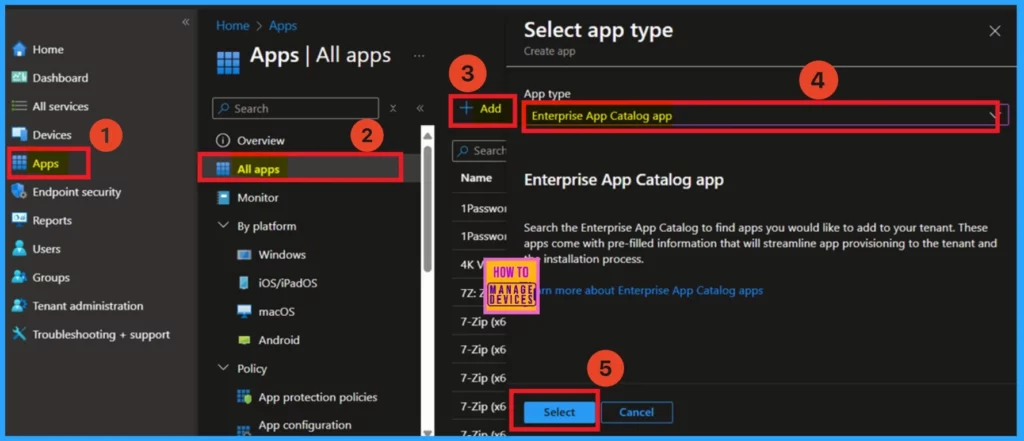
To get started, sign in to the Microsoft Intune admin center with your credentials. After logging in, navigate to the left- menu and click on Apps, then select All Apps. A new window will appear, showing a variety of app types to choose from. From this list, select the “Enterprise App Catalog” option and then click Select.
- How to Install Google Backup and Sync App with Intune Using Enterprise App Catalog App
- Google Chrome for Business Deployment using Intune Enterprise App Catalog App
- Deploy Windows Catalog App type using Intune Enterprise Application Catalog
App Information
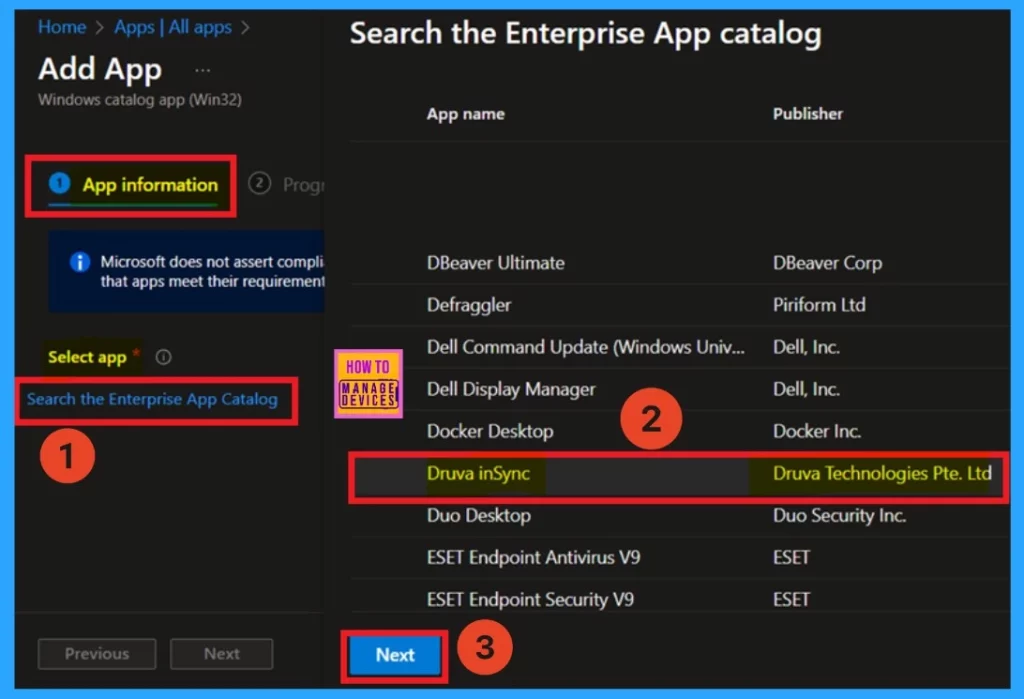
Once you have selected the app type, you will be taken to the App Information page. This is the first section you need to complete. On this page, you can choose your app. You have to Look for the Select App option next to the Search the Enterprise App Catalog field.
- Click on the Select App hyperlink (Check the screenshot below).
- Then a list of available apps will appear.
- In the search bar, type “Druva inSync” to find the app you want to install.
- Once you find Druva inSync, select it from the list, then click “Next” to continue with the app installation process.
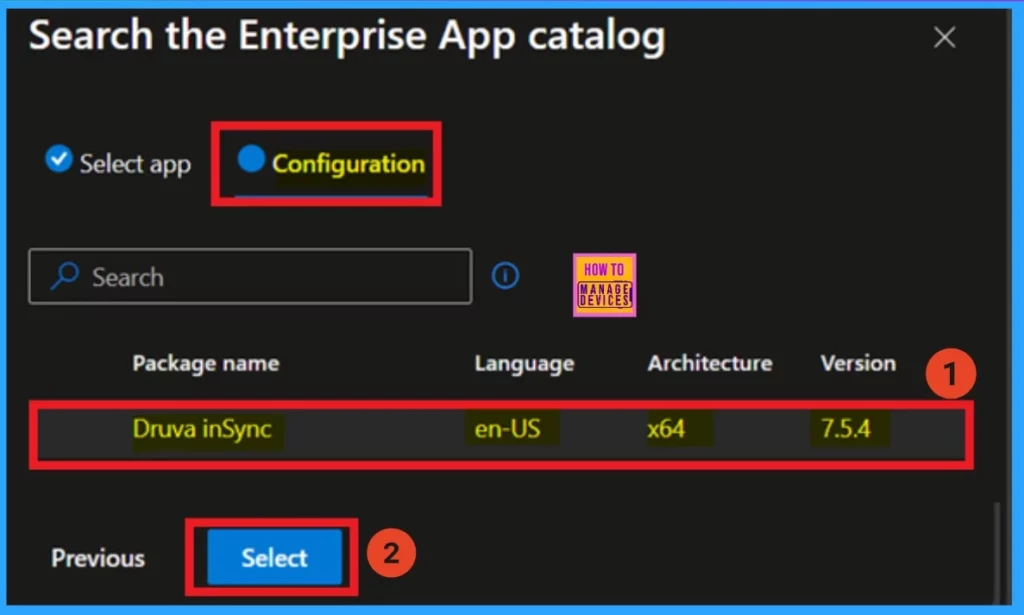
After selecting the “Druva inSync” app, you will be taken to the Configuration tab. In this tab, you will have the option to choose from the available app versions. If multiple versions are listed, select the one you wish to deploy. If only a single version is displayed, simply select that version.
- Once you have made your selection, click on Select to confirm and proceed to the next step in the configuration process.
| Package Name | Language | Architecture | Version |
|---|---|---|---|
| Druva inSync | en-US | x64 | 7.5.4 |
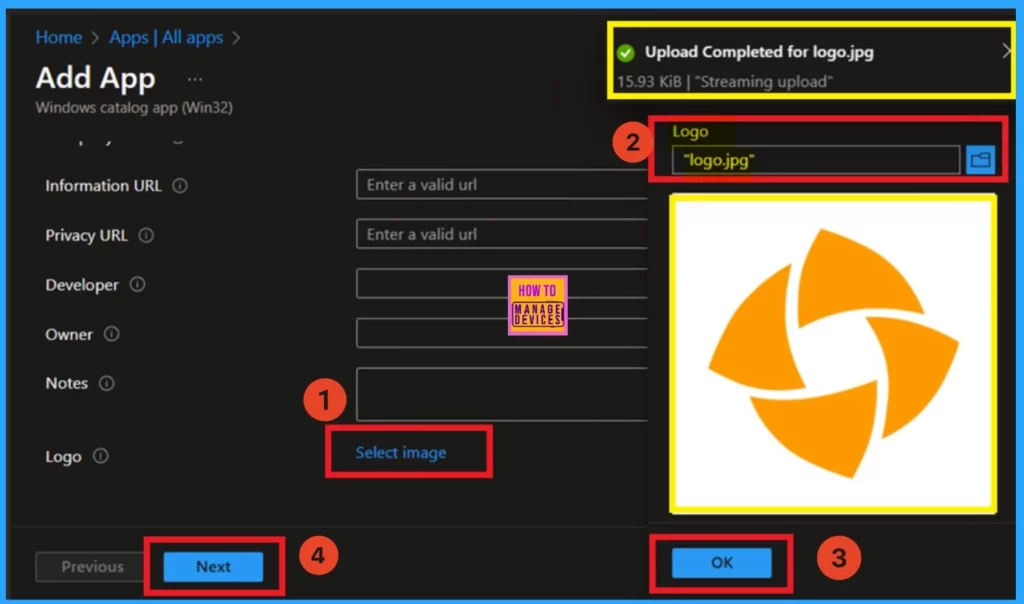
After selecting the app version, you will go through the next process of the App Information page. This page displays important details, including the publisher information and the current app version. As you scroll down, you will see an option labeled “Select Image,” which is a hyperlink. This option allows you to upload a logo for the app deployment.
I previously saved the logo on my files, clicked on the “Select Image” link, and uploaded it to the app information page. Once the upload was complete, a notification confirmed that the logo had been successfully uploaded.
- After clicking Ok, the app logo will appear on the App Information page.
- Once the logo is visible, click “Next” to continue with the setup process.
Program
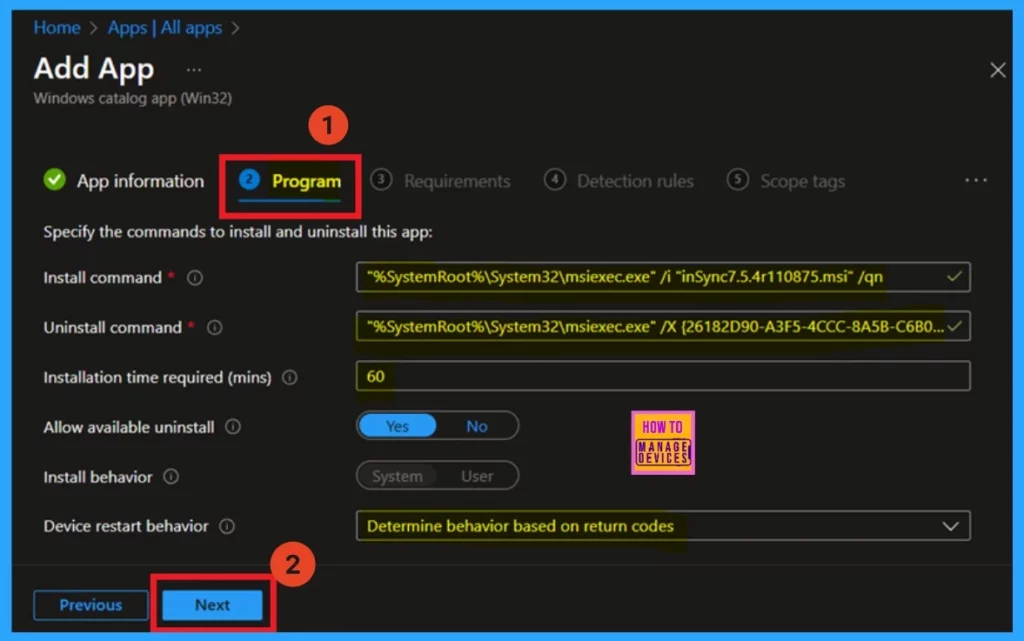
Next, you will be taken to the Program tab. This tab contains important information about the install and uninstall commands and basic settings like install behaviour and restart behaviour. you do not need to make any changes or adjustments. Once you have reviewed the information, click “Next” to proceed to the next step.
Requirements
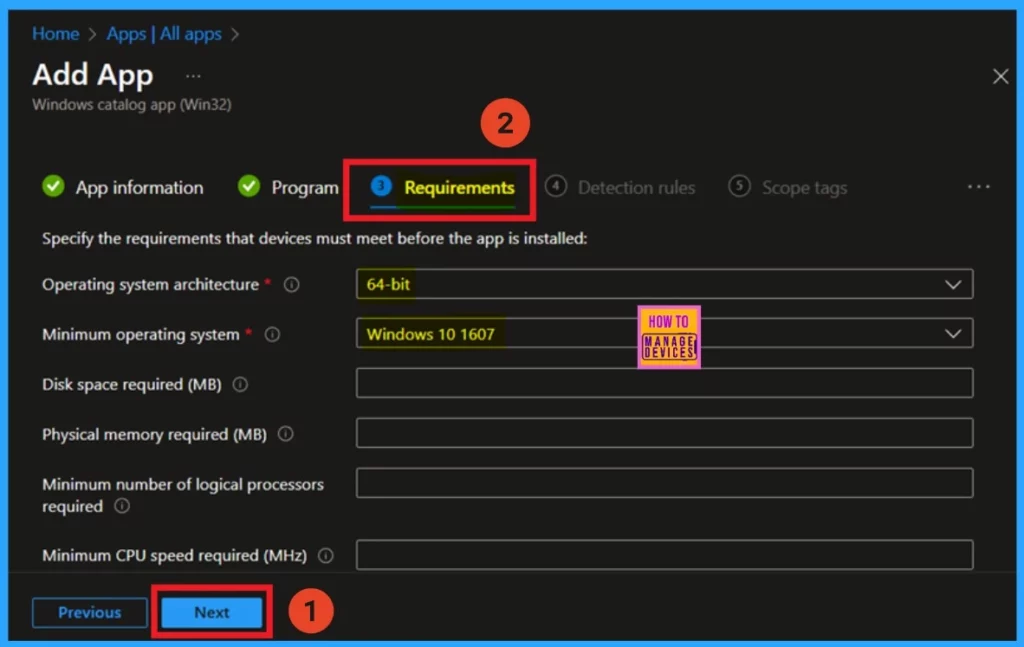
You are now on the Requirements tab. This page provides essential information about the system requirements for the app, similar to the Program tab. It includes details such as the required operating system architecture, the necessary storage space.
- Once you’re check the details, you can click on the next button.
Detection Rules
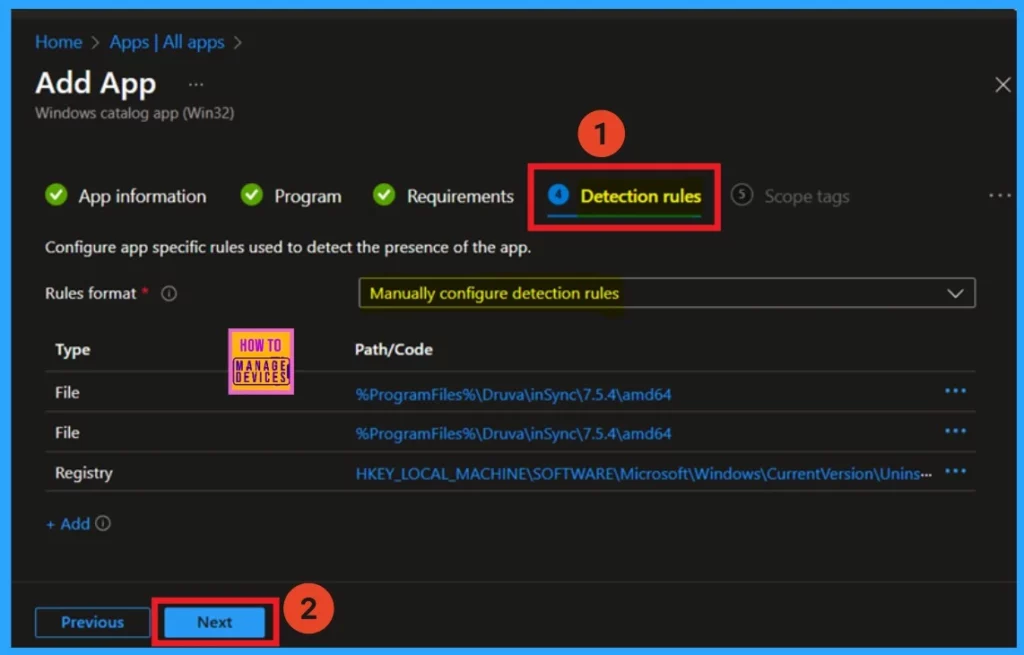
You are now on the Detection rules page, Here you can find information about rule formats and specific paths, including file paths and registry paths. This section already contains all the necessary information, so there’s no need for any special actions.
- Click on the Next.
Scope Tags
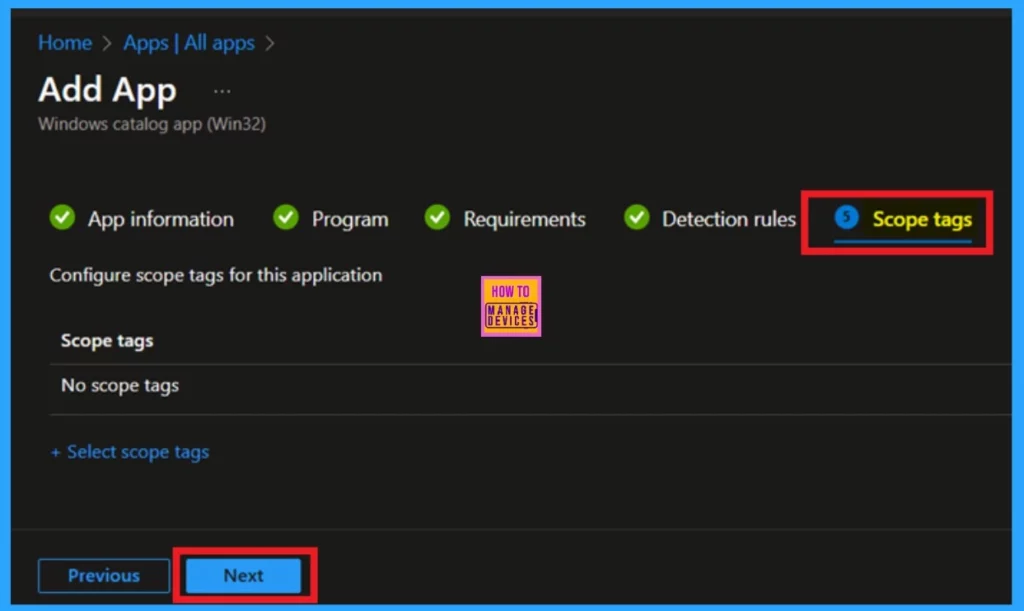
In the next step, is the Scope Tags section. Here, you have the option to add scope tags to the policy deployment. To do this, click on the “Select Scope Tag” option, which will allow you to choose the appropriate scope type for the app deployment. This step is not mandatory and I have skipped the scope tags section for this deployment.
Assignments
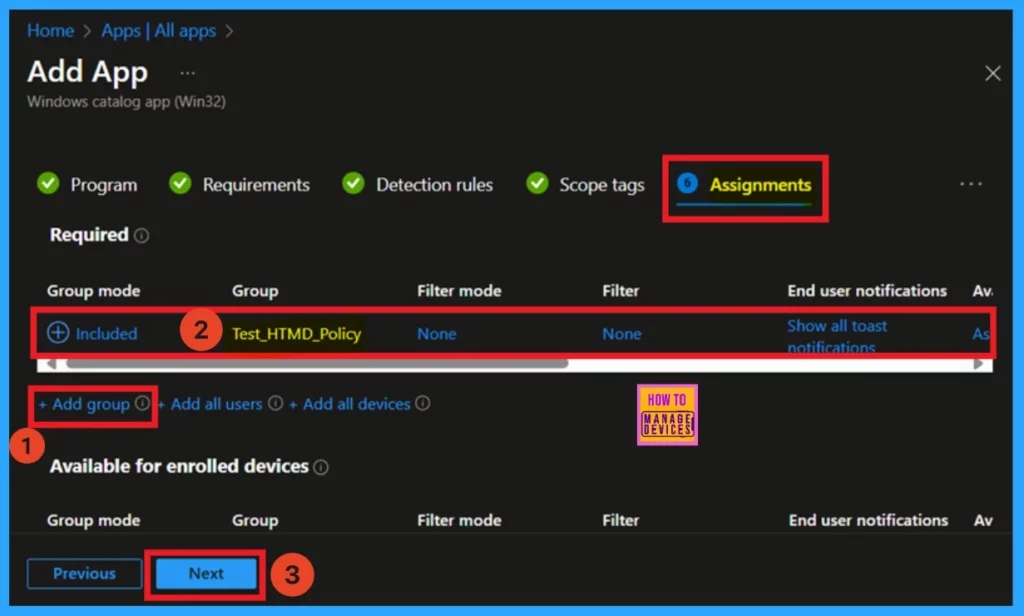
The next step is the Assignments section, which is an essential part of the process. In this section, you can assign the policy to specific groups. Under the Required options, you will see the Add Group button. Click on this button to select the specific group you want to assign the policy to.
This step allows you to get the right group for the app deployment. Once you have selected the appropriate groups, click Next to continue with the deployment process.
Review + Create
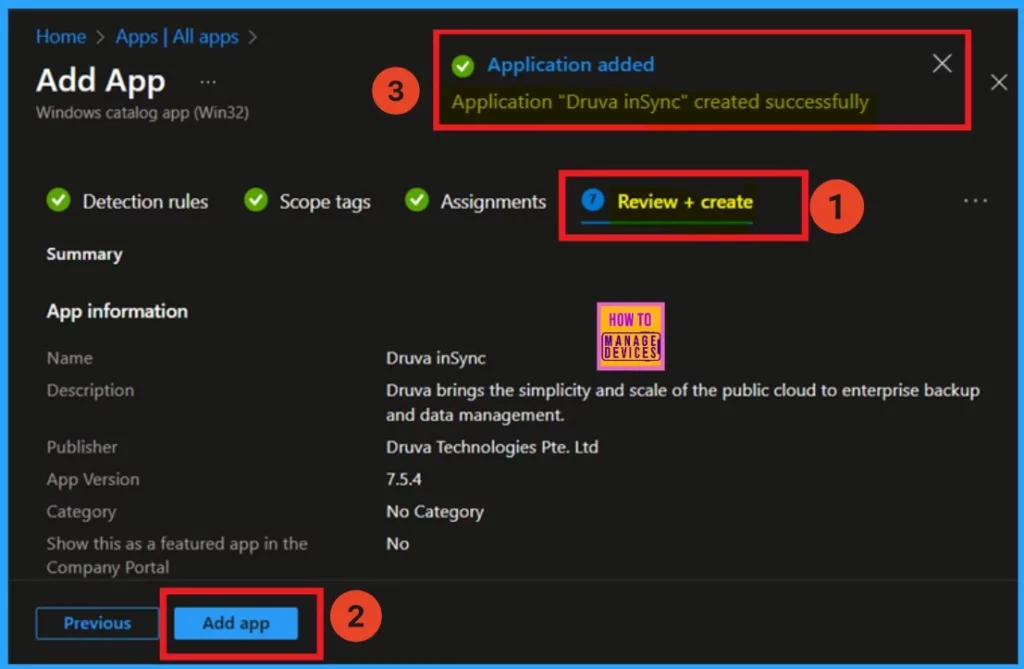
The Review + Create option is the final step in the process. This page provides a summary of all the details related to the app deployment. It includes an overview of the information you’ve entered, such as the app’s name, description, publisher, version, and any other details.
- Once you’ve verified that all the details are correct, click on the Add App option.
- Now you will Notified that Application added successfully.
Monitor Status
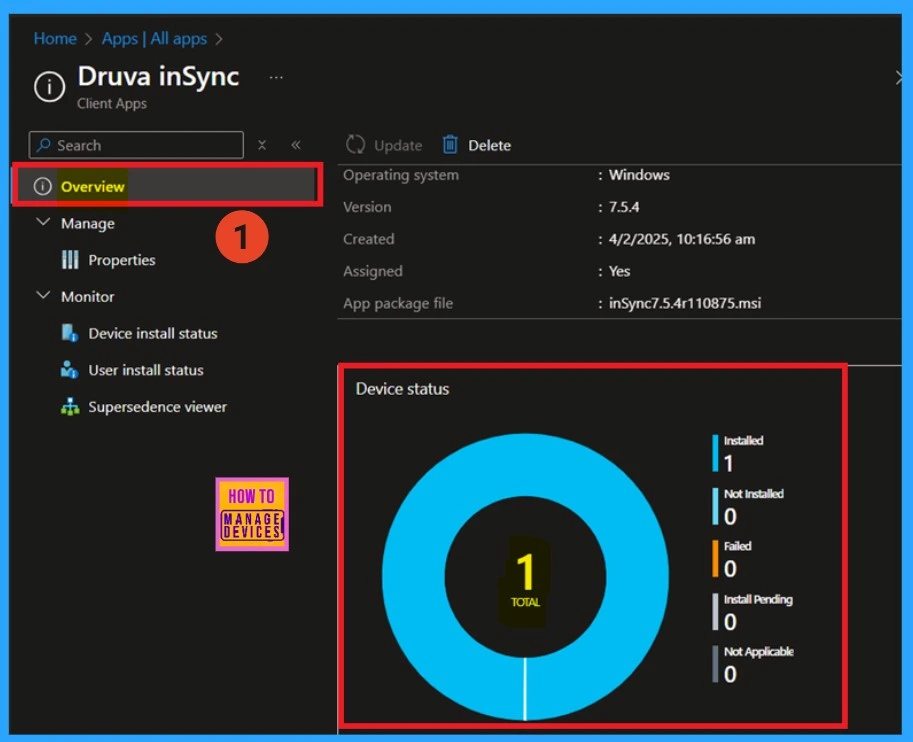
The next step is to check the monitoring status, which is crucial for determining whether the policy was created successfully. After a waiting period of 8 hours, you can check the monitoring status. To do this, navigate to Apps, then select All Apps. From there, search for the specific policy you created to get an overview of it.
- Here, you will see the device status.
- If it shows that one device is installed, this means the policy was successfully applied to the specified groups.
End User Experience
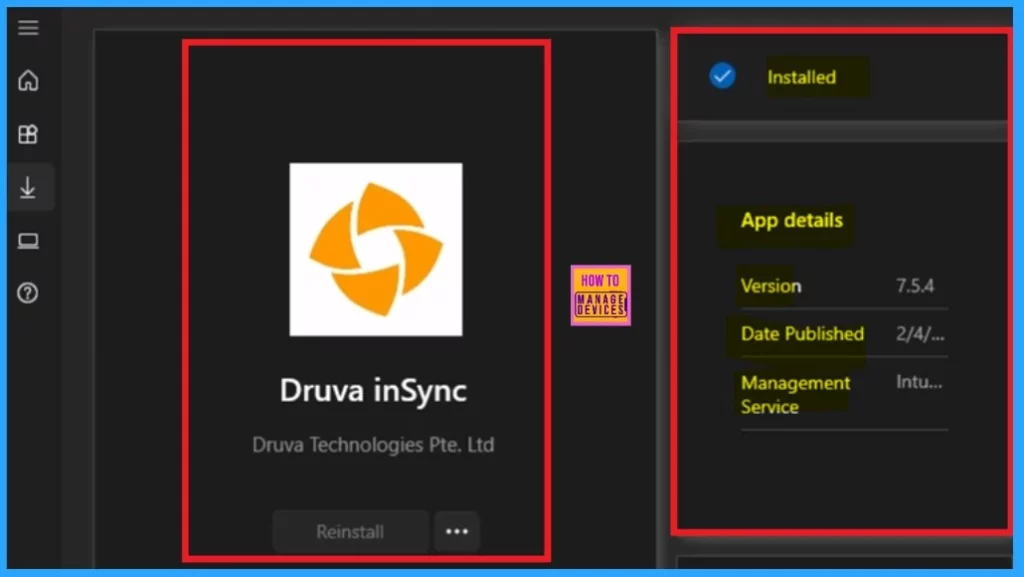
After the waiting period, you can check the app’s status. It should be successfully installed in your specified groups. you can review the end-user experience. To do this, go to the Company Portal and click on the “Download and Update” option. Then, search for the Druva InSync app.
- If you find the app in the list, it means it has been successfully installed.
Need Further Assistance or Have Technical Questions?
Join the LinkedIn Page and Telegram group to get the latest step-by-step guides and news updates. Join our Meetup Page to participate in User group meetings. Also, Join the WhatsApp Community to get the latest news on Microsoft Technologies. We are there on Reddit as well.
Author
Anoop C Nair has been Microsoft MVP from 2015 onwards for 10 consecutive years! He is a Workplace Solution Architect with more than 22+ years of experience in Workplace technologies. He is also a Blogger, Speaker, and Local User Group Community leader. His primary focus is on Device Management technologies like SCCM and Intune. He writes about technologies like Intune, SCCM, Windows, Cloud PC, Windows, Entra, Microsoft Security, Career, etc.
