

Key Takeaways
- Simplifies deployment of App Store applications across iOS and iPadOS devices.
- Supports both required installations and user-initiated installations through the Company Portal.
- Automatically delivers application updates from the Apple App Store.
- Enables centralized application management from the Microsoft Intune admin center.
In this post, you will learn how to Configure iOS Store Apps to Simplify App Management using Microsoft Intune. After adding the store apps, you can make the iOS app installed or available for iOS/iPadOS devices. Before you can configure, assign, protect, or monitor apps, you must add them to Microsoft Intune. You must determine app requirements that are needed by the users at your company, such as the platforms and capabilities that your workforce needs.
Table of Contents
Table of Contents
Configure iOS Store Apps to Simplify App Management using Microsoft Intune
Why do you need to manage iOS devices? This is for helping the users to become more productive at the same time protecting the enterprise resources like email, SharePoint, and OneDrive etc.
There are various types of apps that are available for Intune. Store apps, line-of-business (LOB) apps, and web apps are added, and then synchronized into Intune so that they appear in the Client Apps list. Once they appear in the Client Apps list, you can manage the assignment of any store apps.
- Retrieve IOS VPP Managed App ID Publisher Platform Assignment And Last Modified Details Using Intune Copilot Explorer
- How To Collect Intune Logs From IOS Device Company Portal
- Intune Delete Action No Longer Retire IOS And Android Devices
Add iOS Store Apps in Intune
Let’s follow the steps to add iOS store app directly in the Intune console. You can assign apps by using this method only if they are free of charge in the App Store. If you want to assign paid apps by using Intune, consider using the iOS/iPadOS volume-purchase program.

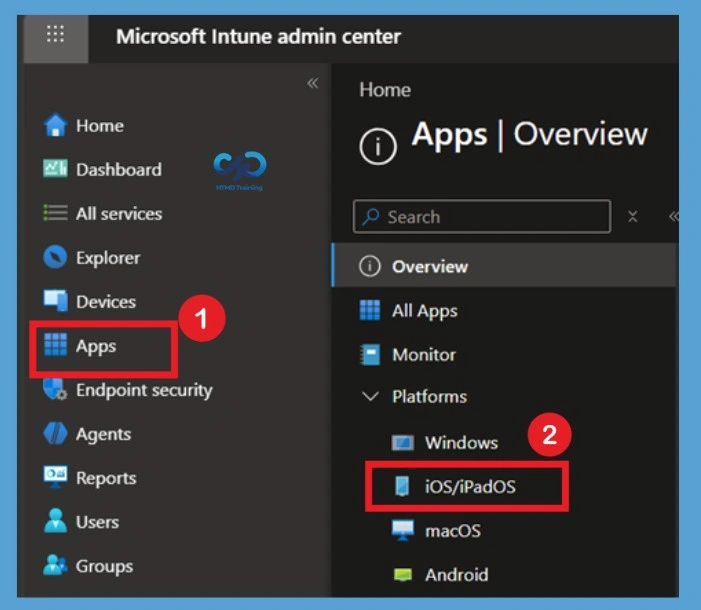
- Sign in to the Microsoft Intune admin center.
- Select Apps > iOS/iPadOS.
Select the iOS Store App Type
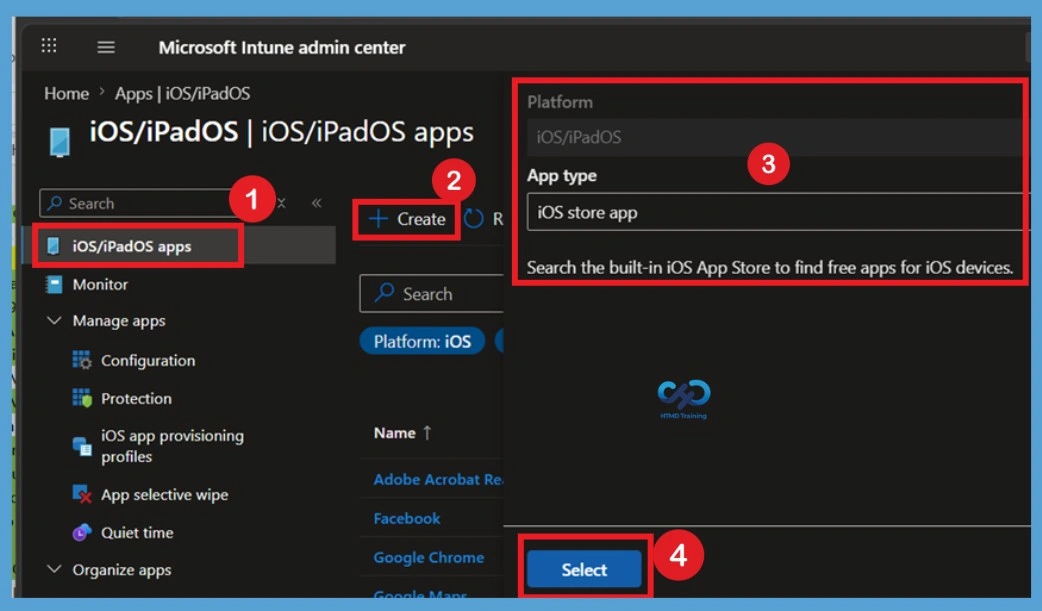
In the Microsoft Intune admin center, navigate to Apps > iOS/iPadOS > iOS/iPadOS apps and click + Create to add a new application. Intune supports multiple app types for Apple devices, allowing administrators to deploy applications based on their organizational requirements.
On the app creation pane, verify that the platform is set to iOS/iPadOS and select iOS store app as the app type. This option enables administrators to deploy free applications directly from the Apple App Store (iOS store app) to managed iPhone and iPad devices
- On the Select app type pane, under the store app, select iOS store app and click Select.
Search and Select the Required App in App Information
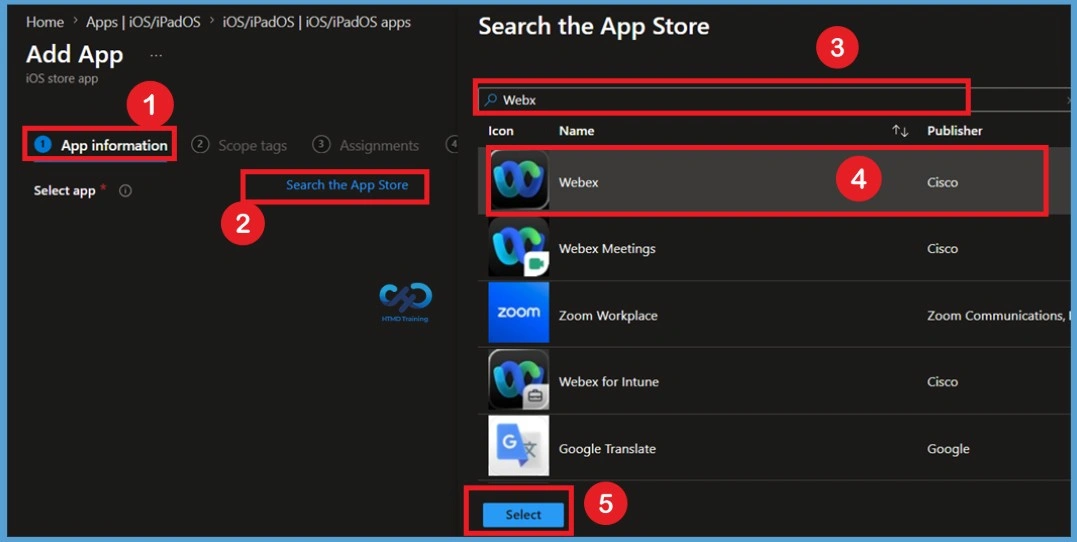
The App Information page allows you to search for applications that are available in the Apple App Store. Click Search the App Store to open the built-in App Store search experience within Microsoft Intune. Enter the name of the application you want to deploy and select the appropriate result from the list. Once selected, click Select to import the application’s metadata into Intune and proceed with the configuration process.
- Here, I search for the Webex App.
- Then in the results click the Select
Configure App Information Settings
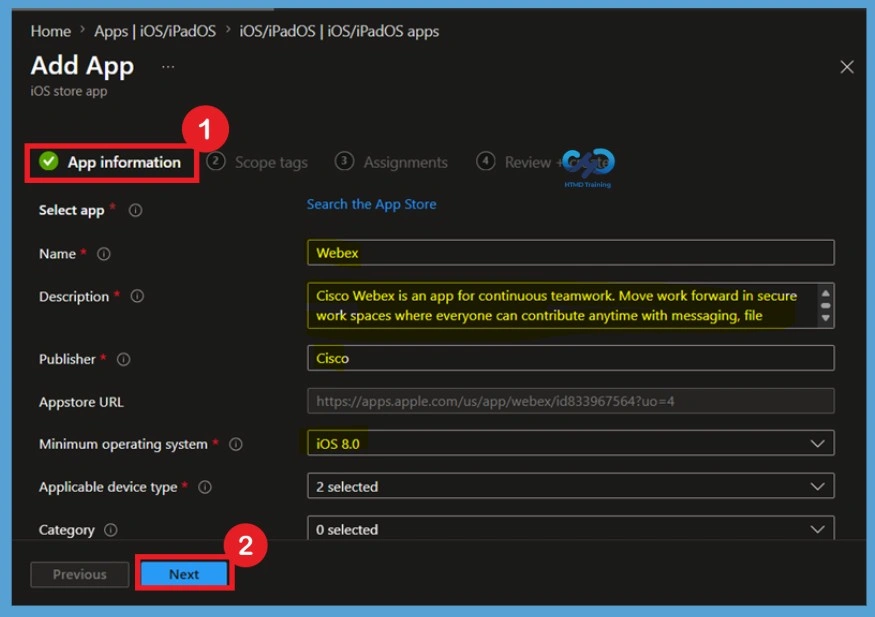
The App Information page contains the configuration settings used to define how the application appears and behaves within Microsoft Intune and the Company Portal. Administrators can customize various properties such as the application’s name, description, publisher details, supported operating systems, and device types.
Additional settings such as app categories, Information URL, Privacy URL, developer information, ownership details, administrative notes, and application logo can also be configured. These settings improve the end-user experience and help administrators maintain organized application deployments within the Intune environment.
| App Details | Info |
|---|---|
| Name | Enter the name of the app as it is to be displayed in the company portal. Make sure that any app name that you use is unique. |
| Description | Enter a description for the app. This description is displayed to users in the company portal. |
| Publisher | Enter the name of the publisher of the app |
| Appstore URL | Type the App Store URL of the app that you want to create. |
| Minimum operating system | In the list, select the earliest operating system version on which the app can be installed. If you assign the app to a device with an earlier operating system, it will not be installed. |
| Applicable device type | In the list, select the devices that are used by the app. |
| Category | Optionally, select one or more of the built-in app categories, or a category that you created. |
| Show this as a featured app in the Company Portal | Select this option to display the app suite prominently on the main page of the company portal when users browse for apps. |
| Information URL | Optionally, enter the URL of a website that contains information about this app. The URL is displayed to users in the company portal |
| Privacy URL | Optionally, enter the URL of a website that contains privacy information for this app. The URL is displayed to users in the company portal. |
| Developer | Optionally, enter the name of the app developer. This field is visible only to administrators and is not visible to your users. |
| Owner | Optionally, enter a name for the owner of this app, for example, HR department. This field is visible only to administrators and is not visible to your users. |
| Notes | Optionally, enter any notes that you want to associate with this app. This field is only visible an administrator and will not be visible to end users. |
| Logo | Optionally, upload an icon that will be associated with the app. This icon is displayed with the app when users browse the company portal. |
Configure Scope Tags
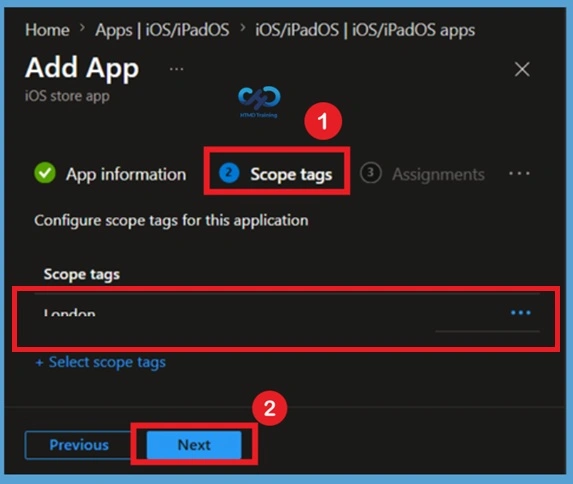
If your organization uses administrative segmentation, you can assign one or more scope tags to the application. Otherwise, this step can be skipped without affecting the application’s deployment functionality. Here I add scope tags by clicking Select scope tags to optionally add scope tags for the app. Click Next to display the Assignments page, Select the group assignments for the app.
Assign the Application
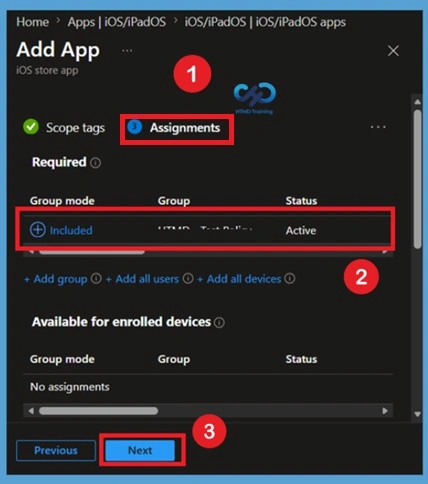
The Assignments page allows administrators to specify how the application will be deployed to users or devices. Applications can be made available for installation through the Company Portal or configured as required installations for automatic deployment. Here I selected the Appropriate groups in the Included section. Then click on the Next.
Review and Create the Application
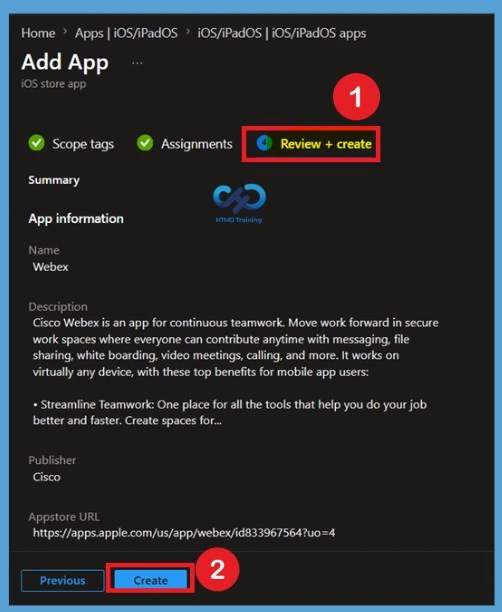
Before creating the application, review all configured settings to verify that the deployment configuration is correct. The Review + Create page provides a summary of the selected options, allowing administrators to make any necessary changes before proceeding. Once the configuration is confirmed, click Create to add the application to Microsoft Intune. added.
Verify Successful Application Creation
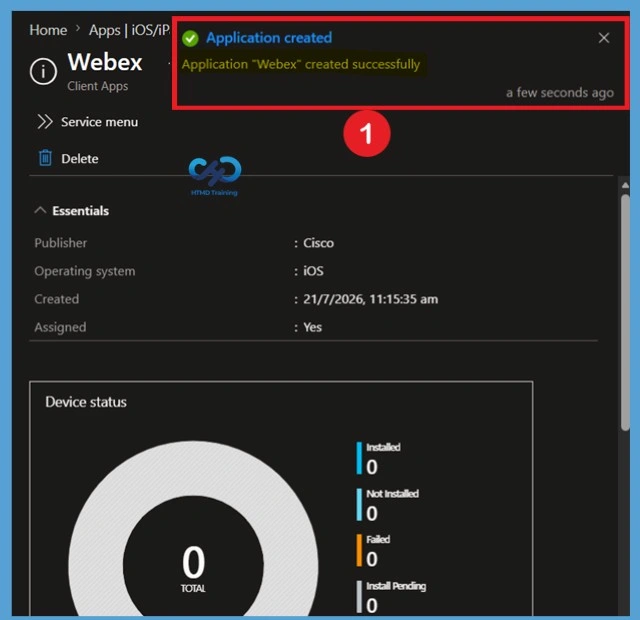
After completing the configuration and assignment steps, click Create to add the application to Microsoft Intune. A notification message will appear in the upper-right corner of the portal confirming that the application has been created successfully.
The application’s overview page provides important information such as the publisher name, operating system, assignment status, and deployment statistics. Administrators can use this page to monitor installation progress and review deployment details for managed devices.
Verify the Added iOS Store Application
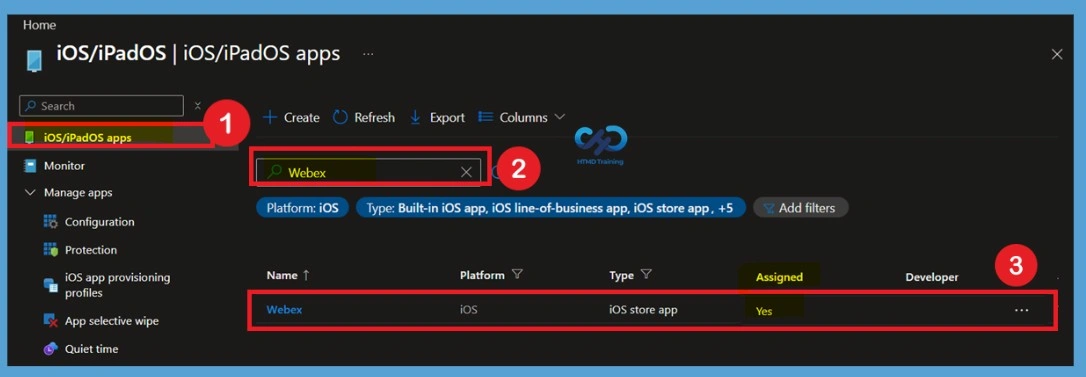
Once the application has been successfully added, it will appear under the iOS/iPadOS apps section within the Microsoft Intune admin center. Administrators can use the search functionality to quickly locate the application and verify its configuration. The application list displays useful information such as the platform, app type, and assignment status. This provides a simple way to confirm that the application has been added correctly and is ready for deployment or further management tasks.
- On an iOS device, within a few moments, you will see Webex is available to install based on assignment.
- Users can proceed to install and you can monitor the progress from Intune console.
Delete an iOS Store App from Intune
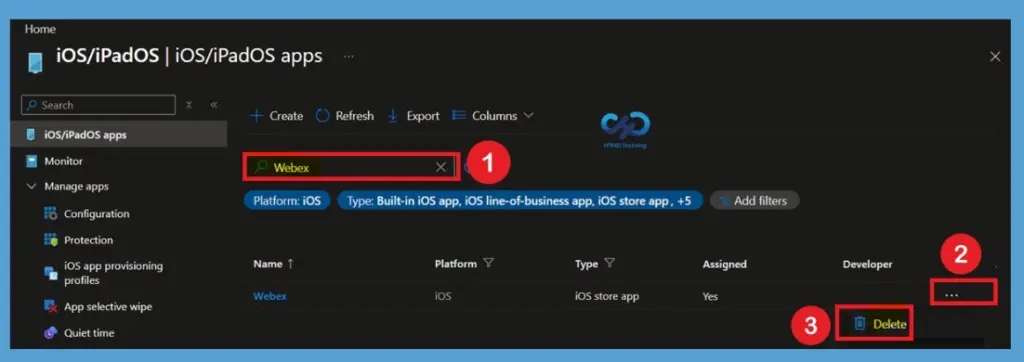
If an application is no longer required, Microsoft Intune allows administrators to remove it from the iOS/iPadOS applications list. Search for the application in the Intune admin center and open the available actions menu. Select Delete to permanently remove the application from Intune. Before deleting an application, ensure that it is no longer assigned to users or devices to avoid any deployment issues.
Need Further Assistance or Have Technical Questions?
Join the LinkedIn Page and Telegram group to get the latest step-by-step guides and news updates. Join our Meetup Page to participate in User group meetings. Also, join the WhatsApp Community and the WhatsApp channel to get the latest news on Microsoft Technologies. We are there on Reddit as well
Author
About Author – Jitesh, Microsoft MVP, has over six years of working experience in the IT Industry. He writes and shares his experiences related to Microsoft device management technologies and IT Infrastructure management. His primary focus is Windows 10/11 Deployment solution with Configuration Manager, Microsoft Deployment Toolkit (MDT), and Microsoft Intune.
I am having difficulties when i am trying to see the app on my device. My iOS device is enrolled in ABM and Intune, a profile is also assigned to it. Even though i see the apps in my Company portal, i am not able to install the apps. Additionally i am seeing an error saying Sync with Microsoft Defender for Endpoint. How can i have my iOS store apps to install automatically on the group assigned under required?