Let’s discuss Ways to Enable Different Keyboard Layout for Each App Window in Windows 11. A Keyboard Layout is any specific physical, visual, or functional arrangement of the keys, legends, or key-meaning associations.
It includes a computer keyboard, mobile phone keyboard, or another computer-controlled typographic keyboard. Different Keyboard layouts are available. You can change the keyboard layout by typing in another language and using input methods.
Windows 11 has some settings that enable you to add keyboard layouts to your desktop or laptop. There are different ways to change the default keyboard layout in Windows 11. Users can easily enable different keyboard layouts for each app window on Windows 11.
When users change their keyboard layout, it is applied globally to their account by default in Windows. This blog post explains how to Enable Different Keyboard Layouts for Each App Window in Windows 11.
- Best Ways to Change Keyboard Layouts in Windows 11
- How to Install Additional Language in Windows 11| Keyboard Layout
What are the Advantages of keyboard layout?
Keyboard Layouts are significant for a PC act. There are different types of Keyboard layouts available. The following are the advantages of Keyboard Layout.
1. It indicates how exactly your hardware acts
2. It improves users’ typing efficiency
3. Without a Keyboard layout, the keyboard would be just a desk with some buttons that do nothing
Ways to Enable Different Keyboard Layout for Each App Window in Windows 11
There are different ways to enable Different Keyboard Layouts for Each App Window in Windows 11. Users can easily choose any method to allow a different keyboard layout. The table below shows the other methods.
| Different Keyboard Layouts for Each App Window in Windows 11 |
|---|
| Enable Different Keyboard Layouts for Each App Window in Settings |
| Enable Different Keyboard Layouts for Each App Window in PowerShell |
1. Enable Different Keyboard Layout for Each App Window in Settings
This is the first method for Enabling Different Keyboard Layouts for Each App Window in Settings. Users can easily access and use this method to enable different Keyboard Layouts.
- Select Settings from the Start Menu.
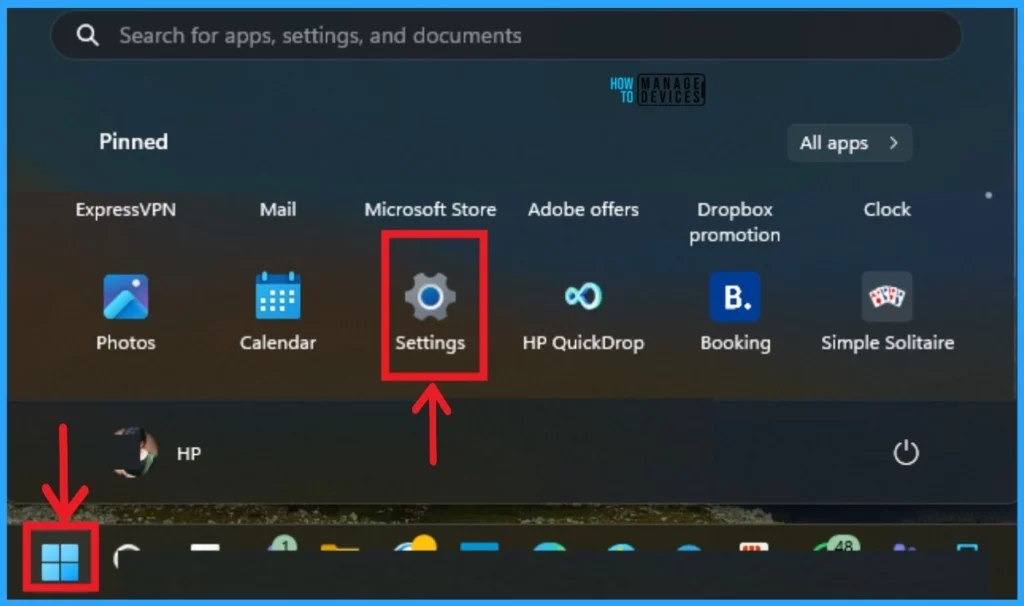
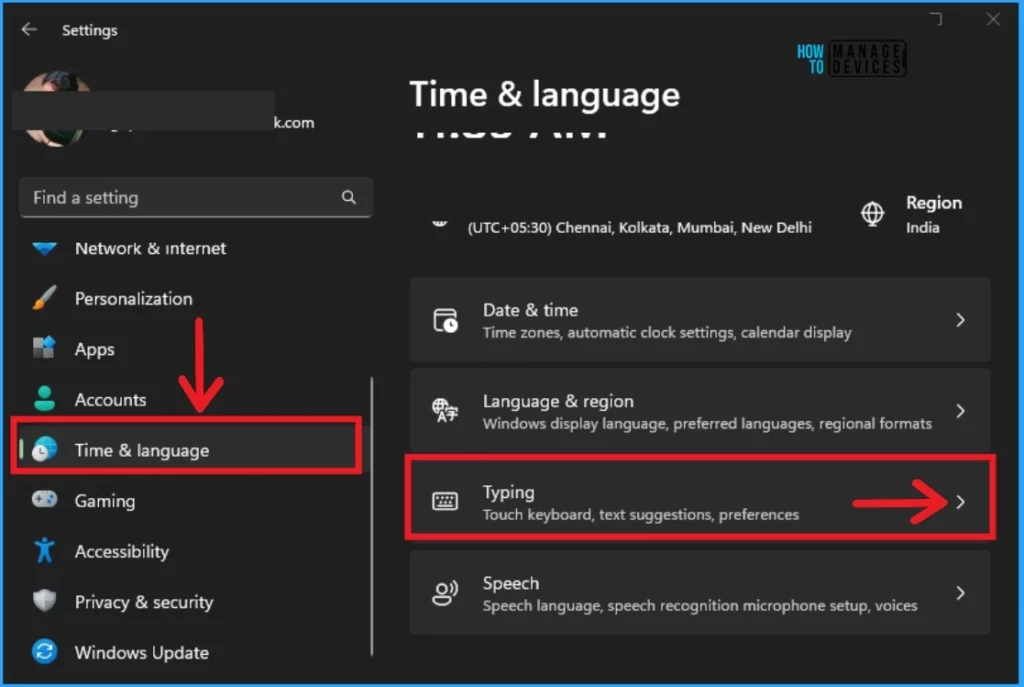
After selecting the Settings Application, choose Time & language on the left side of the settings. Then select the Typing feature from Time & language, shown on the right side of the window.
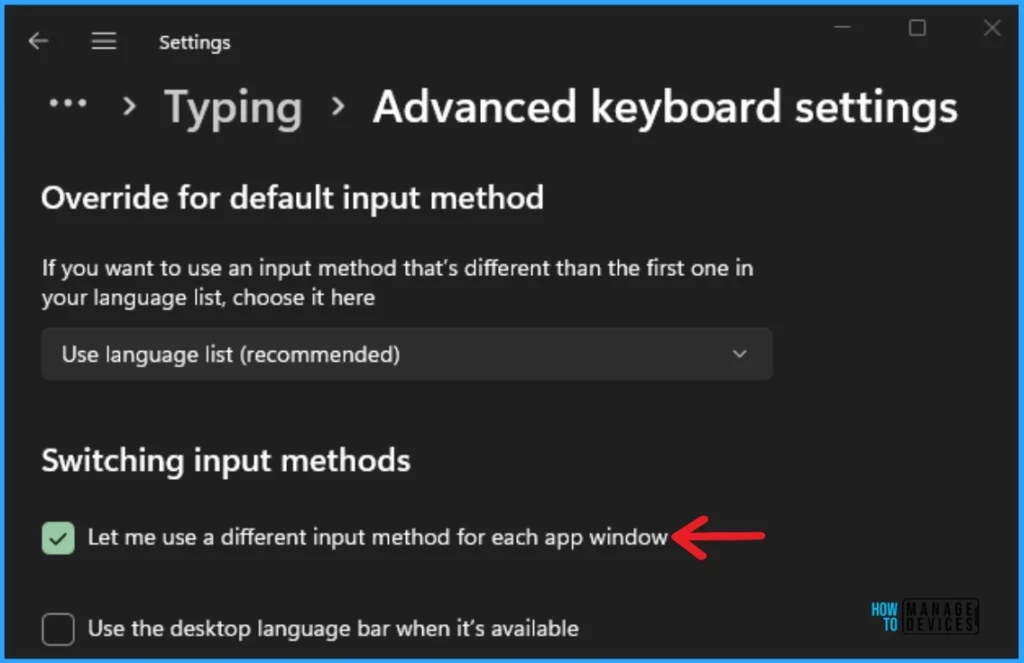
There are many features available in the typing feature. Select Advanced keyboard settings from the Typing feature. You can override the default input method. Here, there are different Switching input methods. Click on the checkbox to enable “Let me use a different input method for each app window.”
2. Enable Different Keyboard Layouts for Each App Window in PowerShell
The second method enables different keyboard layouts for each app window in PowerShell. It is also straightforward. To open PowerShell, click on the Start Menu and search for Windows PowerShell in the search bar.
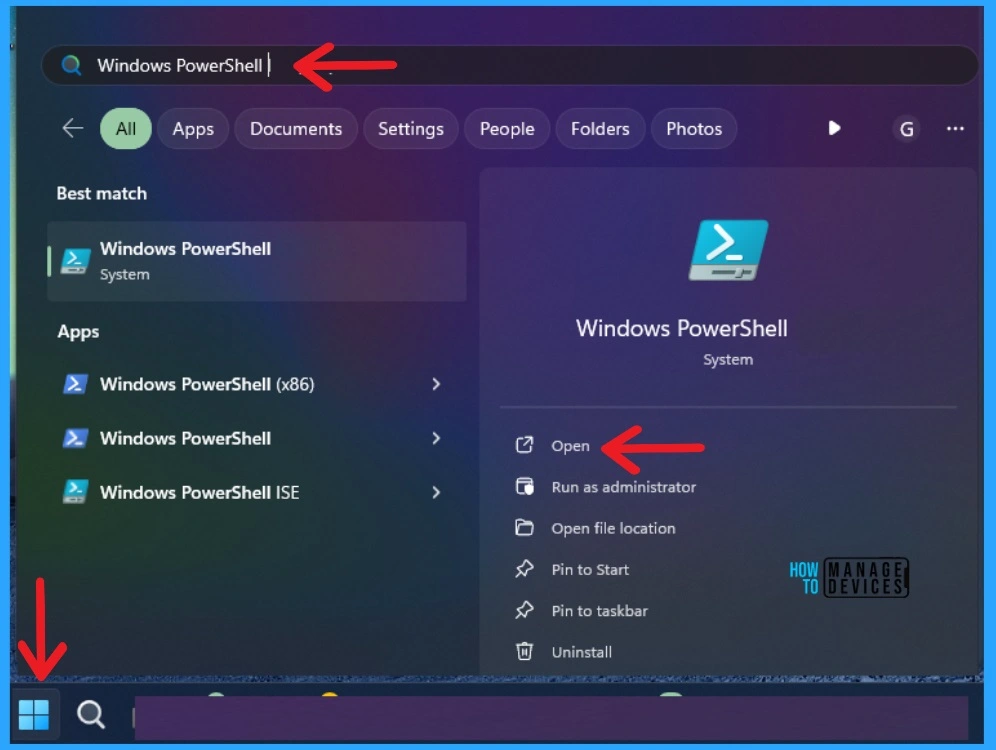
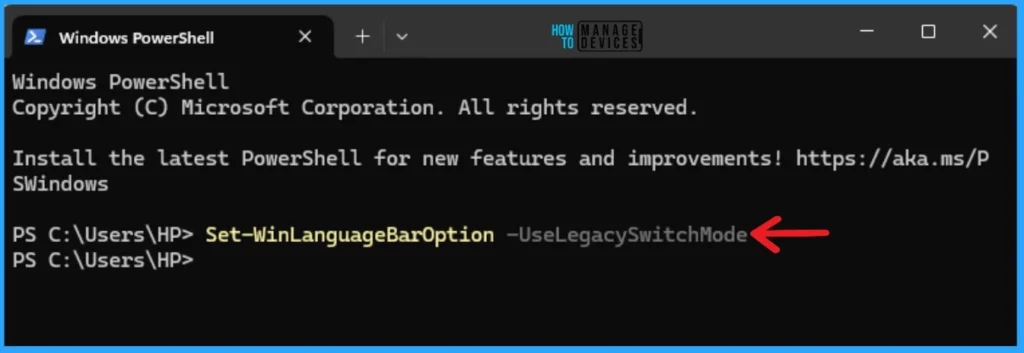
In PowerShell, you can give command prompts to change your PC. Here, you can Enable Different Keyboard Layouts for Each App Window in PowerShell. This command is used to get the current user account’s language bar mode and language bar type. Open PowerShell, type the following command prompt and Press the Enter key.
Note:- Set-WinLanguageBarOption -UseLegacySwitchMode
You can also use another method to enable different Keyboard Layouts for Each App Window in PowerShell. Open the PowerShell, type the following command prompt, and press Enter.
Note:- Set-WinLanguageBarOption -UseLegacyLanguageBar -UseLegacySwitchMode

- Turn On or Off Microsoft Defender SmartScreen for Microsoft Edge in Windows 11
- Guidelines for Setting up Kiosk in Windows 11
Disable Different Keyboard Layout for Each App Window in PowerShell
With the command prompt, you can also disable the different Keyboard Layouts for Each App Window in PowerShell. Open the Powershell and type the command prompt below. Then press the Enter key.
Note:- Set-WinLanguageBarOption

You can also disable the Different Keyboard Layouts for Each App Window in PowerShell. Open PowerShell and type the command prompt. Press the Enter Key.
Note:- Set-WinLanguageBarOption -UseLegacyLanguageBar

- 3 Best Ways to Disable Taskbar Thumbnail Preview on Windows 11
- Ways to Allow an App through Windows Defender Firewall
We are on WhatsApp. To get the latest step-by-step guides and news updates, Join our Channel. Click here –HTMD WhatsApp.
Author
Gopika S Nair is a computer enthusiast. She loves writing on Windows 11 and related technologies. She is here to share quick tips and tricks with Windows 11 or Windows 10 users. She is Post Graduate Diploma Holder in Computer Science.
