Let’s learn How to Give Read Write Permission Except Delete in Windows 11. When you are working in an environment, there are certain things that you need to provide permission to access something. Sometimes, it happens mistakenly that any important folder might be deleted by someone or intentionally.
Providing read-write permission allows you to modify and delete files and folders. But in many cases, unfortunately, some files are deleted by mistake or intentionally, which causes data loss. To prevent this situation adjust in advance setting to withdraw the delete permission.
Withdrawing delete permissions prevents unauthorized users from deleting shared files or folders. There are various methods to perform delete prevention for unauthorized users, and some settings can change in a few seconds using the command line tool.
File permission allows access to the selected users who make the modification to your files. So many users want to assign read and write file/folder permission, whereas delete permission is prohibited. Setting this type of permissions is easier, this article enlightens some methods.

- Improve Windows PC Performance by using New Efficiency Mode
- 300 Windows 11 Performance Improvements – Benchmark Report from Microsoft
Prevention Before Giving Read Write Permission Except Delete in Windows 11
There are certain guidelines before making any changes to your device. It is very necessary to double-check the details of any file or folder you assign to anyone, the instructions are listed below.
- Be careful before assigning any necessary file or folder permission to users or groups, plan accordingly for the necessary files/folders only.
- Wisely use inbuilt groups in Windows as they have predefined permissions.
- To avoid improper configuration issues, seldom use deny permission.
- Note down all permissions and access rules if you are managing multiple computers.
Set Read Write Permission For Files Folders
The file/folder permissions are highly useful since users need administrator access to delete some folders from their devices. The methods listed below for set Read-write permission for files/folders.
- Use File Properties
- Use Advanced Security Settings
- Use Terminal (Admin)
Use File Properties
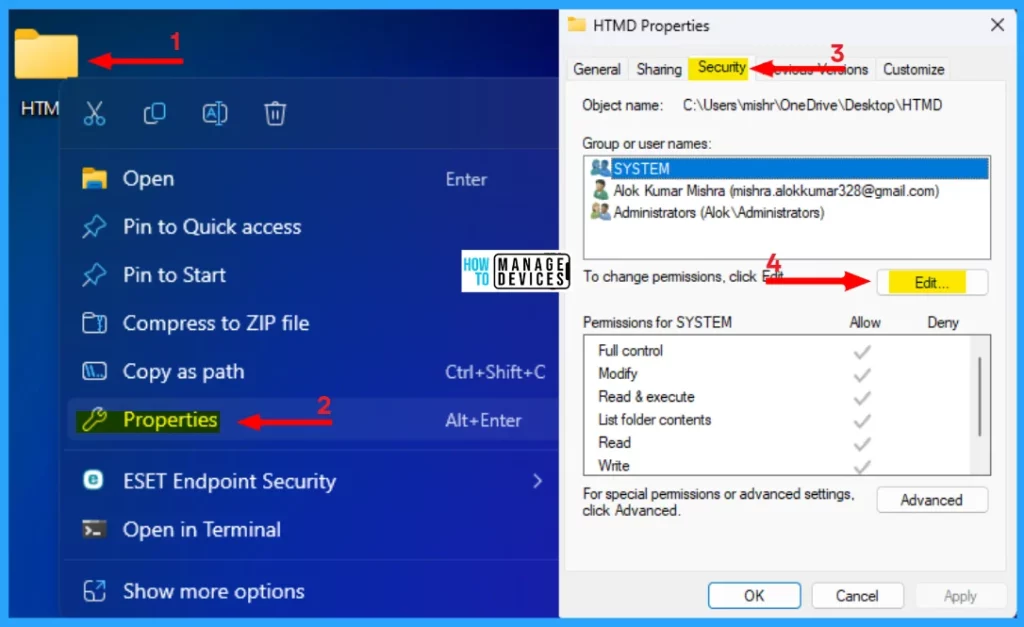
To use file properties, right-click on the desired folder, then click on Properties. When the folder’s Properties window opens, then click the Security tab. Under the security tab, click the Edit.. button to add your user name or group.
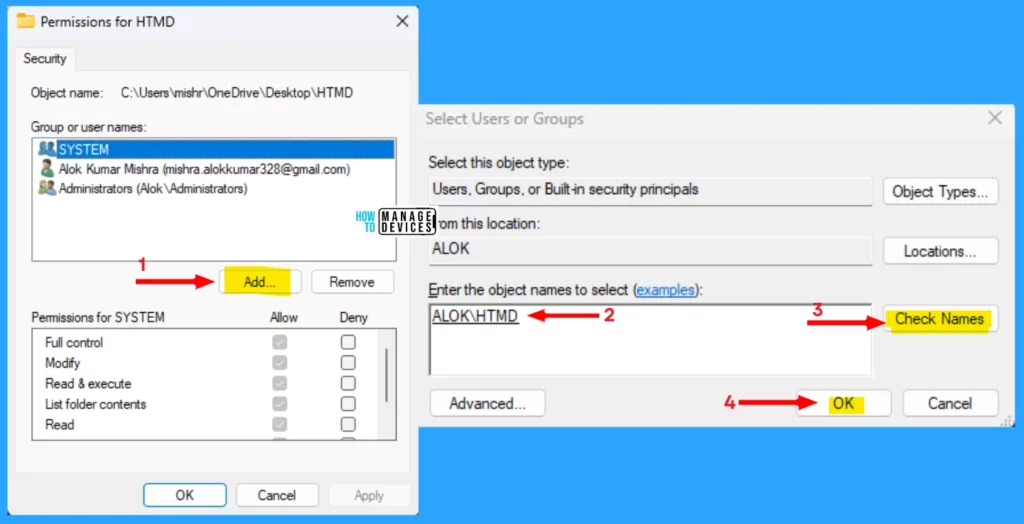
When the Permissions for the selected folder window opens, click on Add…, and then the Select Users or Groups window opens. Enter the user or group name that you want to add. This is only to add users or groups, not any folder, otherwise, it shows only an error message.
Add your user or group name in the text box under Enter the object names to select, and click on Check Names to check whether it is correct. After its success, click on OK to forward to the next step, as shown in the image below.
NOTE! If the user name is presented in the list by default present then no need to go to the edit section. The Edit section is to add a new group or user name only.
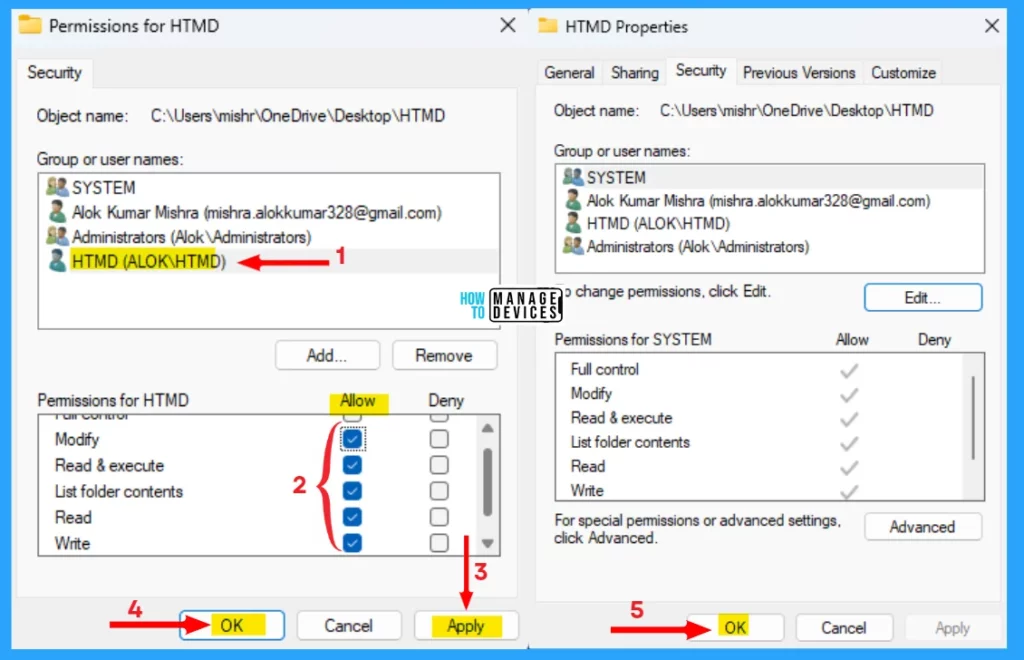
After clicking on OK, that user or group name is added to the list. Select the name and allow the related permission for the user to click on Apply and then OK. It returns to the properties window, then click on OK to continue, and you are done, as shown in the image below.
Use Advanced Security Settings
To do it through advanced security settings, right-click on the desired folder, then click on Properties as shown above. When the folder’s Properties window opens, then click the Security tab. Under the security tab, click the Advanced button to add your user name or group.
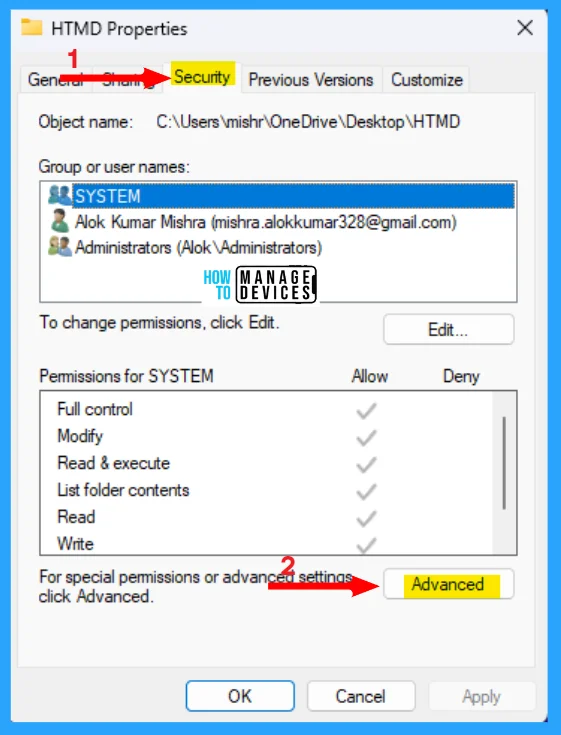
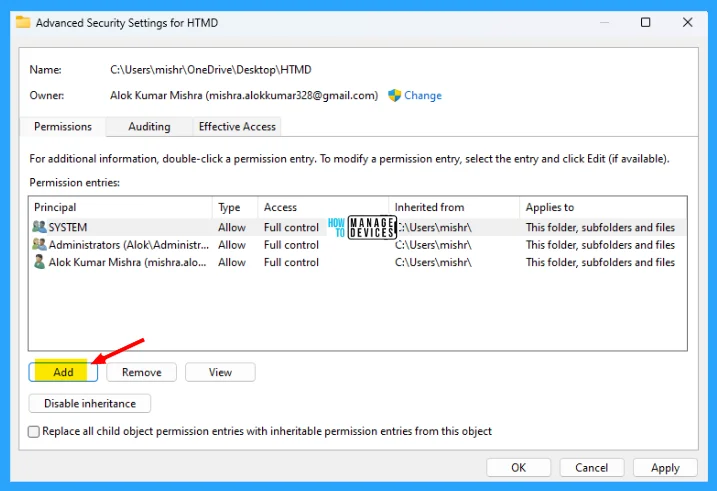
The Advanced Security Setting for the selected folder. Here also click on the Add button that allows you to select the user you want to add to give permissions.
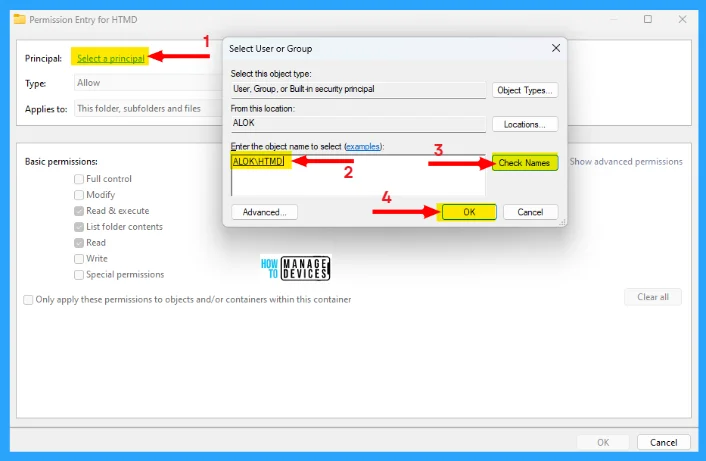
In the next Principal tab pop-up, click Select a Principal to add a user or group. Now as discussed earlier process provides the user name, checks the user name and clicks OK to Add that user or group.
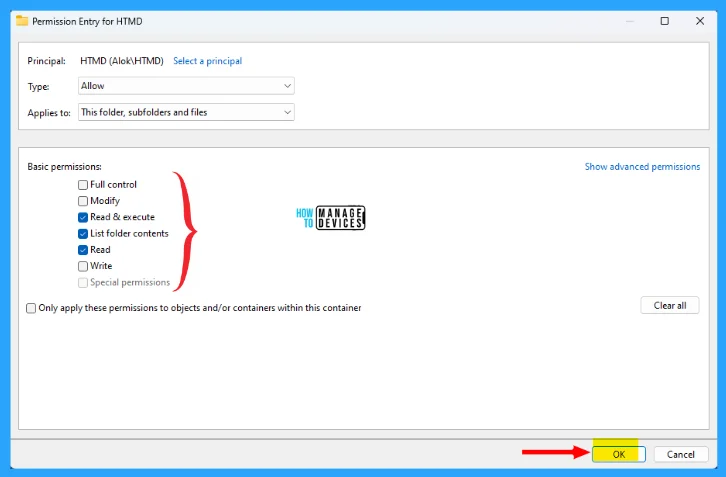
After you successfully initiated the user or group, now is time to provide some basic permissions to the user. As shown below, provide the necessary read-write permission and click on OK to continue.
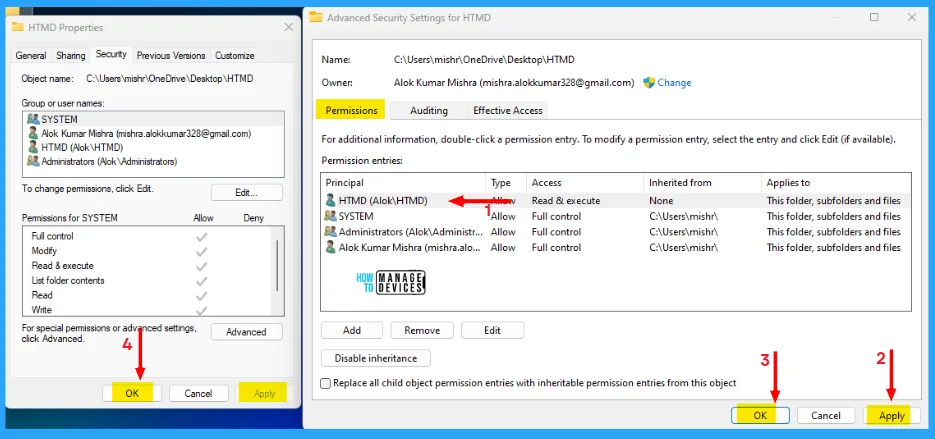
Here you can see the user already added to the list with the type of user, Access permission applied to all are mentioned, click on Apply and then click on OK. The properties window opens. Click on OK to finish the setup.
Use Terminal (Admin)
To do so using the window terminal open the Windows terminal with Admin privilege, right-click on the window icon or press Win key + X, then press Yes on User Account Control to give permission to make changes to this device.
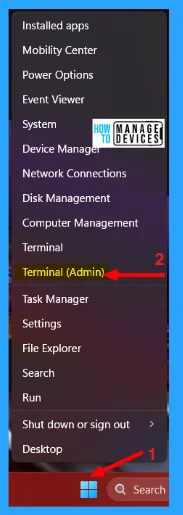
When the terminal opens with the administrative privilege, now type the command as icacls “path” / grant “user:(R,W)” and press Enter. So the command line for this is shown below. It provides the concerned user the read and write permission.
icacls “C:\Users\mishr\OneDrive\Desktop\New folder” /grant “Mishra:(R,W)”

Withdraw Delete Permission For Files Folders
There are two ways that are used to withdraw the delete permission for a file or folder if given earlier. Both the processes are listed below.
- Use Advanced Security Settings
- Use Terminal (Admin)
Use Advanced Security Settings
You can withdraw the delete permission for files/folders from the Advanced Security Settings. To do so, follow the process discussed above listed below.
- Right-click on the folder you want to set permission and click on the properties.
- In the properties, click on the Security tab and then click on the Advanced button.
- Double-click on the account you want to withdraw delete permission.
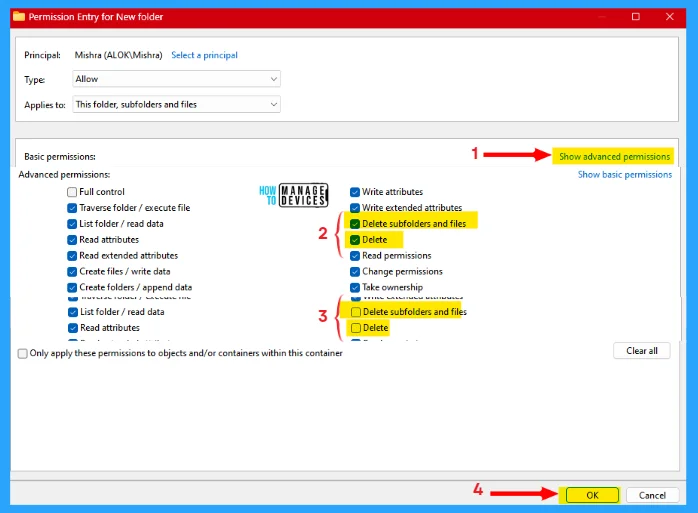
- Next, click on the Show Advanced permissions link.
- Now uncheck the Delete & Delete subfolders and files as shown in the 2 & 3 steps in the image below.
- Finally, click on OK to allow all the changes to be made.
Use Terminal (Admin)
You can make changes using the Windows Terminal in Administrator access. To do so, right-click on the window icon or press Win key + X, then press Yes on User Account Control to give permission to make changes to this device.
When the terminal opens with the administrative privilege, now type the command as icacls “path” / grant “user:D” and press Enter. Here D is represented as Delete in the command line. So the command line for this is shown below. It withdraws the Delete permission from the concerned user.
icacls “C:\Users\mishr\OneDrive\Desktop\New folder” /grant “Mishra:D”

In the terminal again, type the command as icacls “path” / grant “user:(DC)” and press Enter. Here DC is represented as Delete subfolders & files in the command line. So the command line for this is shown below. It withdraws Delete subfolders & files permission from the concerned user.
icacls “C:\Users\mishr\OneDrive\Desktop\New folder” /grant “Mishra:(DC)”

As per the discussion above, it seems that it is easy to manage read and write permissions. New users are also strongly recommended to use file or folder properties, whereas the command line is suggested for the advanced user.
NOTE! The permissions are so sensitive they cause issues if the user is not careful. No worries, Windows 11 can have the option to reset all permissions to default on your device.
I hope the How to Give Read-Write Permission Except Delete in Windows 11 information is helpful. Please follow us on the HTMD Community and visit our website HTMD Forum, if you like our content. Suggest improvements, if any, and we love to know which topic you want us to explore next.
We are on WhatsApp. To get the latest step-by-step guides and news updates, Join our Channel. Click here – HTMD WhatsApp.
Author
Alok is a Master of Computer Applications (MCA) graduate. He loves writing on Windows 11 and related technologies. He likes to share his knowledge, quick tips, and tricks with Windows 11 or Windows 10 with the community.
