Let’s learn how to Remove or Change the Reading Pane Layout in Outlook for Windows 11. Outlook is the best platform for managing Emails and calendars, Microsoft provides this service. The new feature in Outlook gives us a new reading experience. It helps you read according to your wishes.
The reading pane, also called the preview lane, lets you read items without opening them. You can customize it according to your preferences. The Reading pane is a simple but essential part of the Outlook app, with plenty of valuable features to help you shape your reading experience the way you want.
Outlook’s reading pane displays the text of a selected message, preventing you from having to open the actual message to work with it. This makes it easier to read Outlook messages individually.
We can easily customize, remove, or change the Reading Pane, which helps you scan your messages. In this blog post, I will share the details of removing or changing the Reading Pane Layout in Outlook and discuss some features of this option.
- Enable Disable Conversation View in Outlook for Windows 11
- Change to Classic or Modern Theme in Outlook for Windows 11
What are the Features of Reading Pane?

The Reading pane is enabled by default. When you click on a message in any folder, the pane displays its contents and essential controls for replying and forwarding the message.
1. It gives a better reading experience
2. It helps to read Outlook messages individually
3. It helps you quickly scan messages
4. This option will display the contents of the selected message
Remove or Change Reading Pane Layout in Outlook for Windows 11
The reading pane is a powerful tool in our Outlook application, allowing many features. You can Remove or change the Reading Pane layout in 2 ways. The table below shows the details.
| Different Methods |
|---|
| 1. Remove or Change the Reading Pane Layout in Outlook for Windows from Ribbon |
| 2. Remove or Change the Reading Pane Layout in Outlook for Windows from Settings |
1. Remove or Change the Reading Pane Layout in Outlook for Windows from Ribbon
Our first method is to remove or Change the Reading Pane Layout in Outlook for Windows from the Ribbon. To do this, we first take an outlook from the following steps.
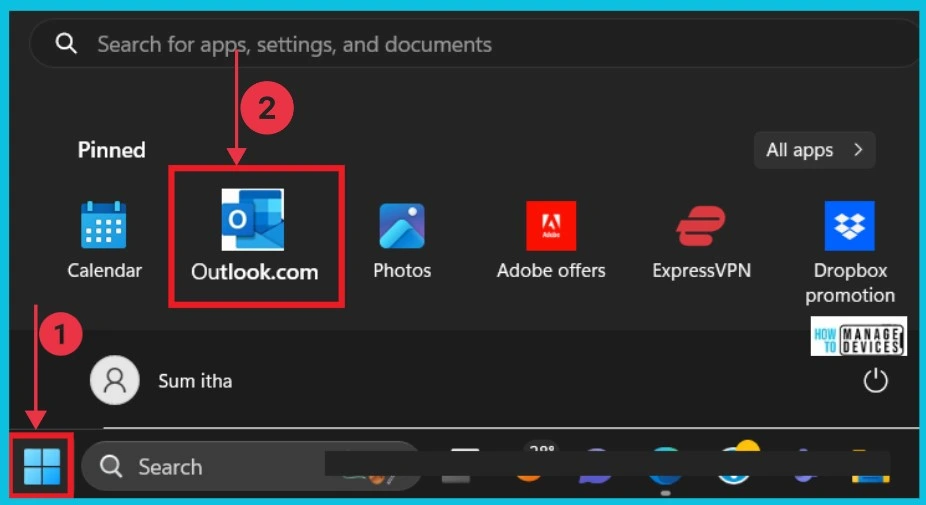
- Select Outlook from the Start button.
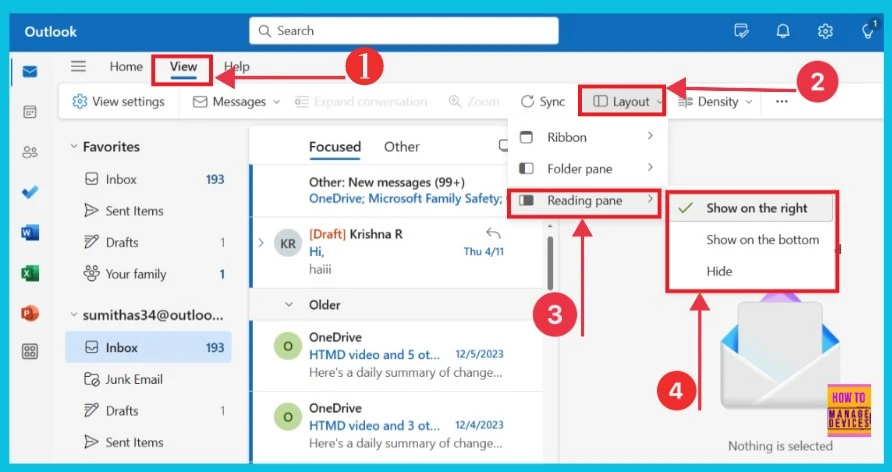
Now, we can access the Outlook Home page. Here, we can see different settings options. Click the View option, then click the layout, and click the left arrow of the Reading pane. Then you will get a small window. We can easily change or hide the reading pane options in that window.
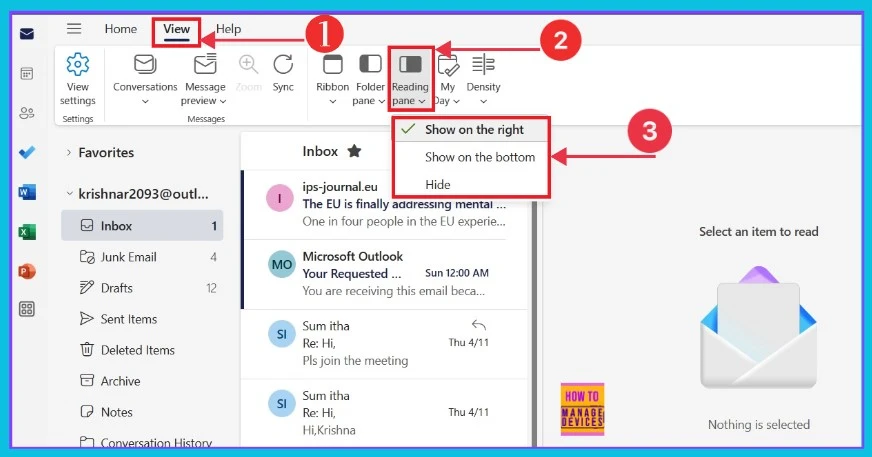
The screenshot below shows us after we select the reading pane option Show on the right. This is the default option in Windows 11.
- Microsoft Office Security Warning for ICS Files in Outlook
- Outlook Desktop Blocks Printing to PDF if Mandatory Labeling is Enabled
2. Remove or Change the Reading Pane Layout in Outlook for Windows from Settings
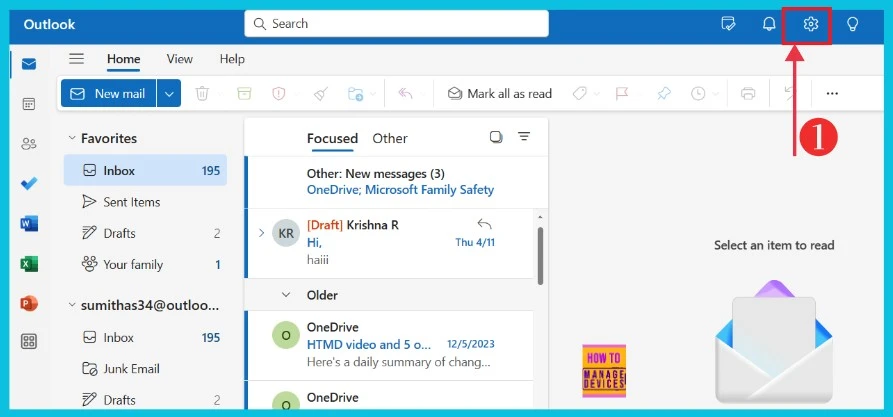
Removing or Changing the Reading Pane Layout in Outlook for Windows from Settings is the second method to change the layout. First, we take the Outlook from the start button. Then, you can see the Home page of Outlook. Click the Settings option on the right side of the screen. The below screenshot gives the details.
Now, we can access the settings page. Here, we click the Mail option on the left and can access the Layout option on the right. Click it. The screenshot below gives the details.
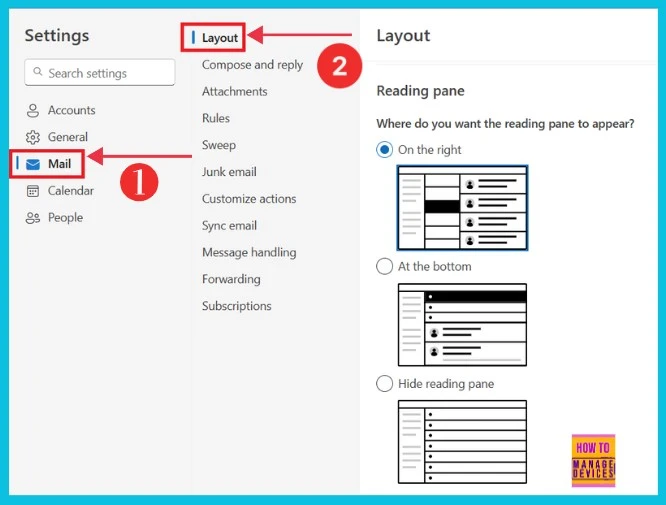
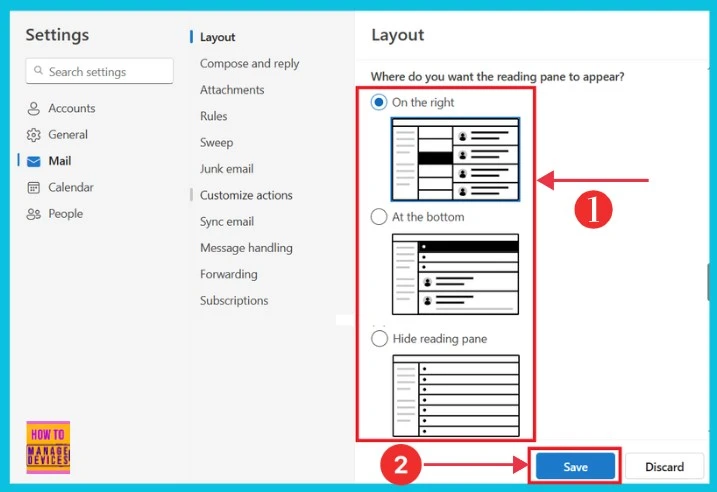
The screenshot below shows the different layouts used. We can easily change or hide other options. On the right is the default option in Windows 11.
- Select any of the Reading Pane
- Click on the Save option
We are on WhatsApp now. To get the latest step-by-step guides, news, and updates, Join our Channel. Click here. HTMD WhatsApp.
Author
Sumitha was introduced to the world of computers when she was very young. She loves to help users with their Windows 11 and related queries. She is here to share quick news, tips and tricks with Windows security.
