In this article, let’s quickly explore how to change the Region Name and Geography of Microsoft 365 Cloud PCs using the Microsoft Graph API. You’ll learn how this can be done using API endpoints and a PowerShell script. I believe this article will be a real time-saver for you.
Microsoft 365 Cloud PCs offer a persistent Windows experience hosted entirely in the cloud, allowing users to stream a full Windows desktop—including apps, settings, and data from any device. These Cloud PCs are fully hosted on Microsoft’s cloud infrastructure, eliminating the need for local hardware.
These virtual desktops integrate seamlessly with Microsoft 365 services such as Microsoft Teams, Outlook, OneDrive, and Office apps. They also support endpoint management via Intune and identity and access control through Entra ID. This makes them ideal for hybrid work environments, remote employees, and organizations seeking scalable, secure desktop solutions without the overhead of physical device management.
The provisioning policy defines the configuration settings for Cloud PCs, including the Windows version, language, region, join type (Microsoft Entra join or hybrid join), and the image used. With the release of Windows 11 24H2, you can now provision Cloud PCs with the latest OS build, featuring enhanced security, performance improvements, and AI-powered experiences.
Table of Contents
Windows 365 vs Azure Virtual Desktop: What’s the Difference
Well, Is Windows 365 Cloud the Same as Azure Virtual Desktop? Not quite. While both are cloud-based desktop solutions from Microsoft, Windows 365 and Azure Virtual Desktop (AVD) serve different purposes and offer distinct user experiences.
Microsoft’s journey into desktop virtualization began with Windows Virtual Desktop, which was later rebranded as Azure Virtual Desktop. AVD provides a flexible, scalable platform for delivering virtual desktops and apps—but it requires manual configuration of virtual machines, networking, and user environments. This makes it powerful but complex, especially for organizations without deep Azure expertise.
- How to Fix Windows 365 Inactive Azure Network Connection in Intune
- Easy way to Enable Windows Backup using Microsoft Intune Configuration
- How to Resolve Windows 365 Provisioning Policy Unsupported Image Status in Intune
Windows 365, on the other hand, simplifies the experience by offering Cloud PCs—personalized, persistent desktops that come preconfigured with Windows 10 or Windows 11. These Cloud PCs are ready to use out of the box, just like physical devices, and are managed through familiar tools like Microsoft Endpoint Manager and the Remote Desktop app.
In short, AVD is ideal for custom, multi-session environments, while Windows 365 is designed for simplicity, individual use, and streamlined management.
Working with Windows 365 Cloud PCs using the Microsoft Graph API
The Microsoft Graph API provides robust programmatic access to manage and monitor Cloud PCs within your organization. It mirrors the capabilities available in Microsoft Endpoint Manager, allowing administrators to perform key operations, such as provisioning, configuration, and lifecycle management through automated workflows instead of manual portal interactions.
- Intune Policy Assignment Classification Easy Secrets of using Graph API with PowerShell
- Managing Windows Bitlocker Compliance Policy Using Intune | MS Graph | Grace Period
Using Graph API, you can seamlessly list, retrieve, and track Cloud PC resources, including device status, user assignments, and configuration metadata. This enables scalable automation for onboarding and offboarding users, ensuring consistency and reducing administrative overhead. Whether you’re managing hundreds of devices or adapting to dynamic workforce changes, these API-driven workflows offer precision and repeatability.
Beyond monitoring, Graph API supports direct lifecycle actions like rebooting, renaming, resizing, and ending grace periods for Cloud PCs. These operations can be triggered based on user roles, performance needs, or compliance policies. For instance, upgrading a Cloud PC’s vCPU or storage tier is as simple as an API call ideal for seasonal staff or evolving workloads.
You can also automate provisioning policies, defining OS versions, language preferences, region settings, join types (Microsoft Entra join or hybrid join), and custom images to ensure every Cloud PC aligns with your organizational standards
Required Microsoft Graph API Permissions to Manage Windows 365 Cloud PCs
To manage Windows 365 Cloud PCs using Microsoft Graph API, you need specific delegated or application permissions under the CloudPC and DeviceManagement permission sets. Let’s discuss more about it.
- Best Guide to Run Intune Device Query with Microsoft Graph API
- Automate Microsoft Intune Device Compliance Report using Graph API
- Complete Guide to Install the New Microsoft Entra PowerShell Module
- How to Pause Intune Config Refresh Feature on Windows Device using Microsoft Graph API
CloudPC.ReadWrite.All and DeviceManagementConfiguration.ReadWrite.All are the permissions that you would need automate Windows 365 Cloud PCs using Microsoft Graph API. Both CloudPC.ReadWrite.All and DeviceManagementConfiguration.ReadWrite.All require admin consent before use.
- Intune Proactive Remediation Scripts Vs PowerShell Scripts
- How to Trigger SCCM Client Agent Actions Using PowerShell Script
Also, your Your tenant must have active Windows 365 licenses assigned to users for API operations to succeed. These permissions enable access to endpoints for listing Cloud PCs, managing lifecycle actions (reboot, resize, rename), and configuring provisioning policies.
Update Cloud PC Region Settings via Microsoft Graph API
The Region Name and Geography of Microsoft 365 Cloud PCs are part of Windows 365 Provisioning Policy in Intune. Let’s learn how it can automated and update via Microsoft Graph API.
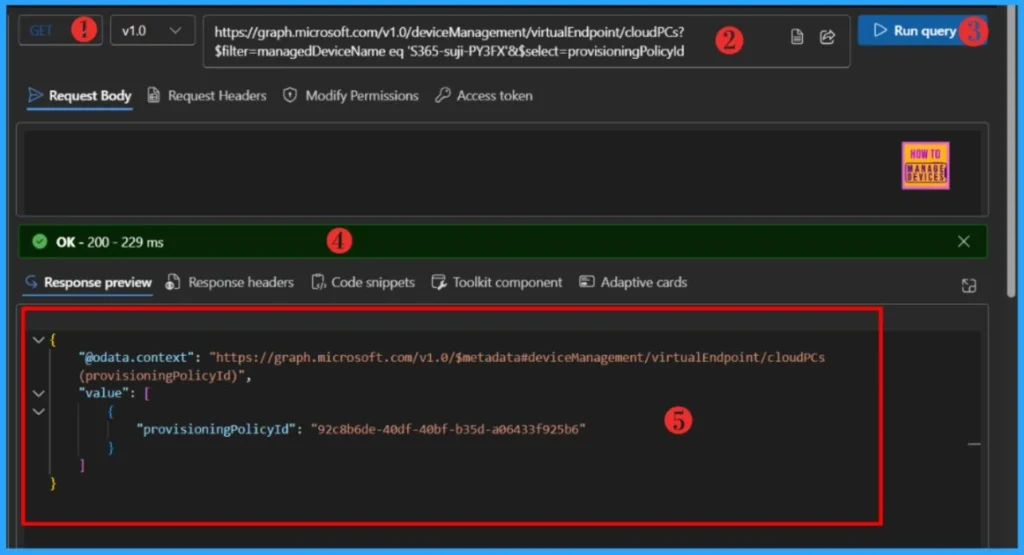
Read More: How to Create a New Windows 365 Provisioning Policy in IntuneBefore proceeding, make sure you have the Windows 365 provisioning policy ID readily available. Use the endpoint below to retrieve and note down the provisioningPolicyId. Make sure to replace managedDeviceName with your Windows 365 machine name.
- Sign in to the Graph Explorer with your credentials.
- Click on Run query after typing the URL below. You should use the GET API request method
https://graph.microsoft.com/v1.0/deviceManagement/virtualEndpoint/cloudPCs?$filter=managedDeviceName eq 'S365-suji-PY3FX'&$select=provisioningPolicyIdMake sure to replace managedDeviceName with your Windows 365 machine name. When you click on Run query, you will receive a success message with the text ‘OK -200.’ The Response preview box will show the desired output.
- Time to use Microsoft Graph Device Management PS Module Instead of MS Graph Intune Module.
- Automate Intune App Deployment using Microsoft Graph API and PowerShell
- Manage Intune Tasks with PowerShell Part 1
We will use the provisioningPolicyId in the next URL. Change the request method from GET to PATCH and paste the below endpoint. Make sure to replace provisioningPolicyId.
https://graph.microsoft.com/v1.0/deviceManagement/virtualEndpoint/provisioningPolicies/92c8b6de-40df-40bf-b35d-a06433f925b6Since this is a PATCH call, the request body is mandatory in this example. The below table will help you to explain the Region Name and Geography name that can be used in the automation.
| Region Group | Region Name | Geographic Location | Notes |
|---|---|---|---|
| Asia | eastasia | East Asia | Hong Kong |
| Asia | southeastasia | Southeast Asia | Singapore |
| Australia | australiaeast | Australia East | New South Wales |
| Canada | canadacentral | Canada Central | Toronto |
| Central America | mexicocentral | Mexico Central | Mexico City |
| European Union | northeurope | North Europe | Ireland |
| European Union | westeurope | West Europe | Netherlands |
| European Union | italynorth | Italy North | Milan |
| European Union | polandcentral | Poland Central | Warsaw |
| European Union | spaincentral | Spain Central | Madrid |
| European Union | swedencentral | Sweden Central | Gävle |
| France | francecentral | France Central | Paris |
| Germany | germanywestcentral | Germany West Central | Frankfurt |
| India | centralindia | Central India | Pune |
| Japan | japaneast | Japan East | Tokyo |
| Japan | japanwest | Japan West | Osaka |
| Middle East | israelcentral | Israel Central | Tel Aviv |
| Norway | norwayeast | Norway East | Oslo |
| South Africa | southafricanorth | South Africa North | Johannesburg |
| South America | brazilsouth | Brazil South | São Paulo (Restricted) |
| South Korea | koreacentral | Korea Central | Seoul |
| Switzerland | switzerlandnorth | Switzerland North | Zurich |
| UAE | uaenorth | UAE North | Dubai |
| United Kingdom | uksouth | UK South | London |
| US Central | centralus | Central US | Iowa |
| US Central | southcentralus | South Central US | Texas |
| US East | eastus | East US | Virginia |
| US East | eastus2 | East US 2 | Virginia |
| US West | westus2 | West US 2 | Washington (Restricted) |
| US West | westus3 | West US 3 | Arizona |
As I mentioned earlier, the request body is mandatory in this example. Please use the below JSON input in the request body. Make sure to replace the regionName and regionGroup
{
    "@odata.type": "#microsoft.graph.cloudPcProvisioningPolicy",
    "domainJoinConfigurations": [
        {
            "@odata.type": "#microsoft.graph.cloudPcDomainJoinConfiguration",
            "regionName": "centralindia",
            "regionGroup": "india"
        }
    ]
}- How to Create Autopilot Device Preparation Policy for Windows 365 Frontline Devices using Intune
- How Microsoft Security Copilot Improves Intune Admin Center Efficiency
- Windows 365 Cloud PC Frontline Provisioning Policy Creation Process | 3 Cloud PC with One License
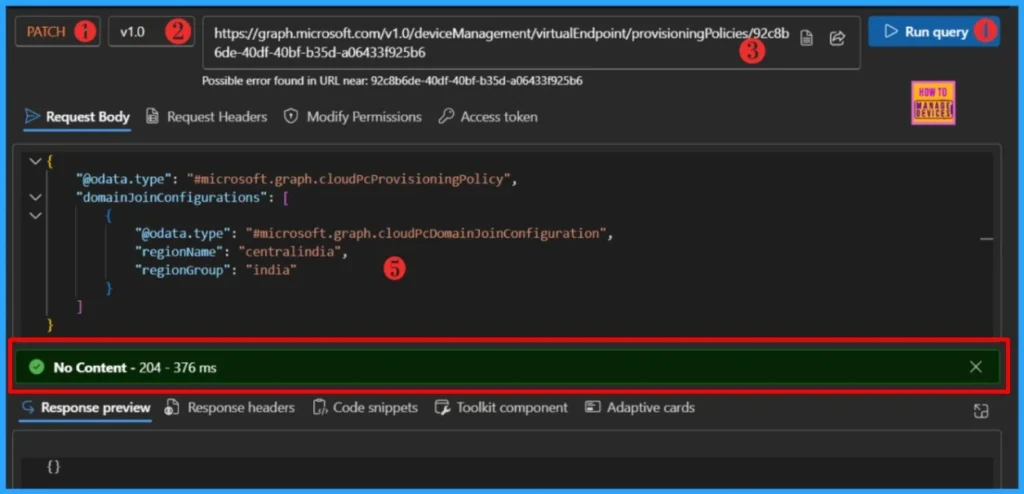
The below endpoint will get you complate information about the Provisioning Policies, it should the information about the regionName and regionGroup. Change the request method from PATCH to GET and click on Run query.
https://graph.microsoft.com/v1.0/deviceManagement/virtualEndpoint/provisioningPolicies/92c8b6de-40df-40bf-b35d-a06433f925b6End Result
The changes have been successfully applied to this provisioning policy. You can use the above specified endpoint to verify the result. Alternatively, you can log in to the Intune portal to confirm the update.
- Sign in to the Microsoft Intune Admin Center.
- Navigate to > Devices > Device onbording > Windows 365
- Click on Provisioning policies and Select provisioning policy that you would to make the changes.
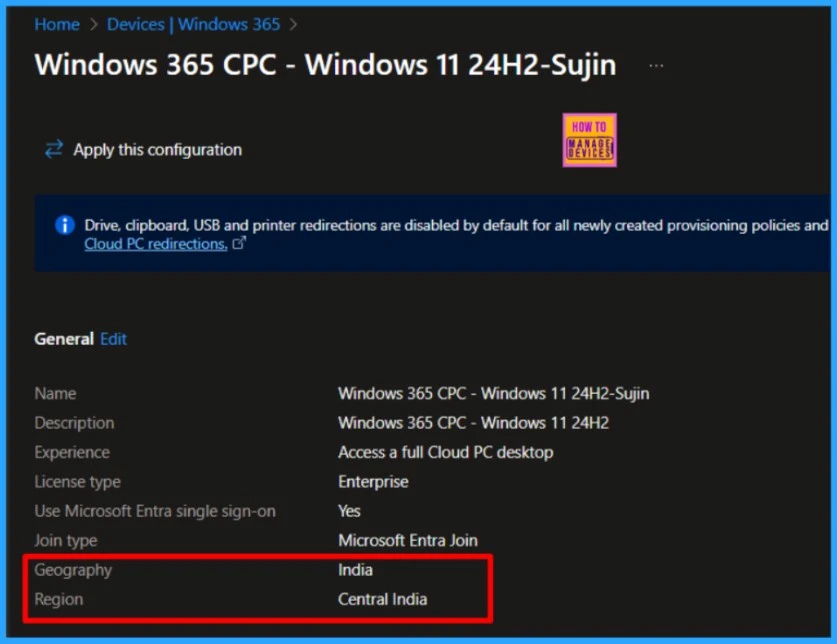
PowerShell Script to Update Cloud PC Region Settings
Let’s devolop a script that could do all the above tasks with in few seconds. Please make sure to install the Microsoft Graph PowerShell module before proceeding further.
Read more: Best Guide to Install Microsoft Graph PowerShell ModulesThe code below assumes that you’ve already installed the Microsoft Graph module and are attempting to authenticate with the required permissions. It will also prompt you to enter the Windows 365 Cloud PC name, Region Name, and Region Group as input.
##########################################################################

#Update-W365MachineRegion.ps1
#Author : Sujin Nelladath
#LinkedIn : https://www.linkedin.com/in/sujin-nelladath-8911968a/


##########################################################################

Connect-MgGraph -Scopes "CloudPC.ReadWrite.All", "DeviceManagementConfiguration.ReadWrite.All" -NoWelcome

# Get user inputs
$CloudPCName = Read-Host "Enter Cloud PC Name"
$RegionName = Read-Host "Enter Region Name (e.g., centralindia)"
$RegionGroup = Read-Host "Enter Region Group (e.g., India)"
$RegionName = $RegionName.ToLower()
$RegionGroup = $RegionGroup.ToLower()

Write-Host "Searching for Cloud PC: $CloudPCName"

# Step 1: Find the Cloud PC and get policy ID
$cloudPCUri = "https://graph.microsoft.com/v1.0/deviceManagement/virtualEndpoint/cloudPCs?`$filter=managedDeviceName eq '$CloudPCName'&`$select=provisioningPolicyId"

try
{
    $cloudPC = Invoke-MgGraphRequest -Uri $cloudPCUri

    if ($cloudPC.value.Count -eq 0)
    {
        Write-Host "Cloud PC not found!" -ForegroundColor Red
        exit
    }

    $policyId = $cloudPC.value[0].provisioningPolicyId
    Write-Host "Found Policy ID: $policyId"

}

catch
{
    Write-Host "Error finding Cloud PC: $($_.Exception.Message)" -ForegroundColor Red
    exit
}

# Step 2: Update the provisioning policy
$updateUri = "https://graph.microsoft.com/v1.0/deviceManagement/virtualEndpoint/provisioningPolicies/$policyId"

$body = @{
    "@odata.type" = "#microsoft.graph.cloudPcProvisioningPolicy"
    "domainJoinConfigurations" = @(
        @{
            "@odata.type" = "#microsoft.graph.cloudPcDomainJoinConfiguration"
            "regionName" = $RegionName
            "regionGroup" = $RegionGroup
        }
    )
} | ConvertTo-Json -Depth 3

Write-Host "Updating region to: $RegionName ($RegionGroup)"

try
{
    Invoke-MgGraphRequest -Uri $updateUri -Method PATCH -Body $body
    Write-Host "Region updated successfully!" -ForegroundColor Green

}

catch

{
    Write-Host "Error updating region: $($_.Exception.Message)" -ForegroundColor Red
}
I trust that this article will significantly benefit you and your organization. I appreciate your patience in reading this post. I look forward to seeing you in the next post. Keep supporting the HTMD Community. I’ve uploaded the code to my GitHub repository, you can download it directly from there.
Download : Update-W365MachineRegion.ps1Need Further Assistance or Have Technical Questions?
Join the LinkedIn Page and Telegram group to get the latest step-by-step guides and news updates. Join our Meetup Page to participate in User group meetings. Also, Join the WhatsApp Community to get the latest news on Microsoft Technologies. We are there on Reddit as well.
Author
About the Author: Sujin Nelladath, a Microsoft Graph MVP with over 12 years of experience in SCCM device management and Automation solutions, writes and shares his experiences with Microsoft device management technologies, Azure, DevOps and PowerShell automation.

