
Key Takeaways
- Prevent users from copying and pasting Clipboard content between local and remote devices during Remote Desktop sessions.
- Block client drive redirection to prevent access to local drives and unauthorised file transfers.
- Reduce the risk of sensitive data leakage by restricting Remote Desktop resource redirection.
- Improve the security of Remote Desktop Services (RDS) environments by enforcing centralised policy management.
- Improve the security of Remote Desktop Services (RDS) by limiting resource redirection on managed Windows devices.
Let’s discuss Manage Remote Desktop Clipboard and Drive Redirection Policies to Prevent Data Leakage using Intune. Remote Desktop Services (RDS) allows users to access remote desktops and applications while providing convenient features such as Clipboard redirection and Drive redirection. By default, these features enable users to copy and paste Clipboard content between local and remote devices and access local drives during Remote Desktop sessions.
Table of Contents
Table of Contents
Manage Remote Desktop Clipboard and Drive Redirection Policies to Prevent Data Leakage using Intune
Let’s read through to know more about the conflict policy story as part of this deployment! I used the settings catalog profiles in Intune to test the RDP property policy deployment scenario. Although this functionality improves productivity and simplifies file transfers, it can also increase the risk of sensitive organisational data being copied or transferred outside the managed environment.
Microsoft Intune enables administrators to centrally manage these settings through the Settings Catalog by configuring the Do not allow Clipboard redirection and do not allow drive redirection policies
- Disable PST Access in Microsoft Outlook to Prevent Unmanaged Email Storage using Intune Policy
- Free 50-Hour Windows 365 for Agents Trial Now Available with Microsoft Copilot Studio
- Best Way to Create Windows 365 Cloud Apps with Intune
- Easy Way to Update User Storage Size for Windows 365 Frontline Shared Cloud PCs
- How to Setup Windows 365 Cloud PCs with Autopilot Device Preparation
Start Create Policy
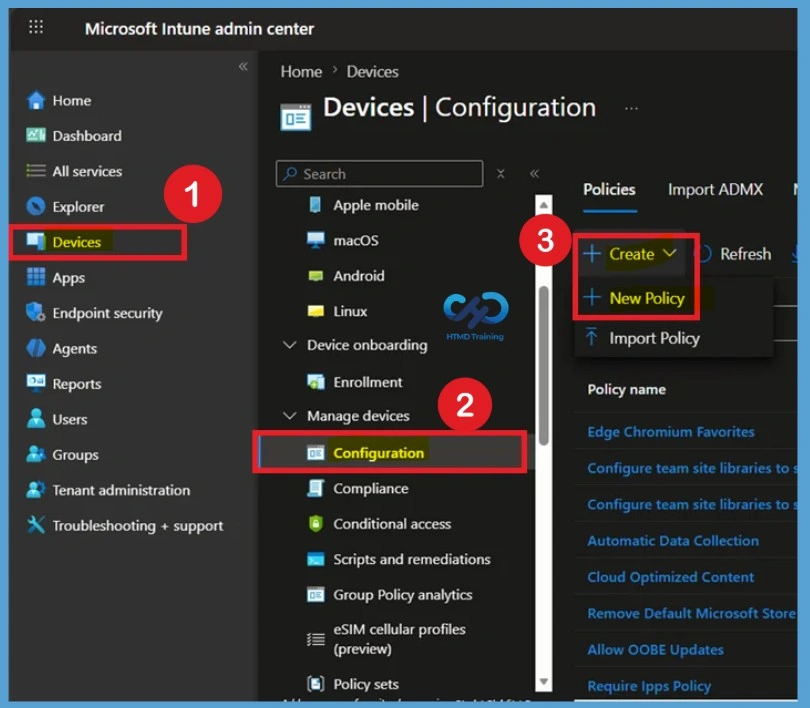
To begin, create a new Settings Catalog profile in Microsoft Intune. This profile will be used to configure Remote Desktop Clipboard and Drive Redirection Policies using Intune for targeted users or devices. To get started, sign in to the Intune admin portal and navigate to Devices > Windows devices > Configuration > Create profile > New policy.

- Log in to Microsoft Intune
- Navigate to Devices > Windows > Configuration profiles.
- Click on +Create Profile.
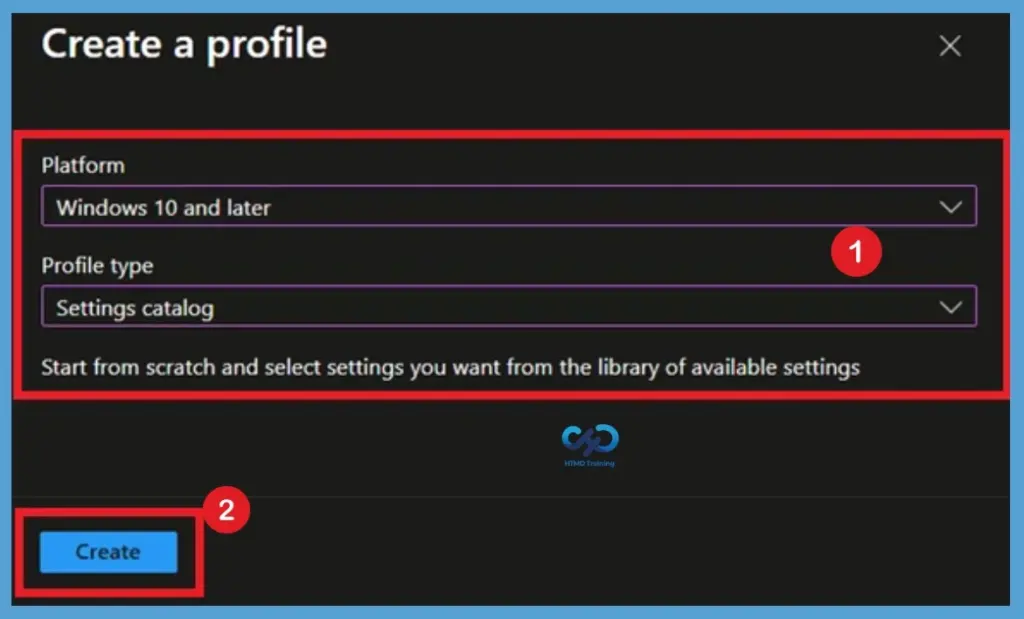
In the Create Profile blade, you can select Platform: Windows 10 and later, and Profile: Settings catalogue (preview). Click on the Create button. For Example, you have to select the Windows 10 platform or later. You can enter the details of the policy and settings in the next screens.
Configure the Basic Information
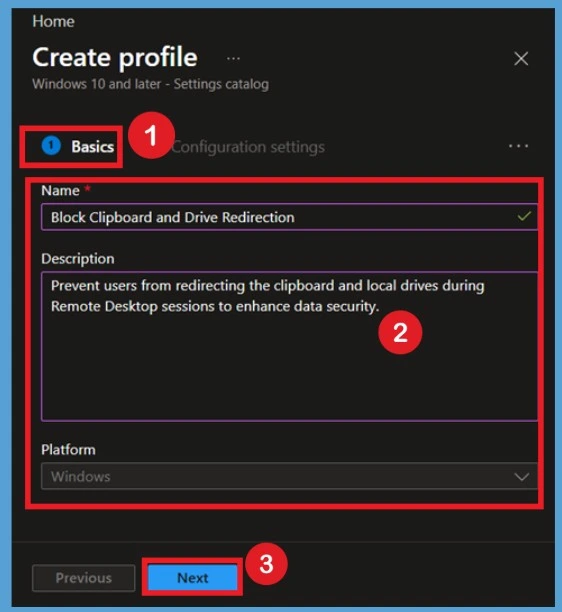
On the Basics page, enter Block Clipboard and Drive Redirection as the policy name. In the Description field, enter Prevent users from redirecting the clipboard and local drives during Remote Desktop sessions to enhance data security. Providing a descriptive policy name and description makes it easier for administrators to identify the purpose of the configuration profile. After verifying the details, click Next.
Add the Required Settings
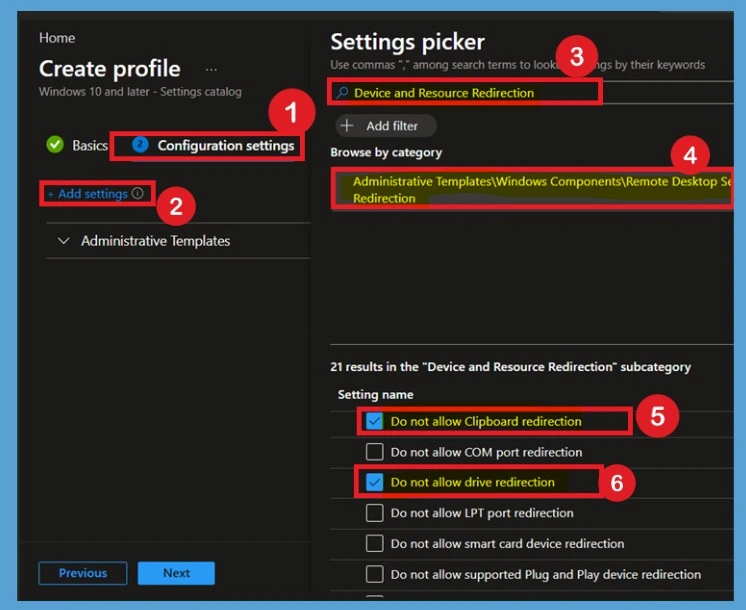
On the Configuration settings page, you will need to click on the +Add Settings hyperlink from the next page of the policy configuration wizard. This opens up the search box and a lot of settings catalog policy categories. You can use the search box to find the relevant policies for Cloud PC RDP settings. Search for Device and Resource Redirection, then select Do not allow Clipboard redirection and Do not allow drive redirection.
After adding both settings to the Block Clipboard and Drive Redirection policy, they will appear in the configuration profile, where you can configure their policy states.
- Search with the keyword -> Device and Resource Redirection
I have selected the two policies highlighted in bold from the above list. The first one is to disable Clipboard redirection between the base PC and the Cloud PC. The second setting is for disabling drive redirection for Cloud PC. Click on the Select button to continue to the next page.
Configure Disabled State
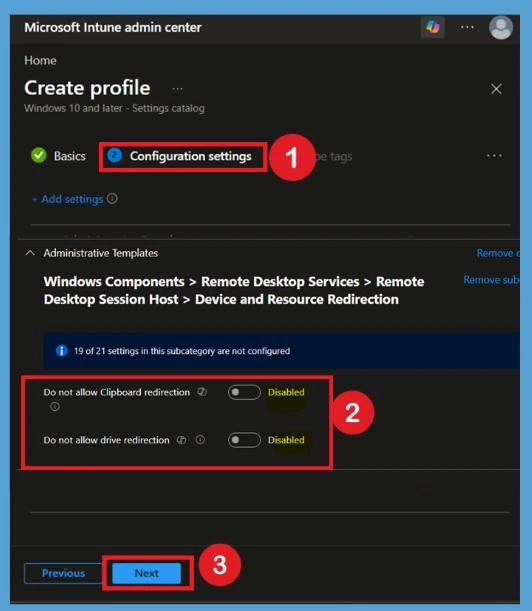
After adding the required settings to the profile, both policies appear with their default values. In the Configuration settings section, each policy can be configured as Not configured, Enabled, or Disabled. You can see that here, both policies are Disabled (Do not allow Clipboard redirection and do not allow drive redirection) if you want to allow clipboard and local drive redirection during Remote Desktop sessions. This setting permits users to copy data between local and remote devices and access local drives from the remote session.
- If you want to continue with these settings, please click Next.
Configure the Enabled State of the Policy
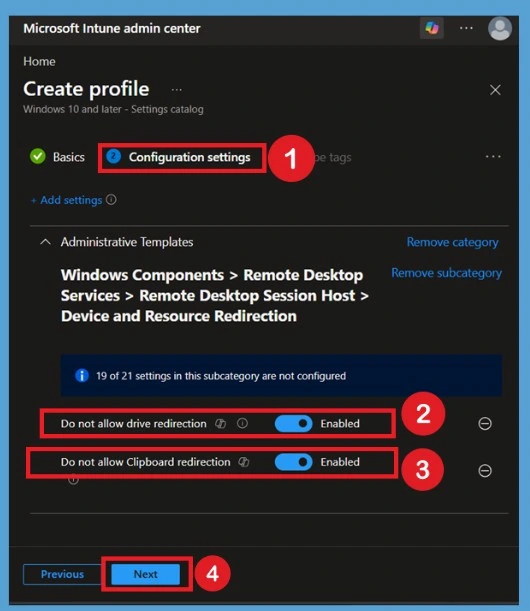
To block clipboard and drive redirection, change both policy settings from Disabled or Not configured to Enabled. Enabling these policies prevents users from redirecting the clipboard and local drives while using Remote Desktop Services. After configuring both settings to Enabled, review the selected values to ensure the policy matches your organisation’s security requirements. Once verified, click Next to proceed to the Scope tags page.
- Now it’s time to enable these two settings to disable the clipboard and drive redirection. Click on the Next button to continue. You can select all the other available policy settings if you need to disable or enable other RDP settings.
| Settings | Info |
|---|---|
| Do not allow Clipboard redirection | This policy setting specifies whether to prevent the sharing of Clipboard contents (Clipboard redirection) between a remote computer and a client computer during a Remote Desktop Services session. |
| Do not allow drive redirection | This policy setting specifies whether to prevent the mapping of client drives in a Remote Desktop Services session (drive redirection). By default, an RD Session Host server maps client drives automatically upon connection. |
Scope Tag for the Policy
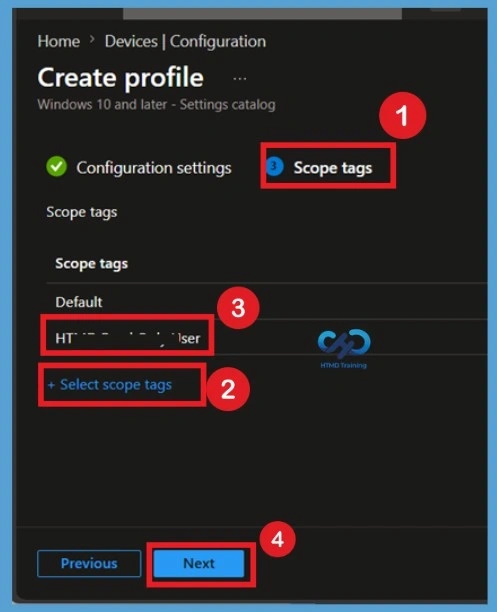
The Scope tags page allows administrators to control which IT administrators can view and manage the policy. If your organisation doesn’t use custom scope tags, you can leave the Default scope tag selected. Organisations using Role-Based Access Control (RBAC) can assign custom scope tags to limit policy visibility to specific administrative teams. After confirming the required scope tag, click Next.
Assignments
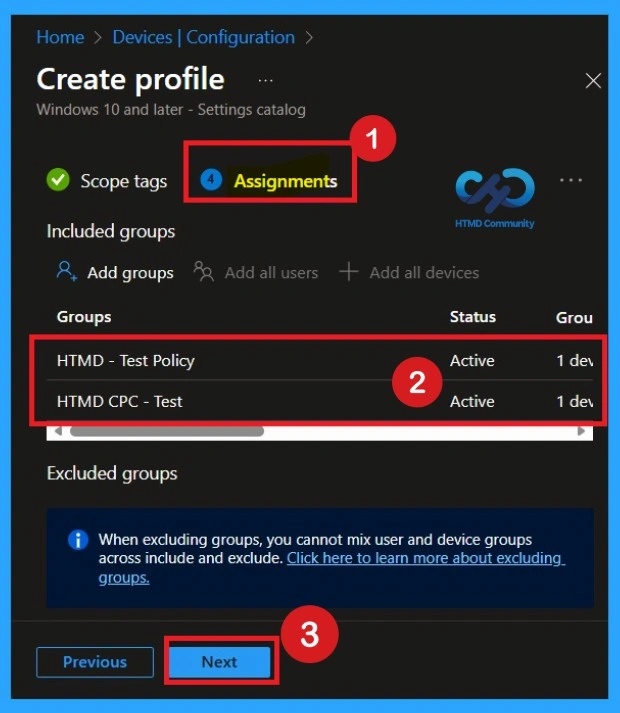
On the Assignments page, click Add groups and select the Microsoft Entra user or device groups that should receive the Block Clipboard and Drive Redirection policy. Review the selected assignments and configure any exclusion groups if required. After confirming the deployment scope, click Next. Here I add 2 groups, HTMD – Test Policy and HTMD CPC – Test.
Review + Create Policy Step
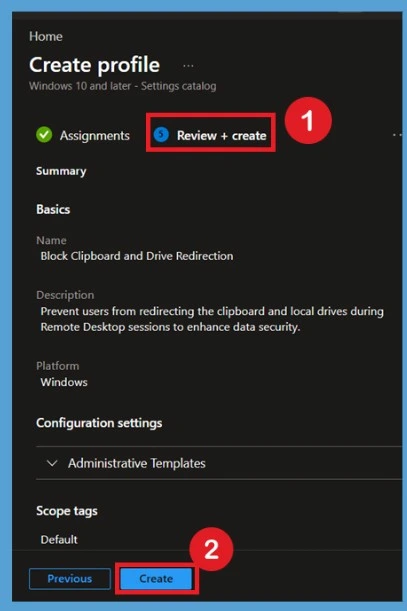
The Review + create page displays a summary of the Block Clipboard and Drive Redirection policy, including its name, description, configured settings, scope tags, and assignments. Verify that all settings are configured correctly before clicking Create. Microsoft Intune will create and deploy the Block Clipboard and Drive Redirection policy to the assigned devices.
Monitoring Status
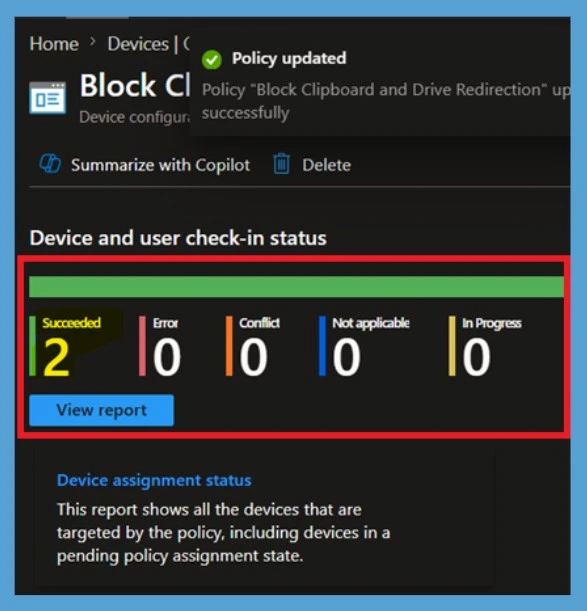
So now we can check the Monitoring status to confirm the policy deployment. After creating the policy, open the configuration profile from Devices > Configuration. Review the Device status, User status, and Per-setting status reports to verify successful deployment. These reports help identify devices that successfully received the policy and any devices that have deployment or compliance issues.
Client-Side Verification
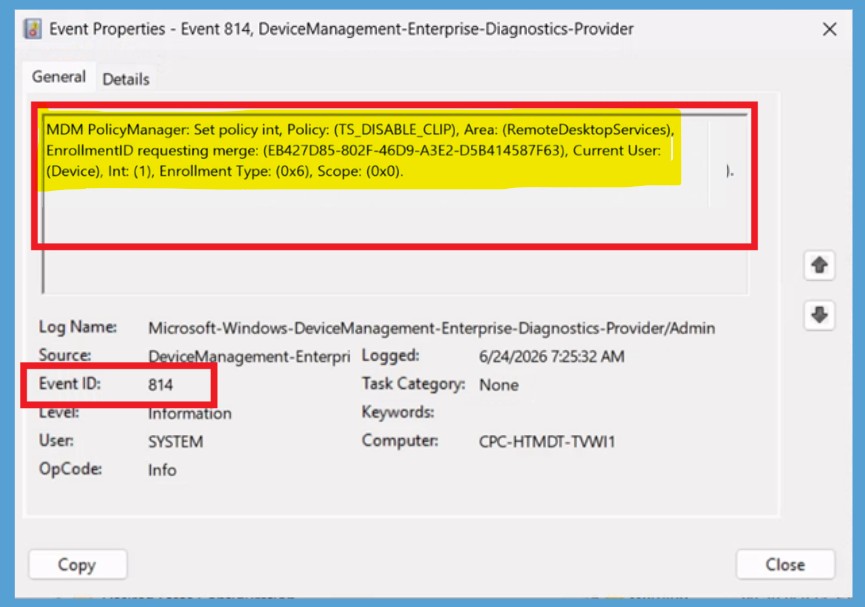
To verify policy application, open Event Viewer and navigate to Applications and Services Logs > Microsoft > Windows > Device Management-Enterprise-Diagnostics-Provider > Admin. Select Filter Current Log from the Actions pane and search for Event ID 814, which indicates that the Intune policy has been processed successfully.
| Policy Info |
|---|
| MDM PolicyManager: Set policy int, Policy: (TS_DISABLE_CLIP), Area: (RemoteDesktopServices), EnrollmentID requesting merge: (EB427D85-802F-46D9-A3E2-D5B414587F63), Current User: (Device), Int: (1), Enrollment Type: (0x6), Scope: (0x0). |
How to Delete Policy Permanently
When the Block Clipboard and Drive Redirection policy is no longer needed, open the configuration profile from the Intune admin center and select Delete. Confirm the deletion to permanently remove the Block Clipboard and Drive Redirection policy from Microsoft Intune. After deletion, the policy will no longer be managed or deployed to devices.
For detailed information, you can refer to our previous post – Learn How to Delete or Remove App Assignment from Intune using by Step-by-Step Guide.
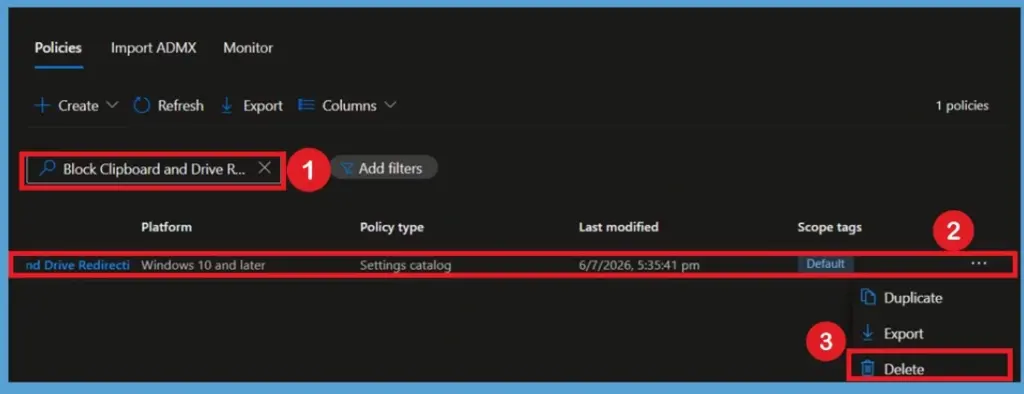
Remove Assigned Group from the Policy
In this case, if you think you don’t need the policy group that you assigned for a policy creation, then you can do 1 thing: search for the policy in the Configuration profiles, then go to the policy status page. When you scroll down, you can see the basic, configuration and assigned tab details. There, you will get the edit option. Click on the edit option near the assignment.
For detailed information, you can refer to our previous post – How to Delete Allow Clipboard History Policy in Intune Step by Step Guide.
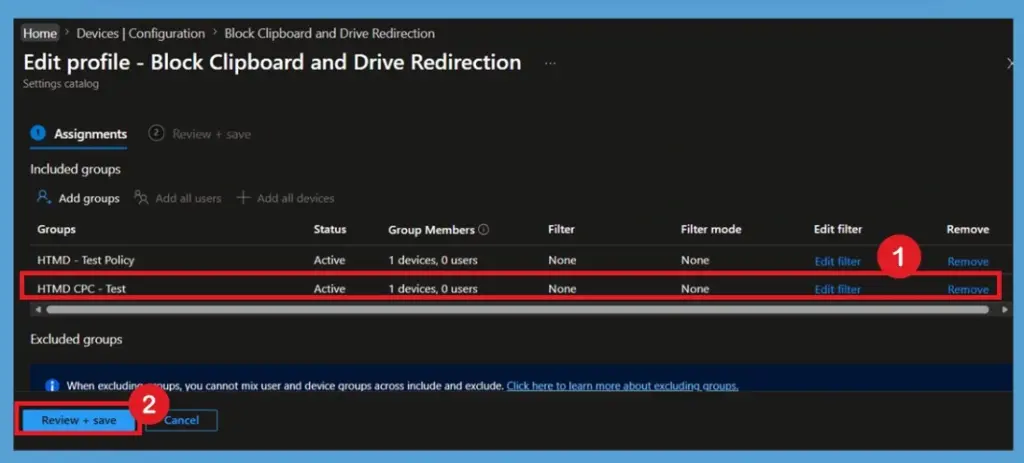
Need Further Assistance or Have Technical Questions?
Join the LinkedIn Page and Telegram group to get the latest step-by-step guides and news updates. Join our Meetup Page to participate in User group meetings. Also, Join the WhatsApp Community and WhatsApp Channel to get the latest news on Microsoft Technologies. We are there on Reddit as well.
Author
Anoop C Nair has been Microsoft MVP from 2015 onwards for 10 consecutive years! He is a Workplace Solution Architect with more than 22+ years of experience in Workplace technologies. He is also a Blogger, Speaker, and Local User Group Community leader. His primary focus is on Device Management technologies like SCCM and Intune. He writes about technologies like Intune, , Cloud PC, Windows, Entra, Microsoft Security, Career, etc.