Let’s learn how to Safely Transfer Programs from OS Drive to Another Drive in Windows 11. When the C drive, where most OS and programs installed are, becomes full or has a low disk space problem in Windows 11, it’s time to transfer installed programs from C drive to any other drive available on your Device.
Transferring the installed program can help separate the installed application from the Operating System; after getting separated, it frees up spaces in that drive and speeds up the computer. Windows 11 Operating system automatically installs applications on the C drive by default.
C drive is the partition where the operating system is installed; by default, it is the place for other programs installed into it. Users want their files and applications installed on a different partition or volume for security or other reasons.
Moving a program from C drives to any other drive without uninstalling the application is impossible for many of us. But It is possible to move them using various methods discussed below for better understanding.
Safely Transfer Programs from OS Drive to Another Drive using Windows Settings.
According to the Microsoft support team and professionals, using Apps in Windows Settings can help you to transfer some installed programs from C drive to D drive. The step-by-step demonstration is as below.
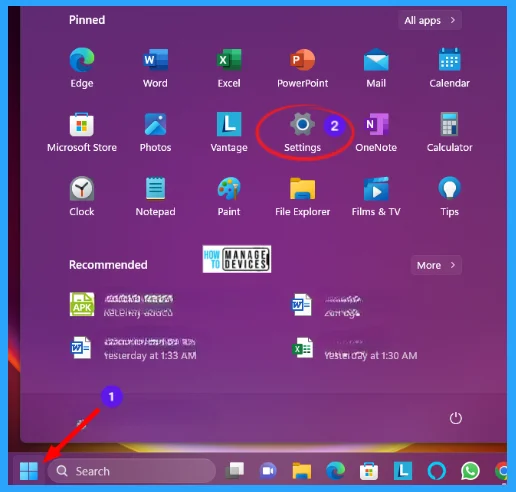
Step 1: To move the programs from the C drive to another drive, you need to open the settings by pressing Windows key + I, or you can open settings by clicking on the Windows button and selecting Settings from the App menu, illustrated below.
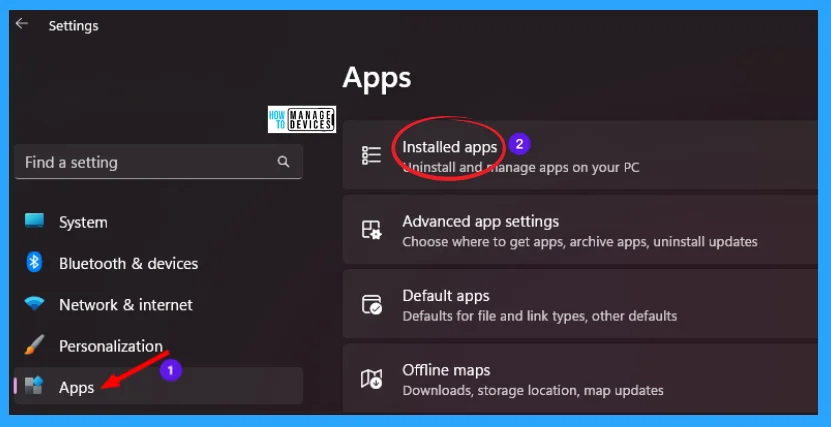
Step 2: When the Settings window opens, click on the Apps option present in the left panel. In the right panel, the sub-options of Apps option open, then click on the sub-option named Installed Apps is used to uninstall and manage apps on your PC.
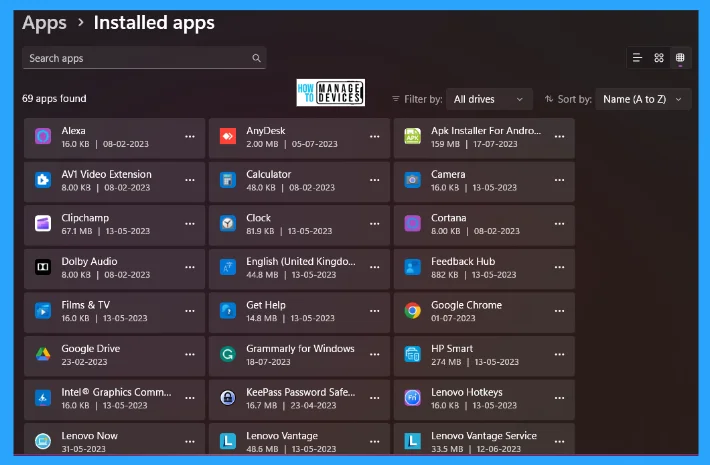
Step 3: The Installed Apps window shows all the applications installed on your PC. You can see the applications with a three-dot menu near every app. Click on the three-dot to open the menu for the individual app.
Step 4: Some options appear when you click on the three-dot menu; if a move option is available, click on that for further process. Including there are some other options are available with different functionalities shown in the table below.
| Options | Description |
|---|---|
| Advance Options | This option is used to repair, reset, and manage the installed program |
| Modify | This option is used to repair, reset, and manage the installed program |
| Move | This option is used to Move program files from one drive to another |
| Uninstall | This option is used to uninstall an installed program from your PC |
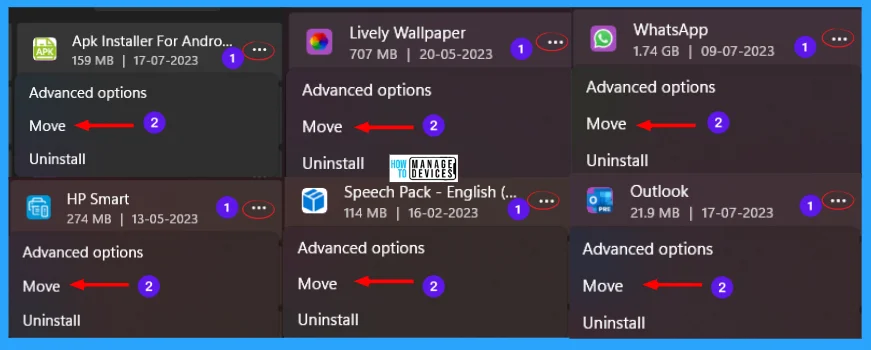
Step 5: When you click on the move, the next window appears where you can select a drive to move the selected app. You can choose your desired drive from the drop-down list to move your app and click on the Move button, and the app starts moving to the selected drive.
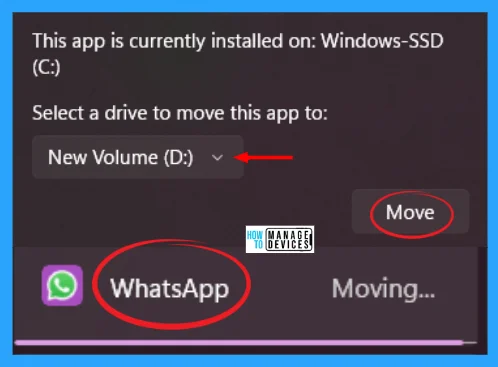
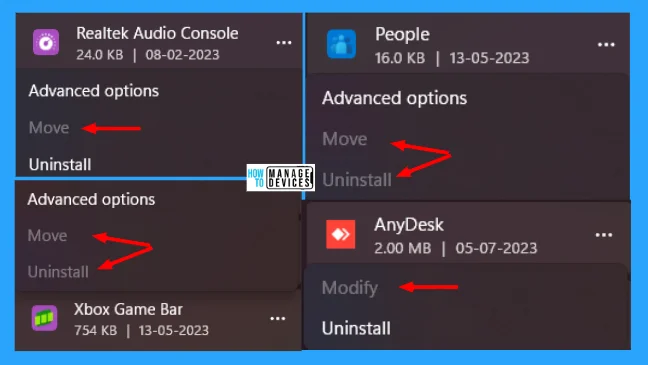
Following the above steps, you move an app from C drive to any other selected drive. But in some apps, you may notice that Move, Uninstall, Modify, etc., are disabled. It indicates that the publisher doesn’t want to change the app.
Safely Transfer Programs from C Drive to D Drive using Registry
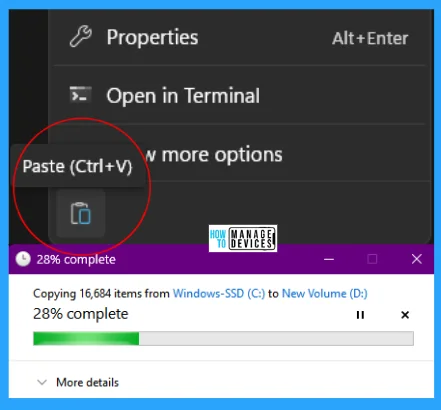
Using the registry editor, there is a way to revise the time zone in Windows. This procedure is done using the Registry. Before entering the registry editor, copy the Program Files and Program Files (x86) from the C drive, as illustrated below.
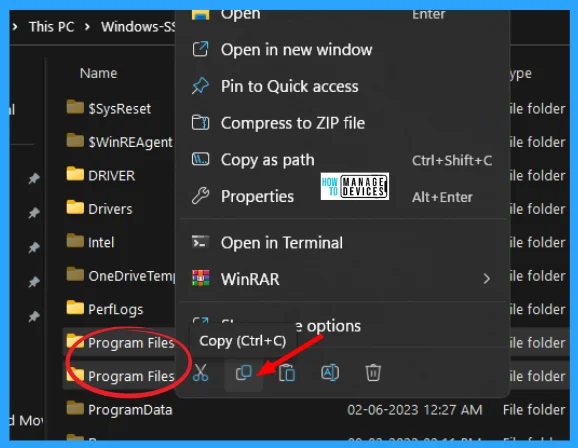
After copying the files from the C drive, move to your destination drive; here, I choose D drive as my destination drive and paste them into it. Now wait a few times for the completion of the copy process.
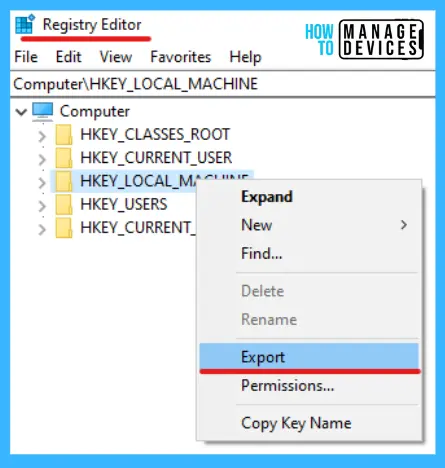
NOTE! Take Backup – Registry Editor may affect the system if any mistake occurs. It is advisable to take a backup of the Registry before proceeding. For backup, go to File in the top left corner of the Registry Editor. Click on it, then select Export and save the backup.
- Go to File
- Right-click on HKEY_LOCAL_MACHINE
- Click on Export
- Please save it
| Setting Type | Hive | Key | Value | Value name | Value Data |
|---|---|---|---|---|---|
| Registry | HKEY_LOCAL_MACHIN | Software\Microsoft\Windows\CurrentVersion | String | ProgramFilesDir | Drive name |
| Registry | HKEY_LOCAL_MACHIN | Software\Microsoft\Windows\CurrentVersion | String | ProgramFilesDir (x86) | Drive name |
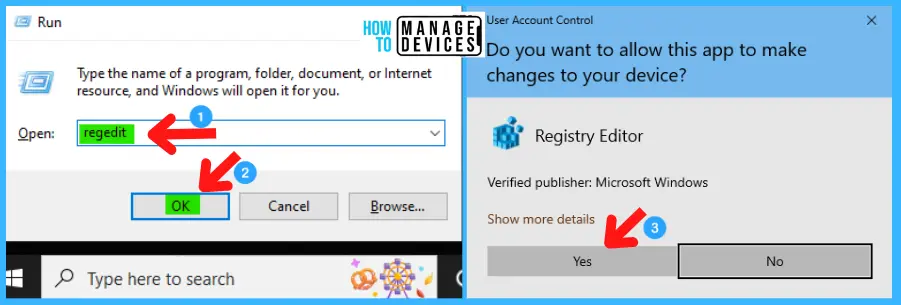
Now, open Run Window, and press Windows Key + R from the keyboard simultaneously. This is the keyboard shortcut to open the run window. Now, type regedit and click on OK to continue. Then it asks the Admin’s permission to change the Device. Click Yes.
- Window Key + R (To open run command)
- Type ‘regedit‘ and press OK
- Administrator Permission press Yes
Now, the Registry Editor opens. Find the path ‘HKEY_LOCAL_MACHINE\Software\Microsoft\Windows\CurrentVersion.’ Following the trail, I reached the needed folder for further action.
HKEY_LOCAL_MACHINE\Software\Microsoft\Windows\CurrentVersion
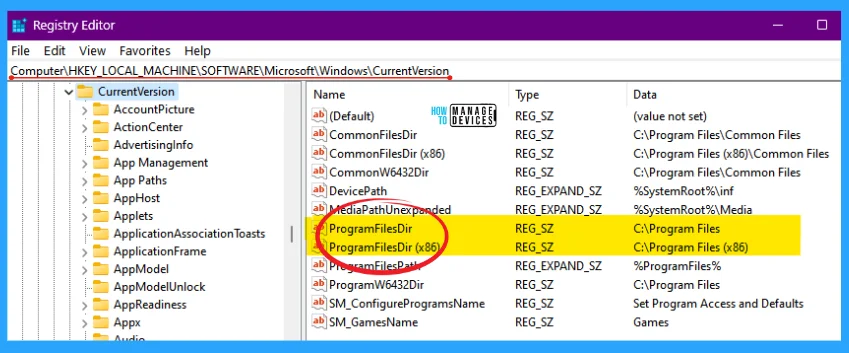
Now you can see two string values as ProgramFilesDir and ProgramFilesDir (x86); double-click on it to make changes or right-click on each and select Modify to make changes.
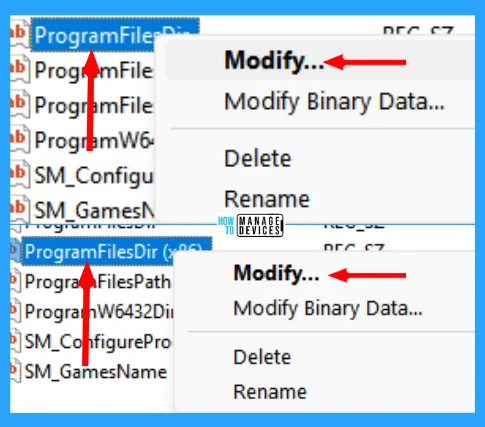
Here the Edit String window opens for both ProgramFilesDir and ProgramFilesDir (x86); change the C drive to D drive or any drive you wish, and press OK to make changes.
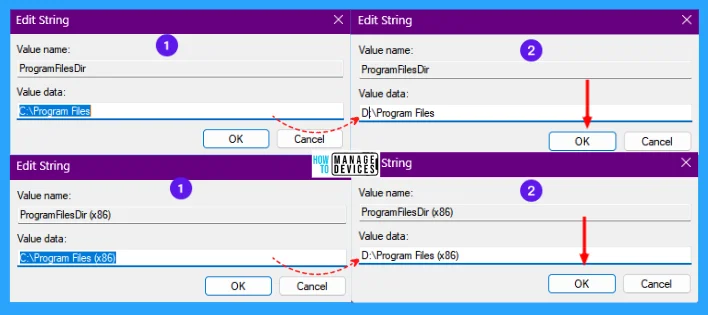
The above information is all about safely transferring programs from C drive to D drive using Windows settings and registry editor; if the registry editor changes are not visible, restart your PC for the modifications.
I hope the Guide to Safely Transfer Programs from C Drive to D Drive in Windows 11 information is helpful. Please follow us on HTMD Community and visit our website HTMD Forum if you like our content. Suggest improvements, if any, and we love to know which topic you want us to explore next.
Author
Alok is a Master of Computer Applications (MCA) graduate. He loves writing on Windows 11 and related technologies. He likes to share his knowledge, quick tips, and tricks with Windows 11 or Windows 10 with the community.
