In this post, You will learn how to Use Managed Identities for Azure Resources. The Managed identities for Azure resources help you safely access Azure resources. With managed identities, credentials are fully managed, rotated, and protected by Azure.
Managed Identity is a feature of Azure Active Directory. It is used for communications among cloud services that support Azure Active Directory (Azure AD) authentication. Using this feature, we can eliminate password complexity and its all drawback.
There are many more Azure resources that Managed Identify supports. Below is the list of some common Azure resources which Managed Identify supports –
- Azure SQL
- Azure Key Vault
- Azure Virtual Machines
- Azure Virtual Machines Scale Sets
- Azure Kubernetes Service (AKS)
- Azure Import/Export
- Azure API Management
- Azure App Configuration
- Azure App Service
Below are some of my articles which you can refer to get detailed description of some more Azure resources
- Improve VM Network Performance Using Azure Proximity Placement Groups
- Availability Set for Azure VMs Step by Step Guide
- Step by Step Guide to Configure Azure Bastion Host

Use Case of Managed Identity
A common challenge that we usually come across is managing our credentials when deploying any resources and connecting to particular Azure resources.
If we want to leverage it for any work, we have to take care of many aspects during that period, like our credentials should not be exposed anywhere during the activity and many more.
We utilize Managed Identity instead of credentials for the above-mentioned activity to overcome these challenges because It creates an identity linked to an Azure resource. The Identity can be granted access to Azure resources, which remove credentials to use any Azure resources for any activity.
Note – Managed identities for Azure resources is the new name for the service formerly known as Managed Service Identity (MSI).
Features of Managed Identity:
Let’s see what the features of managed Identity are. Learn How to Use Azure Resources Managed Identity.
- Automatic Service Identity creation
- Key Management and rotation
- Identity life-cycle management
- Price – Free
Let’s discuss each feature in detail
- Automatic Service Identity creation –
Here automatic means, we have to enable the Managed identity service which is present in all supported Azure resources, and it will create an identity for you in the background then we can able to use to access the required Azure resource and also we can provide it all type of Roles which we need using Access control IAM.
- Key Management and rotation –
When we use Managed Identity for authentication, we don’t have to worry about storing any credentials—keeping your credentials rotating means keeping it changing, which is security best practice. All of this takes care of by managed Identity itself.
- Identity life-cycle management –
Here life-cycle management means to manage expiration which we generally deal with our user credentials. This type of work is also taken care of by management identity we don’t have to worry about.
- Price Free –
Azure didn’t charge any money to these managed identities, as the name suggests. We can use them for free 🙂.
Types of Managed identity
System-assigned managed Identity: You need to enable a system-assigned managed identity for an Azure resource. The life cycle of a system-assigned managed identity is tied to the life cycle of the Azure resource it represents.
User-assigned managed Identity: You can Create a user-assigned managed identity and assign it to one or more Azure resources. The life cycle of the user-assigned managed Identity is independent of the Azure resources.
System-assigned –
It is tied to Azure resources, which comes up when we enable managed Identity against any azure services or resources. It automatically gets removed when that particular resource is got removed. Follow below steps to create System Assigned for required Azure resources:
- Login to Azure Portal http://portal.azure.com/.
- Go to the Azure resources in which we want to leverage System Assigned managed identity and select “Identity” Tab. Here we take an example of a Virtual Machine.
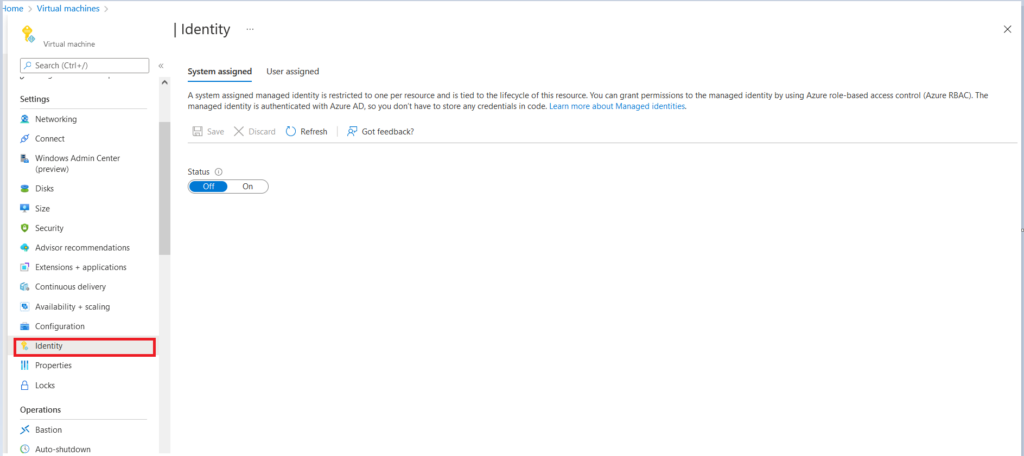
Once we click on Identity TAB, it will lead us to the Identity Page, where we can turn On the status and click on Save to create a System Assigned Managed Identity.
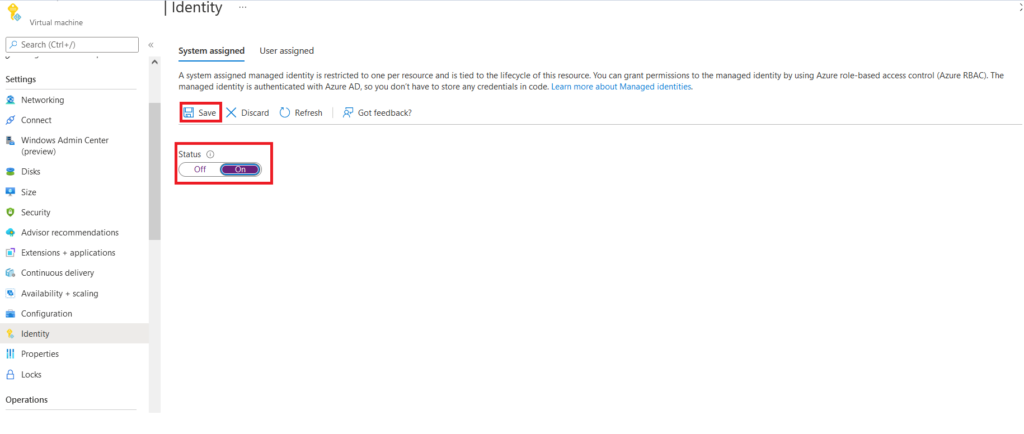
Once you click on Save, you will be prompted to Enable system assigned managed Identity with a message. By clicking on Yes, your resources will be registered in Azure AD, and we can give permission to use the required resource.

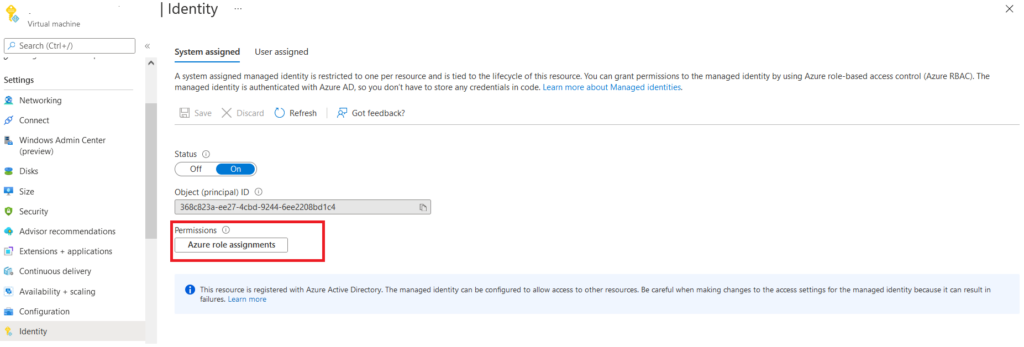
After we click on Yes, it will create a system assigned managed Identity and register it with Azure AD, we can check it with Object ID on the Azure AD, which is displayed on the same Identity page.

From “Azure role Assignments” TAB, we can provide granular access to the Identity over particular resources like the reader, owner contributor or customize the role by creating any custom rules.
User Assigned
It is user created Identity. We can use it for multiple resources, and we have to manage it for all services we tie up.
The only difference is that this Identity will not get deleted when we delete any resources in which it gets assigned to use the same User Assigned identity multiple times.
Steps to Create User Assigned Identity
Let’s follow the below steps to create a User Assigned Managed Identity–
- Login into Azure portal.
- Navigate to “Managed Identities” service on Azure Global search and click on “Create“

Once we select on Create button, it will lead us to one creation page where we have to fill below details and fill Tags if required and then Click on “Review+Create” to create a user assigned managed Identity
- Subscription – Select the required subscription under which we have to create this user assigned managed Identity
- Resource Group – Select the existing resource group or create one as per your requirement.
- Region – Select the same region where your resources resides in which you want to use this managed identity
- Name – Give a valuable name to this managed identity as per your organization Naming convention.

After the user assigned managed Identity is created, we can attach it to the required resources by following the below steps.
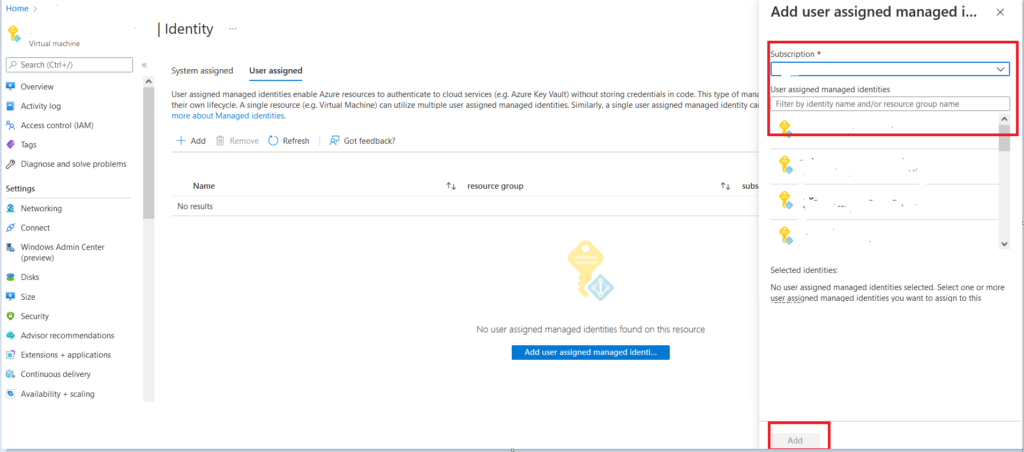
Go to the Azure resources in which we want to leverage User Assigned managed Identity and select “identity” TAB and select “User Assigned” here; we take an example of a Virtual Machine.
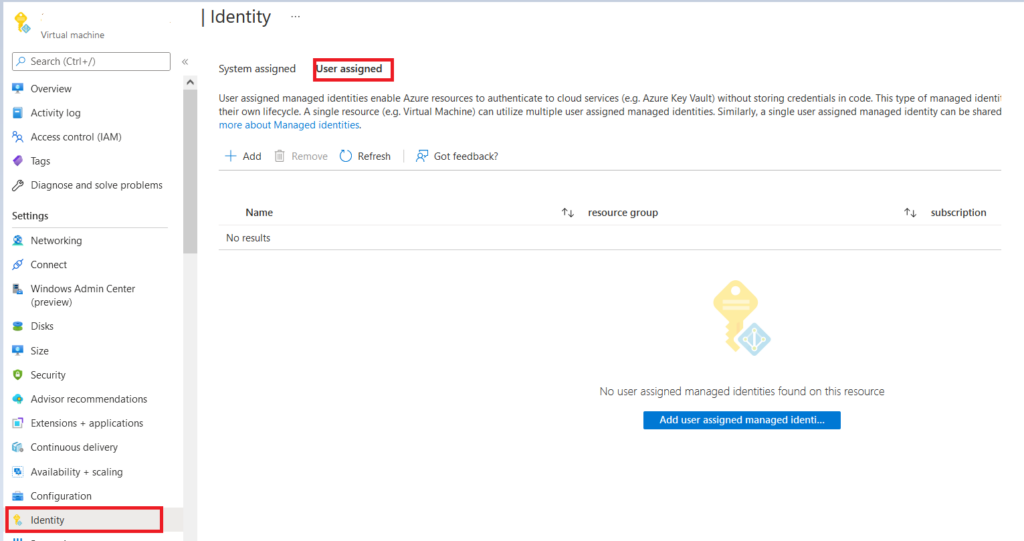
It will lead us to a page where we can select the required Subscription and pre created User Assigned Identity and click on “Add.”
By doing this, we add that Identity on required resources so that we can access it using this Identity after providing required access from Access control IAM.
Author
About Author, -> Abhinash has over 6 years of working experience in the IT Industry. His primary focus area is Azure IAAS, PAAS & SAAS, and Azure DevOps. He writes and shares his experiences related to Cloud Computing, mainly Azure.
