Let’s check more about Windows Autopilot Self-deploying Mode, which is now Generally Available. Microsoft recently released the Microsoft Intune 2402 February Update, Which includes many features and enhancements to improve Users’ abilities.
Windows Autopilot self-deploying mode is an Autopilot solution that automates the configuration of Windows on a new device delivered directly from an IT department, OEM, or reseller to the end-user. Windows Autopilot for pre-provisioned deployment uses the existing Windows installation installed by the OEM at the factory.
In the initial stage, Windows Autopilot Self-deploying Mode was in public preview. Now, it is generally available and out of preview. Users can explore this feature and deploy devices easily on the Microsoft Intune Portal.
The main advantage of Windows Autopilot’s self-deploying mode over other Autopilot deployment methods is that it minimizes the interaction needed during the device’s initial deployment. This blog post will help you learn more about Windows Autopilot Self-deploying Mode.
- Microsoft Intune 2402 New Features February Update
- Windows Autopilot Block Only Selected Apps and Continue if Other Applications Fail to Install
Windows Autopilot Self-deploying Mode is now Generally Available
Windows Autopilot self-deploying mode is also an Autopilot Solution. It is designed for kiosk-like devices or devices shared by multiple users. It supports only Microsoft Entra join, and Entra hybrid join is not supported.
In Autopilot self-deployment, no single user is assigned to the device. Autopilot self-deployment mode can perform different tasks during the deployment.
| Different Tasks Performed in Windows Autopilot Self-deploying Mode |
|---|
| It allows to join the device to Microsoft Entra ID |
| It can Enroll the devices in Intune |
| It helps to install applications |
| It allows device configurations such as Bitlocker and Windows Hello for Business |
Intune Steps for Enrolling Devices in Autopilot Self-deploying Mode
Autopilot Self-deployment mode is available to users in Microsoft Intune, so you can easily enroll devices in the Microsoft Intune Portal. The device provisioning process starts automatically if the device connects to the network once. The Enrollment Status Page (ESP) is displayed during OOBE so users can track the deployment status.
- Sign in to the Microsoft Intune admin center.
- Under Devices, select Windows Platform.
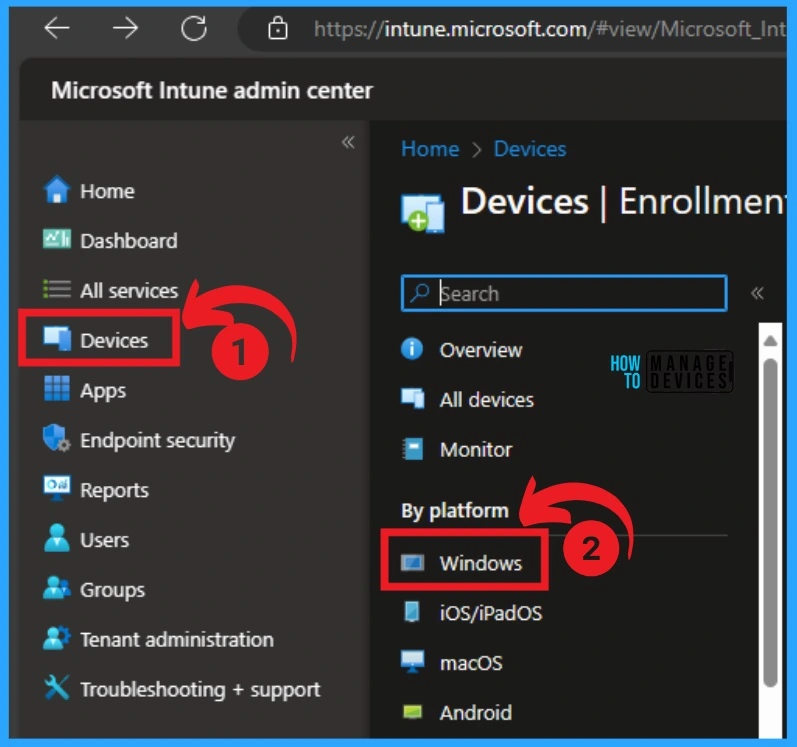
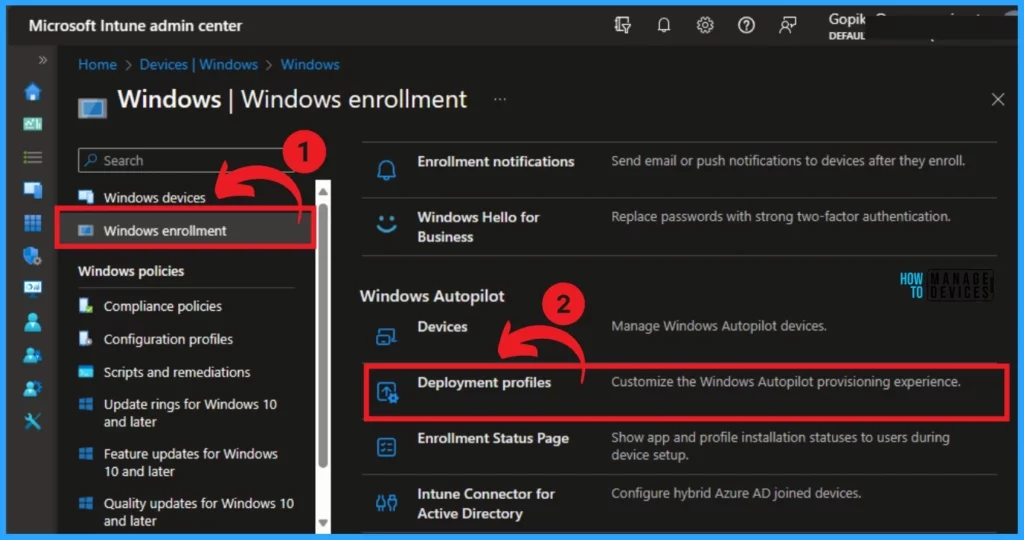
After that, Select Windows Enrollment and select Enrollment. On this page, you can see several enrollments. Select the Deployment option under Autopilot.
You can create a Profile on this page. Click on + Create Profile. Select Windows PC from this window. You can also choose the HoloLens option for profile creation.

- Block Use of Copied or Impersonated System Tools using Defender ASR Rules
- Onboard iOS/iPadOS Devices to Microsoft Defender for Endpoint
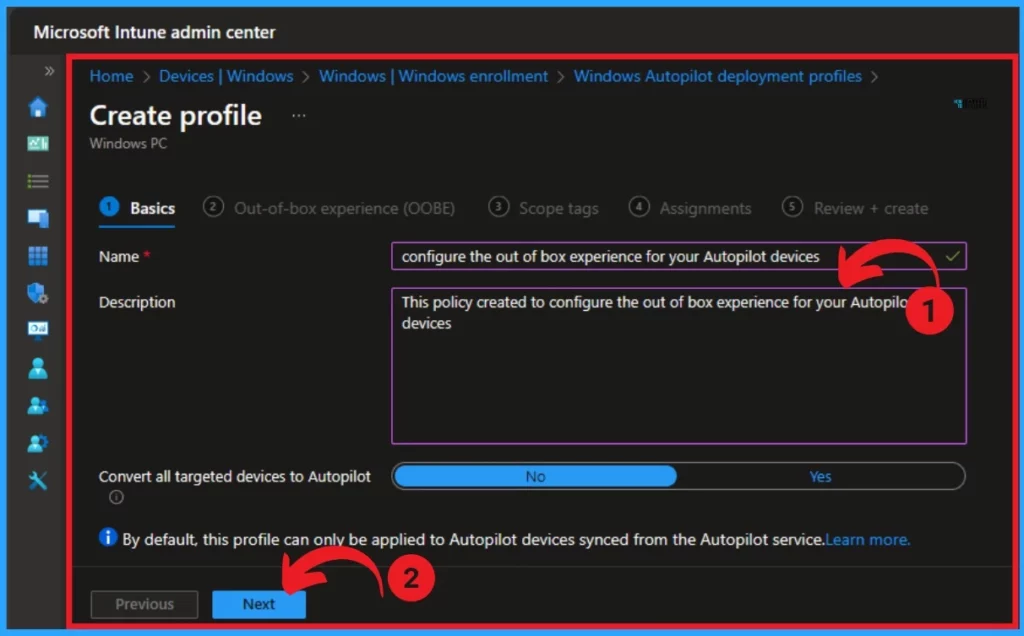
After that, you will get the basic page, and you can do the basic steps of policy creation. Here you can give the Name and Description. After that, click on the Next button.
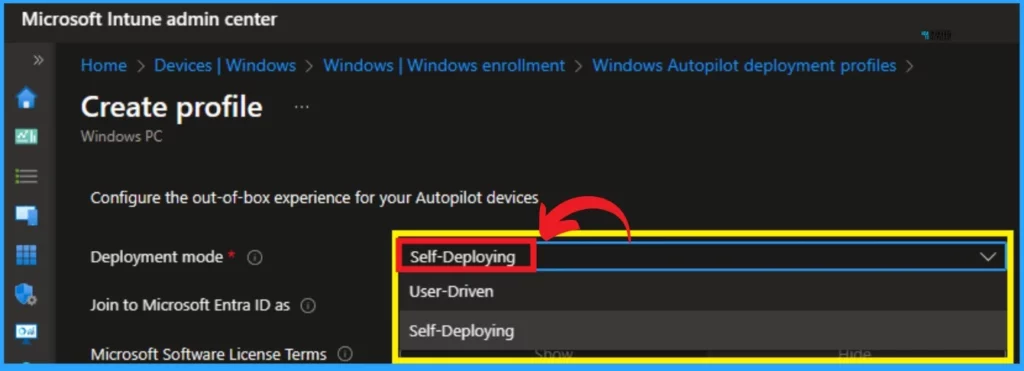
After that, you can follow the out-of-box experience(OOBE) steps. Here, you can select the Deployment Mode as Self-Deploying.
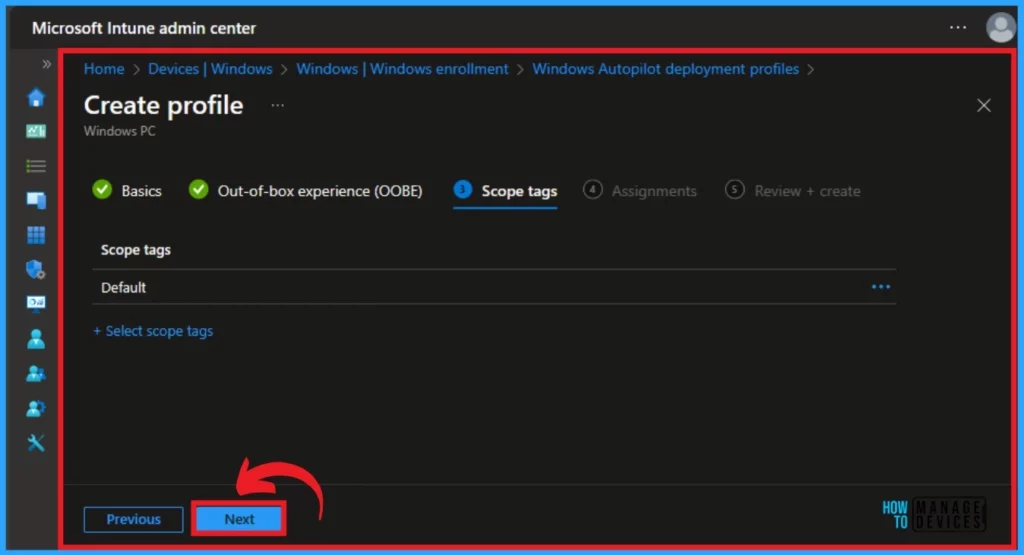
The next step is setting Scope tags, which are optional. Scope tags are used in Microsoft Intune to manage administrators’ access and visibility.
- Click on the Next
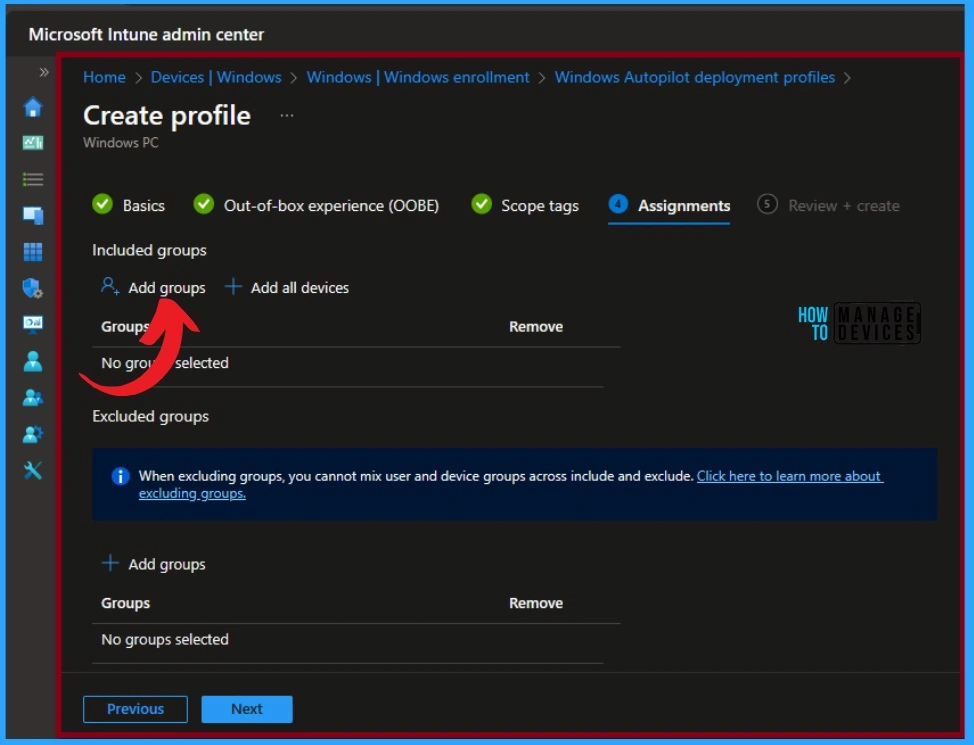
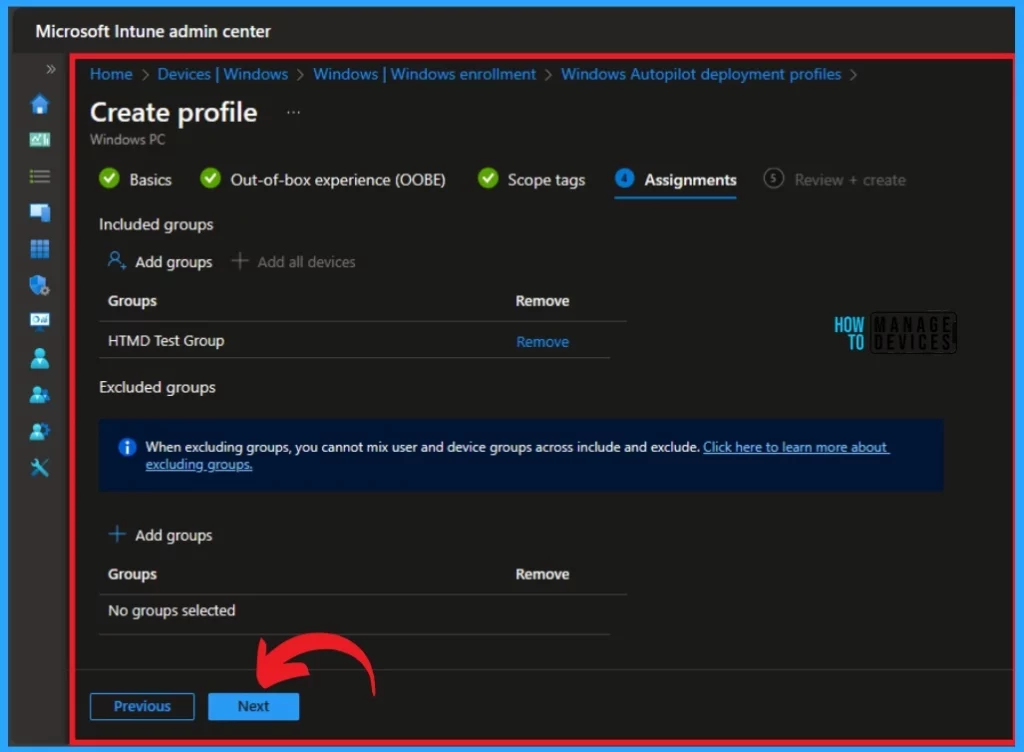
You can see the Add groups for the policy from the Assignments section. Click on the Add groups under the Include groups. The included groups will Add the task to the particular group that you selected. You can also exclude any group by selecting the excluded group.
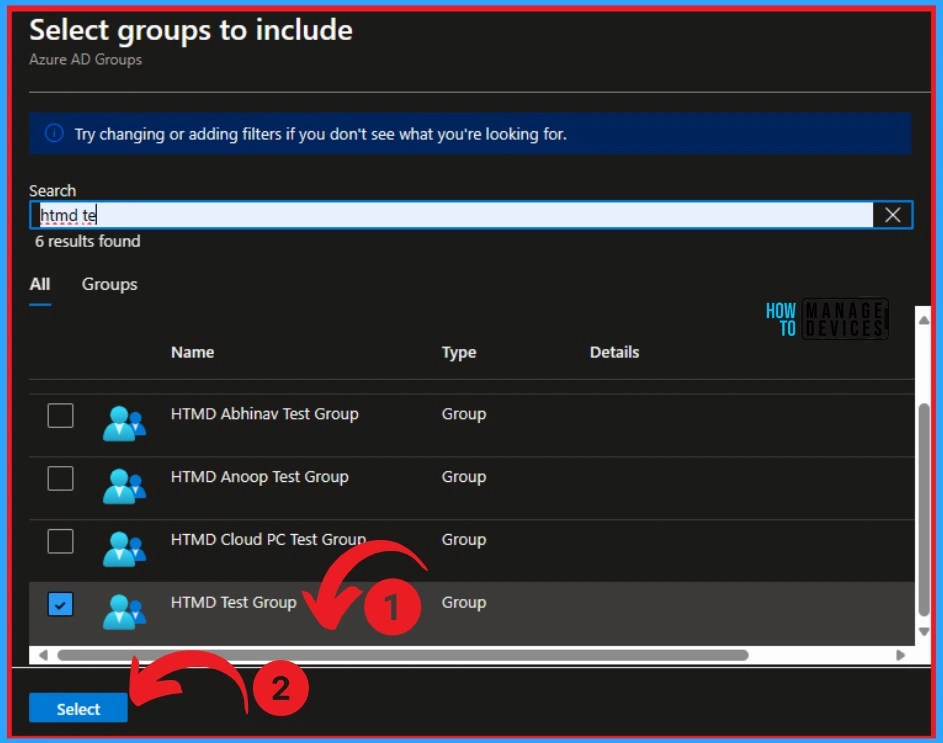
When you click Add Groups under the Include group option, you will see a pane with groups to select from. You can assign the policy to the selected group. I selected the group to which I wanted to add that policy and clicked on the select option.
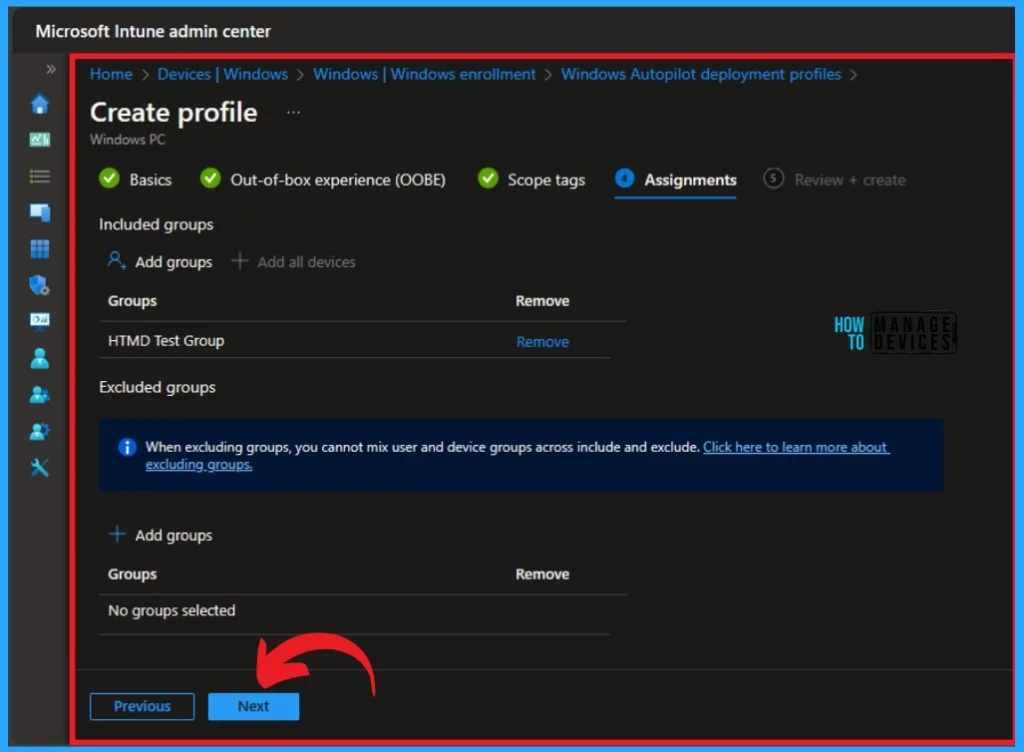
On this page, you can see the Group added. No group is excluded here. You can also remove the selected group from this page. Click on the Next button.
- Click on Create to create the policy.
At the last step of policy creation (Review and Create), you can review the settings and Create the policy. In this step, you can check all the details and settings you added for policy creation.
- Turn on Real-time Monitoring Antivirus policy for Microsoft Defender in Intune
- How to Configure Microsoft Edge Favorites using Intune Configuration Profile Step by Step Guide
We are on WhatsApp. To get the latest step-by-step guides and news updates, Join our Channel. Click here –HTMD WhatsApp.
Author
Gopika S Nair is a computer enthusiast. She loves writing on Windows 11 and related technologies. She is here to share quick tips and tricks with Windows 11 or Windows 10 users. She is Post Graduate Diploma Holder in Computer Science.
