Hello everyone, Namaste. We are back with another exciting topic on how to Onboard iOS/iPadOS devices to Microsoft Defender for Endpoint. I hope you are enjoying and having a great time learning Intune with the help of our blogs.
In our previous blogs, we learned how to Secure Android Devices using Microsoft Defender for Endpoint in Intune and Microsoft 365 Defender Attack Simulation to educate users about phishing emails in parts 1 and part 2. In this article, let’s focus on iOS/iPadOS devices.
Microsoft Defender for EndPoint is designed to help organizations detect, investigate, prevent, and respond to advanced threats. It’s important to note that Microsoft Defender for Endpoint is not the same as the Microsoft Defender application available on Windows devices. This product can be integrated with various M365 services, such as Microsoft 365 Threat Intelligence, Cloud App Security, Azure ATP, and Intune.
Microsoft Defender for Endpoint is quick in responding to advanced attacks and provides automatic investigation and remediation for the attacks. This, in turn, reduces the number of alerts to be investigated manually.
Prerequisites
Before we begin, let’s discuss the prerequisites for onboarding the iOS/iPadOS device to Microsoft Defender for Endpoint.
- Users should have Microsoft Defender for Endpoint license
- Admin should have access to Defender portal and Intune portal
- A valid Apple Push Notification Certificate to allow iOS devices to enrol in Intune
Deploy Defender App to End Users
Users must install the Microsoft Defender app before onboarding the iOS devices to Microsoft Defender for Endpoints. So we need to deploy the Defender for the endpoint app, which is available in the iOS app store to the end users as a Required application. Please follow the below steps to deploy the app.
- Sign in to Microsoft Intune Admin Center
- Click on Apps > iOS/iPadOS apps
- Click on Add Apps and select iOS Store Apps under App type

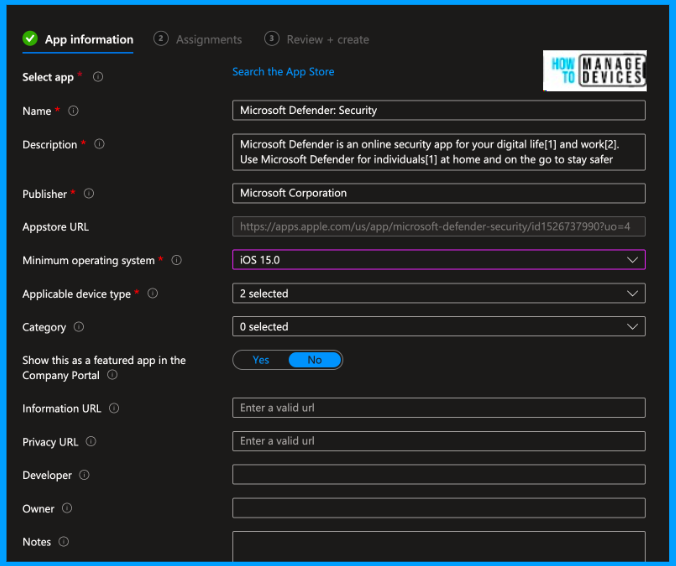
Now click on Search the App Store and search for the Microsoft Defender app in the search and select the Defender app.

After selecting the app, you can view all the application details, like the app name, description, publisher, minimum OS required, and icon for the application. You can edit the fields as per your requirements, and also you can change the icon for the application.
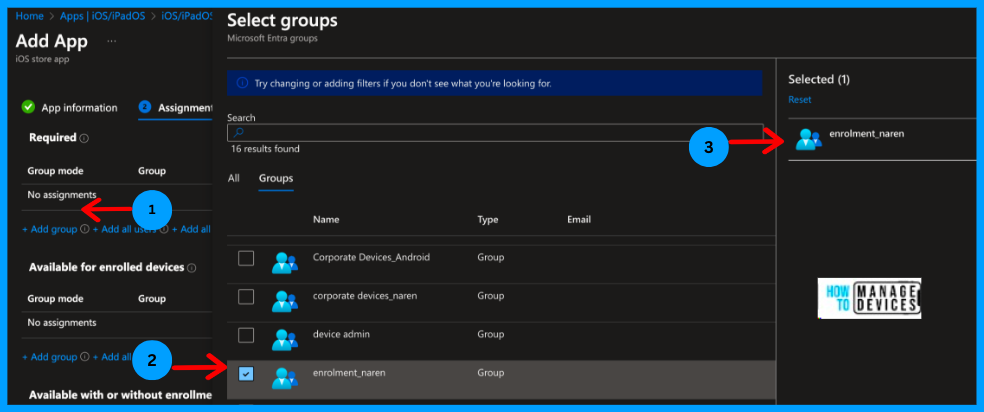
Now click Next to the Assignment page and assign the required groups under the Required section, as we want to deploy the app silently. Users who enrol their devices to Intune will have the Defender application installed without user interference.
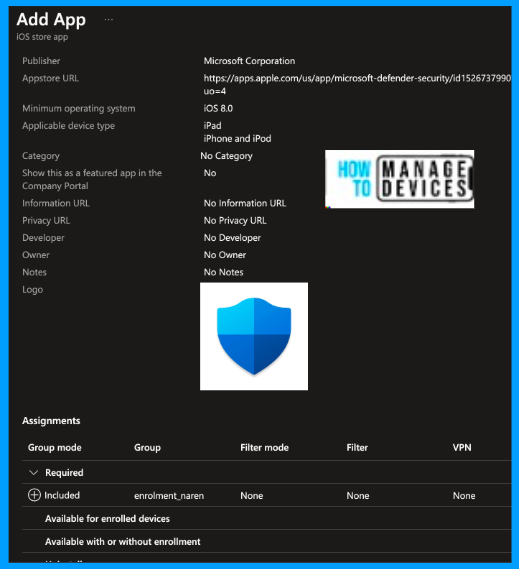
Now click Next to Review + Create page. Here, review the application; if you want to make any changes, make the changes and click on Create. After a few seconds, the application will be created.
Now, the Defender for Endpoint application is ready to install on users’ devices once they enrol them in Intune. In the section below, let’s see how we can onboard iOS/iPadOS devices to Microsoft Defender for Endpoint.
Onboard iOS/iPadOS devices to Microsoft Defender for Endpoint
We can onboard iOS/iPadOS devices for unsupervised devices in two ways: Zero-touch (Silent) onboarding and Auto-Onboarding of the VPN profile. In Zero-touch onboarding, we can configure Microsoft Defender for Endpoint to deploy and activate silently. Auto-Onboarding is a Simplified Onboarding in which we create a VPN profile and assign it to the users.
Zero-touch (Silent) Onboarding
As discussed above, admins can configure and activate the Defender for Endpoint application silently without requiring user interaction in this onboarding type. In this method, we will create a deployment profile, and the user will be notified of the installation. The Defender application is automatically installed without the need for the user to open the app. Follow the below steps to create a profile.
- Sign in to Microsoft Intune Admin Center
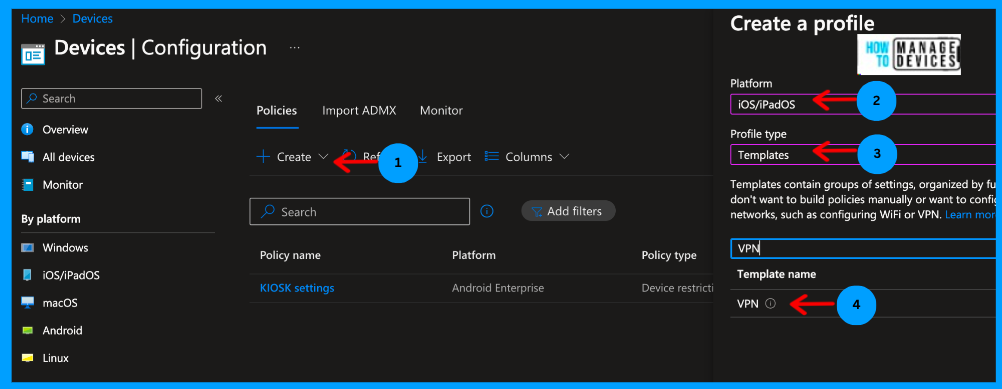
- Click on Devices > Configuration Profiles > Create profile
- Now, under the platform, select iOS/iPadOS
- Now select Profile type as Templates
- Under Template name, search for VPN, select VPN and then click Create
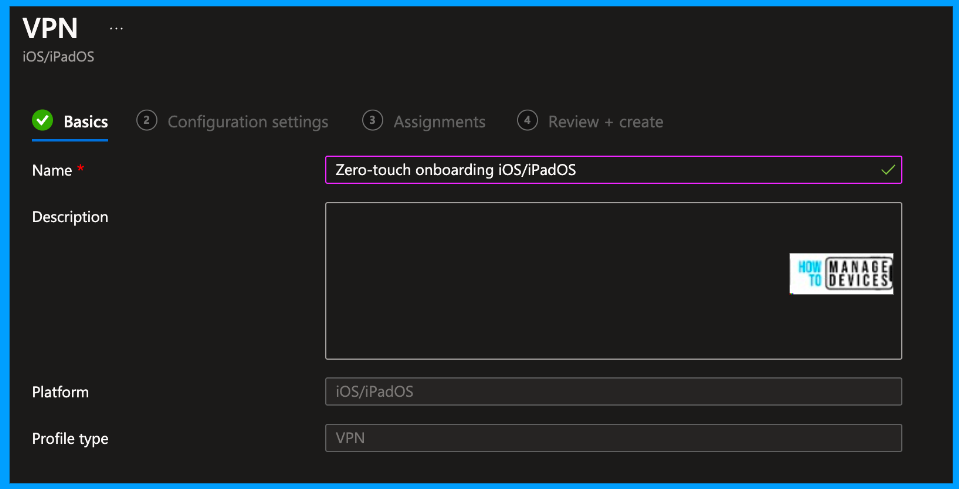
Now, provide the Name and Description for the profile. You can observe that the platform is selected as iOS/iPadOS and the profile type as VPN. “We are creating a VPN profile to protect the web content of the device“. Now click on Next to proceed to the Configuration settings page.
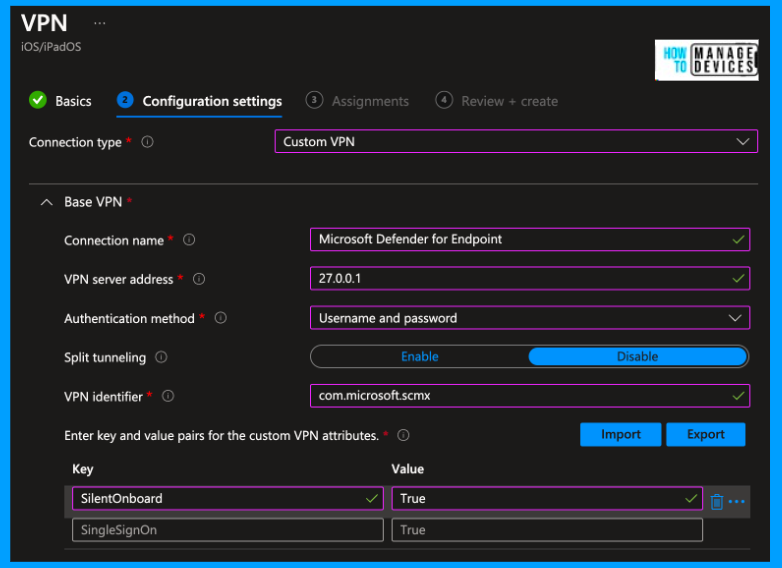
On the Configuration settings page, select Custom VPN under Connection type. To complete the profile, you need to fill in a few fields. Please use the configurations below.
- Connection Name = Microsoft Defender for Endpoint(you can give any name)
- VPN server address = 127.0.0.1
- Auth method = “Username and password”
- Split Tunneling = Disable
- VPN identifier = com.microsoft.scmx
- In the key-value pairs, enter the key SilentOnboard and set the value to True.
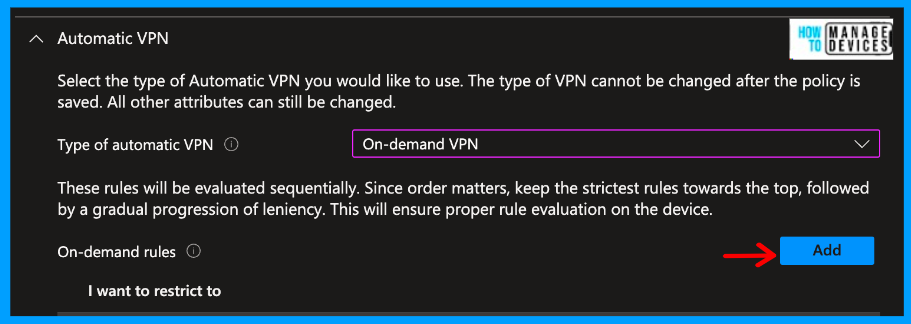
Now we need to add a few more configurations under the Automatic VPN section, please add the below configuration
- Type of Automatic VPN = On-demand VPN
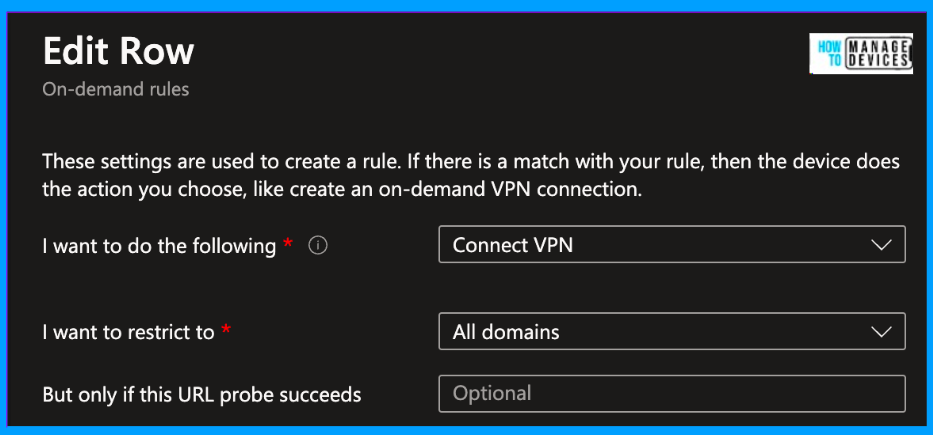
- Select Add for On-Demand Rules and select I want to do the following = Connect VPN.
- I want to restrict to = All domains.
When you click on Add, a new rule page will open and add the On-demand rules given above in rules and save it.
Now click on Next to the Assignment page, click on Add group, search for the assignment group to which the profile has to be assigned, select the group and click next to the Review and Create page.
Note! If you want to exclude any users, you can also add exclusions.
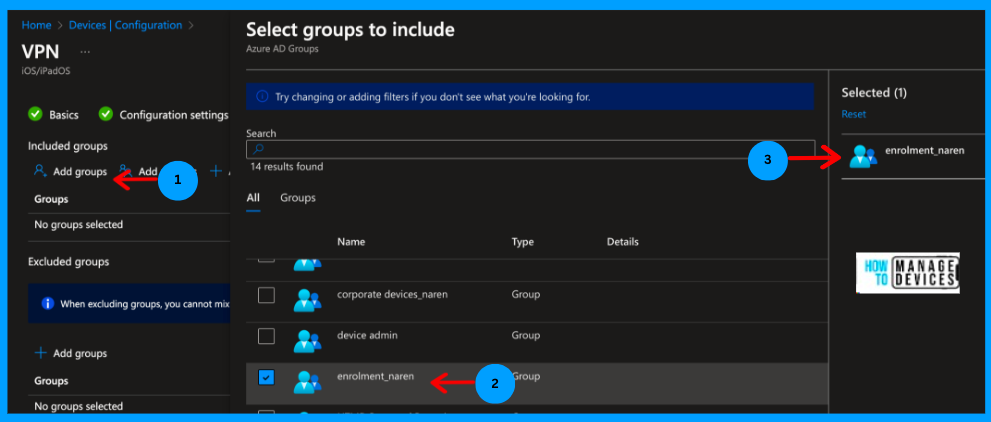
Now, on the Review+Create screen, you can validate the configurations and any changes you can edit them. If everything is validated, click on Create. We have created the required profile and are ready to onboard the iOS/iPadOS device to Microsoft Defender for Endpoint. Once the user enrols the device, the device will be shown in the Defender Portal.
User Experience
As I have assigned the Defender app as a Required app, as soon as I enrol the device to Intune, the Defender application will be installed on my device. Now, let’s look at the user experience of how the Defender app onboards the iOS/iPadOS device to the Defender.
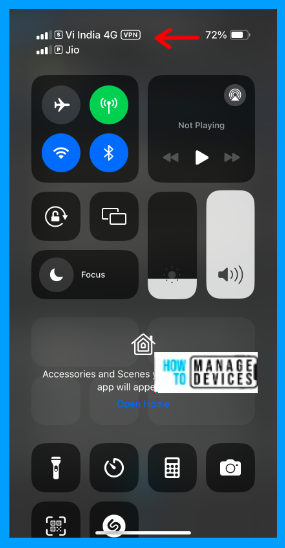
As we have pushed the VPN configuration profiles as SilentOnboard, the VPN turns on automatically. I don’t even need to open the Defender application. The Defender app starts the local/looping VPN if I browse the internet.
Whenever I browse anything, the VPN is on. If the user opens the Defender app, it prompts the user to allow app permission and shows the Dashboard, as shown in the screenshots in the Auto-Onboarding section.
Auto-Onboarding of the VPN profile
This method simplifies the onboarding by setting up a VPN profile. VPN is used to provide the Web Protection feature, and this is not a regular VPN but a local/self-looping VPN that does not take traffic outside the device. If you have configured Zero-touch onboarding, these steps are not required. You can choose either of the methods to onboard the devices.
The local/self-looping VPN provides web protection against phishing or web attacks. It won’t monitor the traffic or activities that are carried on your device. Instead, it will use on-device capabilities and, in some cases, remote services to detect malicious websites. Let’s see the steps to configure the Auto-Onboarding, and it is similar to the VPN profile we created above but with only one change. Let’s see the change below.
- Sign in to Microsoft Intune Admin Center
- Click on Devices > Configuration Profiles > Create profile
- Now, under the platform, select iOS/iPadOS
- Now select Profile type as Templates
- Under Template name, search for VPN, select VPN and then click Create
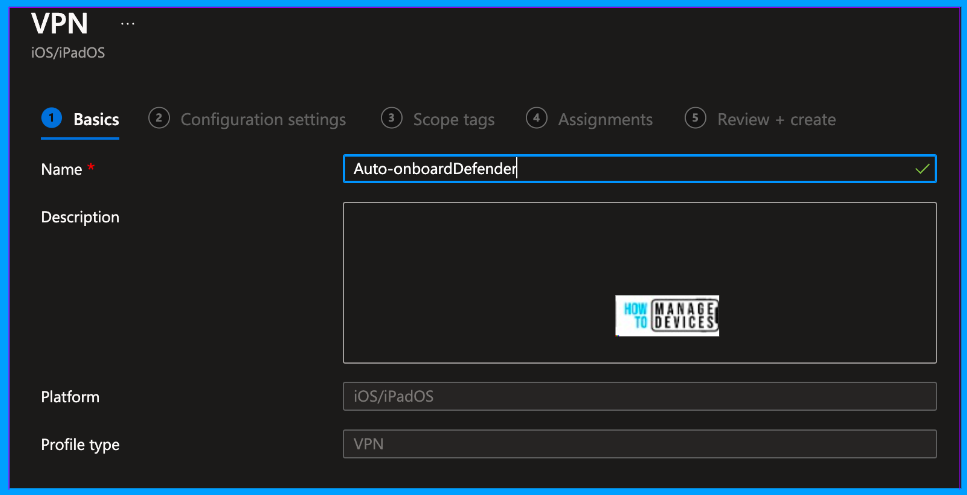
Now, provide the Name and Description for the profile. You can observe that the platform is selected as iOS/iPadOS and the profile type as VPN. We are creating a VPN profile to protect the web content of the device, similar to that of Zero-touch onboarding. Now click on Next to proceed to the Configuration settings page.
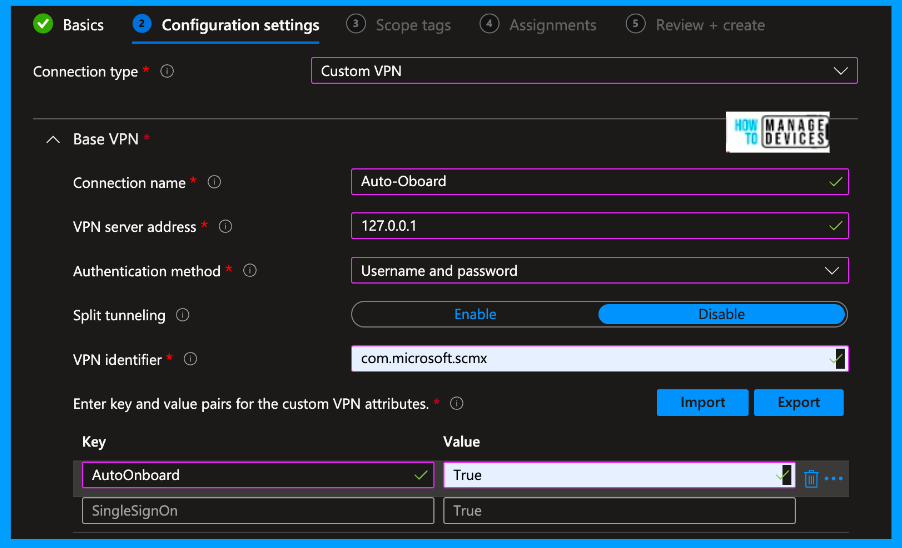
On the Configuration settings page, select Custom VPN under Connection type. Now, you need to fill in a few fields to complete the profile. Please use the configurations below
- Connection Name = Microsoft Defender for Endpoint(you can give any name)
- VPN server address = 127.0.0.1
- Auth method = “Username and password“
- Split Tunneling = Disable
- VPN identifier = com.microsoft.scmx
- In the key-value pairs, enter the key AutoOnboard(above, we used SilentOnboard) and set the value to True.
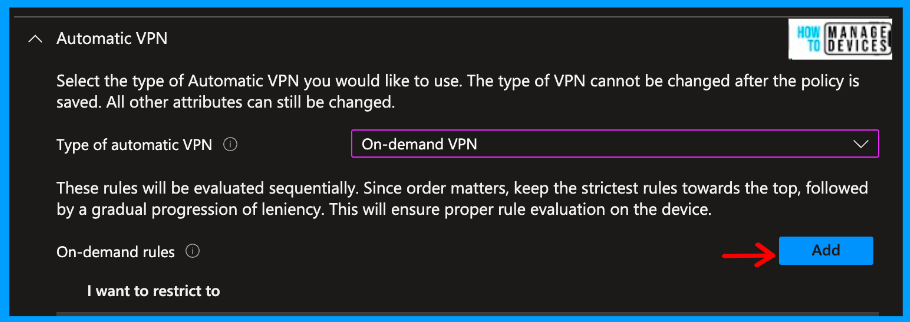
Now let’s add a few more configurations under the Automatic VPN section, and please add the below configuration
- Type of Automatic VPN = On-demand VPN
- Select Add for On Demand Rules and select I want to do the following = Connect VPN, I want to restrict to = All domains.
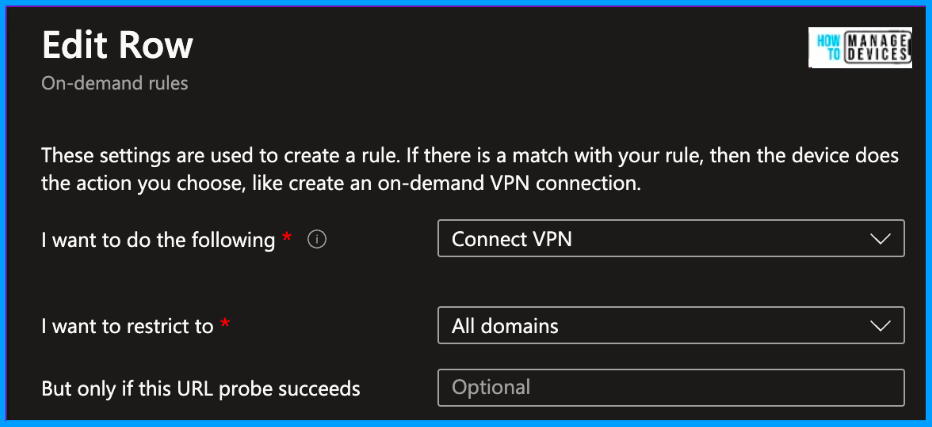
When you click on Add a new rule page will open and add the On-demand rules given above in rules and save it.
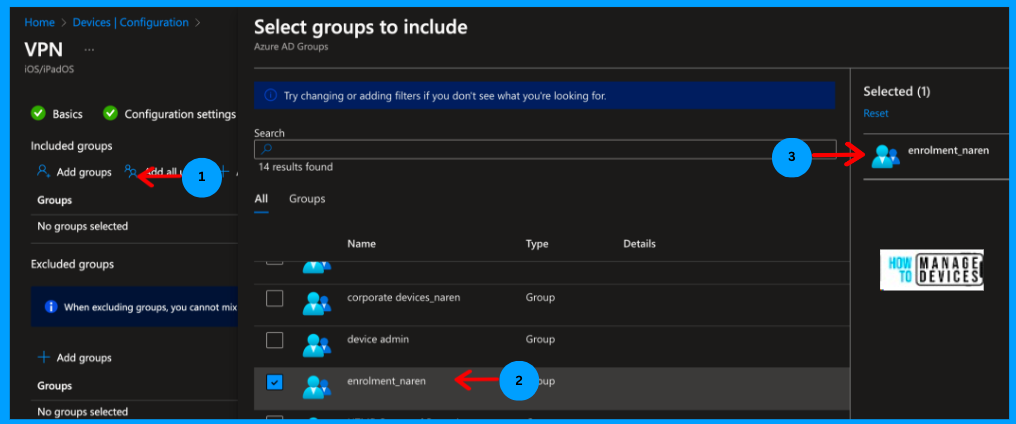
Now click on Next to the Assignment page, click on Add group, search for the assignment group to which the profile has to be assigned, select the group and click next to Review and Create page. If you want to exclude any users, you can add exclusions as well.
Now, on the Review+Create screen, you can validate the configurations and edit any changes. If everything is validated, click on Create. Now, we have created the required profile for Auto-onboarding and are ready to onboard the iOS/iPadOS device to Microsoft Defender for Endpoint. Once the user enrols the device, the device will be shown in the Defender portal.
User Experience
Unlike Zero-touch Onboarding, VPN will be enabled once the user sets up the Defender app. Users need to open the app and allow the required permissions. Once the app setup is completed, Defender onboard the device to Microsoft Defender for the Endpoint portal.
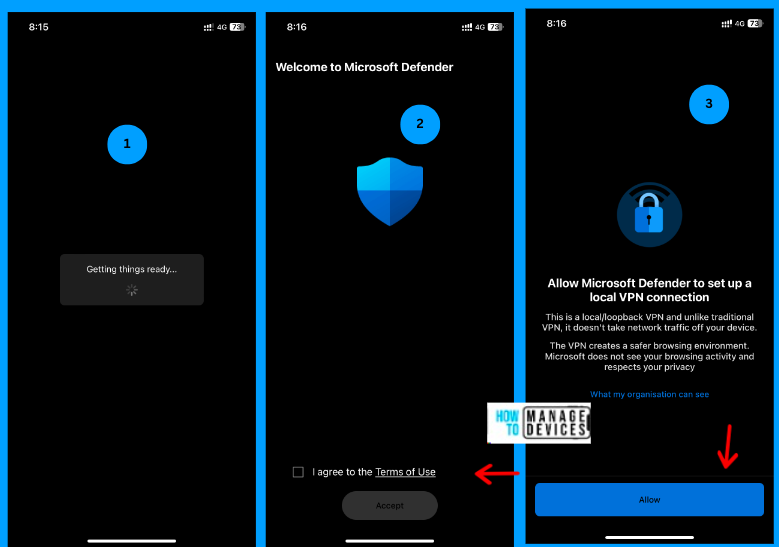
As soon as the user opens the app, they are prompted to accept the Terms and Conditions. Later, they are prompted to Allow the MDE application to set up the VPN on their iOS device. Clicking on Allow will create the VPN profile in the settings under General > VPN and Device Management.
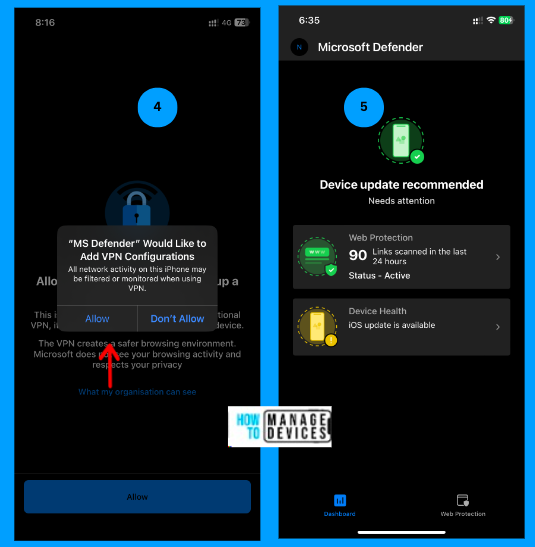
As shown in the above screenshots, the user will be prompted to add the VPN configurations. Please click on Allow. This will allow the Defender app to configure the VPN configuration. The Dashboard shown above will be the same for both the Zero-Touch and Auto-Onboarding processes.
Microsoft Defender Portal
Now that we have seen the user experience and two types of onboarding methods let’s see how an admin can view the devices in Microsoft Defender for the endpoint portal. Once the device onboarding is completed, it is visible in the MDE portal.
- Sign in to the Microsoft Defender portal
- Click on Assets > Devices
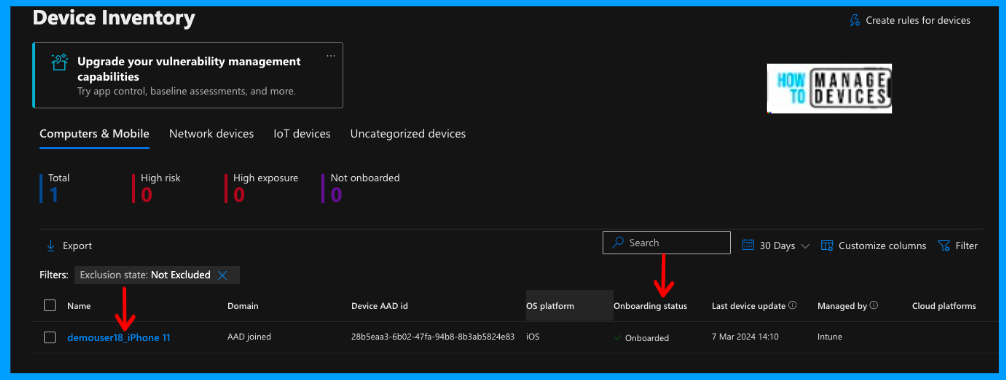
As shown in the above screenshot, we can view the list of devices that are onboarded to Microsoft Defender for Endpoint. The MDE portal captures the device’s AAD ID, OS, onboarding status, etc. You can view the device and onboarding status as onboarded, as shown in the above screenshot.
Note: This article focused only on Non-Supervised devices like BYOD and devices that the company portal app enrollees. We are not required to create a VPN profile for supervised devices enrolled as part of the Apple Device Enrollment Program. We will discuss them in a different article.
Conclusion
So, onboarding devices to Microsoft Defender for Endpoint improves security, threat protection, ns and attacks from various web attacks and phishing attacks. I hope you learned something new with this article. We will discuss onboarding Android devices in a new article.
We are on WhatsApp. To get the latest step-by-step guides and news updates, Join our Channel. Click here – HTMD WhatsApp.
Author
About Author – Narendra Kumar Malepati (Naren) has 11+ years of experience in IT, working on different MDM tools. Over the last seven years, Naren has been working on various features of Intune, including migration from different MDMs to Intune. Naren mainly focuses on Android, iOS, and MacOS.

Hi Please share the document for supervised devices
Is it possible to onboard iOS device without enrolling the device to Intune. I have onboarded the iOS device using the application from App Store, however, it does not show on the portal. Does Intune as a management is required to get the details on the portal?