Let’s learn the Status Management of Windows Welcome Experience in Windows 11. The time when you create a new account and sign in to Windows 10 or 11, a Windows Welcome Experience page appears, which offers the Let’s finish setting up your device screen on your computer display.
The Windows Welcome Experience page offers an overview of newly introduced features. It may be informative, but there is no sense in wasting more time learning the features by following a long installation period. This page can also appear after a feature Update.
This is shown every time you create a new account or feature update. But in Windows 10 or 11, you can turn this Windows Welcome Experience page ON or OFF by moving to settings. If you want to stop this Windows Welcome Experience page, read this guide to disable the system.

- Enable Disable Windows Spotlight on Windows 11
- Goodbye to Windows 10 with 22H2 version and Welcome Windows 11 LTSC
Manage Windows Welcome Experience in Windows 11
Many users are fed up with continuing the Windows Welcome Experience page after creating a new user every time. As you know, Windows is very flexible in its settings; it provides various ways to disable the Windows Welcome Experience. The methods are listed below.
- Manage Windows Welcome Experience Using Windows Settings
- Manage Windows Welcome Experience Using Registry Editor
- Manage Windows Welcome Experience Using Registry File
What is Windows Welcome Experience?
The Windows Welcome Experience is a page that appears when you create a new account or at random intervals, and it suggests what is new and suggested. For example, the page might suggest you log in to your account, try Office 365, or set up Microsoft Edge. It also appears after updates and when you sign in.
Manage Windows Welcome Experience using Windows Settings
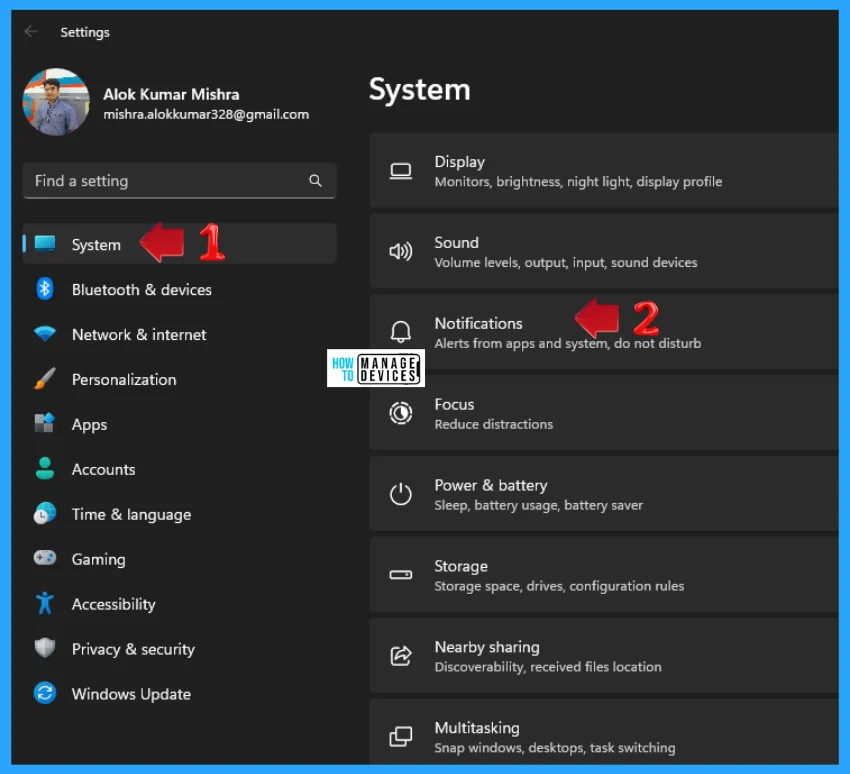
The easy method is to change the status of the Windows Welcome Experience page using Window Settings. Now, click on the Windows button, select Settings, or press Win Key + I to open settings directly. Then, under settings, click on the System option on the left panel, and scroll down to find Notifications in the right panel.
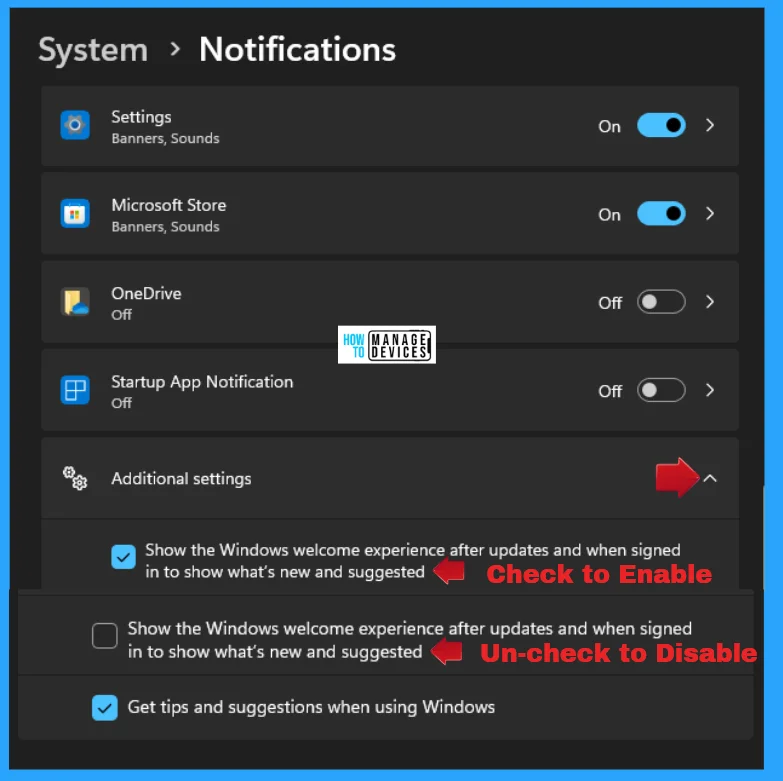
When the Notifications window opens under System Option, scroll down and find the Additional Settings option. Now expand the Additional Settings. Then there you can have two options.
Check mark Show the Windows Welcome Experience after updates and when signed in to show what’s new, and it is suggested that you enable the page.
Uncheck mark the Show theWindows Welcome Experience after updates and when signed in to show what’s new and suggested to disable the page as shown in the image below.
Manage Windows Welcome Experience using Registry File
You can Enable Welcome Windows Experience using the .reg file. To create a .reg file, open NotePad, type the following code, and name it EnableWelcomeWindowsExperience. Then, save it on the desktop using the .reg extension.
Windows Registry Editor Version 5.00

[HKEY_CURRENT_USER\Software\Microsoft\Windows\CurrentVersion\ContentDeliveryManager]
"SubscribedContent-310093Enabled"=dword:00000001
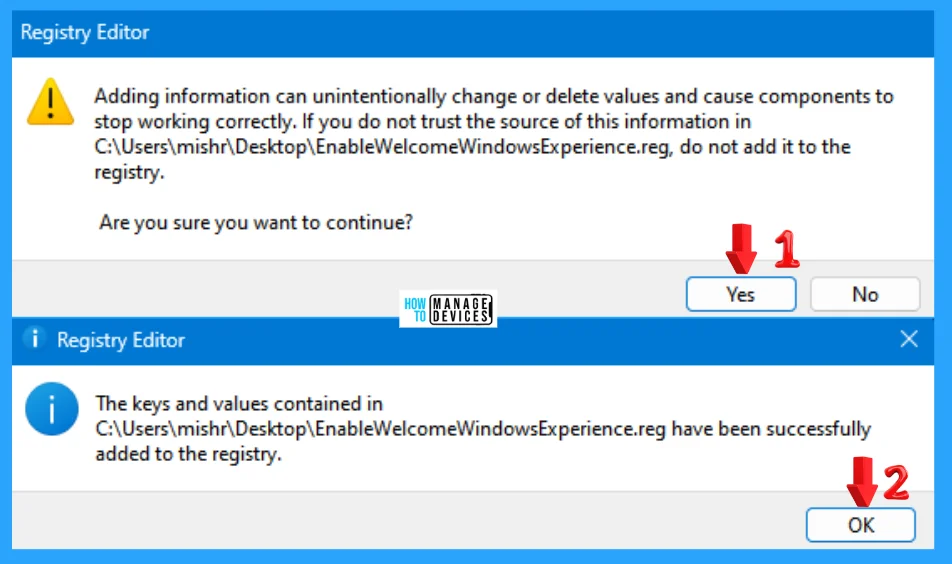
When the file is saved at your selected location, double-click on it. The User Account Control Window will open; click Yes to continue. Then, the Registry Editor Waring window will open.
Adding information can unintentionally change or delete values and cause components to stop working correctly. If you do not trust the source of this information in the path you created, do not add it to the registry; otherwise, click on Yes to continue.
The next window shows that the key and value you added have been successfully added to the registry editor. Now click on OK and restart your PC to add the applicable test.
You can also disable Welcome Windows Experience using the .reg file. To create a .reg file, open NotePad, type the following code, and name it DisableWelcomeWindowsExperience. Then, save it on the desktop using the .reg extension.
Windows Registry Editor Version 5.00

[HKEY_CURRENT_USER\Software\Microsoft\Windows\CurrentVersion\ContentDeliveryManager]
"SubscribedContent-310093Enabled"=dword:00000000
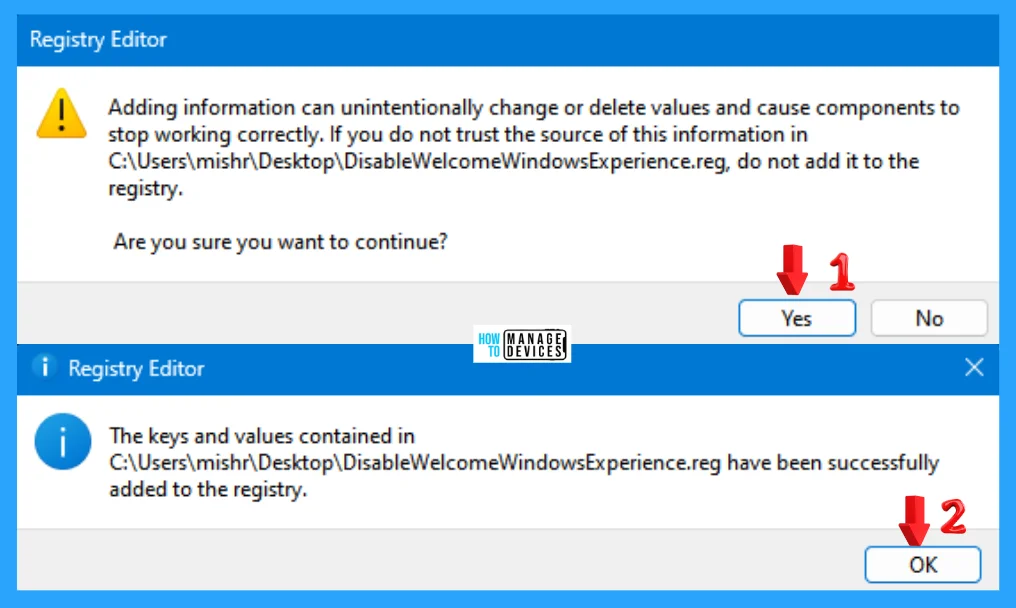
When the file is saved at your selected location, double-click on it. The User Account Control Window will open; click Yes to continue. Then, the Registry Editor Waring window will open.
Adding information can unintentionally change or delete values and cause components to stop working correctly. If you do not trust the source of this information in the path you created, do not add it to the registry; otherwise, click on Yes to continue.
The next window shows that the key and value you added have been successfully added to the registry editor. Now click on OK and restart your PC to add the applicable test.
Manage Windows Welcome Experience using Registry Editor
Another way is to change the status of Windows Welcome Experience from the registry. This procedure is done using the Registry Editor. Let’s check how to change Windows Welcome Experience on Windows 11 using the Registry Editor. You can now follow the process listed below to enter the registry editor to modify changes.
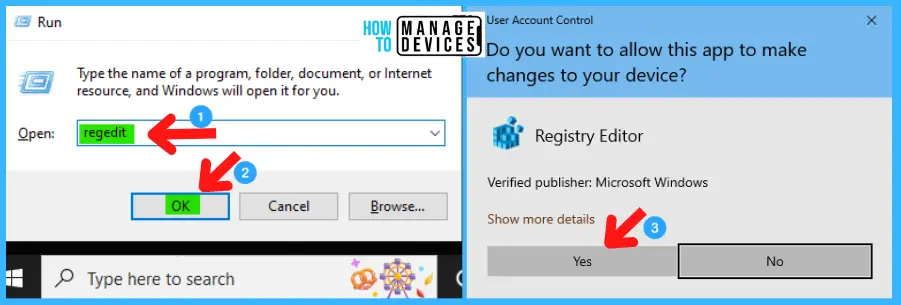
- Window Key + R (To open run command).
- Type ‘regedit‘ and press OK.
- Administrator permission press Yes
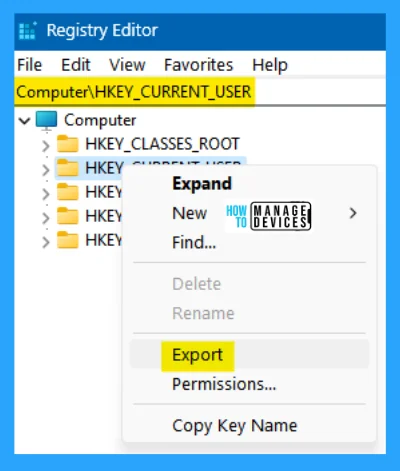
NOTE! Take Backup—If any mistake occurs in the Registry Editor, it may affect the system. It is advisable to take a backup of the Registry before proceeding. In the Registry Editor, go to File in the left top corner for backup. Click on it, then select Export and save the backup.
When the registry editor opens, you must take the backup for your registry editor. Follow the steps below to make a backup for your registry editor.
- Go to File.
- Right-click on HKEY_CURRENT_USER
- Click on Export.
- Save it.
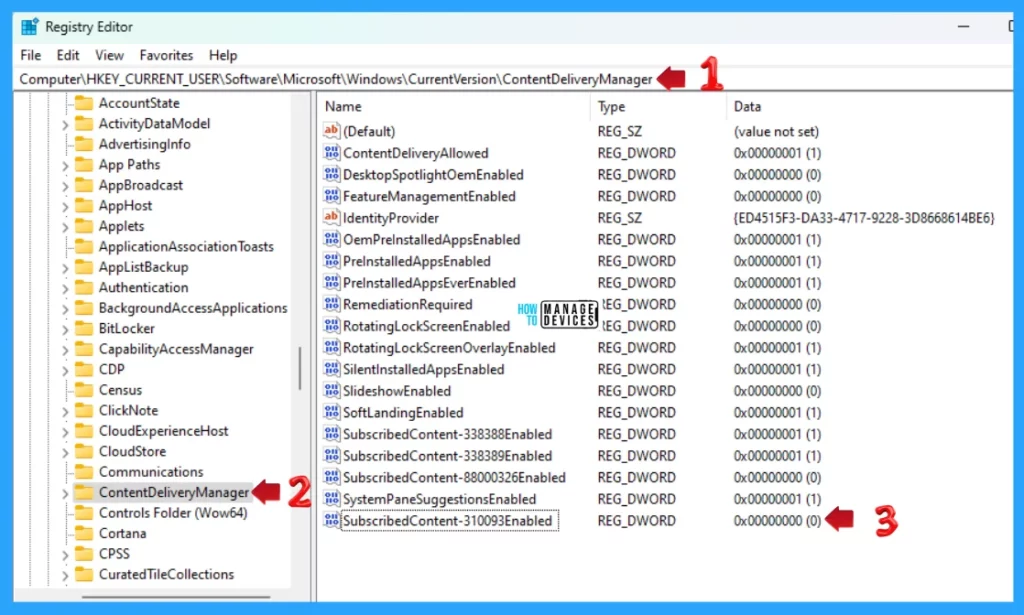
In the registry editor, follow a certain path for certain applications. The trail to reach the required folder for further modification is listed below. Under the Registry Editor, there is a folder named Computer expand the Computer folder and process further.
- Expand the HKEY_CURRENT_USER
- Expand Software under HKEY_CURRENT_USER
- Expand Microsoft under Software
- Expand Windows under Microsoft
- Expand CurrentVersion under Windows
- Expand ContentDeliveryManager under CurrentVersion
- Find and double-click on SubscribedContent-310093Enabled
The path is HKEY_CURRENT_USER\Software\Microsoft\Windows\CurrentVersion\ContentDeliveryManager
If you can not find any option as SubscribedContent-310093Enabled, right-click on the blank space and create a new DWORD (32-bit) key and name as above.
When you double-click on the SubscribedContent-310093Enabled, then the Edit DWORD (32-bit) Value pop-up window opens. Here you can change the Base data in Hexadecimal selection. Change the Value data as 0 to Disable and 1 to Enable the Windows Welcome Experience.

NOTE! Restart the device after every change made by the user.
I hope the information on the Status Management of Windows Welcome Experience in Windows 11 is helpful. Please follow us on the HTMD Community and visit our website, HTMD Forum, if you like our content. Suggest improvements, if any, and we’d love to know which topic you want us to explore next.
We are on WhatsApp. To get the latest step-by-step guides and news updates, Join our Channel. Click here – HTMD WhatsApp.
Author
Alok is a Master of Computer Applications (MCA) graduate. He loves writing on Windows 11 and related technologies. He likes to share his knowledge, quick tips, and tricks with Windows 11 or Windows 10 with the community.
