Let’s learn how to Prevent users to Change Date and Time on Windows in Windows Machines using Intune Configuration profiles. The present article aims to elucidate the process of blocking changing the Date and Time with the Intune Device restrictions Policy and deploying the configuration profiles to the Security group.
Preventing users from altering the date and time settings on Windows constitutes a common security practice employed within organizational environments. Consistent time settings are necessary to maintain the integrity of data, especially in systems that rely on timestamps
Ensuring that all computers within a network maintain synchronized dates and times is imperative for upholding security protocols, facilitating accurate logging, and ensuring seamless system updates. Certain industries are bound by stringent regulations that mandate precise date and time record-keeping.
There are multiple ways to prevent users from changing the Windows date and time. Nobody can alter the settings if you use the Group Policy Editor or Registry Editor and block changing the Date and Time. To use either method, you must have administrative access to the computer to make changes. In this article, we will learn how to prevent users from changing the Windows date and time using Intune Configuration profiles.
Learn more about Device Restrictions Policy
What’s the Device Restrictions Policy in Intune? The Device Restrictions Policy within Microsoft Intune comprises a set of configurations that administrators can implement to regulate various features and settings on devices managed through Intune. These policies are integral to the mobile device management (MDM) solution.

These restrictions allow you to manage various settings and features to safeguard your organization’s resources. For example, administrators can set a minimum password length and block simple passwords. These settings are included in a device configuration profile in Intune and then allocated to Windows client devices.
- Differences Between Intune Enrollment Restriction Device Restriction Profile
- How to Block Personal Windows Devices Enrollment Enrollment Restrictions Options
- Manage Microsoft Edge Browser on Android Devices using Intune
Device Restrictions Policy settings are applied to Windows 11 and Windows 10. Certain settings may only be accessible on specific Windows editions, such as Enterprise. In a Windows 10/11 device restrictions profile, most configurable settings are deployed at the device level using device groups.
Prevent Users Change the Date and Time on Windows with Intune
Let’s learn how to Enable Developer Mode on a Windows device through configuration profiles in Intune. Follow these steps meticulously.
- Sign in to the Microsoft Intune Admin Portal.
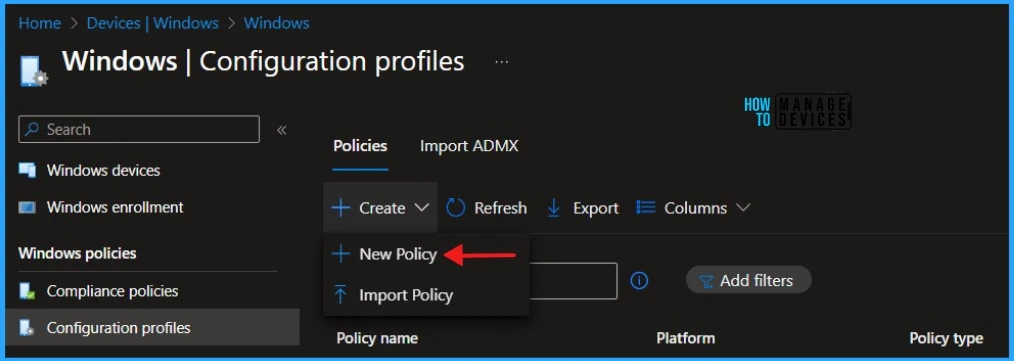
- Select Devices > Windows > Configuration Profiles > Create > New Policy.
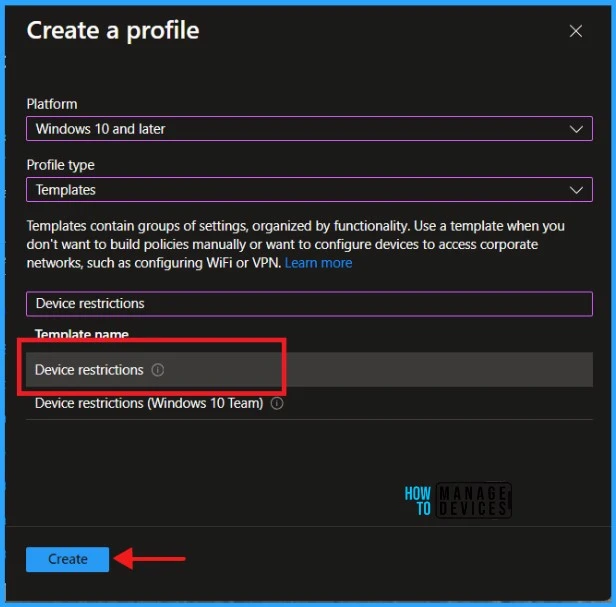
When you click Create and New Policy, a new window will open. In Platform, select Windows 10 and later, Select Profile Type as Templates and Device restrictions. Click on Create.
| Platform | Profile Type |
|---|---|
| Windows 10 and later | Templates |
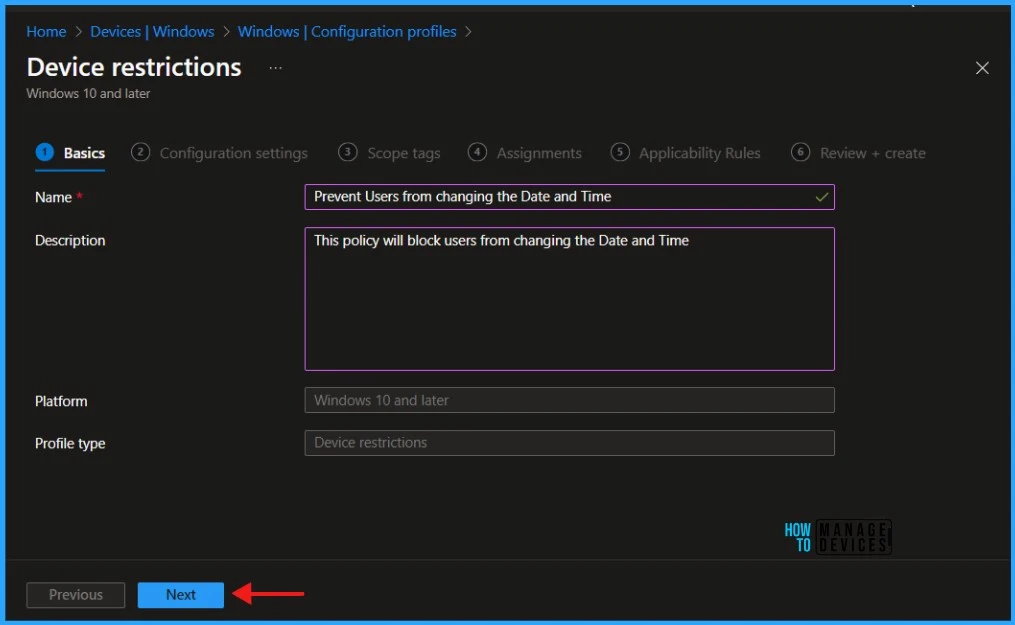
Navigate to the Basics tab and input the profile’s Name and Description. Click Next to proceed.
To add settings in the Configuration Settings section, navigate to the Control Panel and Settings and Click on System Time modification. This will block the user from changing the date and time settings.
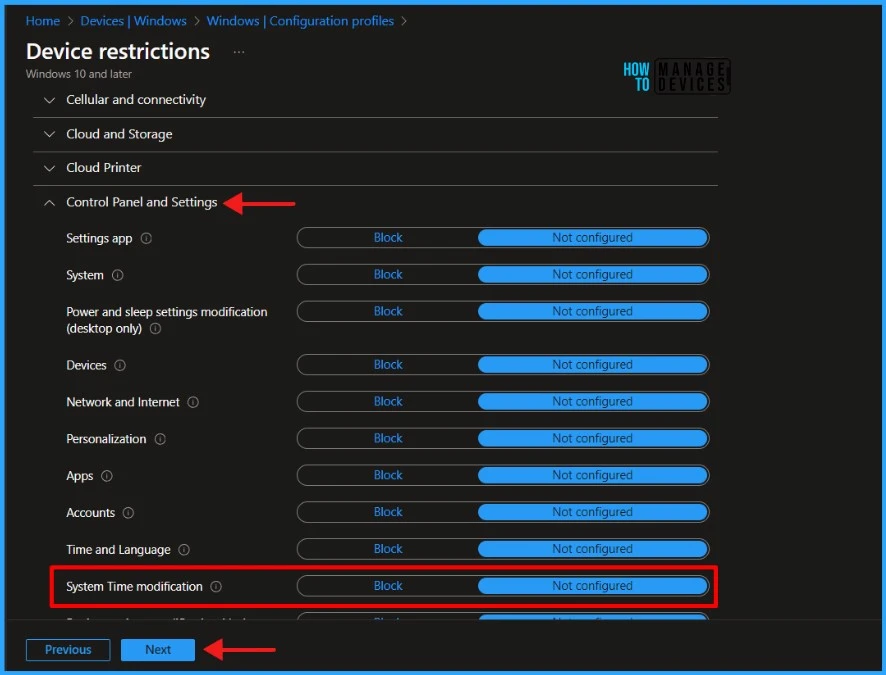
There are two settings available. By default, System Time modification is set to Not Configured, and Intune does not change or update this setting. When you set it to Block, Intune prevents users from changing the Date and Time. In this example, I will choose the Block option. Select Block and click Next to continue.
./Device/Vendor/MSFT/Policy/Config/Settings/AllowDateTimeClick Next to display the Scope tags page. Add the Scope tags if you wish and click Next to assign the policy to computers. I will deploy it to the HTMD – Test Computers Group.
Read more : Intune Scope Tags Implementation Guide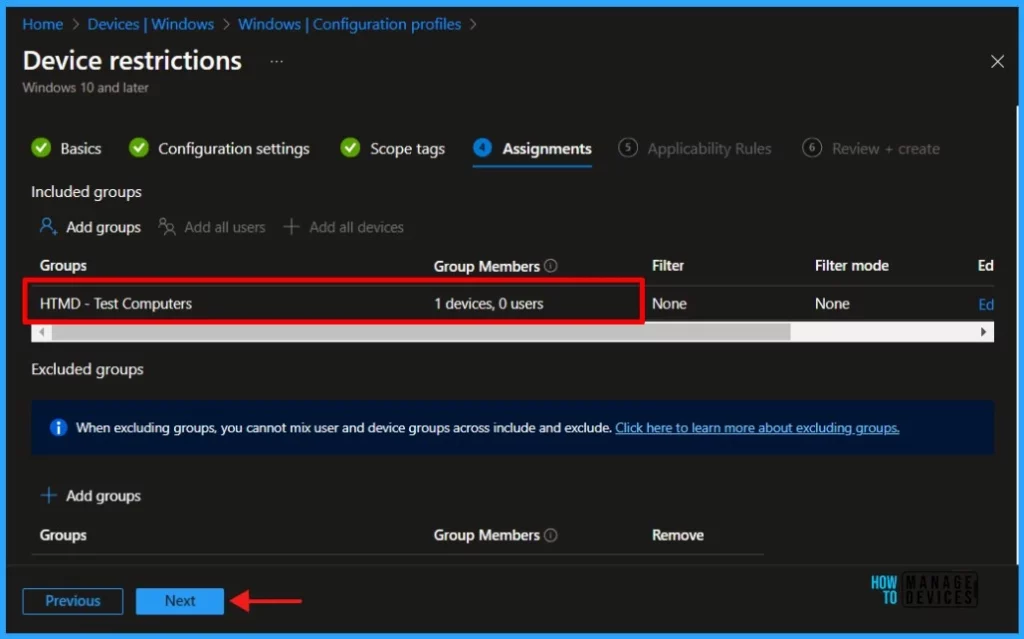
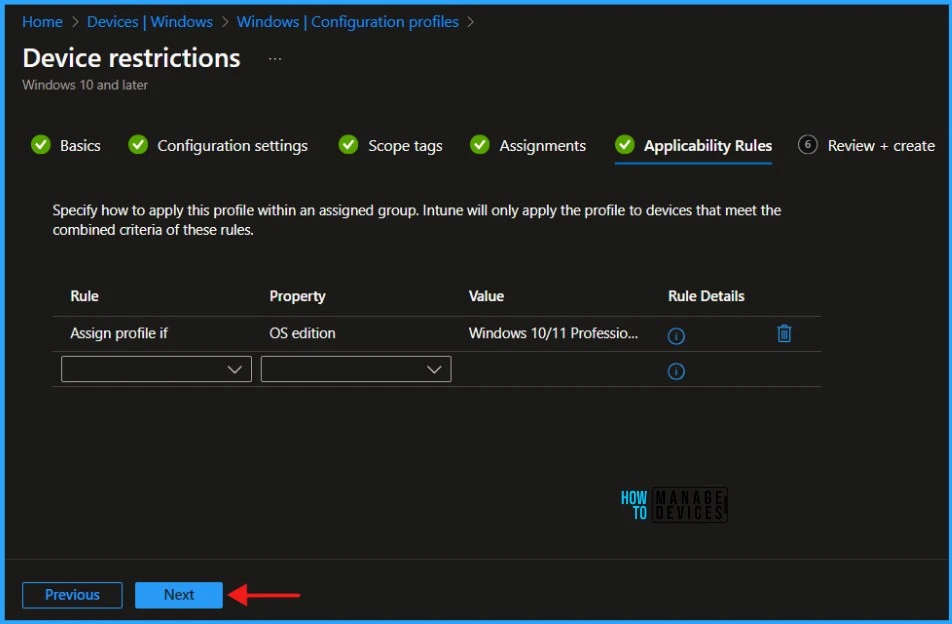
On the Applicability Rules page, if you wish specify how to apply this profile within an assigned group. Intune will only apply the profile to devices that meet the combined criteria of these rules.
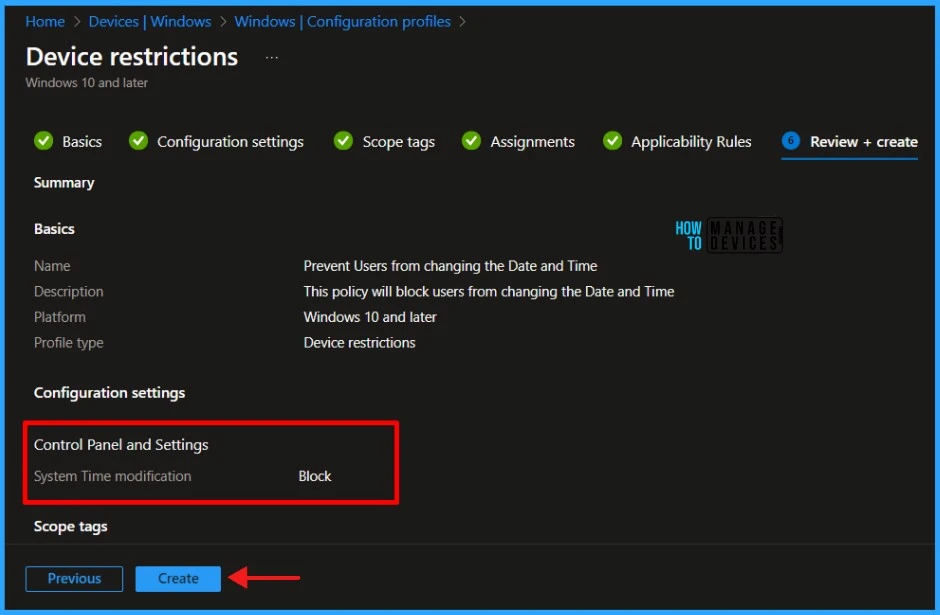
On the Review + Create page, review all the settings you’ve defined for System Time modification in Windows Machines. Once you’ve confirmed that everything is correct, select Create to implement the changes.
Monitor Configuration Profile Deployment in Microsoft Intune
We have created a Configuration Profile to Prevent Users from changing the Date and Time and deployed it to Microsoft Entra groups. Let’s see how we can monitor the deployment and status of installation from the Intune portal. To monitor the Intune policy assignment, follow these steps:
- Navigate to the list of Configuration Profiles and select the policy you targeted.
- Check the device and user check-in status from here.
- If you click “View Report,” you can see additional details
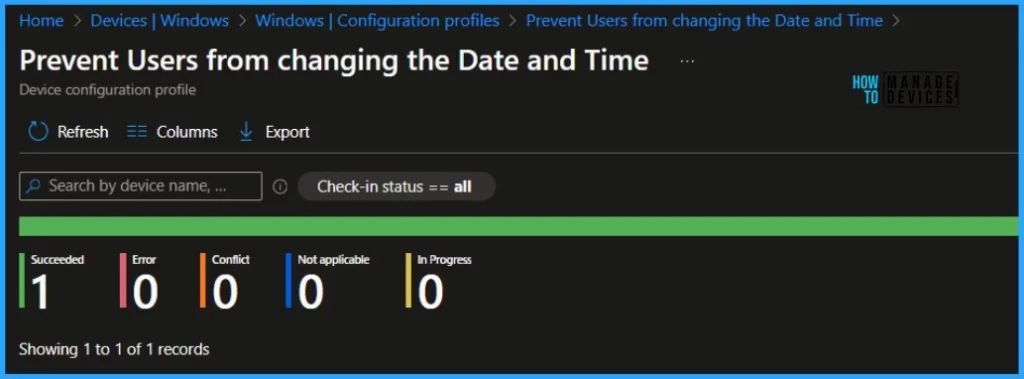
- Monitor Intune App Protection Policy Status
- Monitor Device Enrollment Profile Deployment Report in Intune
- Turn on Real-time Monitoring Antivirus policy for Microsoft Defender in Intune
Event Log to Verify Intune Policy Deployment Status
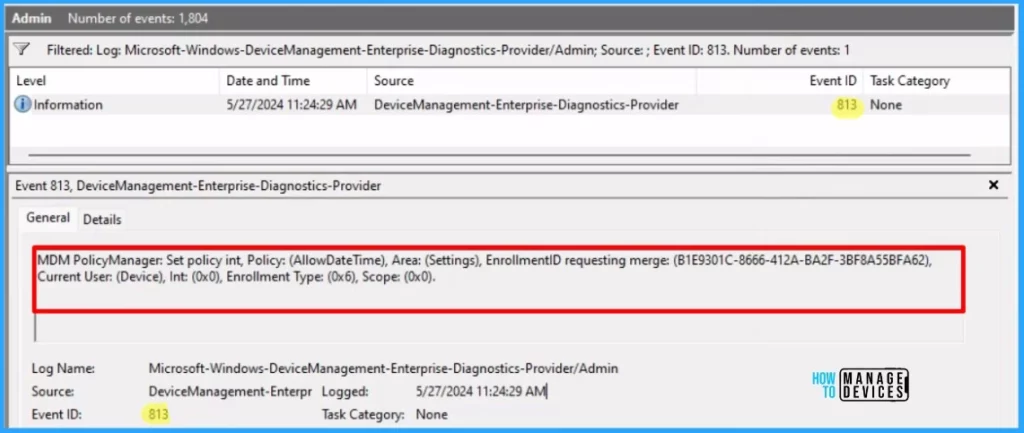
To verify the successful implementation of String or integer policies on Windows 10 or 11 devices through Intune, you can leverage event IDs 813 and 814. These event IDs provide valuable insights into the application status of the policy as well as the specific value assigned to the policy on those devices.
In the case of this particular policy, the value is String and is linked to the event ID 813. Analyzing these event IDs lets you understand the policy’s application status and corresponding value on the devices in question.
To confirm this, you can check the Event log path – Applications and Services Logs – Microsoft – Windows – Devicemanagement-Enterprise-Diagnostics-Provider – Admin.
MDM PolicyManager: Set policy int, Policy: (AllowDateTime), Area: (Settings), EnrollmentID requesting merge: (B1E9301C-8666-412A-BA2F-3BF8A55BFA62), Current User: (Device), Int: (0x0), Enrollment Type: (0x6), Scope: (0x0).
End User Experience
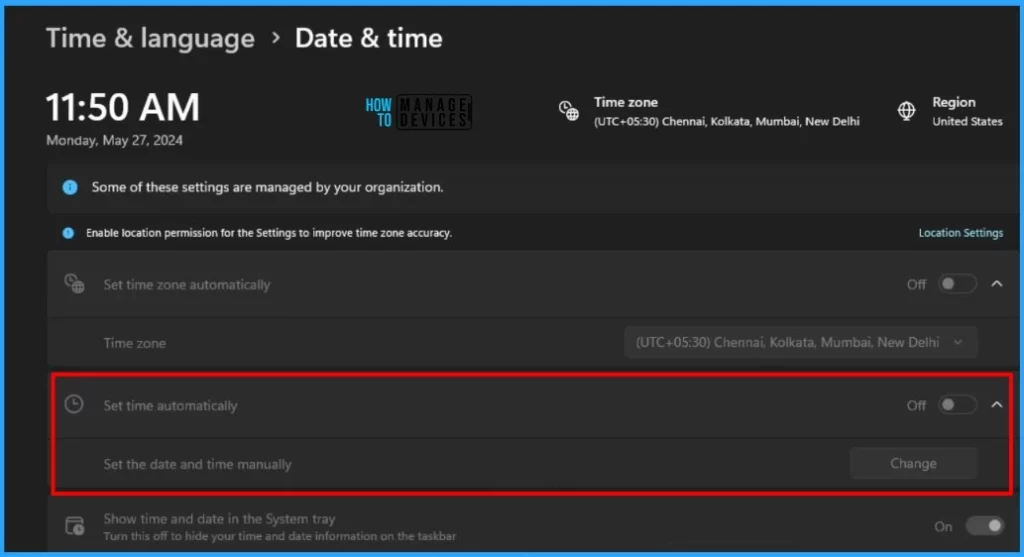
The Configuration Profile that we created to Prevent Users from changing the Date and Time was deployed to Microsoft Entra groups. Let’s learn about end-user experience after changing System Time modification settings.
- Press Start and click on the Settings
- Navigate to System > Time & language
- Check the Date & Time setting at the top of the Time & language page
Set the date and time manually option is greyed out and disabled. You cannot change the date and time on the Windows machine.
I believe that this article will be a valuable resource for you and your organization. Thank you for being so patient in reading this post. I look forward to seeing you in the next post. Keep supporting the HTMD Community.
We are on WhatsApp now. To get the latest step-by-step guides, news, and updates, Join our Channel. Click here. HTMD WhatsApp.
Author
About the Author – Sujin Nelladath has over 10 years of experience in SCCM device management and Automation solutions. He writes and shares his experiences with Microsoft device management technologies, Azure, and PowerShell automation.
