This post will help you understand and create an App Registration In Microsoft Entra for your tenant and explain why this is important. Entra ID app registration is generally used by developers who work with the Entra ID platform and get access using user accounts and groups. Those accesses are based on one or more API permissions in Entra apps.
The Microsoft identity platform can use app registration for identity and access management checks. Entra application registration establishes a trust between the tenant-registered app and the Microsoft identity platform. This is unidirectional trust: The Entra app trusts the Microsoft Identity platform, not vice versa. Once created, we cannot move the Application object between different tenants.
Every Entra App registration needs to be granted some API permissions. After that, only the application or service can access anything as an authenticated user in the Azure tenant. Without API permissions, the app cannot access the resource in the Azure tenant.
After the API permissions are assigned, the same permissions need to be approved, and consent must be obtained from the administrator user before getting desired access such as Device.read. A user with at least a “Cloud Application administrator” can grant admin consent on delegated permissions.

Table of Contents
Before You Get Started
Ensure you have “Application. read-write. all” permissions to register an app and assign it a role in Azure. App registration in Entra will require an Application. Read-write. all access, and the “Cloud application administrator” must grant admin consent on API permissions assigned to the App.
- Easiest Method to Enable MFA for Admins using Azure AD Conditional Access
- What is the Face Check Feature in Entra
- Windows 10 Conditional Access with Azure AD Join Intune MDM Auto Enrollment Enforce Policies
How To Create App Registration In Microsoft Entra
Let’s create a test app registration. We can use Azure portal, Powershell, or Microsoft Graph to create app registration. We are going to use the GUI method directly from the Azure portal. Microsoft App registration supports Authentication via user credentials and Certificate-based authentication. Certification-based authentication will require a self-signed certificate.
- Sign in to the Microsoft Azure portal via Https://portal.azure.com
- Browse to Microsoft Entra ID

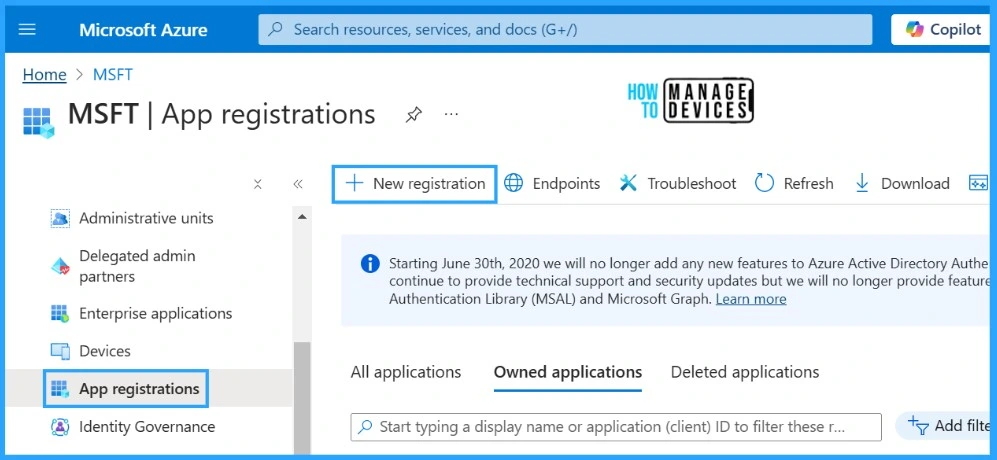
On the Microsoft Entra ID page, scroll down and select App registrations from the portal. Click on the new registration tab on the right pane. This will open the “Register an Application” pane where we can enter application details.
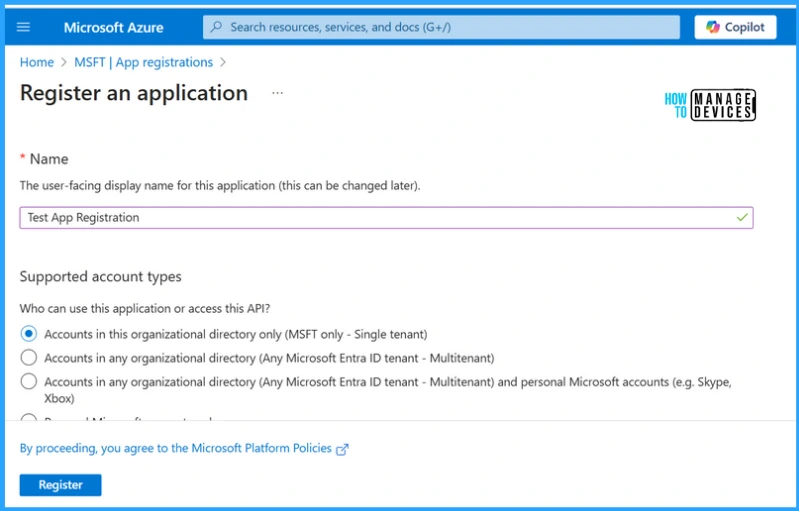
Enter the name for the application you want, for testing we are providing the “Test App Registration” name to our application. We can also specify who can use the application, i.e., single or multitenant accounts. (we have selected “Accounts in this organizational directory only”)
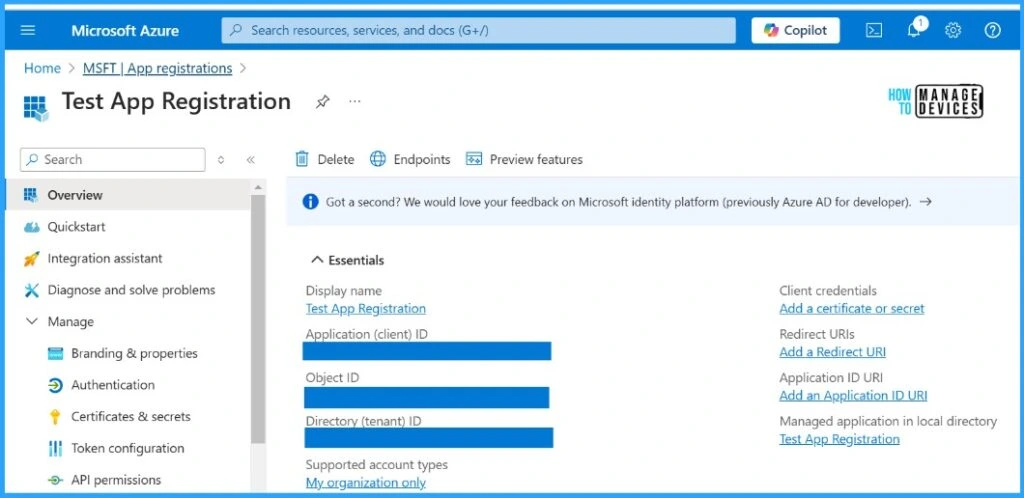
Once the application registration is done, we can find the Application (client) ID and Object (tenant) ID in the overview tab. Note down the Application ID and Tenant ID to use later if required.
Configure API Permissions On Entra App Registration
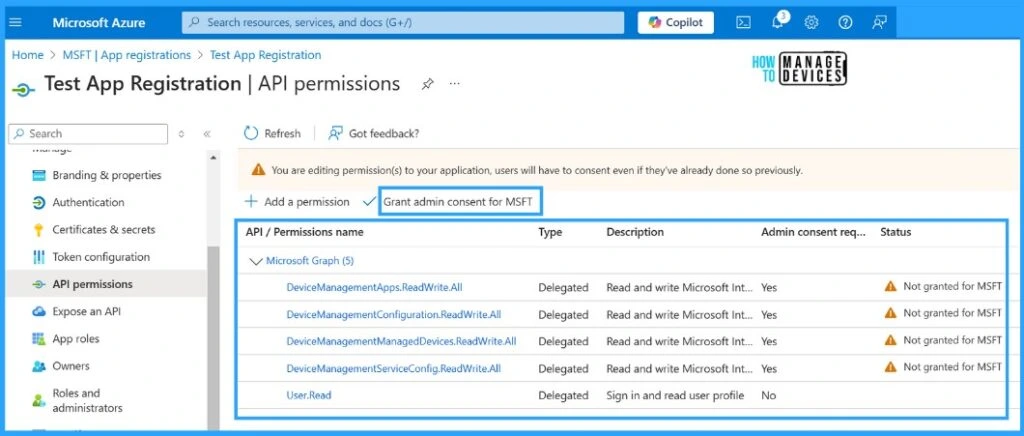
Entra App registration needs to be granted some API permissions. After that, only the application or service can access anything as an authenticated user in the Azure tenant. Without API permissions, the app cannot access the resource in the Azure tenant. Once the API permissions are assigned, the same needs to get consent from the Administrator user before getting the desired access, like Device.read. We will assign the API permissions to the test App registration for device management.
| API Permissions Assigned |
|---|
| DeviceManagementApps.ReadWrite.All |
| DeviceManagementConfiguration.ReadWrite.All |
| DeviceManagementManagedDevices.ReadWrite.All |
| DeviceManagementServiceConfig.ReadWrite.All |
| User.Read |
- Let’s configure API permissions for the app
- Select the API Permissions tab on the Test App and add permissions
- Add delegated permissions on the application.
- We are configuring this app to utilise with Intune, hence assigning device management permissions.
Setup Authentication Method For App Registration
The last step in the app registration process is adding an authentication method, which will be used to access this application. This ensures that only authorized users connect with the application via an approved authentication method.
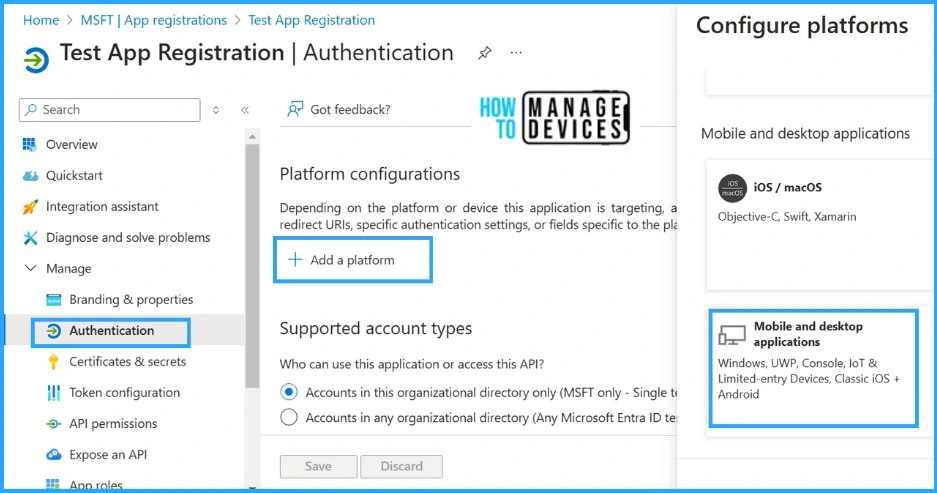
- Go to the Authentication tab on the test App created
- Add a platform > Mobile and desktop application
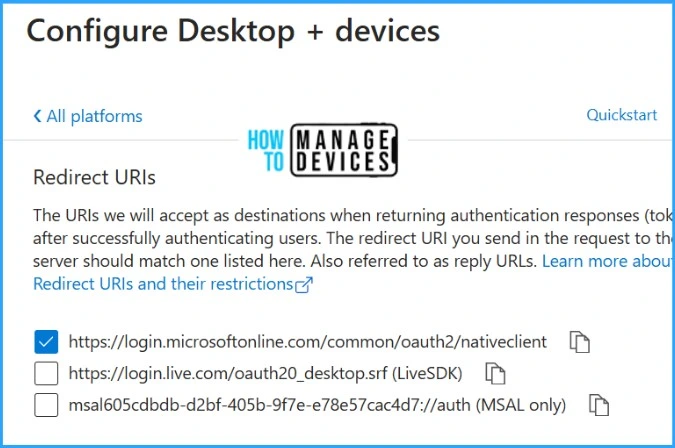
Configure the Redirect URL for our app. If you don’t have any custom redirect URL configured, select “https://login.microsoftonline.com/common/oauth2/nativeclient” for the native client authentication method for Microsoft accounts. You can use any custom redirect URL as well. More information on Microsoft Redirect URL
The Entra App registration will be completed successfully once you complete the above configuration on Azure. The following post will show how we can utilize the Entra app registration to access the tenant services using Microsoft Graph.
I hope this post was beneficial for you. I appreciate your patience in reading this post.
Need Further Assistance or Have Technical Questions?
Join the LinkedIn Page and Telegram group to get the latest step-by-step guides and news updates. Join our Meetup Page to participate in User group meetings. Also, Join the WhatsApp Community to get the latest news on Microsoft Technologies. We are there on Reddit as well.
Author
Sachin Chauhan is a Microsoft-certified professional and Modern device management consultant with over 10 years of experience in Microsoft technologies like MECM, Intune, Windows, Autopilot, Operating system deployments and management, Azure, and PowerShell Automation.
