Let’s understand how to Deploy a Windows Captured Image Using SCCM and MDT. This post will help you manage the deployment of a Windows Captured Image and deploy a Windows Image using MDT + SCCM.
Let’s learn how to deploy Windows 10 images using the Microsoft Deployment Tool (MDT). The same image can be used in SCCM or MECM.
In my previous post, I described the working mechanism of the Sysprep tool and the process of capturing the Windows Image. Learn How to Sysprep Capture Windows 10 Image using DISM.
Since we had successfully captured the Windows image, the next step would be to deploy the captured image.
- Learn How To Sysprep Capture Windows 10 Image Using DISM
- SCCM Create Custom Windows PE Boot Image Using MDT With ConfigMgr
- Windows 10 With Cortana For India More New Features
Deploy Windows Captured Image (Windows 10 Image)
We have many options for managing and proceeding with the deployment. We will choose the Microsoft Deployment Toolkit (MDT) to deploy the captured WIM File.
Microsoft Deployment Tool (MDT) allows you to create Zero Touch Installations to deliver an automated deployment scenario.
- Requires no interaction by the user.
- Users do not need to know any configuration information before initiating the deployment process.
- You can customize your task sequence much more easily.
- It can preconfigure the user profile and apply user-based settings and customizations.
- With CopyProfile, you can change default user settings and apply them to the user profile on the system during deployment.
Prerequisites
- Microsoft Deployment Toolkit (MDT) 8456 Download
- Windows ADK 10 v1903 Download
- WinPE Addon for Windows ADK 10 v1903 Download
- Windows 10 Image
- Configure MDT Deployment Share to Create Reference Image
Implementation Activities and Tasks
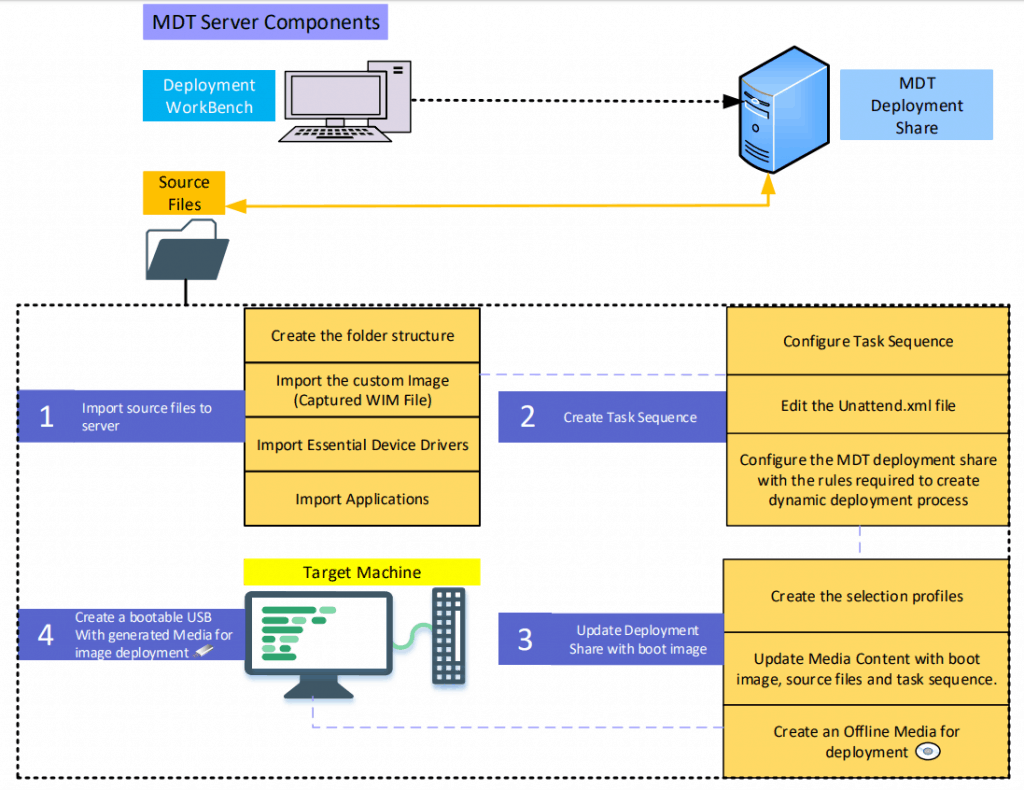
Please remember the following implementation activities and tasks for MDT Server Components:
First, in the Deployment WorkBench, set up the MDT Deployment Share and import the necessary source files. Next, move on to configuring the Task Sequence, which involves importing the source files to the server, creating the folder structure, importing the custom Image (Captured WIM File), and importing essential device drivers.
After that, create the Task Sequence by importing applications, editing the Unattend.xml file, and configuring the MDT deployment share with the rules required to make a dynamic deployment process.
Moving on to the target machine, create the selection profiles and generate a bootable USB with media for mass deployment.
Finally, update the Deployment Share with the boot image by updating the media content with the boot image, source files, and task sequence. Additionally, create an Offline Media for deployment.
Import Custom Image for Deployment
- Expand the Deployment Shares and the MDT Deployment Share.
- Create a folder structure inside the Operating Systems. This helps organize selection profiles. Right Click in Operating Systems > Created Folder and select Import Operating System

Select the Custom Image file to add a captured image you wish to deploy.

Click on Browse; specify the location of the wim file. After Specifying the full path, you can check the box to move the files to the deployment share and click Next. To save your time!
Don’t forget to keep a copy of imported Images.

Select Setup files that are not needed and click Next.

Accept this default directory name or specify the directory’s name and click Next.

Review the values and click Next.

You will get a message: “The Import Operating System Wizard completed successfully.” Click Finish.

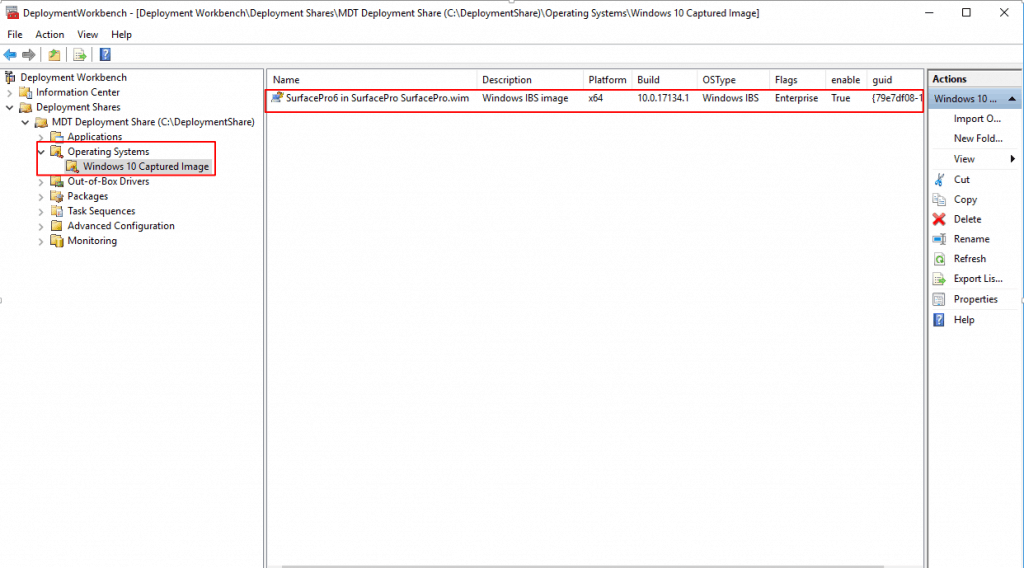
The captured image of the reference computer is added under Operating Systems.
Prepare the Driver Repository
You must download all device drivers for the required models from the OEM Manufacturer’s website. Once you have downloaded the necessary drivers, store them in a folder for a specific model.

Download, Extract and Import Drivers within your folder into MDT
Next, we want to create a folder structure in MDT under the Out-of-Box Drivers node to organize our drivers.
To add drivers for the operating system of different hardware models, Check this Microsoft Blog.
Create and Configure the MDT Task Sequence
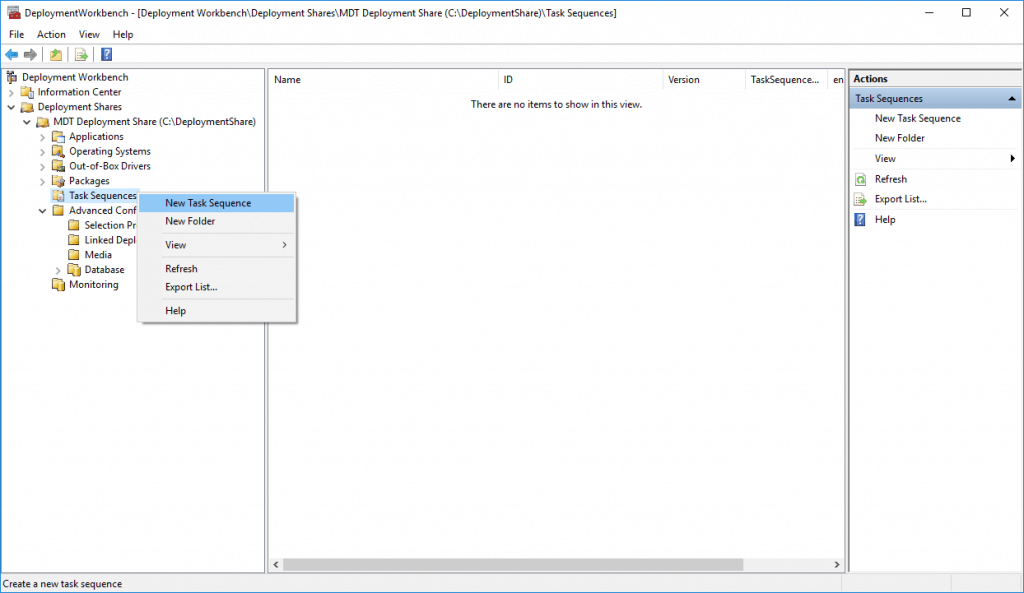
Right-click on the Task Sequence node and select “New Task Sequence.”
Provide the Task sequence ID and Task sequence name.

Select Template Standard Client Task Sequence from the available list.

Select OS: Choose the imported Custom Image to deploy with this Task Sequence.

Select Do not specify a product key at this time.

Fill in the fields Full Name, Organization, Internet Explorer Home Page (these fields can be modified through Answers File at a later stage), and click Next.

Select Don’t specify an Administrator password at this time Option. Click Next.

Review the details and click Next.

The task Sequence creation process was completed successfully. Click Finish to close the wizard.

We have a pretty bare-bones task sequence that will only install Windows and nothing else.
We need to edit Task Sequences and add custom steps to perform other actions required with this Windows installation into a target machine.

Customize the Task Sequence
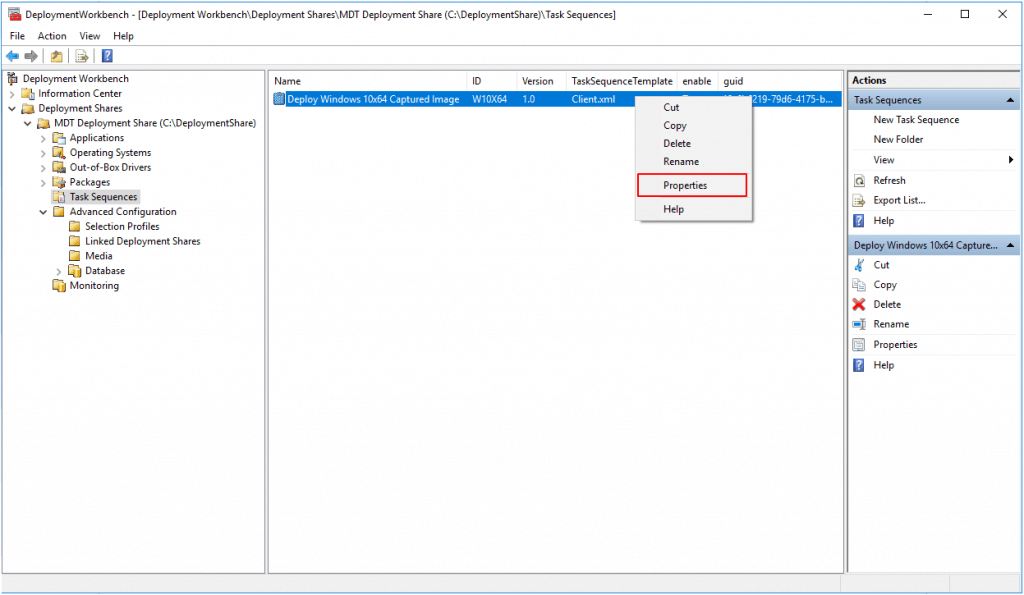
You can edit the task sequence by navigating to the Task Sequences, right-clicking on the created task sequence Name, and selecting Properties.

Under the Preinstall section, we will configure the Inject Drivers step to use the selection profile > Nothing in the task sequence.

We will add a custom Task Sequence Variable step above the Inject Drivers step to set our DriverGroup001 variable to point to the model’s path that we are installing the %model% variable filled.

Task Sequence will appear below; apply changes, click Apply and OK.

Answer files (unattend.xml)
Right-click on the task sequence you created and choose “Properties.” On the “OS Info” tab, click on “Edit Unattend.xml,” which will be Windows System Image Manager.

It started automatically generating a catalog file for the selected WIM. Depending on your configuration, this process could take a while.

Once the generation is complete, you’re free to change your Unattend.xml.
For all unattended settings that can be applied to the answer file. For a complete description of the components, see the Microsoft Docs Unattend Components.

Run the Validation check, click the Tools menu and select Validate Answer File.

You should see that your validation answer file has errors in the Messages area at the bottom of the screen. Double-click on any results to take a right to that setting to remediate any issues.
Make the necessary changes, validate the answer file, and save and exit.

Create a Selection Profile
Selection profiles in the Advanced Configuration node allow users to filter content in the Deployment Workbench.
Selection profiles are used for several purposes in the Deployment Workbench and Lite Touch deployments. For example, they can be used to:
- Control which drivers and packages are injected into the boot images.
- Control which drivers are injected during the task sequence.
- Control what is included in any media that you create.
- Control what is replicated to other deployment shares.
- Filter which task sequences and applications are displayed in the Deployment Wizard.
Expand Advanced Configuration. Right-click on Selection Profiles and select New Selection Profile.
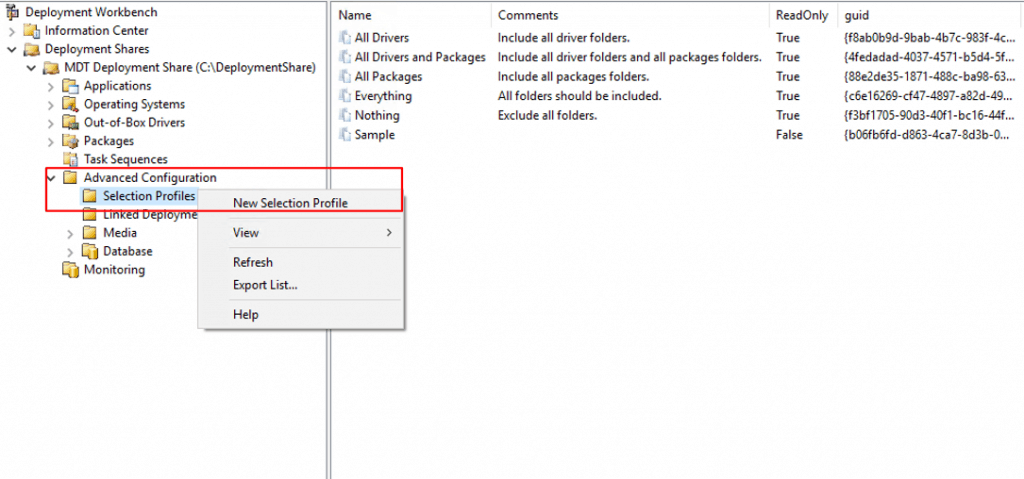
Provide the Selection profile name and Comments for best practice.

Here, we can select the available applications, Operating Systems, Drivers, Packages, and Task Sequences that we need to include in the Image.
Note: Selecting more than necessary will result in larger ISO files and USB storage requirements.
Once done with the selection, click on Next.

Here, we will get a summary page with detailed information.

Click on the Finish button to complete the process.

A custom Selection Profile has been created based on your selection.
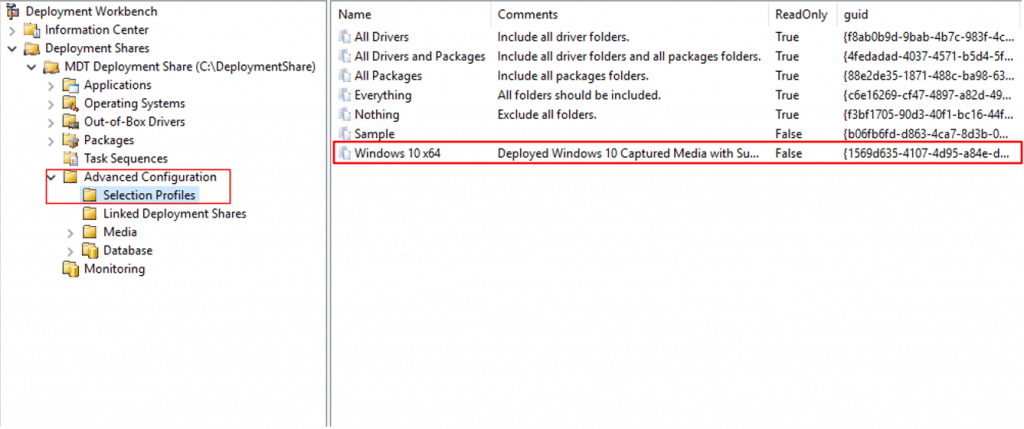
Note: If you need to make any changes later, you can modify the selection profiles by right-clicking> properties in the completed profile.

Creating an Offline MDT Deployment Media
Right Click on Media and select New Media.

Under New Media Wizard, provide the Media path by clicking on the Browse option. We have created a new directory under C drive named “MDT Offline Media.”
Note: The path of the provided directory should be empty.
Now select the selected profile from the drop-down list that was created earlier.

Review the selected values and Click on Next.

Please wait for a while to complete the process. Once you get a message, “The Process completed successfully,” Click on Finish.

Under Media, you can now see that new media has been created.

Right-click in media [in my case, MEDIA001] and choose Properties.

Select the Platforms Supported; provide the appropriate name for ISO.

Configure MDT Deployment Share Rules
To automate media Installations, you modify the two rules files (Bootstrap.ini and CustomSettings.ini). The rules control the Windows Deployment Wizard on the client and provide the following settings to the machine being deployed:
- Computer name
- Domain to join, and organizational unit (OU) in AD to hold the computer object.
- Whether to enable BitLocker
- Regional settings: You can manage hundreds of locations using the rules.
Click on the Rules tab, where you will get the default settings.

Important! Generate a computer name based on a serial number
A serial number can contain 15 characters, but the Windows setup limits a computer name to 15 characters. More Details Configure MDT deployment share rules
Below the configurations I used, you can modify the Rules in the deployment process based on Toolkit Reference.
CustomSettings.ini
Select the Rules tab and modify the properties window using the sample information.
[Settings]
Priority=Default
[Default]
_SMSTSORGNAME=Test Infra
OSInstall=YES
OSDComputerName=PC-%SerialNumber%
SkipApplications=YES
SkipAppsOnUpgrade=YES
SkipBitLocker=YES
SkipCapture=YES
SkipComputerName=YES
SkipComputerBackup=YES
SkipDeploymentType=YES
DeploymentType=NEWCOMPUTER
SkipDomainMembership=YES
SkipAdminPassword=YES
AdminPassword=P@ssWord
SkipLocaleSelection=YES
KeyboardLocale=en-US
UserLocale=en-US
UILanguage=en-US
SkipPackageDisplay=YES
SkipProductKey=YES
SkipSummary=YES
TimeZoneName=UTC
SkipTimeZone=YES
SkipUserData=Yes
SkipTaskSequence=YES
TaskSequenceID=W10X64
_SMSTSOrgName=Test Infra
SkipFinalSummary=NO
Bootstrap.ini
Click Edit Bootstrap.ini will open the configuration in Notepad and modify it using the following information.
[Settings]
Priority=Default
[Default]
SkipBDDWelcome=YES
Click Apply to save the changes and OK to close the Media Properties.
WinPE Drivers
You can create separate folders under your Out-of-Box Drivers node for WinPE_x86 and WinPE_x64 drivers and add the drivers. In the Windows PE tab, in the Platform drop-down list, make sure x64 is selected. Select the Drivers and Patches tab.
By default, MDT will inject all network adapters and mass storage drivers into the WIM file. From the Selection profile drop-down list, choose the selection profile that you created
for WinPEx64.

Why need to Update Deployment Share
Generally, you need to update the deployment share when you make changes that affect the boot image. That would include:
- A driver needs to be injected into WinPE was added.
- Modified the boot image settings.
- Changes to the Bootstrap.ini file.
- Updated any of the scripts or files.
Update the deployment share by right-clicking the MDT Build Lab deployment share and selecting Update Deployment Share. Use the default options for the Update Deployment Share Wizard.
It will only inject drivers into WindowsPE from the specified folder in your selected profile.

Split a Windows Image File (.wim)
We need to configure or validate this setting once before deployment with an image larger than 4GB, as FAT32 is required to boot the UEFI System with a maximum supported file size of 4GB.
After splitting the Image into a set of smaller (.swm) files, it can handle images larger than 4GB when installing Windows images from USB or DVD.
In the Deployment share > Control > Settings.xml. Open with Notepad to modify.
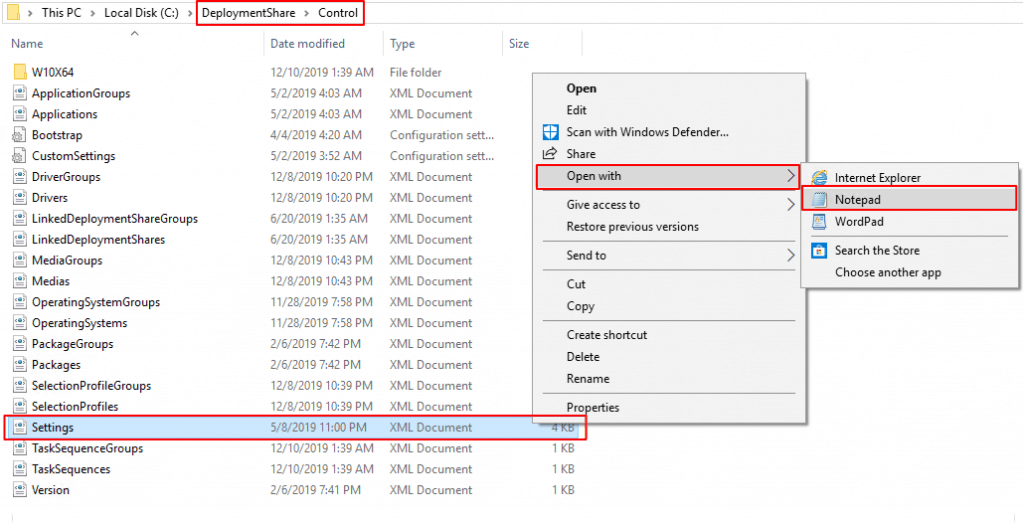
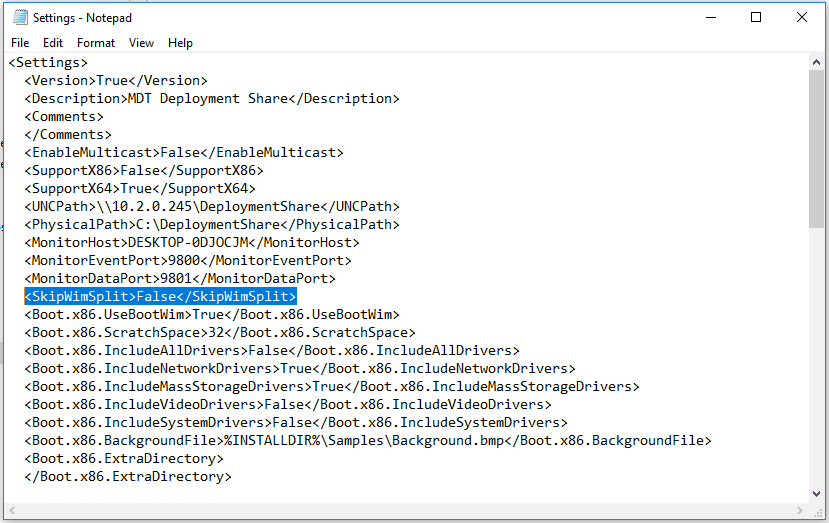
Make Sure the Settings.xml File has the following settings: Save and close the Notepad.
<SkipWimSplit>False</ SkipWimSplit>
Important Tips! Before updating media content, it’s better to close all the opened instances of Deployment Share, a path used by some other process. If needed, sign out of the logged-in User Account, log in to Server, and open Deployment Share> Advanced Configuration> Media> Update Media Content.
Right-click on Media and select Update Media Content.

The ISO Image creation will be in progress, and it will take longer to complete the process.

Once Media generation is completed successfully, Click on Finish to close the wizard.

Media has been created successfully; you can see the ISO files for deployment have been made under the path you specified.
Create a bootable USB from the ISO for offline deployment, depending on your target devices.
We are on WhatsApp. To get the latest step-by-step guides and news updates, Join our Channel. Click here –HTMD WhatsApp.
Author
Jitesh Kumar has over five years of experience in the IT Industry. He writes about and shares his experiences related to Microsoft device management technologies and IT infrastructure management. His primary focus is the Windows 10 Deployment solution with Configuration Manager, Microsoft Deployment Toolkit (MDT), and Microsoft Intune.


Awesome work Jitesh!
Amazing Jitesh !!!! Execlent Artical .
Cleared my doubts I was having in my mind.
Hi Jitesh,
Thanks for putting your efforts making such a detailed deployment knowledge article on Windows 10. It was really helpful to me.
I have got a few Questions on setting up Computer name during OSD?
1.What’s is best way to configure PC Name?
2. How to configure TS so That it can Name the Device based on whether it’s Laptop,Desktop or a Tablet?
I Look forward to hearing from you soon.
Regards,
Vishal
Thanks Vishal..
You can configure variable IsDesktop , IsLaptop and IsTablet to distinguish devices inside the Customsettings.ini rules. Based on your environment requirements you can customize the rules.
Here’s the sample Rules –
[Settings]
Priority=ByLaptop, ByDesktop, Default
Properties=ComputerType,MyCustomProperty
[ByLaptop]
SubSection=Laptop-%IsLaptop%
ComputerType=L
[By Desktop]
SubSection=Desktop-%IsDesktop%
ComputerType=D
[By Tablet]
SubSection=Desktop-%IsTablet%
ComputerType=T
OSDComputerName=%ComputerName%-%SerialNumber%
As these variables are handled by ZTIGather.wsf where there’s no pre defined variable for Tablet, You can prefer the solutions prescribed by Keith.
Add a step Set Task Sequence Variable – IsTablet = True in Task Sequence.
In the Options tab, add WMI Query with the following-
SELECT * FROM Win32_ComputerSystem WHERE PCSystemType = 2 and PCSystemTypeEx = 8
February 21, 2022
https://www.anoopcnair.com/sysprep-capture-windows-10-image-using-dism/
Learn How to Sysprep Capture Windows 10 Image using DISM
https://www.anoopcnair.com/deploy-windows-captured-image-using-sccm-mdt/
Deploy Windows Captured Image Using SCCM and MDT
Hello,
I wonder if there is an easier way to use “sysprep” and its deployment.
What I would like is to use a simple PC with Windows 10 Pro on “one” (system partition and installation partition) and an external hard drive.
And to use “sysprep” and “DISM” only. I understand that IT works on servers and virtual machines but this is not my case. Finally, I just use “VirtualBox” and I am not an expert. And regarding the servers my level is that of a chimpanzee.
If you have the time and a suggestion for me, simple, I would like to know it.
Thanks for sharing your knowledge.
Thanks for this!
Dear Anoop,
I am looking for some help here in regards to my SCCM. In one my company we was using one form before going for actual OSD deployments. In this form we was able to define host name, User name of machine, domain and etc….How we can do that? It was simple web based form….and machine added for OSD was visible into the list of machines you want to image. Any help would be really appriciated.
Many Thanks!
Mukesh Kharade
Dear Mukesh, this post’s Author is Jitesh! I will let Jitesh answer your query.
Hi Mukesh, You can use ServiceUI to prompt users to add the required details based on organization standards during the task sequence progress! For that, you need to design your own form with the details with PS or any other scripting language! You get details for using ServiceUI here – https://www.anoopcnair.com/display-message-for-sccm-task-sequence-unsupported-hardware-model/
The other part, if you have integrated MDT…You can use UDI Wizard – https://www.anoopcnair.com/customizing-udi-wizard-with-udi-designer-using-sccm-configmgr/