Hello Everyone!!! Today we will learn about Configuration Item Configuration Baseline in SCCM. We will detect Registry Changes and Revert using SCCM Configuration Item CI CB using SCCM Console.
The Configuration Item and Baseline can be used to check compliance settings for users and devices. In a larger environment migrating from one Windows 10or 11 version to another, we may be required to check the compliance settings of OS versions, driver versions, application versions, user information, etc. If we find any noncompliant devices or users, we can use CI and CB for remediation.
Configuration Items are widely used in the SCCM world to identify software updates, application models, etc. We can use CI to handle device settings. CI’s are not deployed directly to the collections but can be deployed via CB. Configuration Baselines in ConfigMgr is a collection of CI’s and CB’s. CB can be included at least one or more CI’s to be deployed to device and user collections.
So let’s begin with our post. With the help of Configuration Item Configuration Baseline in SCCM, we will detect a change in the registry and revert it to the original using SCCM Console. There are certain ways to do so. But we will try to explain you all in a very simple way.
- SQL Query for SCCM Configuration Baselines Results | ConfigMgr
- Deployment of Cisco WEBEX using SCCM | Deploy MSI File
Prerequisites for SCCM Configuration Item
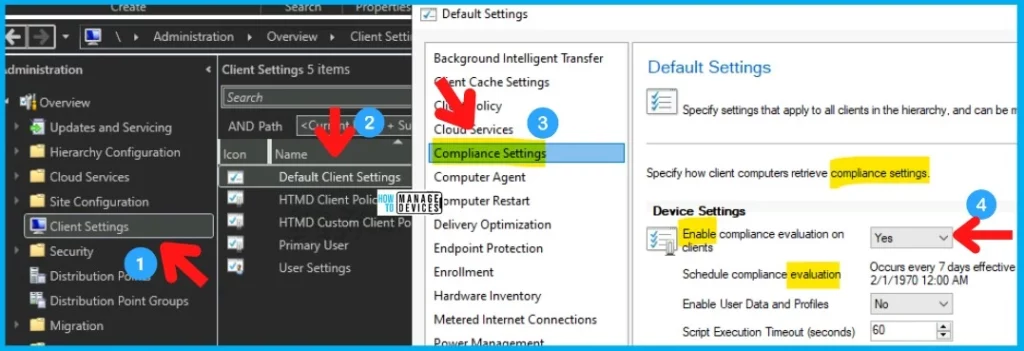
Before begin, you must ensure that Configuration Item related client agent policies are enabled and working ok. To check this, you need to option the client settings from the Administration workspace. Follow the steps mentioned below to confirm whether everything is configured as expected for CI and CB to work!
- Navigate to \Administration\Overview\Client Settings.
- Open the Client Settings deployed to Windows 11 or 10 clients.
- Click on the Compliance Settings tab and check:
- The Enable Compliance Evaluation on Clients = Yes as shown in the below screenshot.
On the client side, you can open the Configuration Manager applet from the control panel or try running the following command from the RUN menu to open the ConfigMgr applet. Check the Components tab and confirm whether the Compliance and Settings Management component is ENABLED.
Control smscfgrc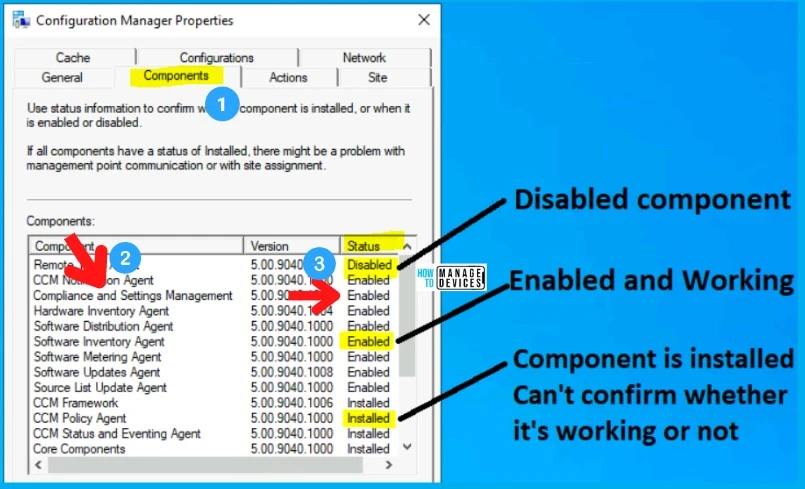
- ConfigMgr Client Component Status | Installed | Enabled | Disabled
- SCCM Shortcut Commands Windows Shortcut Commands
Let’s Begin with Registry Key Creation
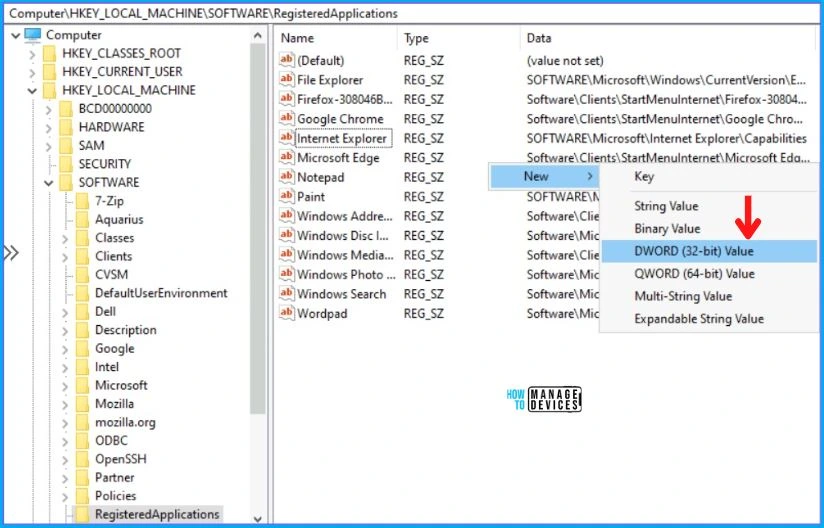
Although you can choose any previously present key from Registry Editor, we are creating a new normal key for you all here to make less confusion. For this, open your RegistryEditor (open run, type regedit, and hit enter). Then you choose any path of your choice (but remember that). Here I am selecting the below-mentioned path:
- COMPUTER\HKEY_LOCAL_MACHINE\Software\RegisteredApplications
The image below shows how to create a Registry Key. After opening the path mentioned above in the Registry Editor, right-click anywhere as shown in the picture and do as depicted.
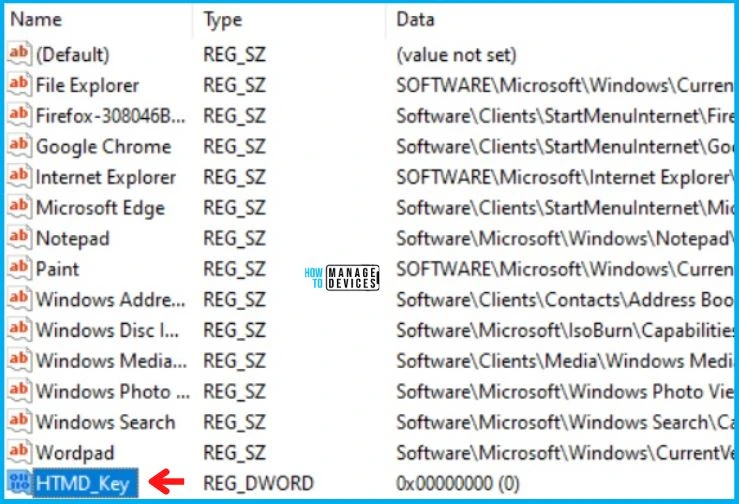
After this, enter the name by which you want to create a key. Here I am creating a key under the name of HTMD_Key and press enter as shown below.
Let’s Create a Configuration Item using SCCM Console
Now let’s move on to the SCCM console and begin with creating a Configuration Item for the registry key we created above or for your chosen key. Open Configuration Manager Console and Go to:
- Navigate to SCCM Console \ Asset and Compliance \ Compliance Settings \ Configuration Items
- Right-click on Configuration Items and select ‘Create Configuration Item’
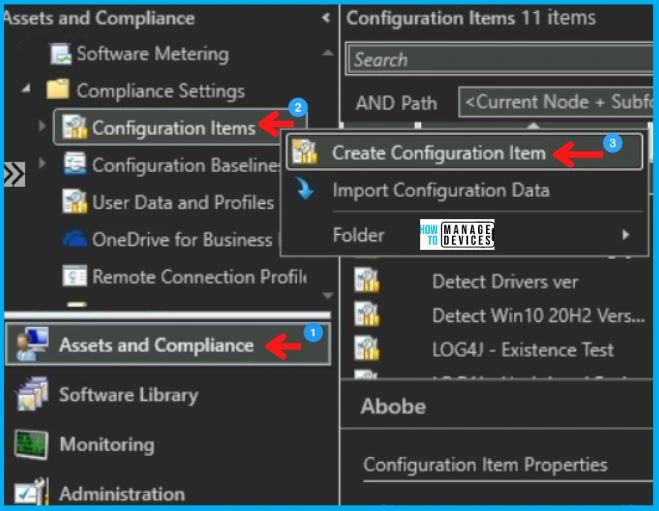
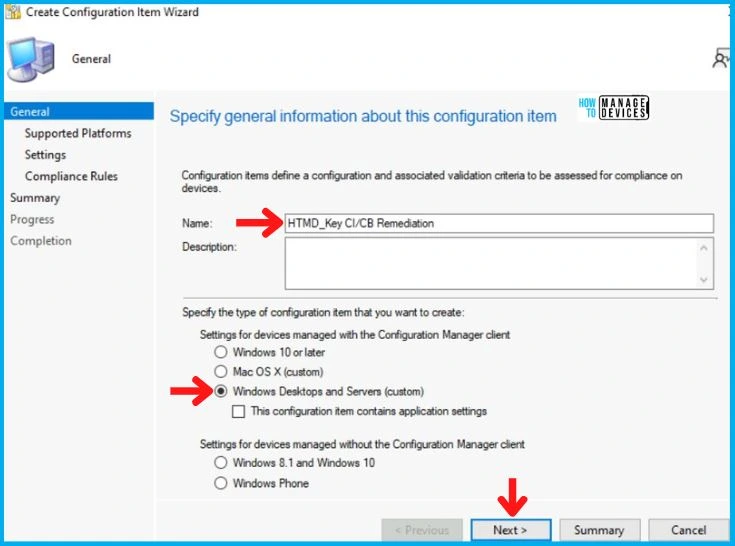
After this Create Configuration Item Wizard will open and provide the name of CI in the Name box and select the option and click on ‘Next ‘as shown below in the image.
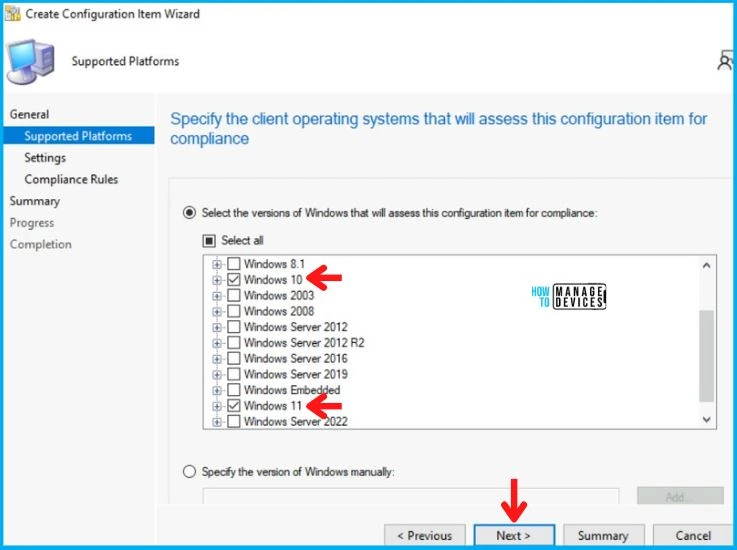
Here in the Supported Platforms tab, Select the operating system version for which you want to create the CI. Here I am choosing Windows 10 and 11 and click on ‘Next ‘as shown below.
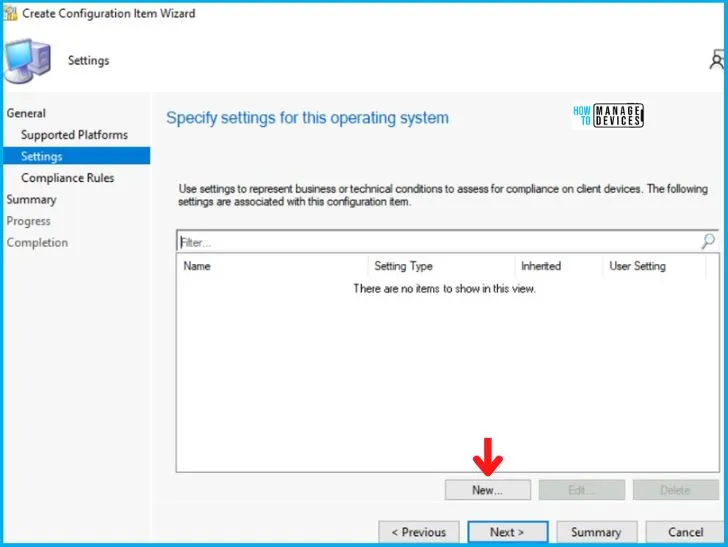
Now, in the Settings Tab click on New as shown below in the image.
After clicking on New, Create Setting dialogue box will open. In the General Tab, enter the name in the Name box and click on Browse as shown below.
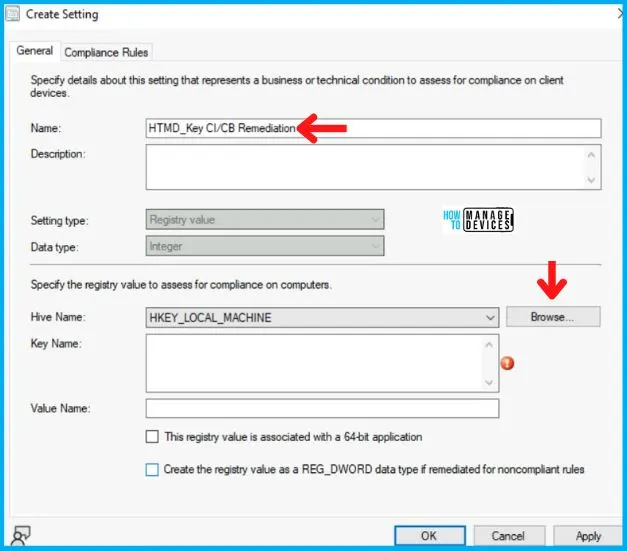
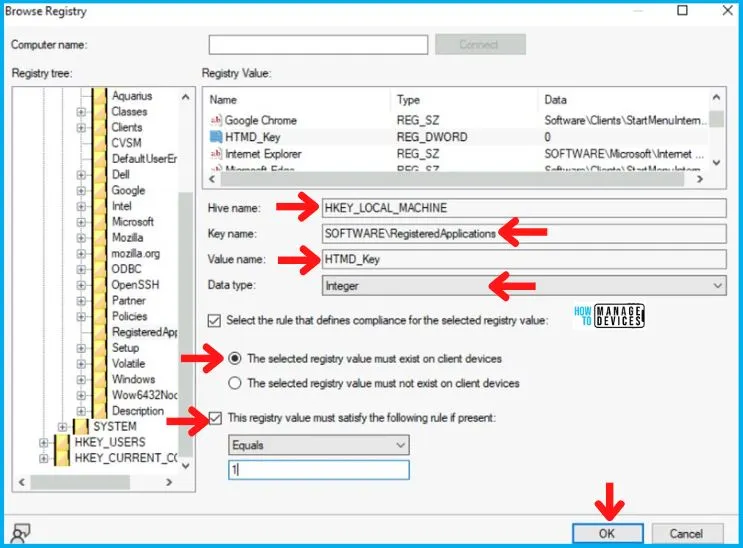
Now you can browse the path using the Registry tree or type the details manually as shown below in the image.
| Hive Name | Key Name | Value Name | Data Type |
|---|---|---|---|
| HKEY_LOCAL_MACHINE | SOFTWARE\RegisteredApplications | HTMD_Key | Integer |
Also, choose the options and enter the details as shown below in the picture, and click on OK.
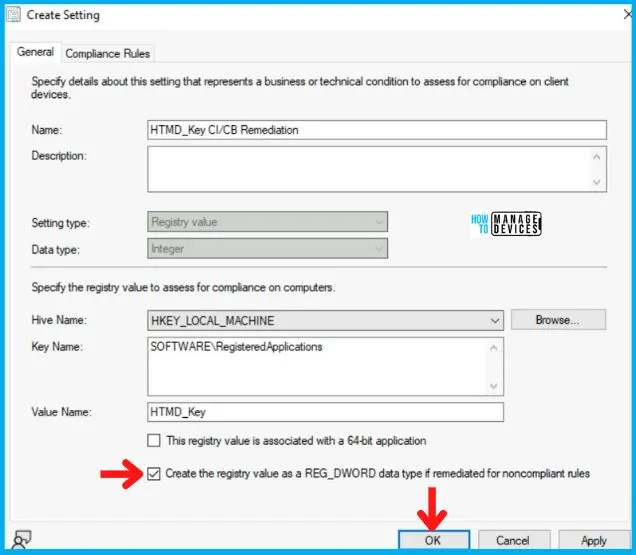
After this in General Tab, also click on Create the registry value as a REG_DWORD data type if remediated for noncompliant rules.
Also in the Compliance Rules Tab, select the key with Condition Equals 1 and click on Edit as shown below.
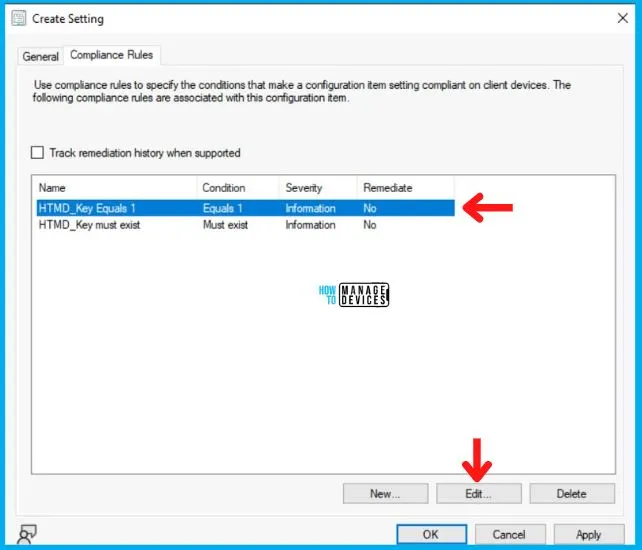
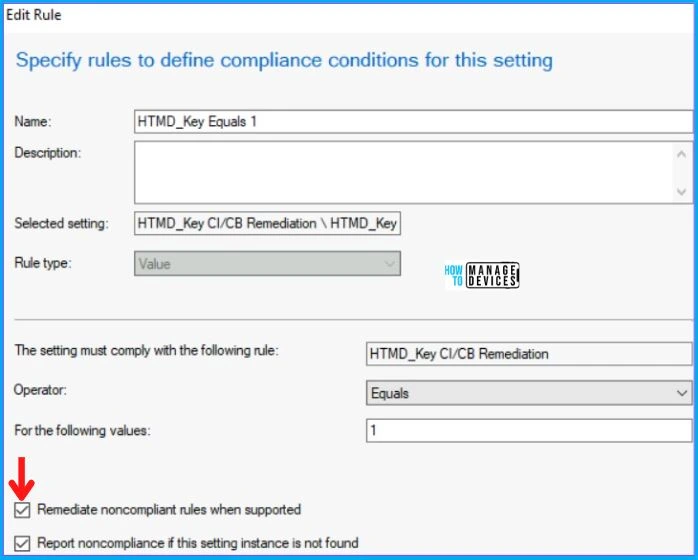
In the Edit Rule tab, check the options are shown below:
- Remediate noncompliant rule when supported
- Report noncompliance if this setting instance is not found
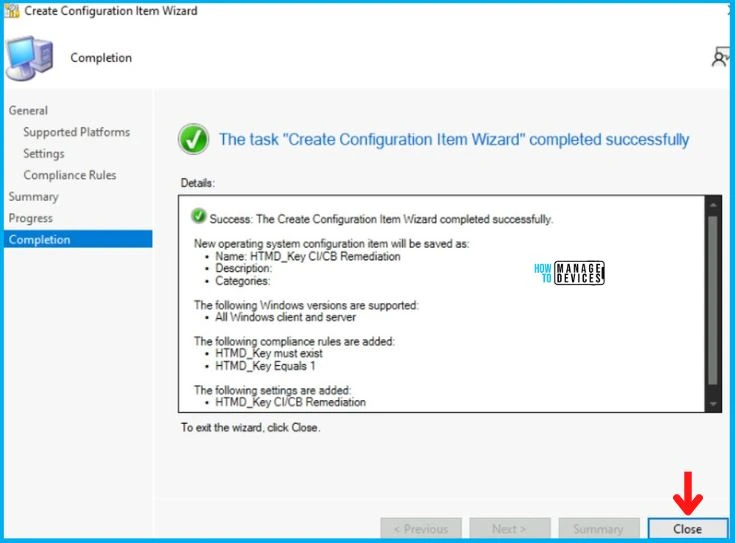
Click Next on Compliance Rules and Summary Tab and end the Create Configuration Item Wizard by clicking Close in Completion Tab.
Create Configuration Baseline using SCCM Console
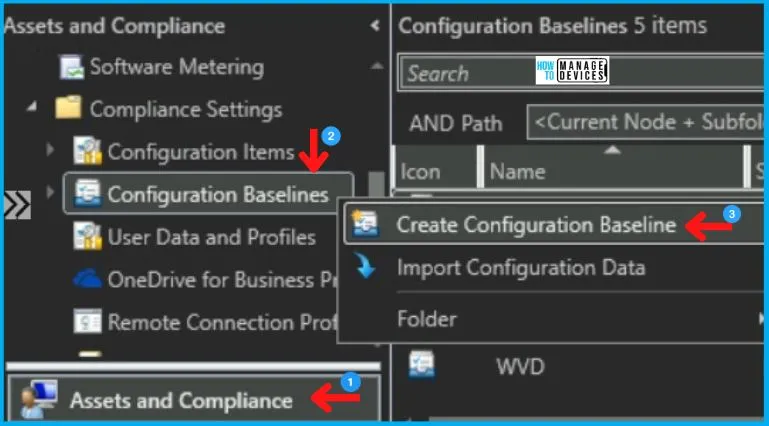
Now let’s create an SCCM Configuration Baseline using SCCM Console. For this go to:
- Navigate to SCCM Console \ Asset and Compliance \ Compliance Settings \ Configuration Baselines
- Right-click on Configuration Baseline and click on ‘Create Configuration Baselines‘
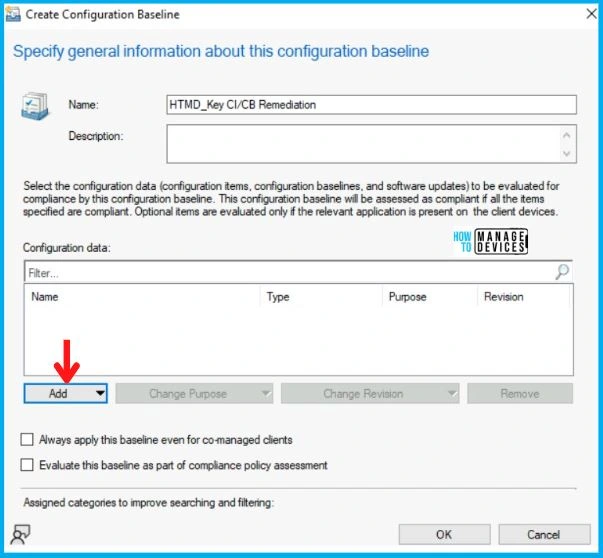
In the Create Configuration Baseline Dialogue Box enter the Name of the Baseline and click on Add to add the Configuration Item created earlier as shown in the image below.
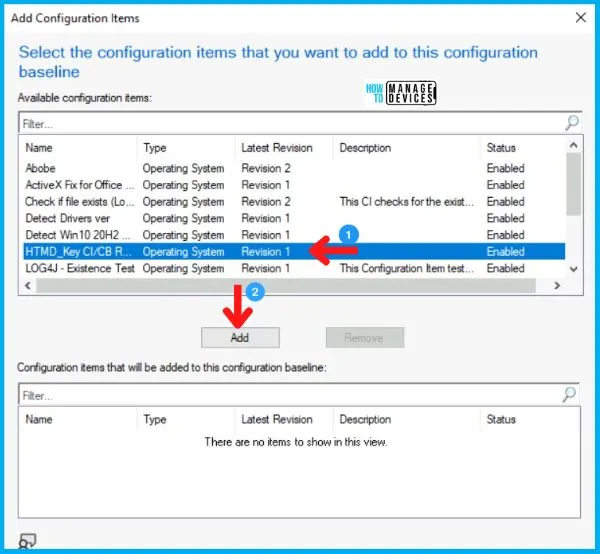
Now choose the Configuration Item created by you from the list as shown below and click on ADD and press OK.
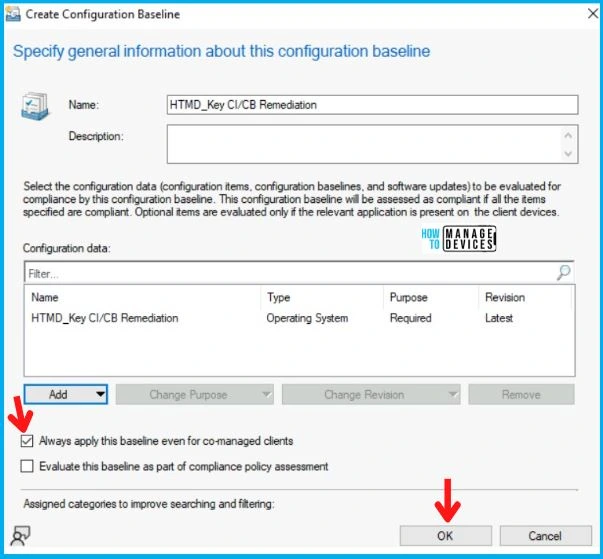
Also, don’t forget to tick the check box mentioning Always apply this baseline even for co-managed clients and click on OK as shown below in the image. If you don’t enable this option, then normally you get the following error in DCMAgent.log.
CDCMAgent::CheckAgentEnabled - The Desired Configuration Management agent is not enabled due to co-management. Request will be ignored.
Agent is disabled. No action needed.NOTE! – Co-management check box is required if your Windows 11 devices are co-managed and workloads are moved to Intune.
Deployment of Configuration Baseline on Targeted Device Collection
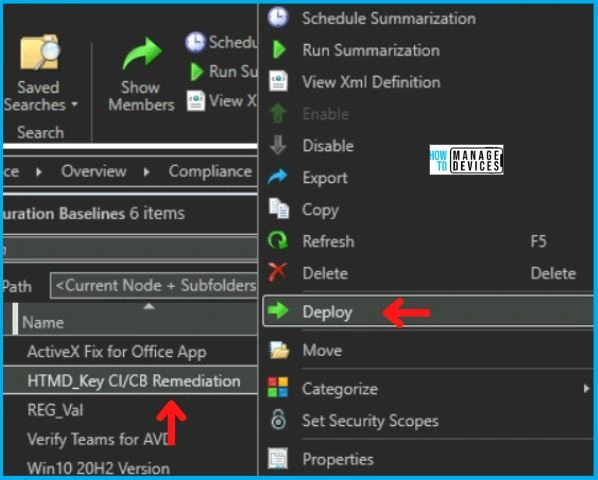
After creating the Configuration Baseline, it will appear in the console, and now right-click on it and click on Deploy as shown below in the image.
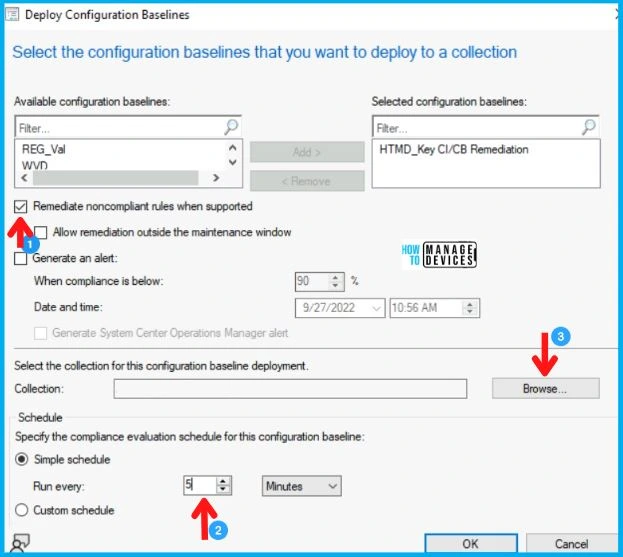
In the Deploy Configuration Baselines wizard,
- Tick the check box for Remediate noncompliant rules when supported
- Select Simple Schedule and set Run Every to 5 mins as shown below in the image. Please Note that this can vary from the production environment to environment. As I am in performing this in my lab environment so I choose 5mins.
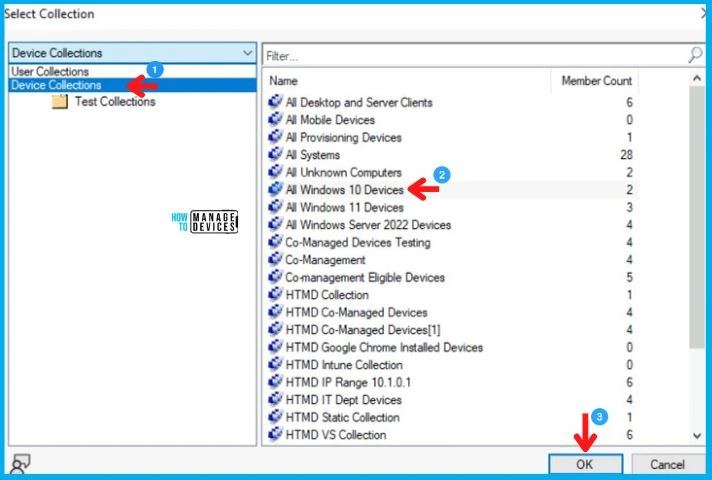
After this click on Browse to select the device collection as shown below.
Now choose the device collection as shown below in the image. Here I choose Windows 10 device collection for the deployment of the SCCM Configuration Baseline.
Time to check Windows 10/11 Device
Until now we have created an SCCM CI (Configuration Item) then created SCCM Configuration Baseline and deployed it to windows 10 or 11 devices. To test the CI quickly on a lab device, you can manually initiate the machine policy either from Windows 11 device or from the console.
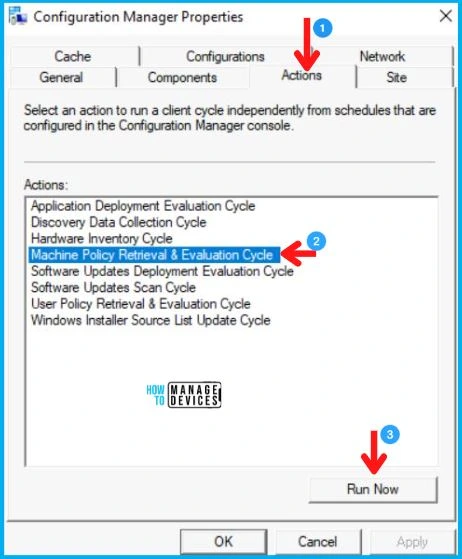
Now when you login into the Windows 10/11 device open the Configuration Manager applet from the Control panel and select the Action tab. Now choose the Machine Policy Retrieval & Evaluation Cycle and click on Run Now as shown below in the image.
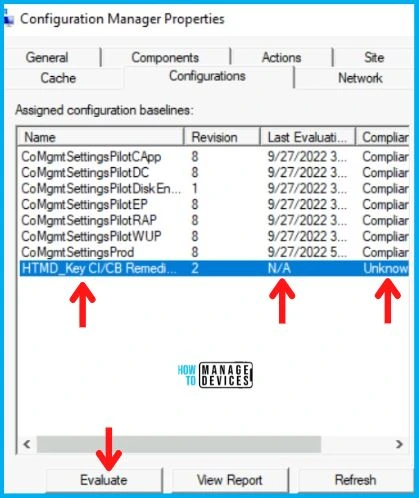
Now click on the Configurations tab and you will see your Configuration Item here in the list and it shows Unknown as it hasn’t been evaluated yet. So now click on Evaluate as shown below in the image.
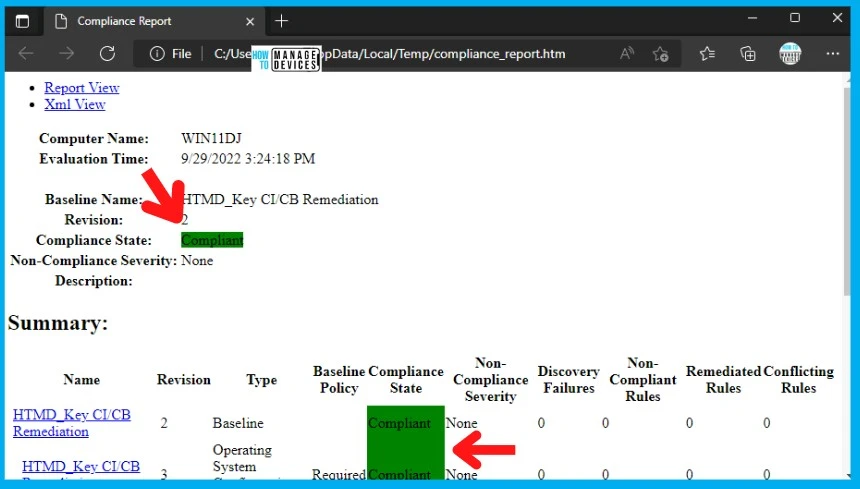
The moment you click on Evaluate it will run and check the system. And the result it shows is compliant as shown below in the image. As we all know there is no such Registry Key in this Win 10 device. So when it checks and found no such thing, it forcefully creates the Registry Key and returns the result as Compliant.
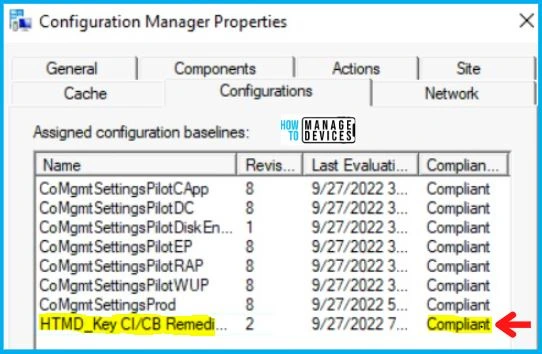
So the above you see, the Configuration Item Configuration Baseline which we created works absolutely fine on the windows 10 device collection.
Troubleshooting SCCM Configuration Item and Baseline Deployment
Let’s have a quick look at the Troubleshooting parts of the SCCM Configuration Item and Baseline Deployment. As usual, you need to understand the logs related to SCCM CI & CB. Normally you can check all the SCCM log file details from the following post – SCCM Log Files Updated List Client and Server.
- CIAgent.log
- CITaskManager.log
- DCMAgent.log
- DCMReporting.log
- DcmWmiProvider.log
You can check the SCCM Compliance reports of Configuration Item from the Configuration Manager applet -> Configurations tab in the control panel as explained in the prerequisite section.
- Click on the CI that you want to check the report.
- Click on the Report Tab below.
Check the reports to understand things in detail and this intern helps to troubleshoot the CI deployment-related troubleshooting.
Author
Abhinav Rana is working as an SCCM Admin. He loves to help the community by sharing his knowledge. He is a BTech graduate in Information Technology.
