In this post, we will see how to disable removable storage write access using Intune, aka Endpoint Manager. If the device stores sensitive data, You can block write access to USB storage to restrict copying the data to USB devices and in your corporate network that can help you to prevent users from trying to make a copy of certain information, improving security.
As an organization, It’s important to understand all security aspects to protect and be safe to prevent malware infections or data loss in your organization, If you want to block USB devices access, you can follow the steps to Block USB Device Access using Intune
You can perform the basic Intune user policy deployment troubleshooting from the MEM admin center portal. More details of Intune Logs Event IDs IME Logs are available in the HTMD blog post
- List of Intune Settings Catalog Policies
- Prevent Changing Lock Screen Logon Image Using Intune MEM
- Intune Logs Event IDs IME Logs Details for Windows Client Side Troubleshooting
Disable Removable Storage Write Access Using Intune
This section will help you assign the policy to disable the ability to write access for Removable Storage using Intune setting catalog policies. You can refer to the following guide to Create Intune Settings Catalog Policy and deploy it only to a set of Intune Managed Windows 11 or Windows 10 devices using Intune Filters.
Let’s get started –
- Sign in to the Endpoint Manager Intune portal https://endpoint.microsoft.com/
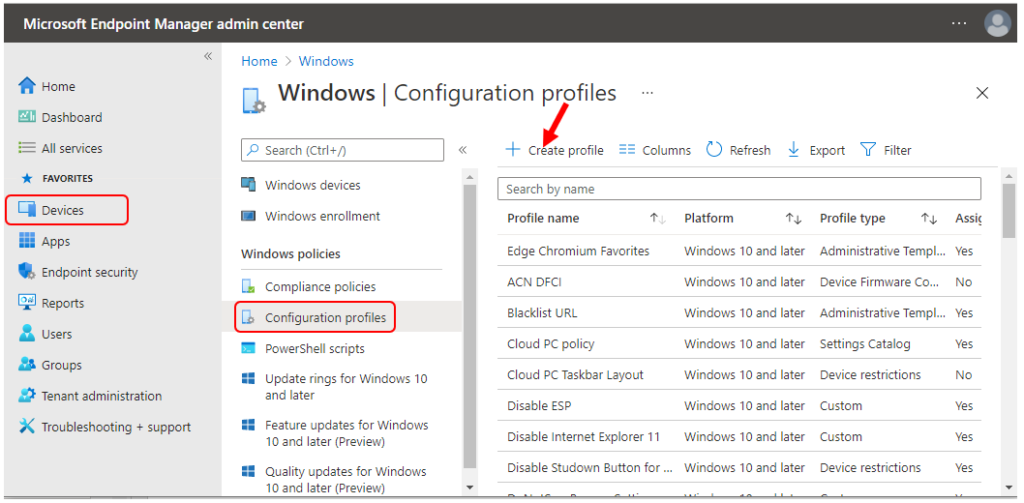
- Select Devices > Windows > Configuration profiles > Create profile

- In Create Profile, Select Platform, Windows 10, and later and Profile, Select Profile Type as Settings catalog. Click on Create button.

On the Basics tab, enter a descriptive name, such as Disable Removable Storage Write Access. Optionally, enter a Description for the policy, then select Next.

In Configuration settings, click Add settings to browse or search the catalog for the settings you want to configure.

On the Settings Picker windows, Select Storage to see all the settings in this category. Select Removable Disk Deny Write Access below. After adding your settings, click the cross mark at the right-hand corner to close the settings picker.

The setting is shown and configured with a default value Disabled. Set Removable Disk Deny Write Access to Enabled. Click Next.
Removable Disk Deny Write Access – If you enable this policy setting, write access is denied to this removable storage class.

Under Assignments, In Included groups, click Add groups and then choose Select groups to include one or more groups. Click Next to continue.

In Scope tags, you can assign a tag to filter the profile to specific IT groups. Add scope tags (if required) and click Next.
In Review + create, review your settings. When you select Create, your changes are saved, and the profile is assigned.

A notification will appear automatically in the top right-hand corner with a message. Here you can see, Policy “Disable Removable Storage Write Access” created successfully. The policy is also shown in the Configuration profiles list.

Your groups will receive your profile settings when the devices check-in with the Intune service. Once the policy applies to the devices when you have blocked the ability to write data to removable storage. Once the USB removable storage device attaches to the device and try to create a folder or copy some data. You will be prompted with this error: Access Denied.
Event Log ID 813 – Disable Removable Storage Write Access
You can now look into the event logs to find out whether the policy is already deployed or not. Check out the Event Log ID 813 – Disable Removable Storage Write Access intune policy.
MDM PolicyManager: Set policy int, Policy: (AllowStorageCard), Area: (System), EnrollmentID requesting merge: (D1E11663-BF69-4DD8-974A-BAD47E6EF433), Current User: (Device), Int: (0x0), Enrollment Type: (0x6), Scope: (0x0).
MDM PolicyManager: Set policy int, Policy: (RemovableDiskDenyWriteAccess), Area: (Storage), EnrollmentID requesting merge: (D1E11663-BF69-4DD8-974A-BAD47E6EF433), Current User: (Device), Int: (0x1), Enrollment Type: (0x6), Scope: (0x0).

Registry Entries Disable Removable Storage Write Access Intune Policy
The following registry entry should be available to confirm whether disable removal storage write access Intune policy.
Computer\HKEY_LOCAL_MACHINE\SOFTWARE\Microsoft\PolicyManager\Providers\D1E11663-BF69-4DD8-974A-BAD47E6EF433\default\Device\System
AllowStorageCard = 0

Author
About Author -> Jitesh has over 5 years of working experience in the IT Industry. He writes and shares his experiences related to Microsoft device management technologies and IT Infrastructure management. His primary focus area is Windows 10, Windows 11 Deployment solution with Configuration Manager, Microsoft Deployment Toolkit (MDT), and Microsoft Intune.

Can we whitelist some storage devices in the policy?
We are using BitLocker to Go, it won’t work once I decrypted the USB.