Hi today with a new topic on how to Enable Disable Prevent Adding New Printers Policy using Intune Setting Catalog. As we all know about the Setting catalog features. We can say that this is one of the crucial features in Intune to deploy different types of Policies through organizations.
You know we already covered many setting catalog policies through our blog Posts. This time we are deploying the Education settings policy such as How to enable disable Adding new printers. With this we can secure the unauthorized hardware access.
In this we have to know about the policies aim and its uses, right? This policy prevents users from adding printers through common methods, ensuring better administrative control. When enabled, it removes the Add Printer option from the Start menu and Control Panel, stopping manual printer installation.
This policy limits user access but does not fully block printer installation. Organizations should assess its need based on security, convenience, and operations. In strict hardware-control, helps prevent unauthorized printer setups.
Table of Contents
What Does the Prevent Addition of Printers Policy Setting Do?
It removes the Add Printer option from the Start menu and Control Panel, and blocks adding printers by dragging icons. However, it doesn’t stop users from adding printers via the Add Hardware Wizard or other programs and doesn’t remove existing printers.
Enable Disable Prevent Adding New Printers – CSP Details
Above, we discussed an overview of the Enable, Disable, and Prevent Adding New Printers policy using the Intune Setting Catalog. Before deploying this policy, it is essential to understand the CSP (Configuration Service Provider) details. This setting is only a placeholder and should not be used in a production environment.
- The description framework properties for this setting are as follows.
| Property Name | Property Value |
|---|---|
| Format | int |
| Access Type | Add, Delete, Get, Replace |
| Default Value | 0 |
./User/Vendor/MSFT/Policy/Config/Education/PreventAddingNewPrinters

- Enable or Disable Physical Computer Location Support for Printers using Intune Policy
- Prevent Users From Installing Printer Drivers using Intune
- How to Create Intune Settings Catalog Policy
Create Profile
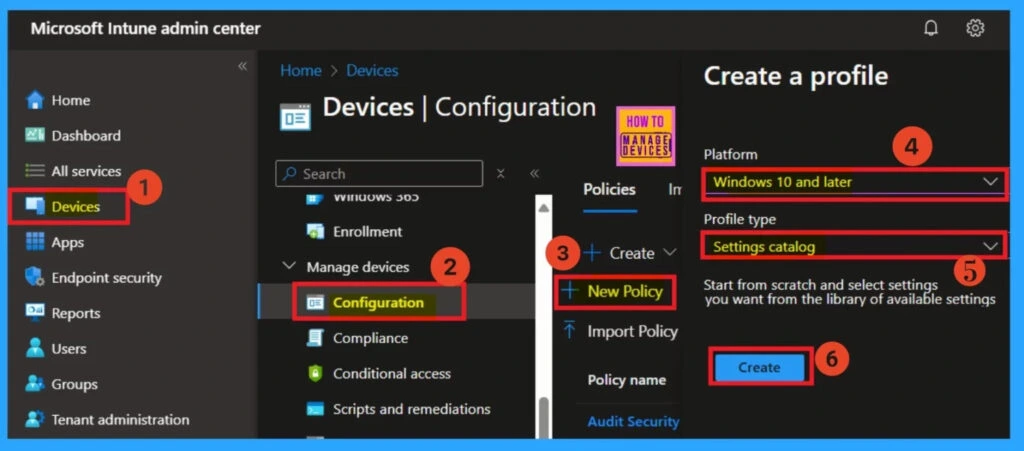
To configure Prevent Adding New Printers in Intune, start by logging into the Microsoft Intune admin center. Navigate to Devices and then select Configuration. In the left-hand pane, go to the Policies section. Click the dropdown arrow next to Policies and choose New Policy to begin the setup.
After clicking New Policy, you’ll need to pick the platform and profile type. You can usually choose Windows 10 and later as the platform and Settings catalog as the profile type.
Basics
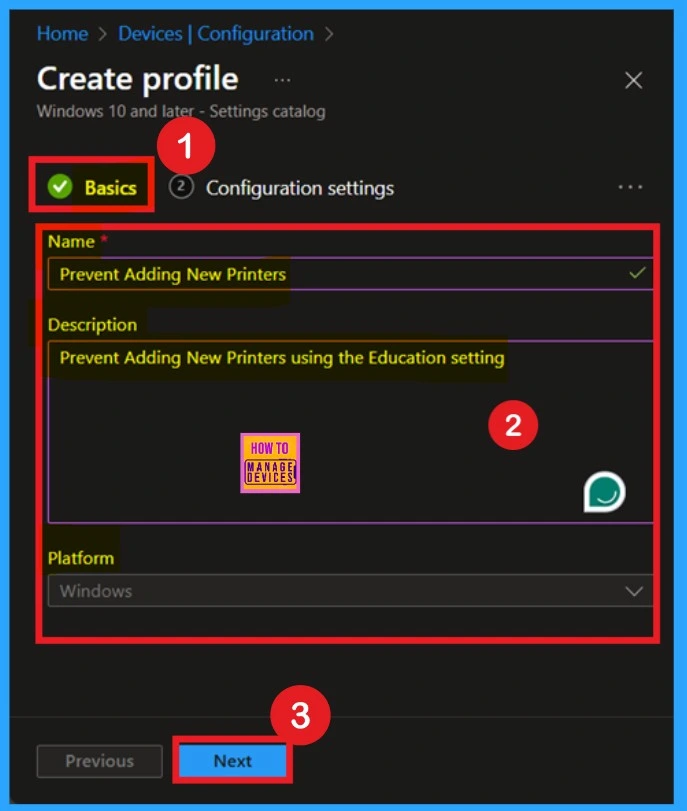
The Basic step is the first step in policy configuration. In this step, you need to enter the essential details of a policy, such as its name and description. The name is crucial for identifying the policy, while the description provides clarity on its purpose and functionality and, the platform is set to Windows by default. Once these details are entered,
- Click Next to proceed.
Configuration Settings – Settings Picker
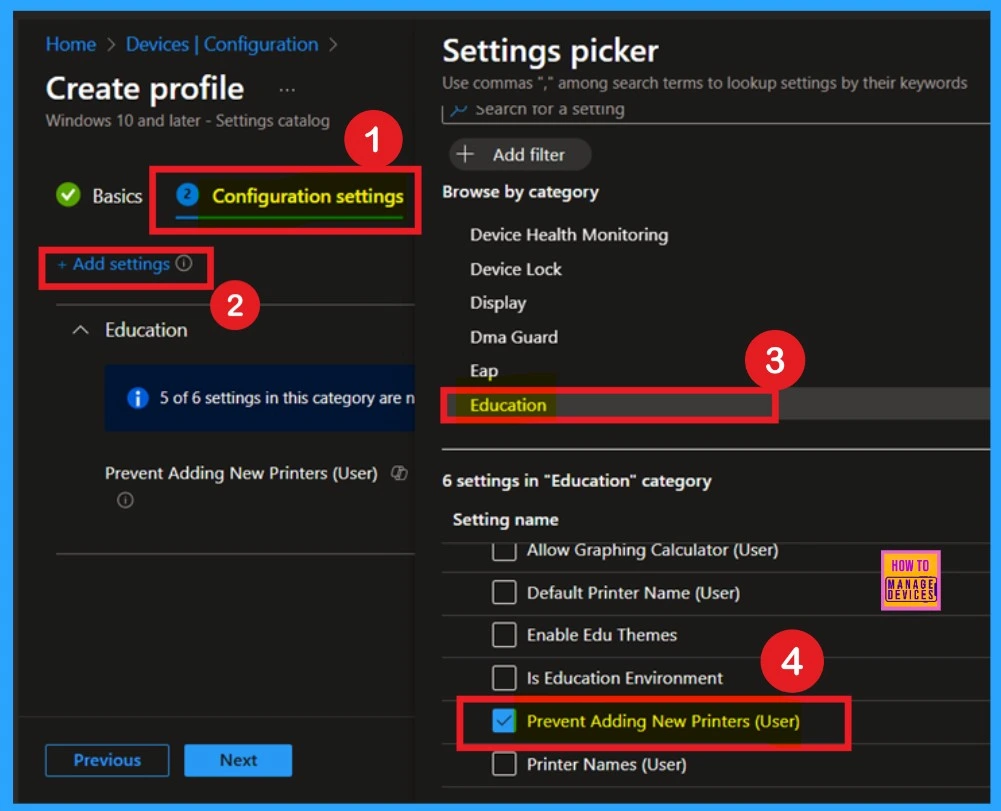
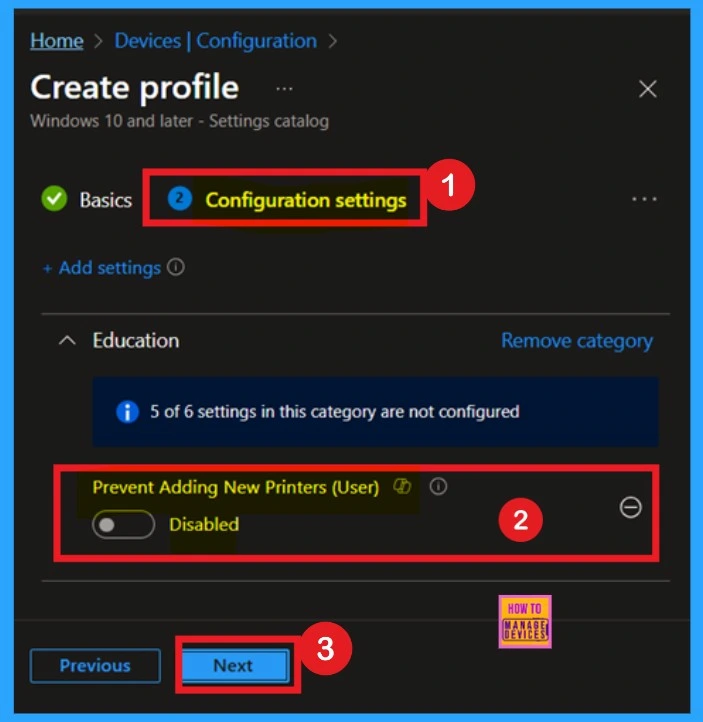
The next step is Configuration Settings. Here, you will see the “+Add Settings” option highlighted in blue. Click on it, and a new window called Settings Picker will open. In this window, you will find various settings categorized by type. Navigate to the Education Settings category.
- Within this section, select the policy named “Prevent Adding New Printers for Users”, and then close the Settings Picker window.
Disable the Policy
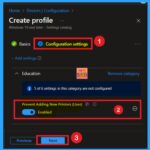
When you close the Settings Picker now you can see the policy on your configuration settings page. Here you can see that the option is Disabled by Default. If you wat to continue with this (disabled) you can easily click on the Next to continue.
- When this policy is disabled, users can add local and network printers using familiar methods, such as through the Start menu, Control Panel, or by dragging a printer icon into the Printers folder.
Enable the Policy
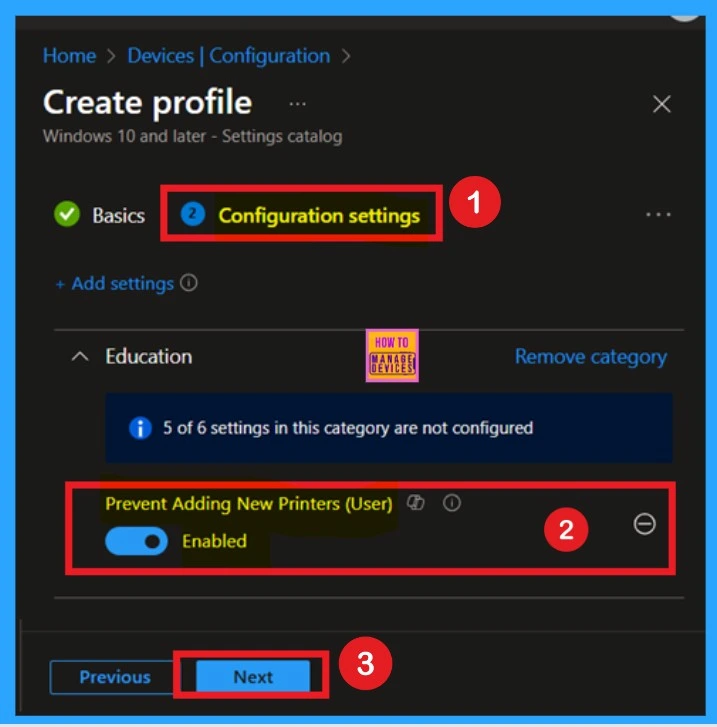
If you want to enable this policy, you just need to toggle the pane to the left to the right. Now you can see that the toggle pane in a blue color and it showing you that the policy is Enabled. You have to remeber that If you Enable this policy:
- It removes the Add Printer option from the Start menu.
- (To find the Add Printer option, click Start, click Printers, and then click Add Printer). This setting also removes Add Printer from the Printers folder in Control Panel.
Scope Tags
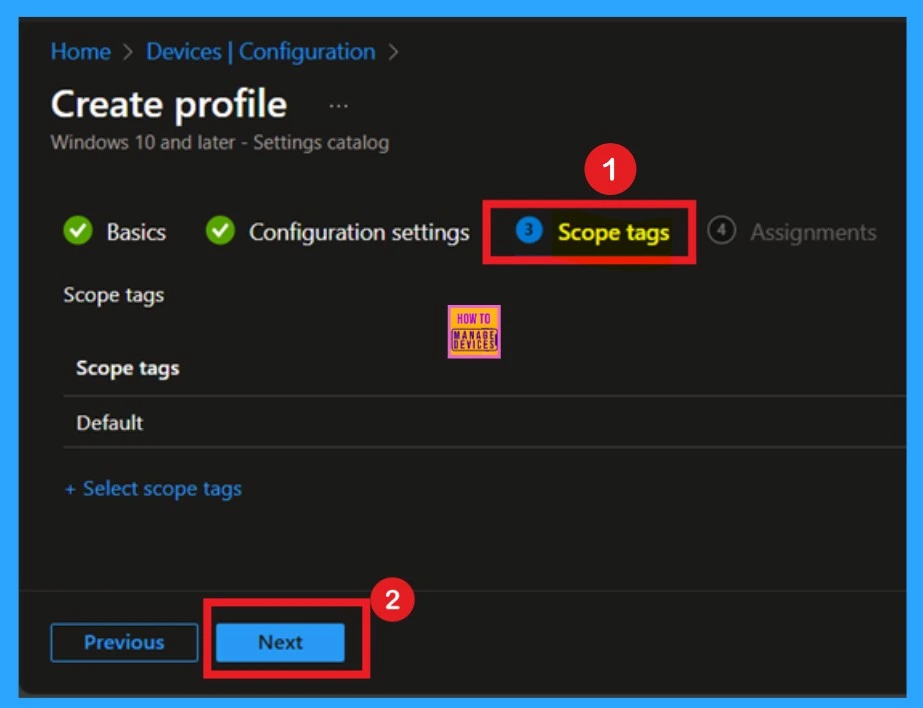
The next step is Scope tags, which help you organize and manage access to the policy, such as for the department or location. This step is optional, so if you don’t want to apply any tags, just click Next to continue.
Assignments
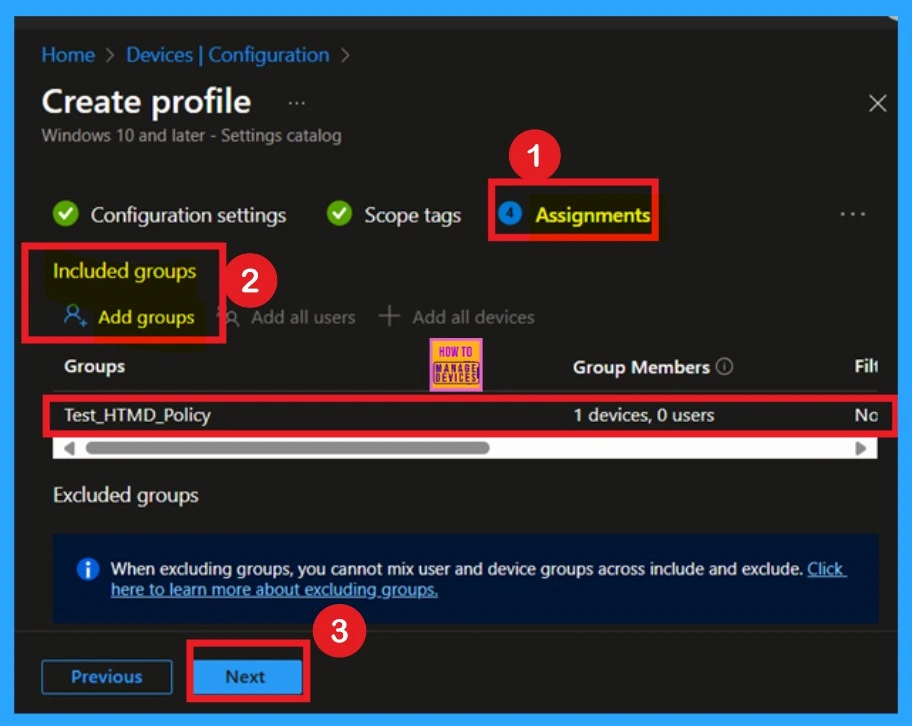
The next step is Assignments, which is an essential section that cannot be skipped, as this is where the policy is applied to a specific group. In this section, you can add a designated group to the policy. First, locate the Include Groups option and click on “Add Groups”.
Once clicked, a list of group suggestions will appear. Select the specified group to apply the policy. For example, I selected “Test HTMD Policy, then confirmed the selection and clicked Next to proceed.
Note: You can also select multiple groups here, depending on your requirements.
Review + Create
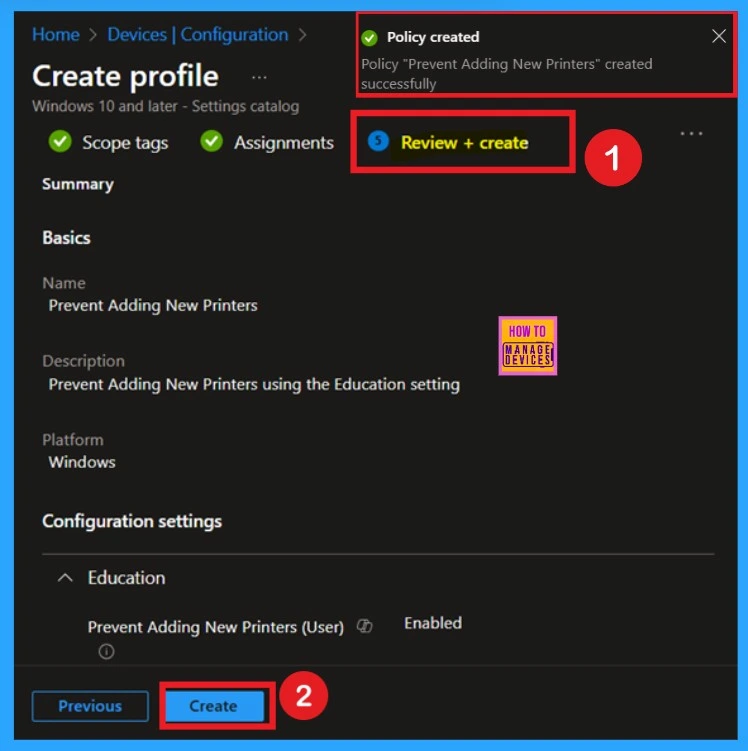
After completing the assignments, you will reach the Review + Create stage, which is the final step in configuring your policy. Here, you can carefully review all settings, including basic details and configuration options, to ensure accuracy. If everything looks correct, click Create to finalize the setup and deploy the policy.
- Once the process is complete, a confirmation notification will appear, indicating that the policy has been successfully created.
Monitoring Status
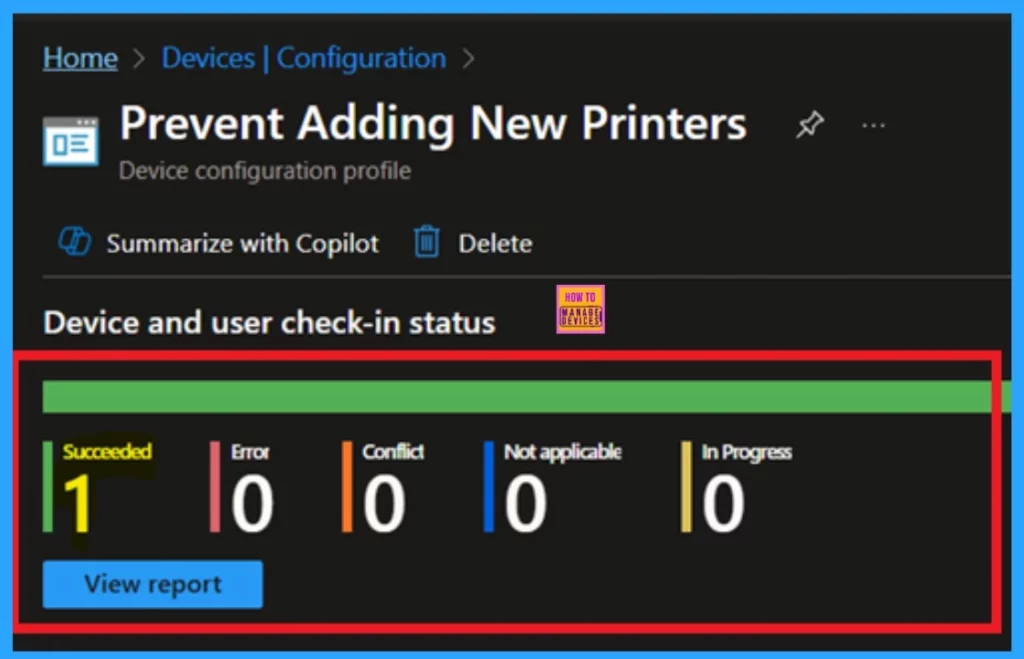
The next step is Monitoring status, we have to know that if the policy got succeeded or not right sometimes this is our major concern. For that first check the monitoring status (after the syncing or 8 hours waiting period) by navigating through the Device > Configuration and select the policy name that you deployed.
- Now you can see that the policy has succeeded 1.
- That means the policy successfully deployed to the selected groups.
Client -Side Verification
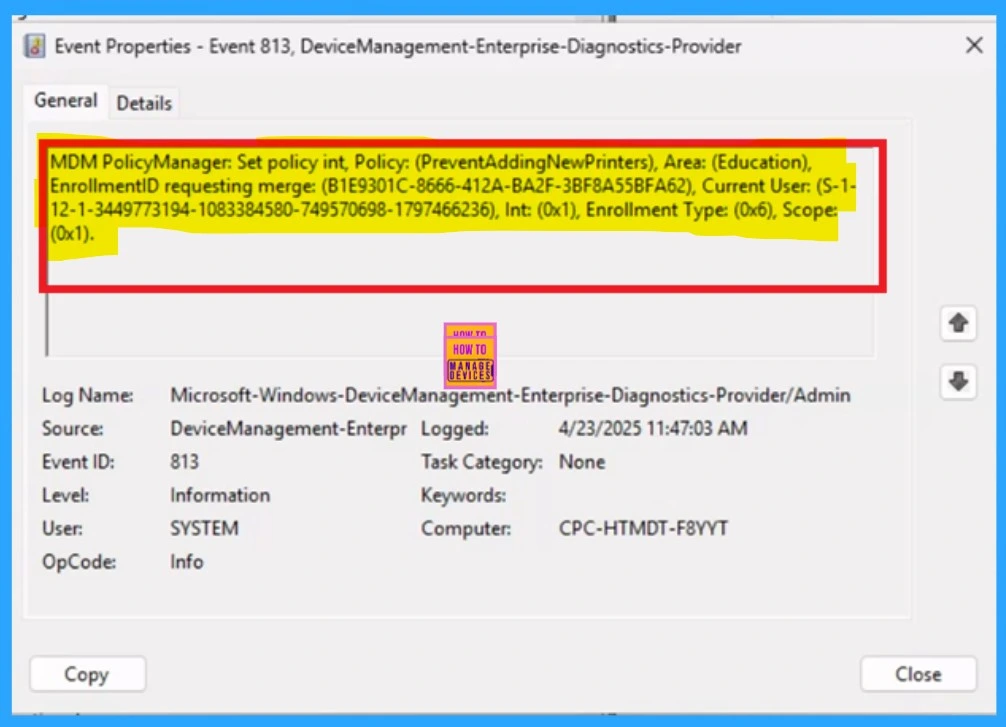
The next confirmation of the Policy succeeds or not is by checking the client side verification. Here first go to the Event Viewer and check the Event ID that is usually in 813 or 814. Navigate to Applications and Services Logs > Microsoft > Windows > Device Management > Enterprise Diagnostic Provider > Admin.
Then you will get a list of policy informations. Sometimes it’s very difficult to understand the policy in wich Event ID so you can use the filter current log located in the right pane. Now you can filter the results easily.
- Here I get the policy details from the 813 Event ID.
| Policy Details |
|---|
| MDM PolicyManager: Set policy int, Policy: (PreventAddingNewPrinters), Area: (Education), EnrollmentID requesting merge: (B1E9301C-8666-412A-BA2F-3BF8A55BFA62), Current User: (S-1- 12-1-3449773194-1083384580-749570698-1797466236), Int: (0x1), Enrollment Type: (0x6), Scope: (0x1). |
Need Further Assistance or Have Technical Questions?
Join the LinkedIn Page and Telegram group to get the latest step-by-step guides and news updates. Join our Meetup Page to participate in User group meetings. Also, Join the WhatsApp Community to get the latest news on Microsoft Technologies. We are there on Reddit as well.
Author
Anoop C Nair has been a Microsoft MVP for 10 consecutive years from 2015 onwards. He is a Workplace Solution Architect with more than 22+ years of experience in Workplace technologies. He is a Blogger, Speaker, and Local User Group Community leader. His primary focus is on Device Management technologies like SCCM and Intune. He writes about technologies like Intune, SCCM, Windows, Cloud PC, Windows, Entra, Microsoft Security, Career, etc.

It’s great to see that this is finally available in Intune.
I’ve made multiple attempts to modify this value by deploying a powershell script instead, but constantly recieved permission errors. Even though the script was configured to run in user context.
Why do you recommend against using this in production? And why do you think it is stored in the Education category?