Let’s learn how to Disable or Enable Taskbar Context Menus in Windows 11. The taskbar is a horizontal bar at the bottom of your desktop in Windows 11 that shows the Start menu, search bar, Task View, Widgets, Chat, File Explorer, Microsoft Edge, and Microsoft Store.
The above icons are aligned to the centre by default. The taskbar corner includes the notification area icons, quick settings (hotkey: Win + A), and notification centre (hotkey: Win + N) with the clock and calendar. The easiest way to access the old context menu is to press Shift + Right-Click instead of just right-clicking.
When you press Shift + Right-Click, the old contest menu will open instead of the new one. This works through Windows 11, so you can use it on the desktop, file folders, files, and other places where you used to access the old context menus in the previous windows.
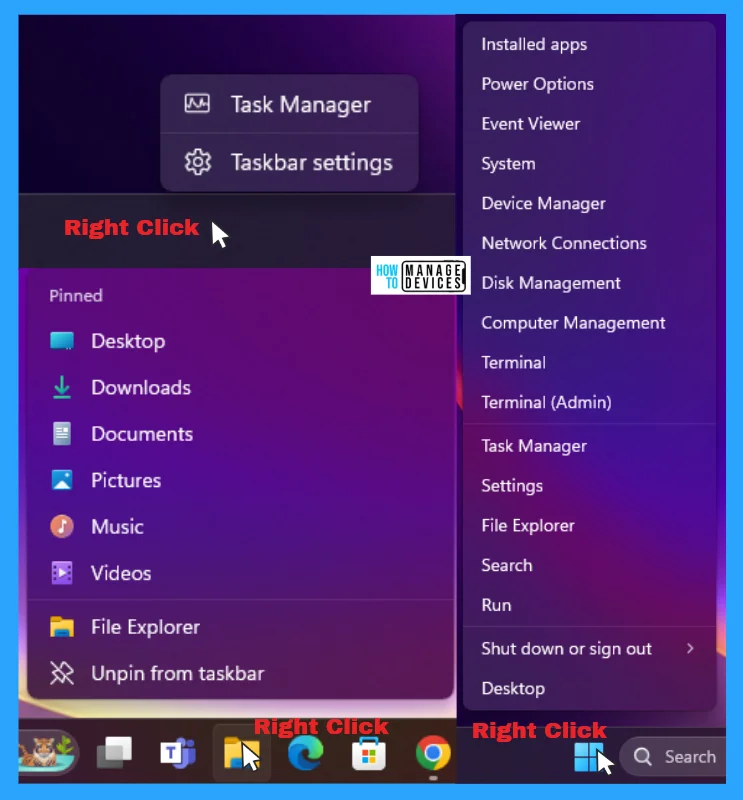
Right-click on the taskbar for Taskbar Settings, Right-click on the Start button (hotkey: Win + X) to open the quick link menu, and right-click on an icon on the taskbar to open its Jump list to help the user access quick services. This post shows the detailed process for disabling or enabling taskbar context menus.
Table of Contents

How to Disable or Enable Taskbar Context Menus
You can disable or enable Taskbar Context Menus in Windows 11. The methods for changing the settings are listed below.
- Disable or Enable Taskbar Context Menus Using Local Group Policy Settings
- Disable or Enable Taskbar Context Menus Using Registry File
- Disable or Enable Windows 11 Context Menu How to Guide
- How to Show Hide Virtual Touchpad Icon on Taskbar in Windows 11
- Show Hide Device Performance Health Report in Windows Security in Windows 11
Disable or Enable Taskbar Context Menus Using Local Group Policy Settings
In Windows 11, you can set the Local Group Policy Editor to disable or enable taskbar context menus. To do so, open the Local Group Policy and follow the process.
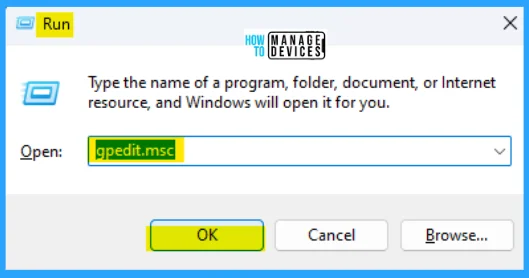
- Open the Run command and press Win Key + R.
- Type gpedit.msc
- Click OK or press Enter.
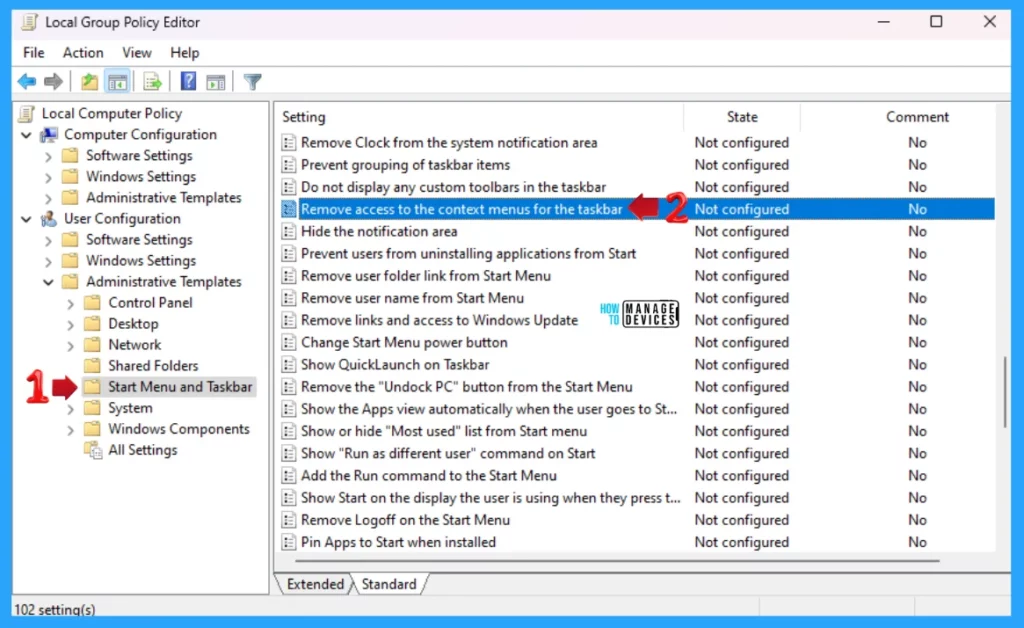
When the Group Policy Editor opens, navigate to the following path to access the required policy settings. To make changes, select Start Menu and Taskbar.
User Configuration > Administrative Templates > Start Menu and Taskbar > Remove access to the context menus for the taskbar
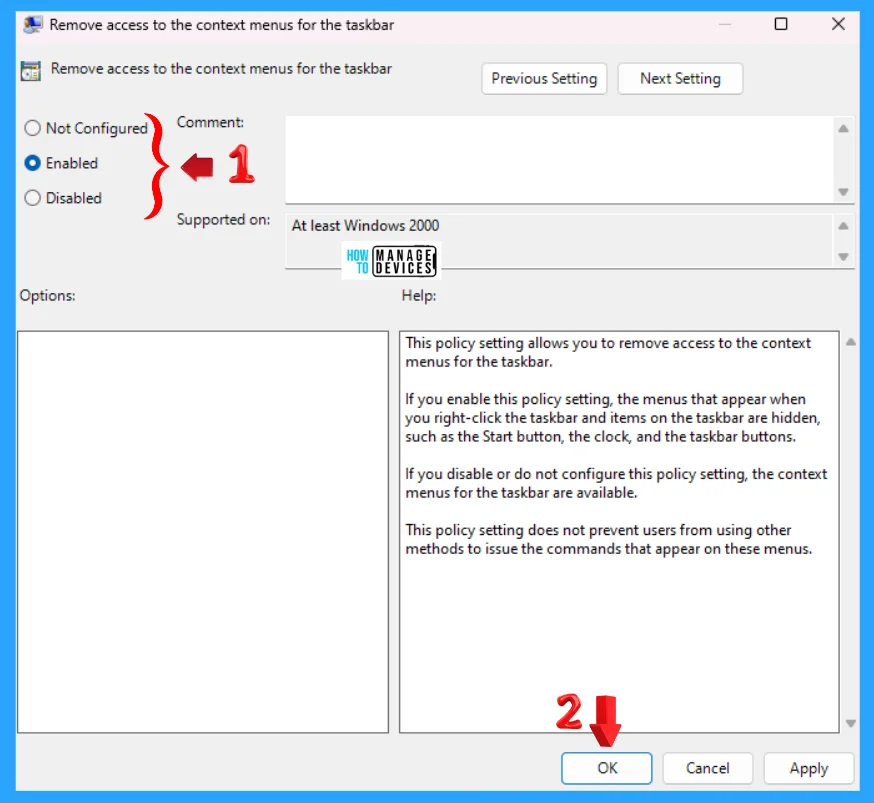
Double-click the Remove access to the context menus for the taskbar to open the settings. Here, you can see that it needs at least Windows 2000. You can choose the following option: press Apply, then press the OK button to apply the changes.
This policy setting allows you to remove access to the taskbar’s context menus. However, it does not prevent users from using other methods to issue the commands that appear on these menus.
- Enabled: If you enable this policy setting, the menus that appear when you right-click the taskbar and items on the taskbar, such as the Start button, the clock, and the taskbar buttons, are hidden.
- Disabled: If you disable this policy setting, the context menus for the taskbar are available.
- Not Configured: Same as Disabled.
Intune Method to Disable or Enable Taskbar Context Menus
Using the Microsoft Intune SaaS solution, let’s check out the way to Disable or Enable Taskbar Context Menus. This is the latest and most modern device management solution in the market.
Let’s use the Intune Settings catalog to create the policy to disable or enable the taskbar context menu option in Windows 11 devices.
Let’s check the steps to create a policy and show how to search and filter the settings in Intune.
- Sign in to the Microsoft Intune admin center
- Select Devices > Configuration profiles > Create profile.
In Create Profile, You can select Platform: Select Windows 10 and later and Profile: Select Settings catalog. Click on the Create button.
In Basics, specify a descriptive name for the profile and a description (optional), then select Next. There are thousands of settings available in the settings catalog. To make it easier to find specific settings, use the built-in features.
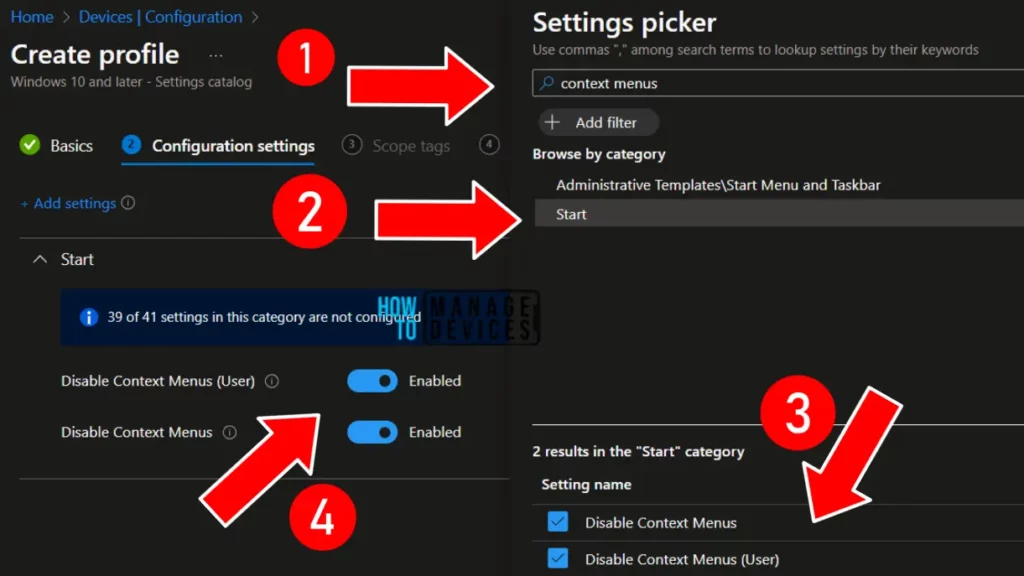
In your policy, use Add Settings> Search for Context Menus to find specific settings. You can search by category or keyword, as shown below.
- Select Start from browse by category option.
- Enable the check mark on any of the following options –
- Disable Context Menu – This is for disabling the context menu for the device (all users).
- Disable Context Menus (User)
- Enabling this policy prevents context menus from being invoked in the Start Menu.
So this is the process to disable the context menu option in Windows 11 using Intune. A more detailed post on how to create Intune policies using Settings Catalog is explained in our previous post – Create Intune Settings Catalog Policy.
Disable or Enable Taskbar Context Menus Using Registry File
Using the registry editor, there are ways to disable or enable taskbar context menus on the taskbar in Windows. This procedure is done using the Registry File. Let’s discuss the step-by-step guidelines for it.
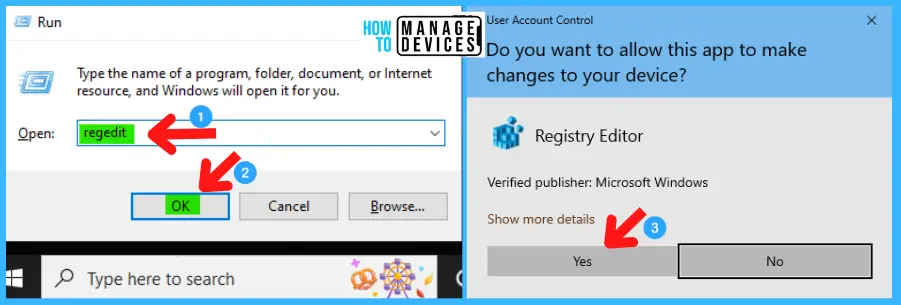
Now, open Run Window, and press Windows Key + R from the keyboard simultaneously. This is the keyboard shortcut to open the run window. Now, type regedit and click on OK to continue. Then, it asks the Admin’s permission to change the Device. Click Yes.
- Window Key + R (To open run command)
- Type ‘regedit‘ and press OK
- Administrator Permission press Yes
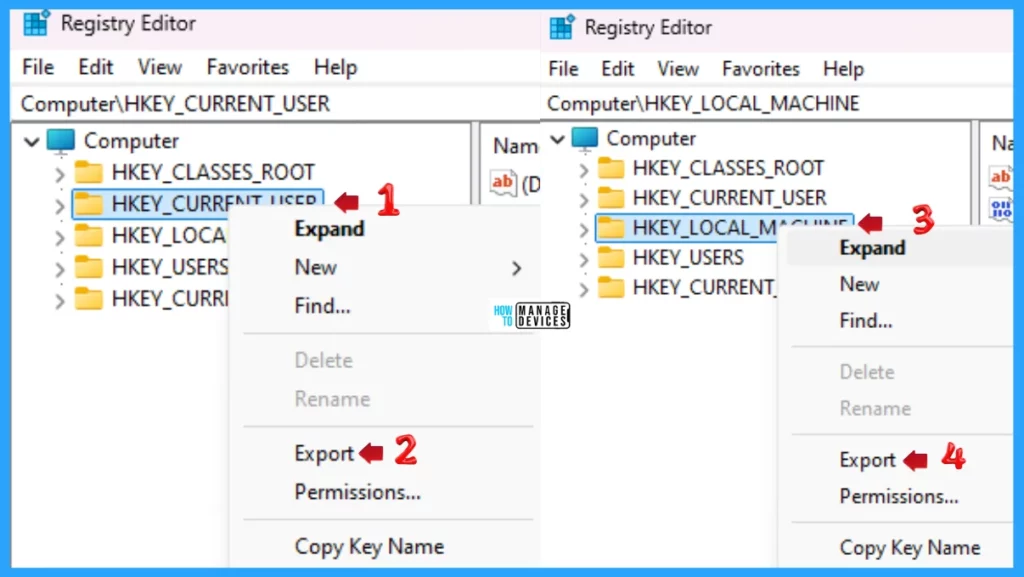
NOTE! Take Backup—If any mistake occurs in the Registry Editor, it may affect the system. It is advisable to take a backup of the Registry before proceeding. To back up, go to File in the top left corner of the Registry Editor. Click on it, then select Export and save the backup.
- Go to File.
- Right-click on HKEY_CURRENT_USER and HKEY_LOCAL_MACHINE.
- Click on Export.
- Please save it.
To enable the taskbar context menus in Windows 11 using the .reg file. To create a .reg file, open NotePad, type the following code, name it EnableTaskbarContextMenu, and save it on the desktop using the .reg extension.
Windows Registry Editor Version 5.00

[HKEY_CURRENT_USER\Software\Microsoft\Windows\CurrentVersion\Policies\Explorer]
"NoTrayContextMenu"=-

[HKEY_LOCAL_MACHINE\SOFTWARE\Microsoft\Windows\CurrentVersion\Policies\Explorer]
"NoTrayContextMenu"=-
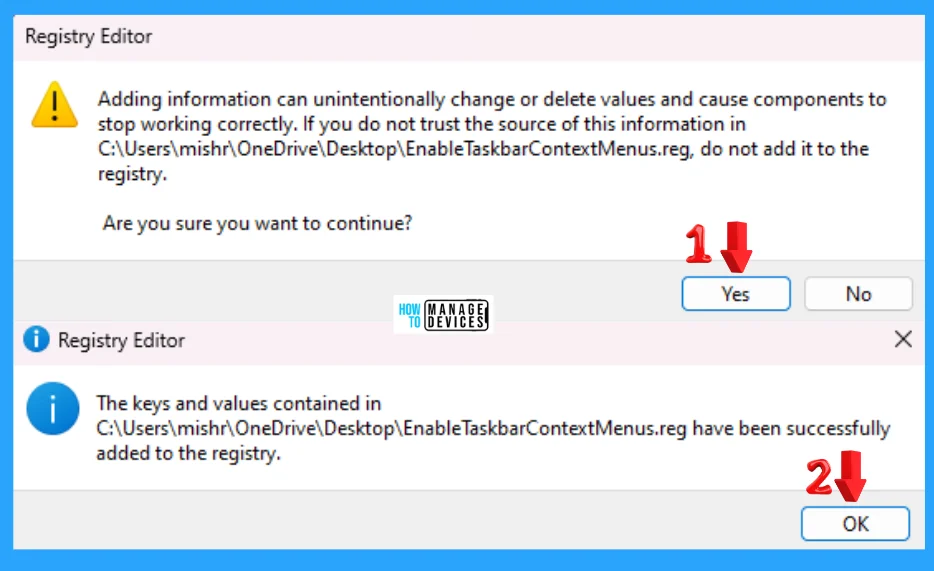
When the file is saved at your selected location, double-click on it. The User Account Control Window will open; click Yes to continue. Then, the Registry Editor Waring window will open.
Adding information can unintentionally change or delete values and cause components to stop working correctly. If you do not trust the source of this information in the path you created, do not add it to the registry; otherwise, click Yes to continue.
The following window shows that the key and value you added have been successfully added to the registry editor. Now click on OK and restart your PC to add the applicable test.
To disable the taskbar context menus in Windows 11 using the .reg file. To create a .reg file, open NotePad, type the following code, name it DisableTaskbarContextMenu, and save it on the desktop using the .reg extension.
Windows Registry Editor Version 5.00

[HKEY_CURRENT_USER\Software\Microsoft\Windows\CurrentVersion\Policies\Explorer]
"NoTrayContextMenu"=dword:00000001

[HKEY_LOCAL_MACHINE\SOFTWARE\Microsoft\Windows\CurrentVersion\Policies\Explorer]
"NoTrayContextMenu"=dword:00000001
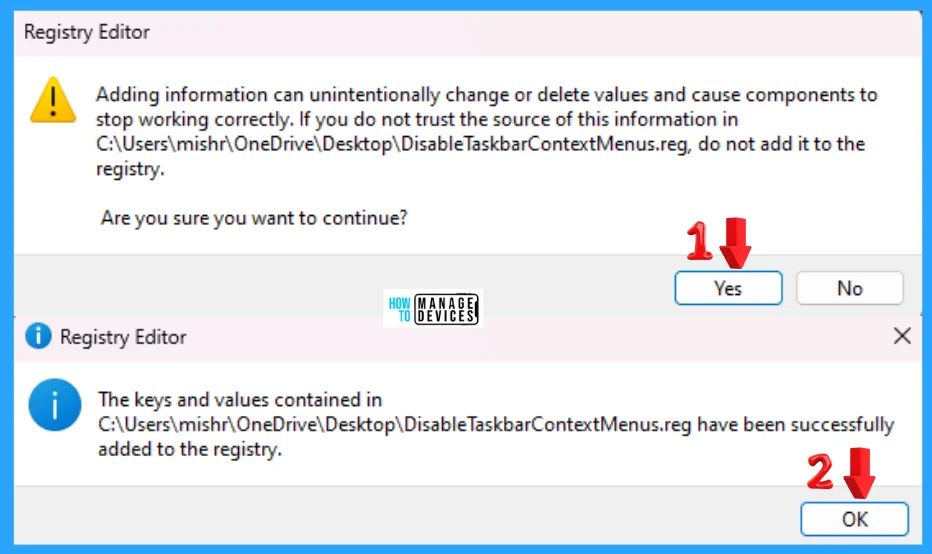
When the file is saved at your selected location, double-click on it. The User Account Control Window will open; click Yes to continue. Then, the Registry Editor Waring window will open.
Adding information can unintentionally change or delete values and cause components to stop working correctly. If you do not trust the source of this information in the path you created, do not add it to the registry; otherwise, click Yes to continue.
The following window shows that the key and value you added have been successfully added to the registry editor. Now click on OK and restart your PC to add the applicable test.
I hope the information on how to Disable or Enable Taskbar Context Menus in Windows 11 is helpful. Please follow us on the HTMD Community and visit our website, HTMD Forum, if you like our content. Suggest improvements, if any, and we would love to know which topic you want us to explore next.
We are on WhatsApp. To get the latest step-by-step guides and news updates, Join our Channel. Click here – HTMD WhatsApp.
Author
Alok graduated with a Master of Computer Applications (MCA) degree. He loves writing on Windows 11 and related technologies. He likes to share his knowledge, quick tips, and tricks with Windows 11 or Windows 10 with the community.
