This post will explain how to Enable WinSCP Win32 app Supersedence and Auto-Update with Microsoft Intune. As per Microsoft Intune’s April Month New Service Release 2404, Microsoft introduced several new features to enhance device management and security. One important feature is Auto Update with Win32 App Supersedence.
In the realm of Windows development, “Supersedence” refers to the concept of one software version replacing another. This is often relevant in the context of updating applications. When a newer version of a Win32 application is released, it may supersede or replace the older version. This could be due to bug fixes, feature enhancements, security patches, or other improvements.
You can specify which apps will be directly updated or replaced when you supersede an application. To update an app, disable the uninstall the previous version option. To replace an app, enable the uninstall the previous version option.
A maximum of 10 updated or replaced apps, including references to other apps outside of this view, form a graph of apps. The total size of the Supersedence app graph is limited to 10 plus the parent app (11 total).

What is Win32 App Supersedence and Auto-Update?
Apps that are deployed with auto-update intent can be superseded using Win32 app Supersedence. For instance, you may utilize auto-update to generate a new Win32 app (app Y) that will replace app X if you release a Win32 app (app X) for consumers to download and install on their devices.
App Y replaces App X on all targeted devices and users who have installed App X, which is accessible through the Company Portal. Additionally, the Company Portal displays only App Y. Under the Available assignment on the Assignments page, there is a toggle for the auto-update feature for the available app Supersedence.
- 2404 Microsoft Intune New Features April Update
- Maximum Size Cap for Intune Win32 App is Increased Now
- Quick and Easy way to Turn on PowerShell Audit using Intune Policy
- Use Intune Win32 App Supersedence in MEM Portal
Prerequisites to Enable WinSCP Win32 app Supersedence and Auto-Update in Intune
Only Win32 apps are eligible for app Supersedence. You need permission to access Microsoft Intune to create and modify dependency relationships between Win32 apps and other apps. By choosing Relate, you can obtain the license in the category of Mobile apps.
Starting with the 2202 service release, Intune admins will require this capability to add Supersedence and dependency applications while building or changing a Win32 app in the Microsoft Intune admin portal.
- To locate this permission, select Tenant Administration > Roles > All roles > Create in the Microsoft Intune admin center.
The following built-in roles now have this Win32 app Supersedence permission:
- Application Manager
- School administrator
Win32 app Supersedence and Auto-Update Scenarios
This section will discuss the Win32 app supersedence scenarios in detail, including how supersedence will work in Win32 app format in Intune.
| Cases | Scenario | Results/Remarks |
|---|---|---|
| App X is still present on the device | The upgrade is already triggered after the first available check-in, but before app Y gets installed on the device, the admin removes the relationship between app X and app Y, making them independent apps. | During the second available check-in, both apps are sent down to the device and app Y will be installed as an independent app. |
| Auto update setting changes | The upgrade is already triggered after the first available check-in, but before app Y gets installed on the device, the admin changes the auto-update setting for app Y to false. | During the second available check-in, app Y is sent down to the device and app X will be upgraded with app Y on the device. |
| Uninstall superseded app after superseding app entities created | The upgrade is already triggered after the first available check-in, but before app Y gets installed on the device, the user requests an uninstall of app X and app X is removed from the device. | During the second available check-in, app Y will be sent down to the device and app X will be upgraded with app Y on the device. |
| Uninstall after Supersedence update | App X was auto-updated to app Y, but app X wasn’t removed from the device. Later, the user requests an uninstall of app Y from the device and app Y is uninstalled successfully. | App X is still present on the device. |
| Upgrade failure | Intune attempts to auto-update app X to app Y but the installation of app Y failed and app X was already removed from the device. | Users won’t be able to reinstall app X from the Company Portal as it’s superseded by app Y, but are able to try to reinstall app Y from the Company Portal. |
Download the WinSCP from the Official Site
This post will describe how to construct a WinSCP application in Intune that is based on the Win32 app type and set Supersedence and Auto-Update with Intune. First, download the WinSCP application binary from the Official Site URL: https://winscp.net/download/WinSCP-6.3.3-Setup.exe/download

Repackage WinSCP-6.3.3-Setup.exe to WinSCP-6.3.3-Setup.intunewin format
Since we use the Win32 App type, we must repackage the software in “.intunewin” format. We are using Microsoft Win 32 Content Prep Tool (IntuneWinAppUtil.exe) for this. You can download the Tool from GitHub’s official website Microsoft Win 32 Content Prep Tool.
- Please specify the source folder: The folder where we downloaded and kept the Remote Help software
- Please specify the setup file: Here, enter the setup file name as remotehelpinstaller.exe
- Please specify the output folder: Provide the output folder location where they want to create remotehelpinstaller.intunewin
- Do you want to specify the catalog folder (Y/N): Type N
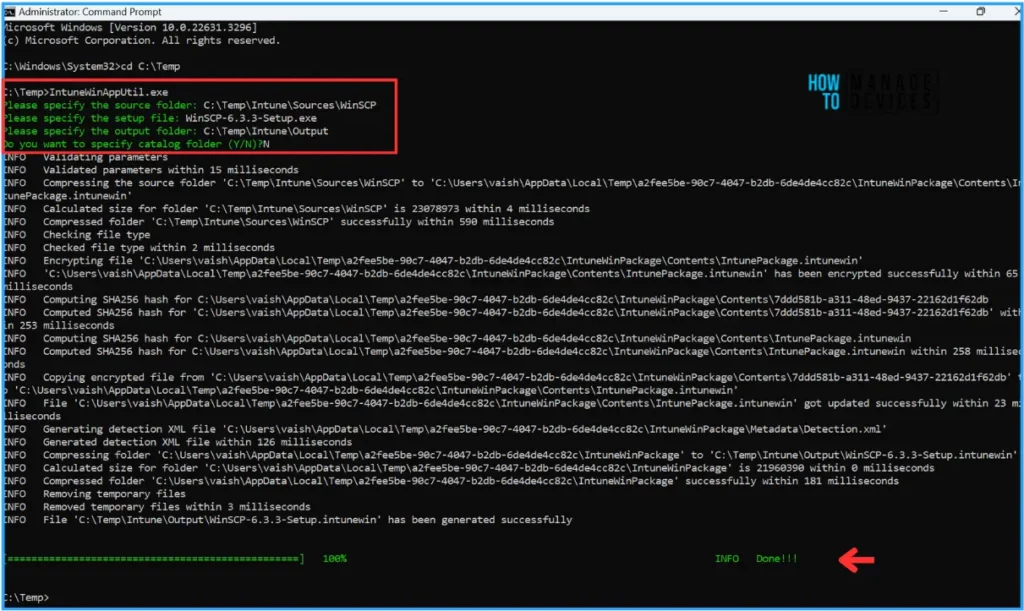
Once you have all the required details provided and hit enter, the Microsoft Win 32 Content Prep Tool will validate and create the Intunewin app for you.

Create a WinSCP App in Intune
Now, we are ready to create the WinSCP app in Intune. While creating the app, make sure you select Win32 App as the app type.
- Sign in to the Microsoft Intune admin center
- In the left pane of the portal, click on Apps. Then under the By platform option, select Windows

- In the Windows Apps page, click on Add, then choose the app type in the drop-down list as Windows app (Win32) and select it
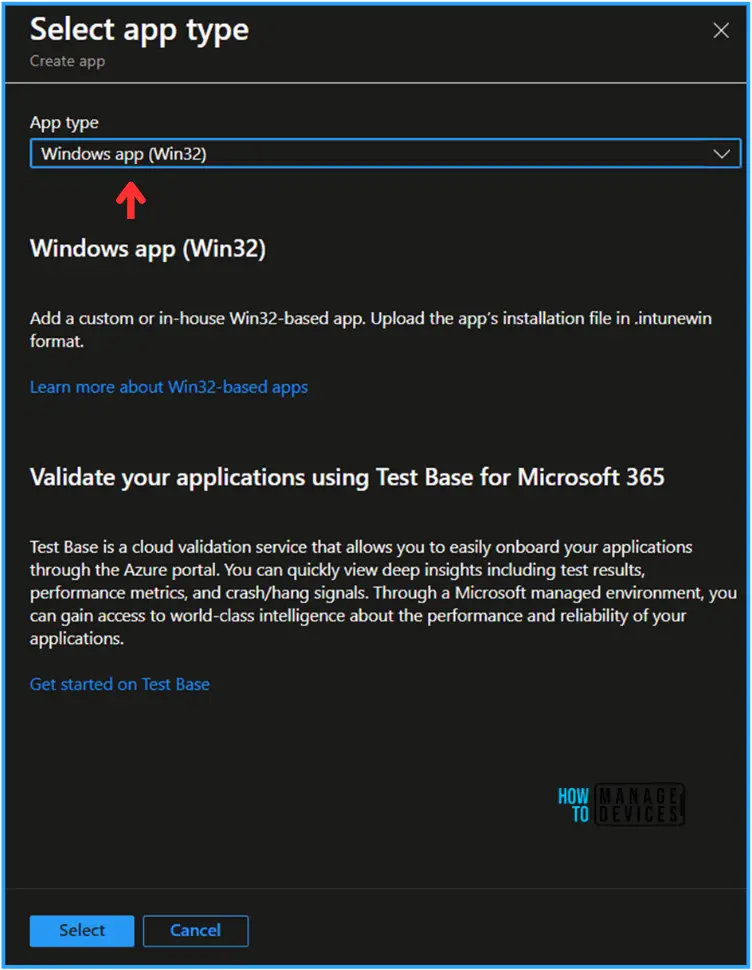
Configure WinSCP App Information
On the App information page, first, we have to select our “WinSCP-6.3.3-Setup.intunewin” app package file, which was already created. Once you select the package, it will auto-populate the following information in Intune
- Name: WinSCP-6.3.3-Setup.exe
- Platform: Windows
- Size: 20.94MiB
- MAM Enabled: No

Now, we need to provide other mandatory details about the app, such as Name, Description, Publisher, and optional details like App version and category, showing this as a featured App in the Company portal, Logo, etc., then click on Next.
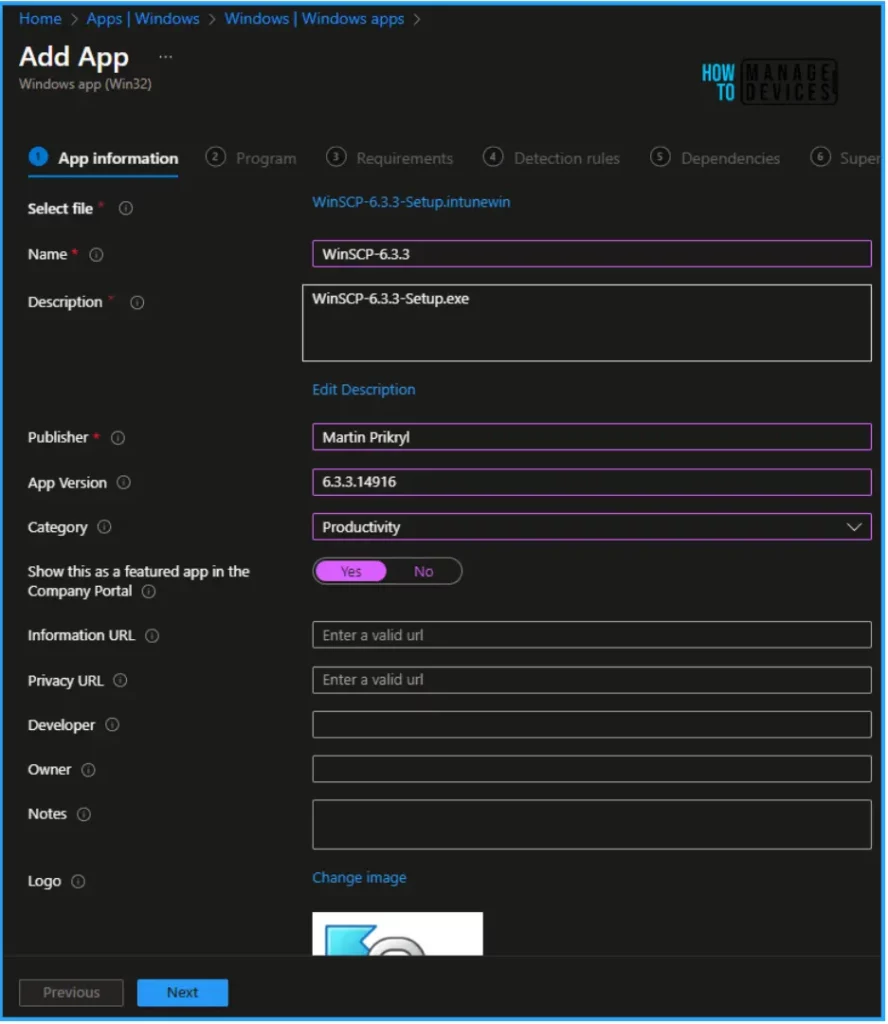
Installation and Uninstallation Commands for WinSCP App Intune Win32 App
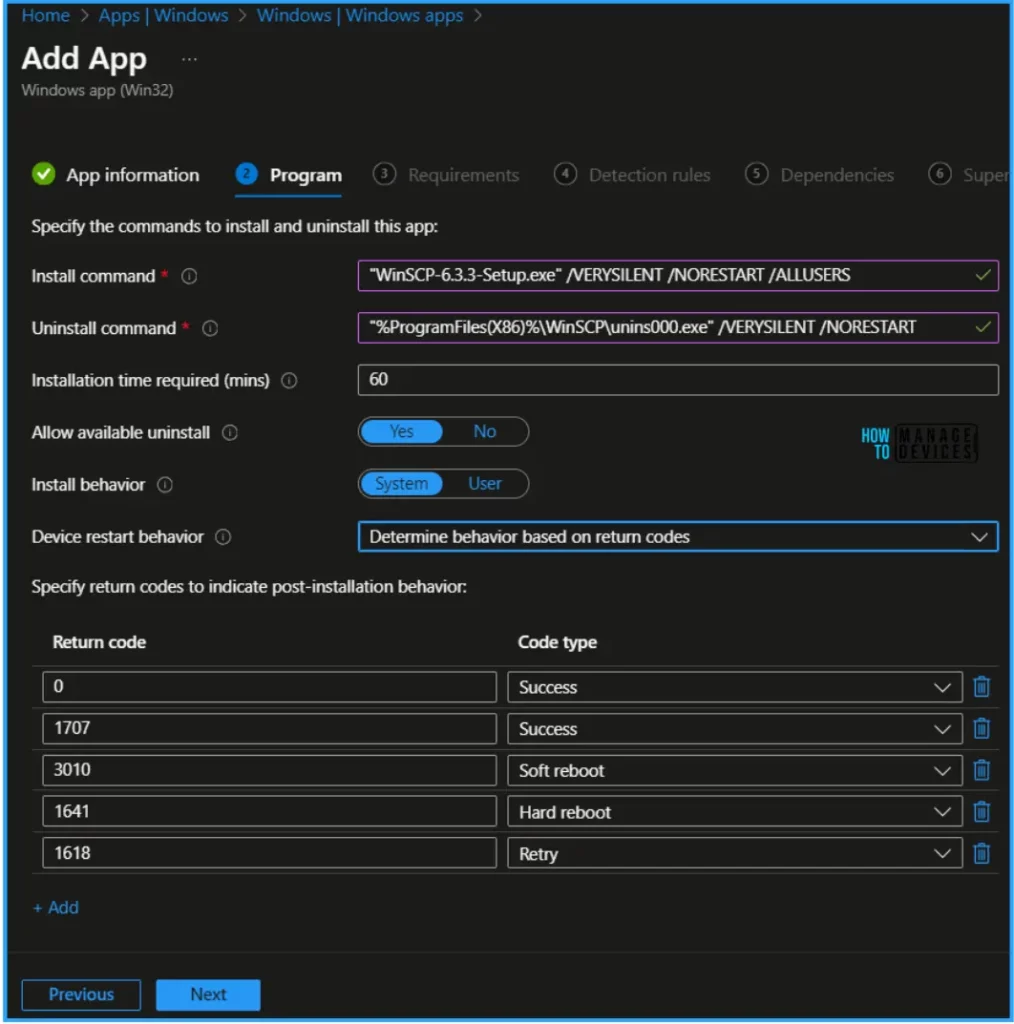
In the program tab of the Windows app (Win32), specify the installation & uninstallation commands.
| Category | Command Lines |
|---|---|
| Install command | “WinSCP-6.3.3-Setup.exe” /VERYSILENT /NORESTART /ALLUSERS |
| Uninstall command | “%ProgramFiles(X86)%\WinSCP\unins000.exe” /VERYSILENT /NORESTART |
Complete the following fields.
- Installation time required in (mins): 60 (default)
- Allow available uninstall: Yes
- Install behavior: System
- Device restart behavior: Determine behavior based on return codes
Since I’m doing this in my lab, I’ve given the default values for all of these options, but you are free to modify them to suit your needs. In the post-installation behavior option am keeping the Return codes as it is and clicking on Next.
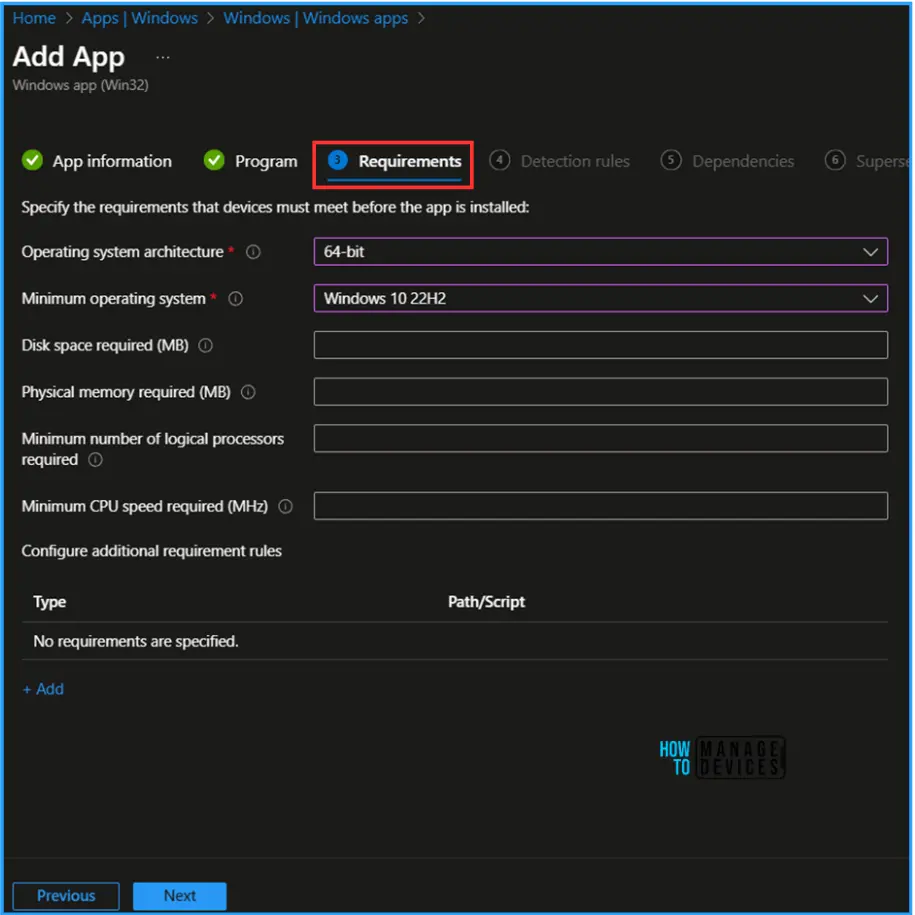
On the Requirement page, you will see the options below. Select the options as follows. The rest of the requirements are optional. Click on Next.
- Operating system architecture: 64bit
- Minimum operating system: Windows 10 22H2 (My test device is Windows 11 23H2)
Add a Detection Rule to Identify a Successful Installation of the WinSCP App
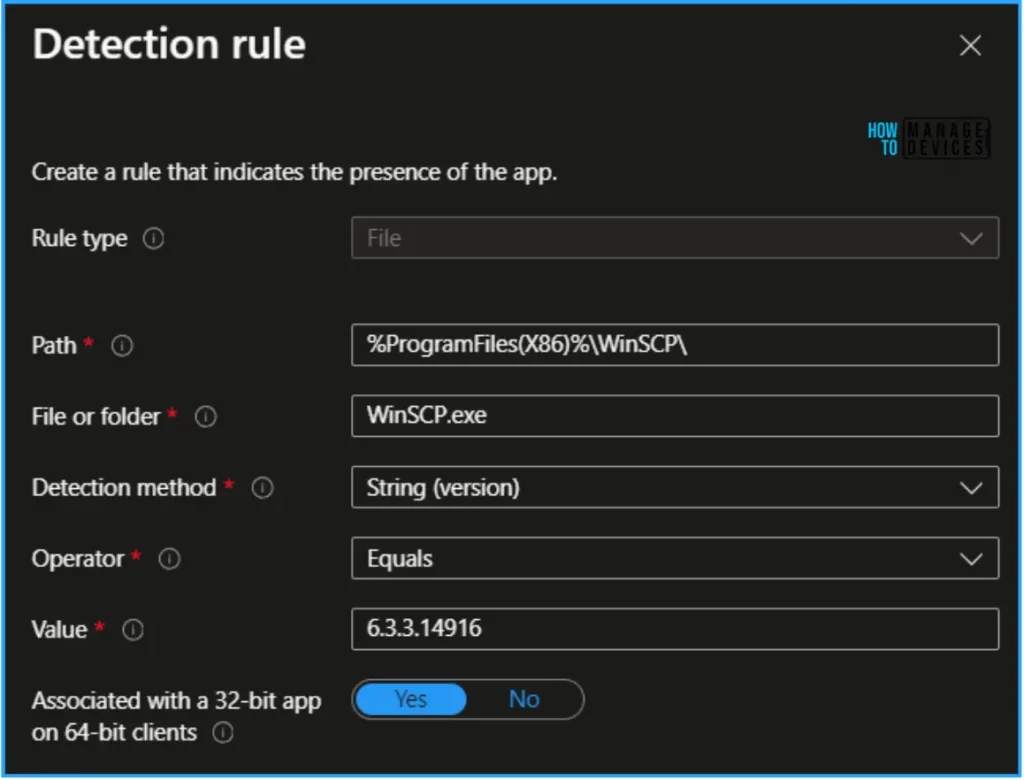
Select the Manually Configure Detection Rules option in the Rules format in the dropdown. Now create a rule that indicates the presence of the Remote Help Application.
- Rule type: File
- Path: %ProgramFiles(X86)%\WinSCP\
- File or folder: WinSCP.exe
- Detection method: String (version)
- Operator: Equals
- Value: 6.3.3.14916
- Associated with a 32-bit app on 64-bit clients: Yes
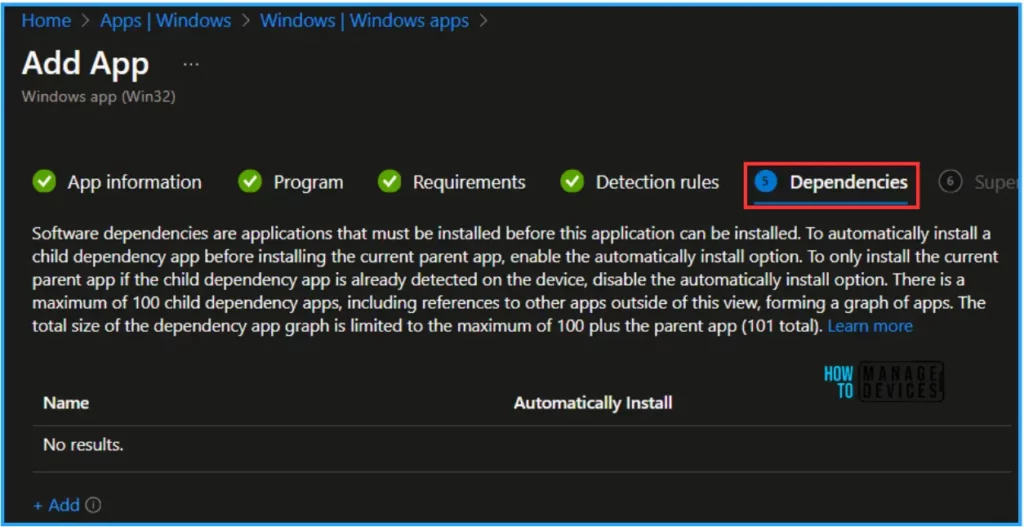
Similar to SCCM, Intune also allows to configure Dependencies. Here we are not using this option, so leave the page as it is and click on Next.
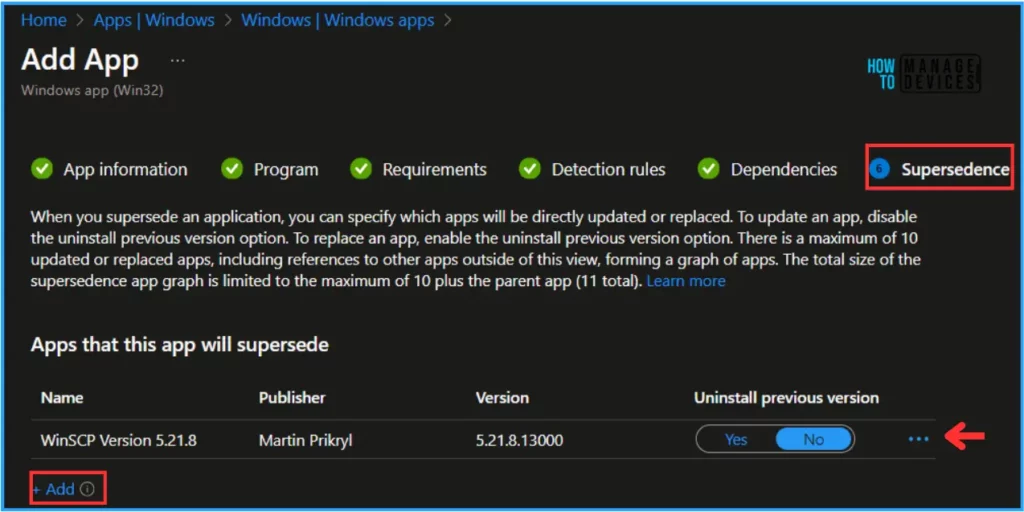
We are testing the Supersedence scenario on the already deployed WinSCP App Version 5.21.8.13000. So, in the Supersedence pane, click on the +Add option to Select the already deployed WinSCP Version 5.21.8 application.
- Uninstall the previous version set to No.
On the next page, click on +Select scope tags and choose Scope tags as Default. Depending on your requirements, you can also select any other custom scope tags available in the tenant.

Click on Next and deploy the WinSCP application to HTMD – Test Computers. In the Available for Enrolled Devices option, click on Add Groups and select the required device group.
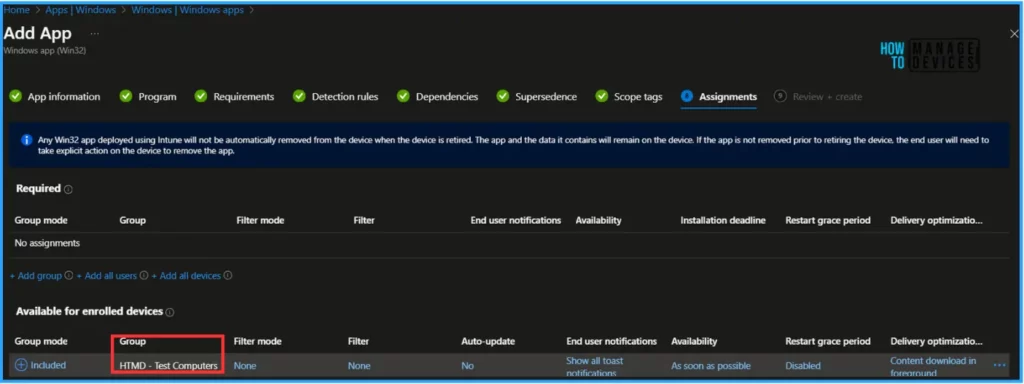
Note! Select the groups for which you want to make this app available. Available for enrolled devices apps are displayed in the Company Portal app and website for users to install optionally. Available assignments are valid for both user groups and device groups.
How to Set Auto-Update with App Supersedence
When Win32 apps are delivered from the Company Portal, they can be automatically updated on an enrolled end user’s device. Set a Supersedence relationship for the app and choose Auto-update when setting the assignment to enable automatic updates for these Win32 programs that have been deployed as available. Furthermore, the assignment type needs to be available for devices that have been enrolled.
The superseding app will be sent to users automatically if they installed it via the Company Portal. Users who have the superseding app through needed intent will not receive it since the Supersedence auto-update only applies to available assignments.
You can establish an auto-update Supersedence link between apps by following these steps:
- On the Assignment pane, we have already set an available deployment to HTMD – Test Computers.
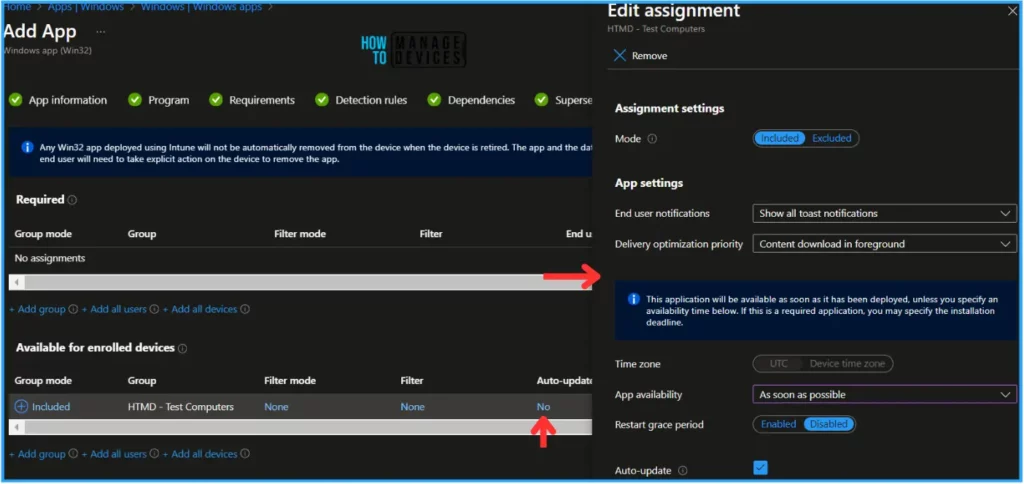
- There is an option to select auto-update; by default, it will be set as No; click on that; under the Edit Assignment page, select the following options and click on OK.
- Mode: Included
- End user notifications: show all toast notifications
- Delivery optimization priority: Content download in foreground
- Time Zone: Default (No Change)
- App availability: As soon as possible
- Restart grace period: Disabled
- Auto-update: Yes (Check the Box)
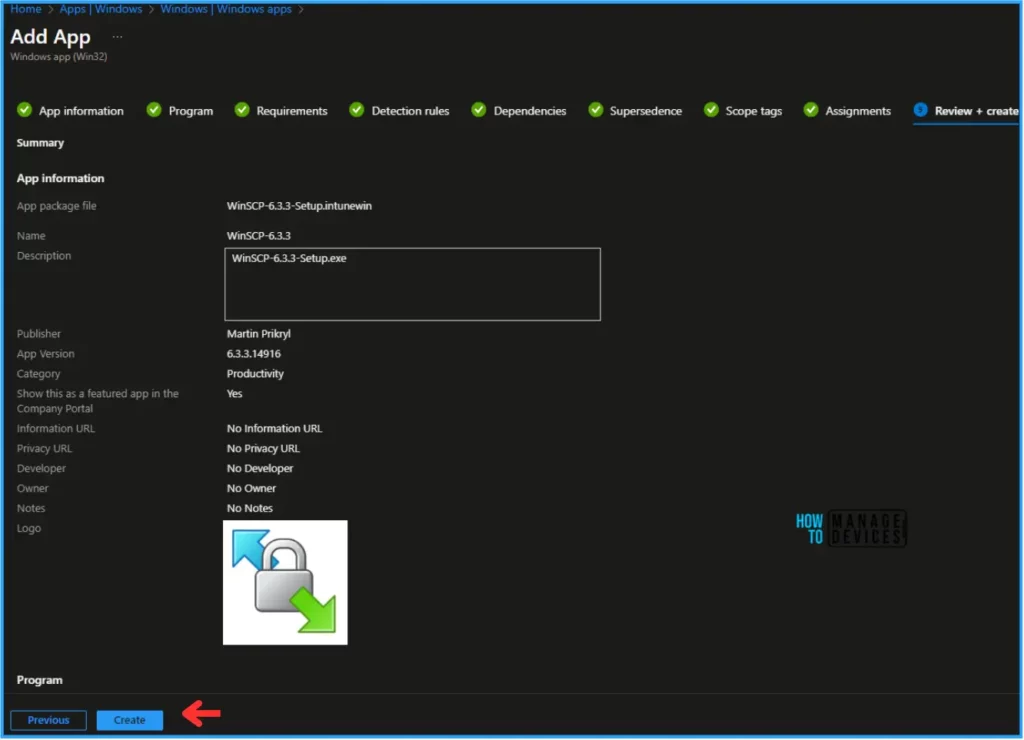
On the Review + Create page, carefully review all the settings you’ve defined for the WinSCP Windows app (Win32). Select Create to implement the changes once you’ve confirmed everything is correct.
End-User Experience of WinSCP Win32 App Supersedence and Auto-Update
Two device check-ins for available applications are necessary for the user to obtain the auto-update for the superseding app.
Usually, the first possible check-in takes place one to eight hours after the assignment is generated. Typically, the second available check-in takes place eight hours following the initial check-in. It will take 8 to 16 hours to obtain the replacement app. In ideal circumstances, auto-update performance is faster.
Here, we are manually initiating the sync from the device. So, to do that, Log in to your targeted device and manually initiate a Sync from the device to get the superseded, auto-upgrade WinSCP, and open the Company Portal.
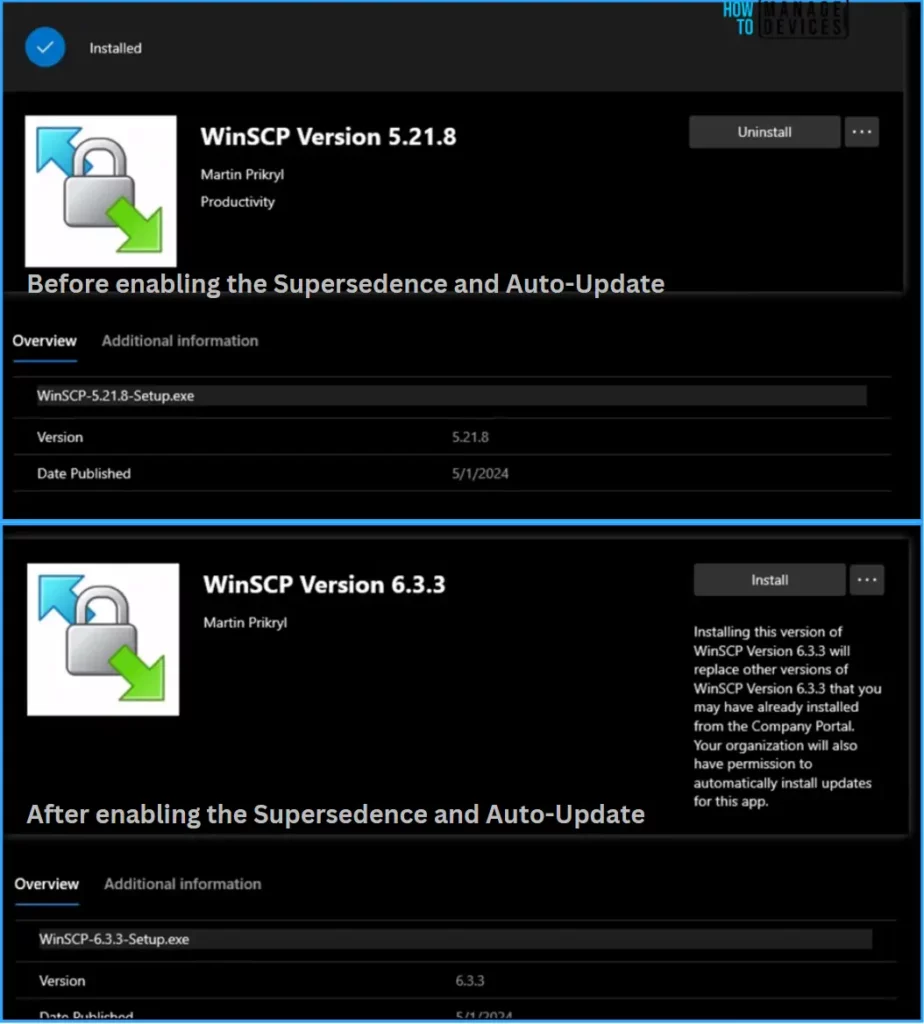
The screenshot below will give an idea of how the Supersedence and Auto-update will work. In the first screenshot, we have already deployed and installed WinSCP version 5.21.8.
The second screenshot is for after we enabled Supersedence and Auto-update. It will replace the existing WinSCP deployed version from the Company Portal and only provide an option for the latest version we deployed i.e. WinSCP 6.3.3
Monitor WinSCP Win32 App Supersedence and Auto-Update in Intune
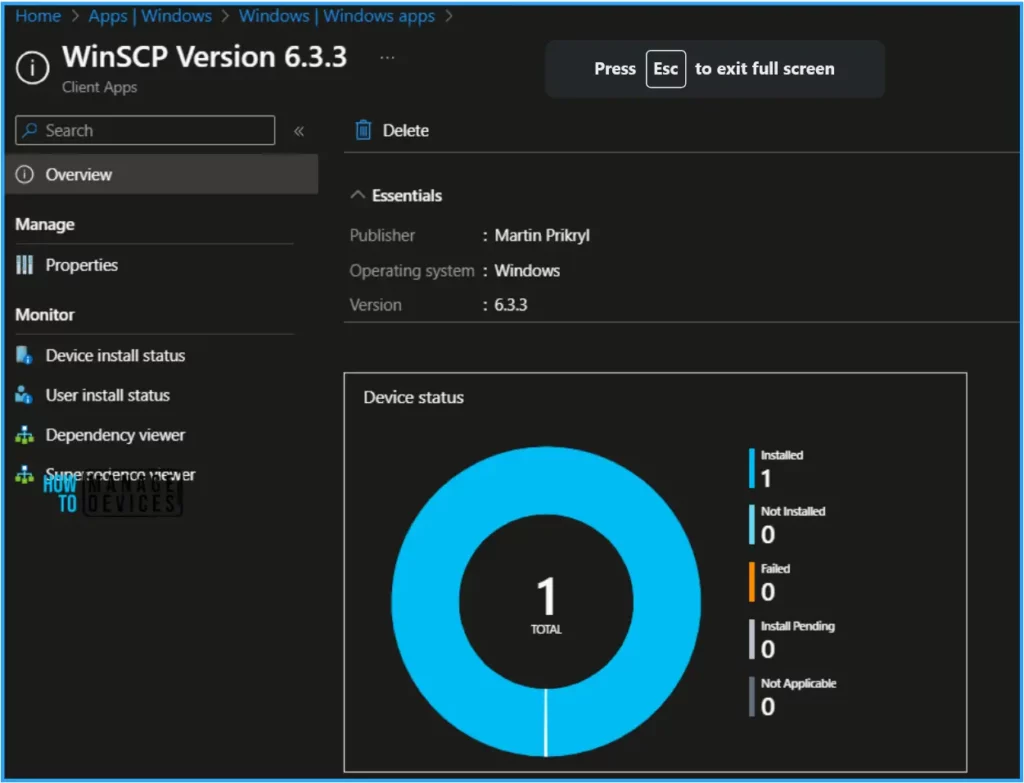
To monitor the WinSCP Version 6.3.3 deployment status from the Intune Portal, follow the below-mentioned steps.
Navigate to Apps > Windows > Windows apps> Search for the “WinSCP Version 6.3.3” App. Under the Device and user check-in status, you can see the deployment status for the same.
I appreciate you taking the time to read my article. I’m excited to see you in the upcoming post. Continue to support the HTMD Community.
We are on WhatsApp now. To get the latest step-by-step guides, news, and updates, Join our Channel. Click here. HTMD WhatsApp.
Author
Vaishnav K has over 10+ years of experience in SCCM, Device Management, and Automation Solutions. He writes and imparts his knowledge about Microsoft Intune, Azure, PowerShell scripting, and automation. Check out his profile on LinkedIn.

Auto Update Checkbox has disappeared in my tennant. Has anyone experienced the same?
Hi Thomas Müller, I have already raised a query to Microsoft regarding the same. Will update you once I get reply from them.
Meanwhile just have a loop on the below tutorial video for the same.
https://www.youtube.com/watch?v=P2nZY3-nigY&t
Hi Thomas Müller,
“Auto-Update” is now available for the Intune Win32 App Supersedence. Please check and confirm.