Let’s discuss installing Evernote with Intune Enterprise App Catalog App. A unique, helpful tool called Intune Enterprise App Catalog App helps you put Evernote on all your work devices.
Evernote helps you to organize your notes and essential information. With Intune, it is easy for everyone in your company to get Evernote on their computers or phones. This way, we all have access to Evernote’s features to help us stay productive and organized.
Microsoft recently released the Intune Enterprise App Catalog App, a new app type. It is a pre-made bundle, much like the Microsoft Store app. Its key benefit is that it comes with all the already filled-in app details, such as names, descriptions, and other important information.
We don’t have to input these details, saving time and effort manually. With this app, it’s easy to access and deploy various software across your organization’s devices without the difficulties of manually entering all the information.

- Install Mozilla Firefox with Intune Enterprise App Catalog App
- Install Mozilla Firefox Browser from Microsoft Store using MEM Intune
- Guidelines for Installing Microsoft PC Manager from New Microsoft Store in Intune
- 6 Exciting Features Coming to Intune Enterprise App Management
- Create and Deploy Python Application with Intune Enterprise App Catalog App
- Install Zoom Client using Windows Enterprise App Catalog App with Intune
What is Evernote?

Evernote is an app designed to help you keep your notes and ideas organized in one place. It acts as a digital notebook where you can store various types of information, including text notes, checklists, photos, and voice memos.
How Does Evernote Work?
Evernote allows you to create and organize notes according to your needs. You can input text directly into the app, attach files, capture photos, or record voice memos.
Install Evernote with Intune Enterprise App Catalog App
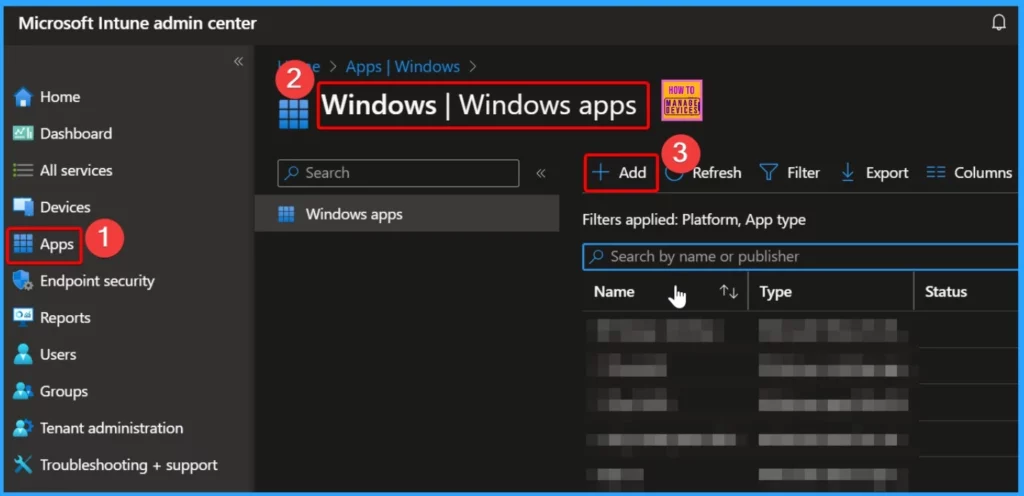
The screenshot below helps you show the Microsoft Intune admin center. This is the server side of Evernote app deployment with Intune Enterprise App Catalog App. The table below shows the steps for installing Evernote with the Intune Enterprise Catalog App.
| Install Evernote with Intune Enterprise App Catalog App |
|---|
| Sign in to the Intune Admin Center portal |
| Go to Apps > Windows > Windows Apps |
| Select the Add button from the below window |
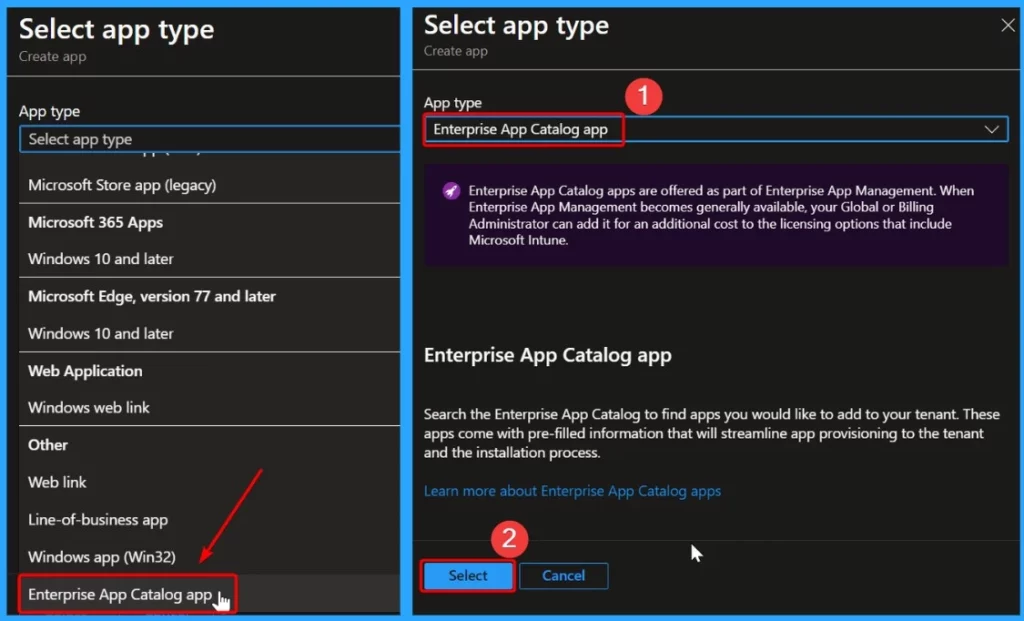
Enterprise App Catalog apps are offered as part of Enterprise App Management. When Enterprise App Management becomes generally available, your Global or Billing Administrator can add it for an additional cost to the licensing options, including Microsoft Intune.
- Select the app type as Enterprise app catalog app
- Click the Select button to continue
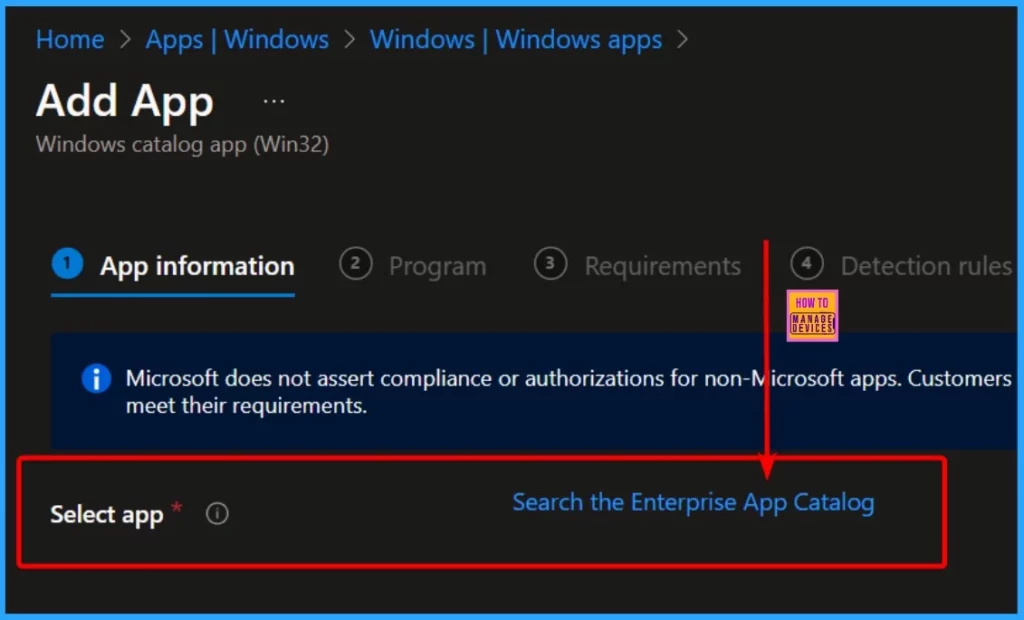
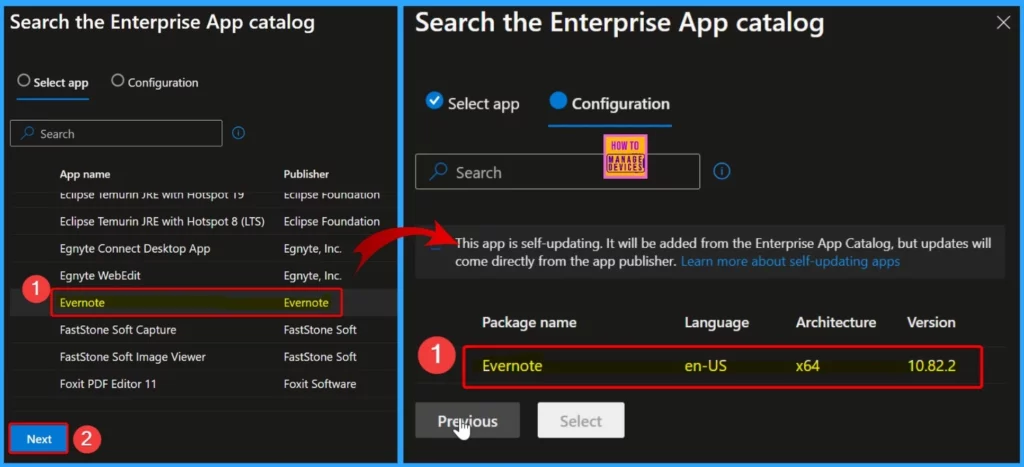
In the App Information section, you will find a part called “Select app“, where you can choose which app to install. A clickable link also says, “Search the Enterprise app catalog app.” If you click this link, you can pick the app you want to use on your system.
It is like searching for the app you need and selecting it to install. This makes it easy to find and add the specific app you want to use on your device.
Once you choose the Evernote app, you’ll see that Evernote publishes it. After selecting the app, click the “Next” button. This action will open another window showing all the app details, including the package name, language, architecture, and version.
| Package name | Language | Architecture | Version |
|---|---|---|---|
| Evernote | en-US | x64 | 10.82.2 |
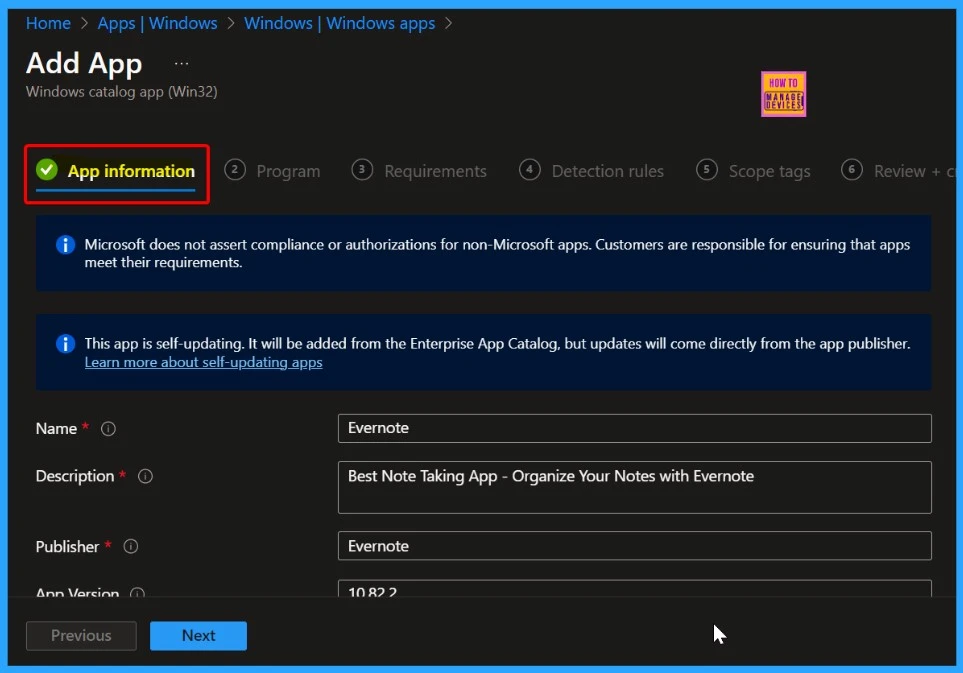
Under “App Information,” you’ll find all the details about the Evernote app. It summarizes what the app is called, what it does, who made it, and which version you’re installing.
The name is “Evernote,” and the description says, “Best Note-Taking App – Organize your Notes with Evernote.” The publisher’s name is Evernote, and the version is 10.82.2.
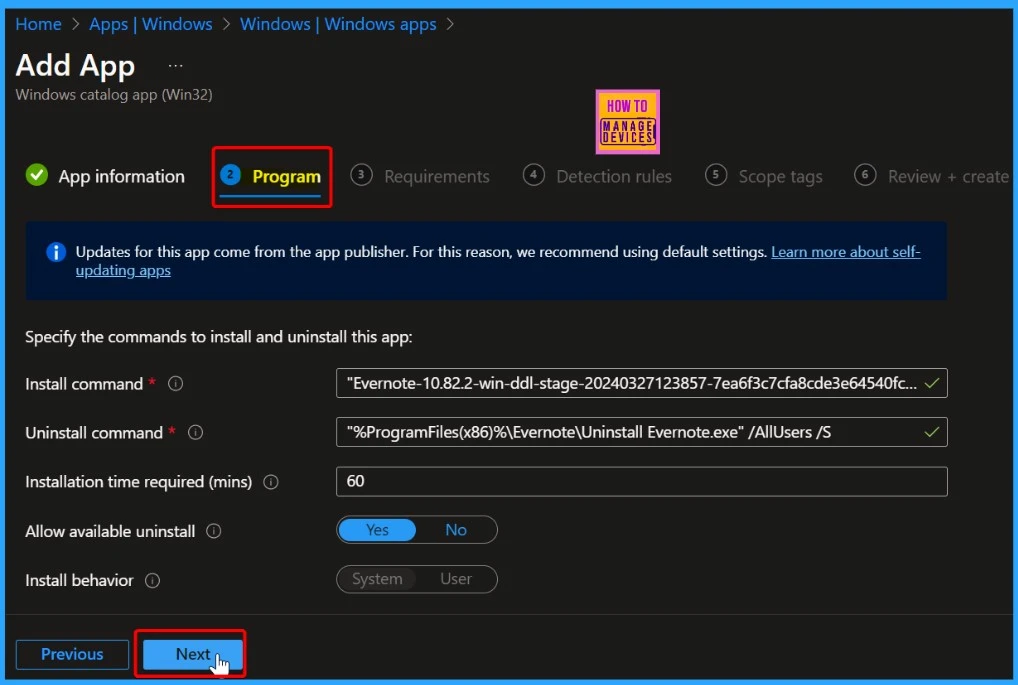
In the “Program” menu, you’ll find important information about the Evernote app. This includes details like how to install and uninstall it, how long it takes, whether you can uninstall it later, and how it behaves when you install it.
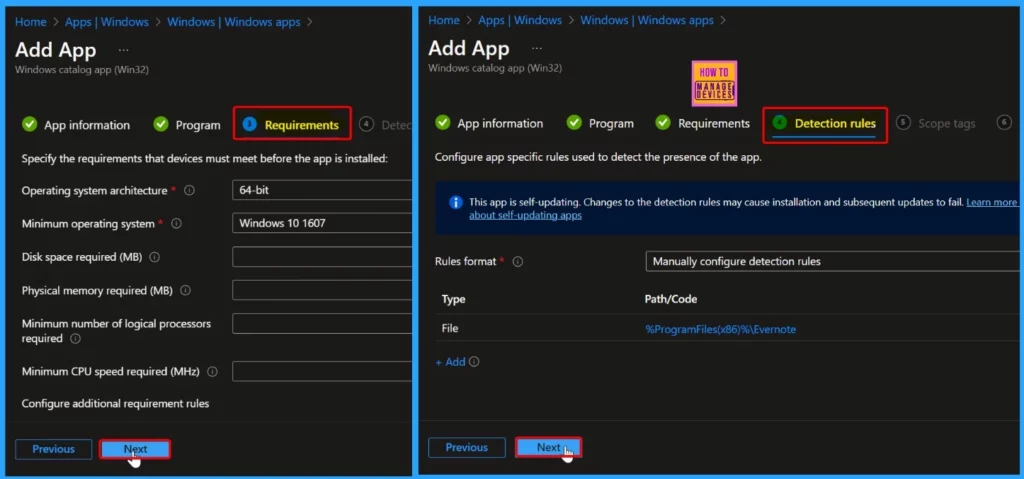
The screenshots below help you show the Requirements and Detection rules. Both menus are essential. The Requirements menu details the operating system architecture, Minimum operating system, etc. The Detection rules show the following details.
- Rules format – Manually configure detection rules
- Type – Path/Code
- File – %ProgramFiles(x86)%\Evernote
Using Scope tags, you can assign a tag to filter the profile for specific IT groups. In the “Review + Create” tab, carefully review all the settings you’ve configured for the app deployment. Once satisfied with the settings, click the “Create” button.
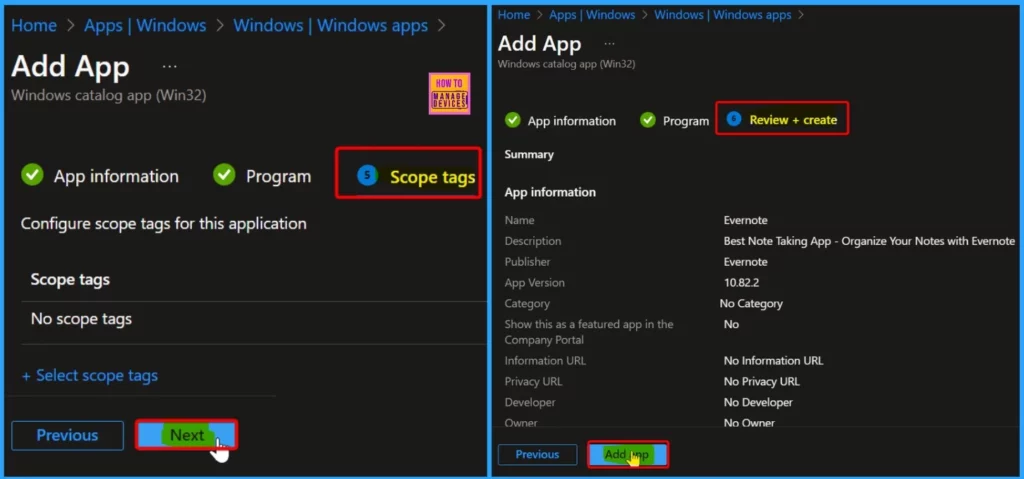
Application Evernote Created Successfully
This Overview page helps you show the application’s created status. A notification shows that the Evernote application has been created successfully. A banner message also indicates, “Your app is not ready. The requested content is being prepared. Check back later.”
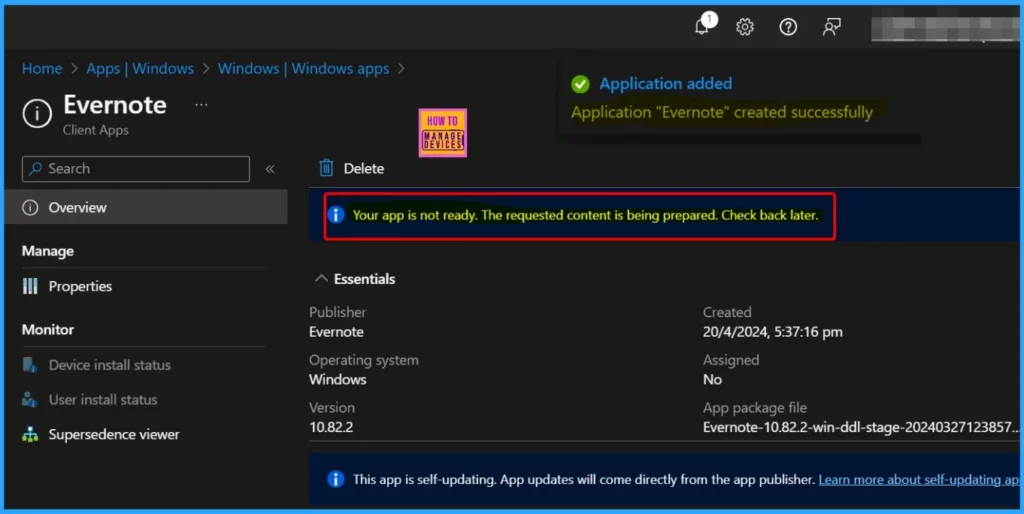
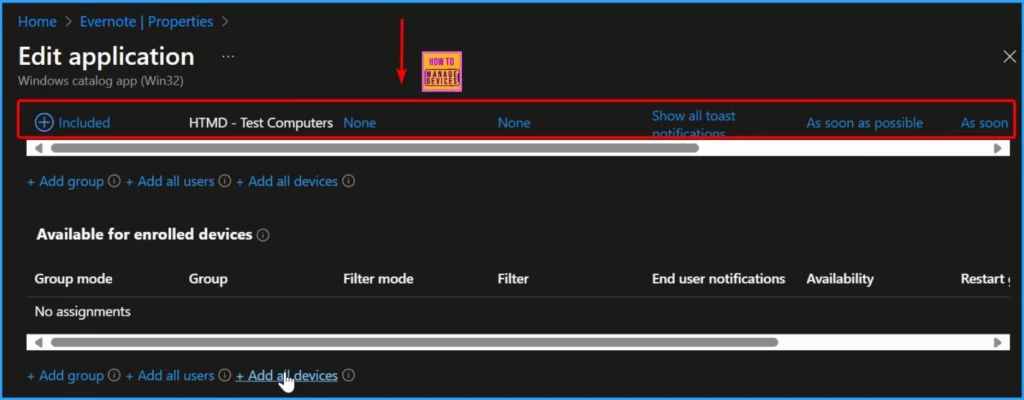
To assign the app to specific groups or users, click the “Add group” link in the assignments section. A window will appear, showing a list of groups and a search box.
In the search box, type the name of the group you want to assign the app to, then select the group from the list.
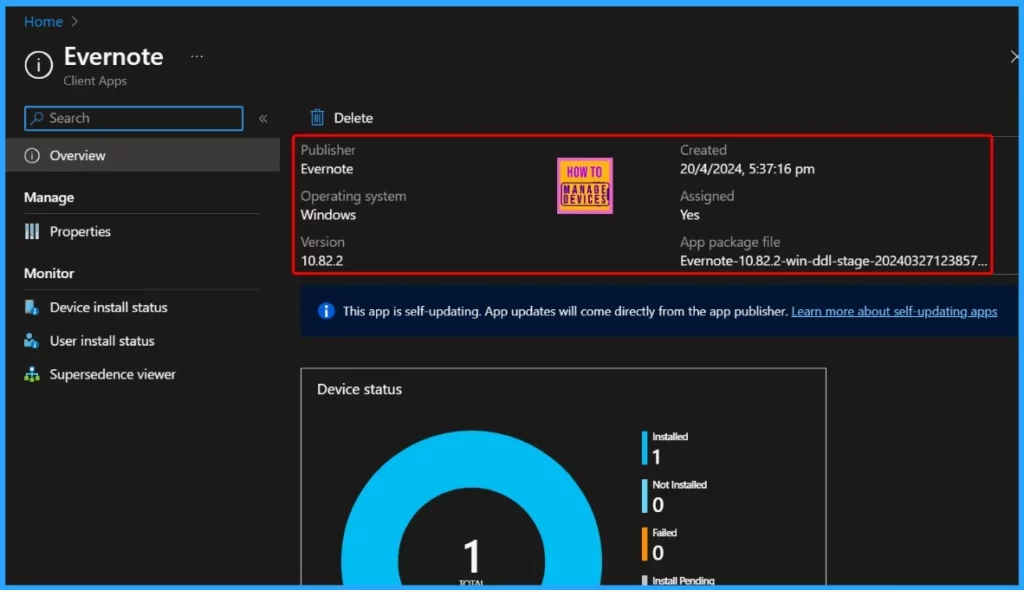
Monitoring Deployment Status
The window below shows the Evernote deployment status. It has several installed ones, and the Assigned status is Yes. The table below helps you show more details.
| Publisher | Operating system | Version | Created | Assigned |
|---|---|---|---|---|
| Evernote | Windows | 10.82.2 | 20/4/2024, 5:37:16 pm | Yes |
End-User Experience
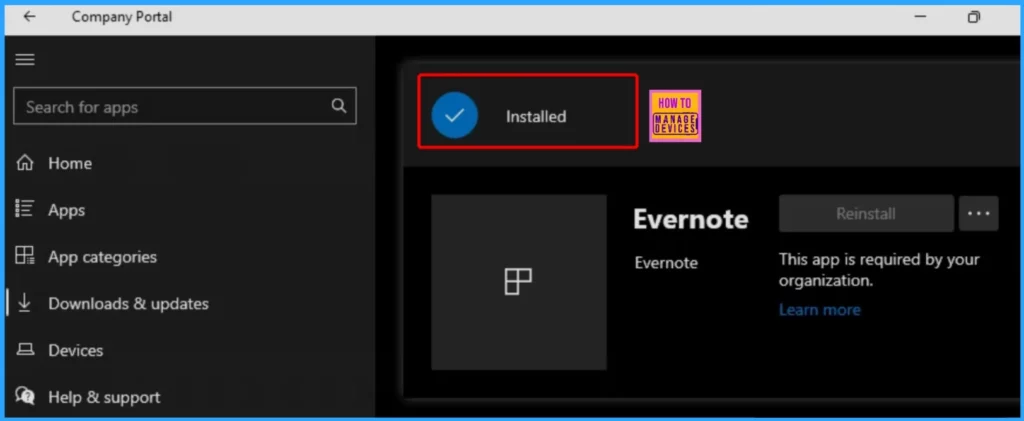
Let’s check the deployment status of the Evernote application. Open the Company Portal and go to the “Download & Updates” section. There, you’ll see the progress of the app installation. It’s like checking the status of your app from your computer by going to a specific place in the Company Portal.
We are on WhatsApp now. To get the latest step-by-step guides, news, and updates, Join our Channel. Click here. HTMD WhatsApp.
Author
About the Author: Vidya is a computer enthusiast. She is here to share quick tips and tricks with Windows 11 or Windows 10 users. She loves writing about Windows 11 and related technologies. She is also keen to find solutions and write about day-to-day tech problems.
