Let’s learn how to Create and Use Passkeys in Windows. Passkeys are a more secure and convenient method of logging into websites and applications than passwords. You can easily use Passkeys in Windows with the help of Windows Hello.
Usually, People access their favourite website applications in daily life for different purposes, and users are very conscious of the security of their accounts. Most of it is hard to remember and type the passwords for accessing websites or applications.
Passkeys in Windows are the best solution to manage all these problems faced by users in daily life. Passkeys can be used without the need for sign-in challenges. It makes the authentication process faster, more secure and more convenient.
With Passkeys, you can use Windows Hello to sign in with a PIN, facial recognition, or fingerprint. Many websites and applications support Passkeys. It allows you to use your phone or tablet to sign in by scanning a QR code or Bluetooth. This post lets you know all about Passkeys in Windows.
What are the Advantages of Passkeys in Windows?

Passkeys are known as the future of authentication. It is incredible, easy to use and intuitive. Passkeys help to eliminate the need for a complicated password creation process. The following are the advantages of Passkeys in Windows.
1. It is unique to each website or application
2. Passkeys help to resistant to phishing attempts
3. It provides more security for your accounts on websites and applications
4. Passkeys can be used across all your device
How to Create and Use Passkeys in Windows
Passkeys are the best choice instead of passwords in websites and applications. You can easily create and use Passkeys on your devices and your sign-in devices.
How to Create Passkeys
You can easily create Passkeys for Websites and applications that support Passkeys. Many websites and applications support Passkey. The following steps will help you to Create Passkeys.
- Open a website or app that supports passkeys
- Create a Passkeys from your account
- You can choose where to save passkey
- After that, Click the Next button
By default, Windows offers to save the passkey locally if you’re using Windows Hello or Windows Hello for Business. If you select the option Use another device, you can choose to keep the passkey in one of the following locations.
| Passkeys Saving Locations | Used to |
|---|---|
| This Windows Device | The passkey is saved locally on your Windows device and protected by Windows Hello (biometrics and PIN) |
| iPhone, iPad or Android device | The passkey is saved on a phone or tablet, protected by the device’s biometrics if offered by the device. This option requires you to scan a QR code with your phone or tablet, which must be in proximity of the Windows device |
| Linked device | The passkey is saved on a phone or tablet, protected by the device’s biometrics if offered by the device. This option requires the linked device to be in proximity to the Windows device, and it’s only supported for Android devices |
| Security key | The passkey is saved to a FIDO2 security key, protected by the key’s unlock mechanism (for example, biometrics or PIN) |
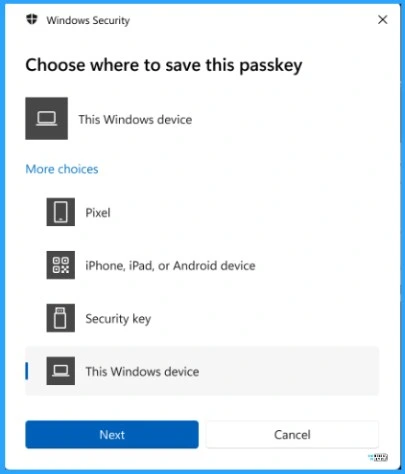
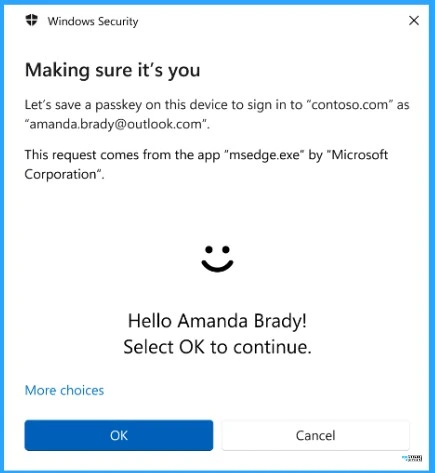
In this window, the Windows device location is selected for saving the Passkey. After that, Select a Windows Hello verification method and proceed with the verification, then select OK.
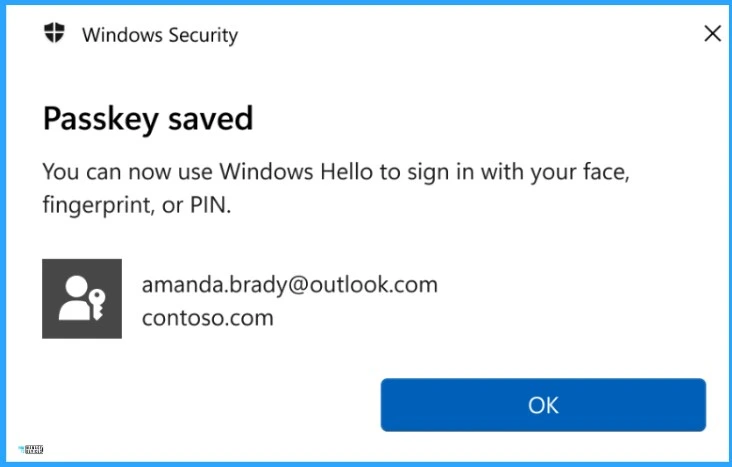
In this Windows, the Passkey is saved to your Windows Device. You can use Windows Hello sign-in with face, fingerprint, or PIN. After that, click on the OK button.
How to Use Passkeys in Website or Application
Passkeys can be used in applications and websites that support Passkeys. Passkeys are more secure than Passwords, which helps protect your accounts. Follow the steps for sign-in.
- Open a website or app that supports passkeys
- Select Sign in with a Passkey or a similar option
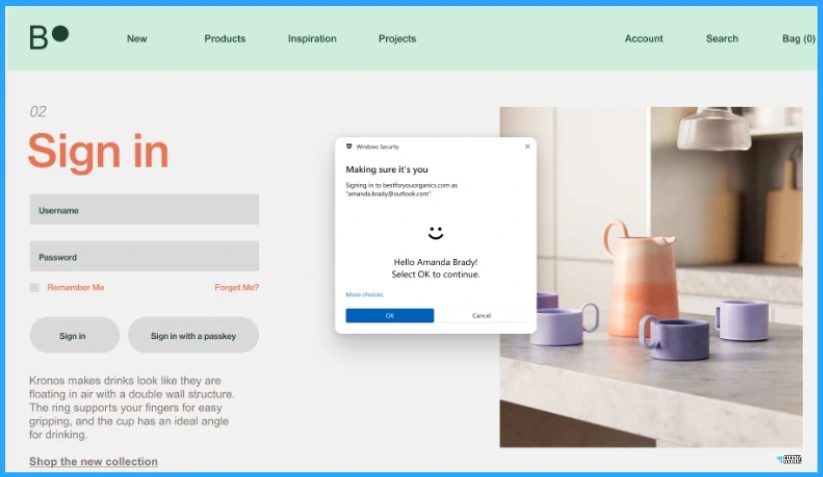
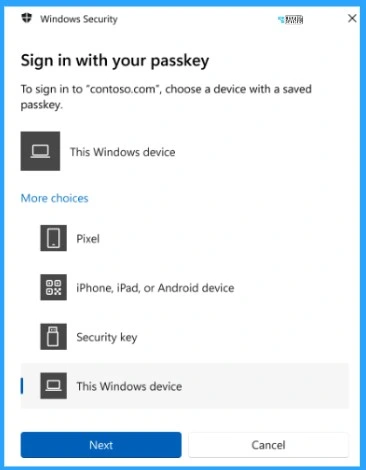
If a passkey is stored locally and protected by Windows Hello, you’re prompted to use Windows Hello to sign in. In this screenshot, This Windows device is selected. You can also choose other options in this window. After choosing the option, click on the Next button.
How to Manage Passkey in Windows
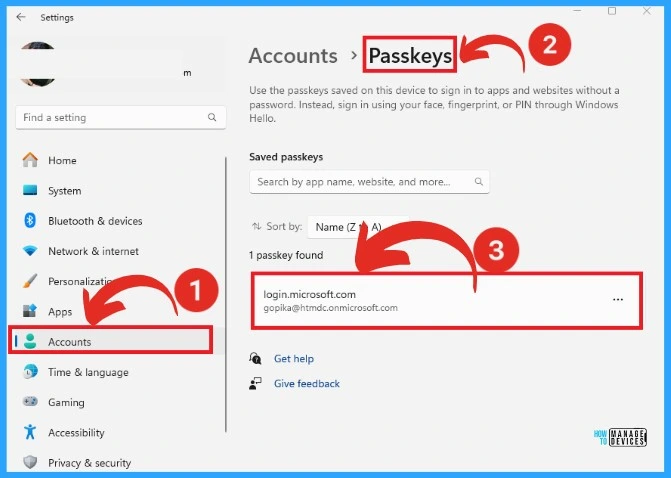
You can easily manage Passkeys in Windows from your Settings. In Settings, you can view and manage Passkeys saved for apps or websites. A list of saved passkeys is displayed, and you can filter them by name.
- Select Settings from the Start Menu
- Select Accounts from Settings
- Select Passkeys from the Account Settings
Reference – Passkeys in Windows
We are on WhatsApp. To get the latest step-by-step guides and news updates, Join our Channel. Click here for HTMD WhatsApp.
Author
Gopika S Nair is a computer enthusiast. She loves writing on Windows 11 and related technologies. She is here to share quick tips and tricks with Windows 11 or Windows 10 users. She is Post Graduate Diploma Holder in Computer Science.

Hi Anoop,
is there a way to disable the Passkeys options from account settings so no one can see that options ?
like with GPOs or anything ??