Let’s learn how to Set Up Dev Drive on a Windows. Dev Drive is a new storage volume form available to improve Key developer workload performance. It is developed on ReFS technology that helps to employ optimizations and provide more control over storage volume settings and security in targeted files.
Maintaining the Storage volume of a PC is very important for the smooth functioning and performance of your system. Windows PC has its default setup to maintain storage volume. It allows you to create a separate volume on your PC that will improve performance for disk-bound operations.
The Resilient File System (ReFS) is one of the newest file systems of Microsoft. It allows you to develop a Dev Drive on Windows 11. It is designed to maximize data availability, scale efficiently to large data sets across diverse workloads, and provide data integrity with resiliency to corruption.
This post discusses setting up Dev Drive on your Windows PC. The Dev has some prerequisites that should be ensured before set up. The different types of Dev Drive setups are also discussed in this post.
- Complete Review of Microsoft Paint Modern Application
- WordPad App Removal from Windows is Announced by Microsoft
What are the Features of Set Up Dev Drive on Windows?
Set Up Dev Drive is an essential factor that helps you maintain your Windows PC’s smooth functioning. Dev Drive allows you to increase the performance efficiency of your PC. The following are the features of Set Up Dev Drive on Windows 11.
1. It helps to increase the performance efficiency
2. It allows you to create a separate volume on your PC
3. It uses ReFS technology for the development
4. Dev Drives are available on all Windows SKU versions
How to Set Up Dev Drive on Windows
Dev Drive can be easily Set Up on Windows 11 via the Settings application. Dev Drive helps you initialize a storage volume specifically for development workloads, providing faster performance and customizable settings optimized for development scenarios. The below list and screenshot will guide you.
- Select Settings from the Start Menu
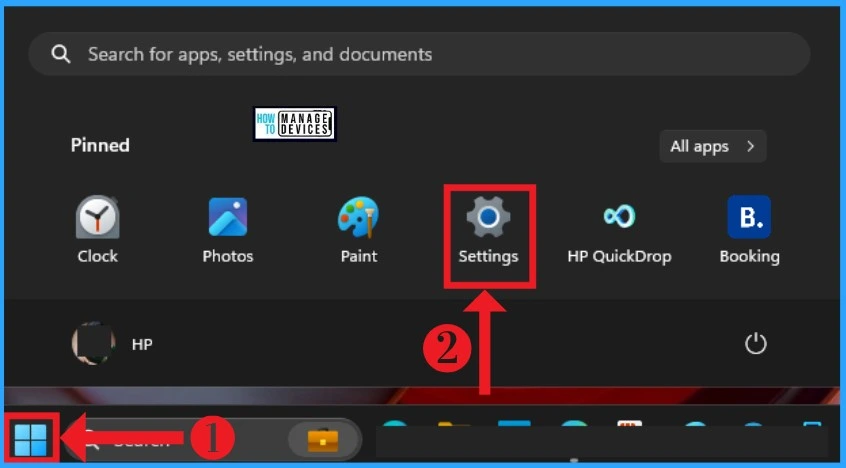
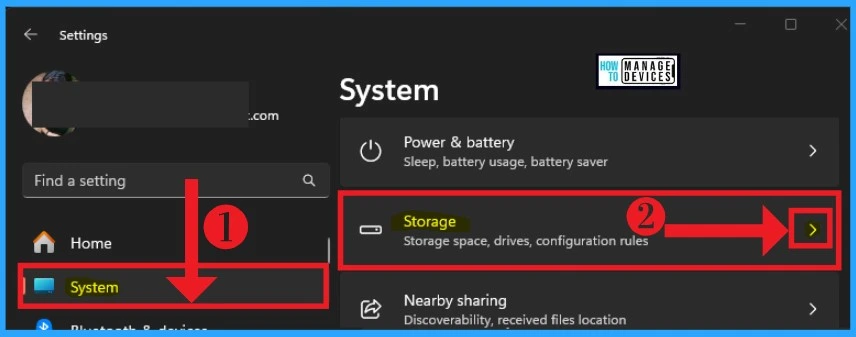
After that, select the System option from the left side of Settings. From the System option, select the Storage option for accessing drives. The Storage option helps you to access Storage spaces, drives, and configuration rules. Click on the drop-down arrow on the Storage to access more options.
After that, you can see different options in the Storage. Here, you can see the Storage Management option. Storage Management lets you launch backup options, storage spaces, other disks, and volumes. Click the drop-down arrow near the Disks & volumes.
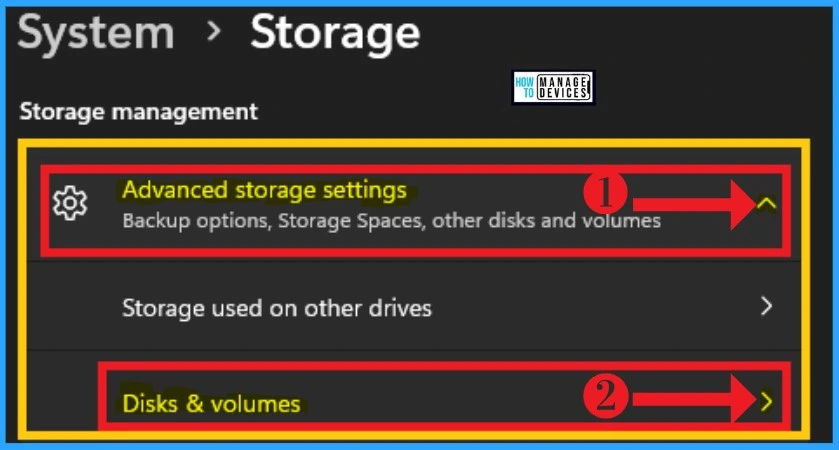
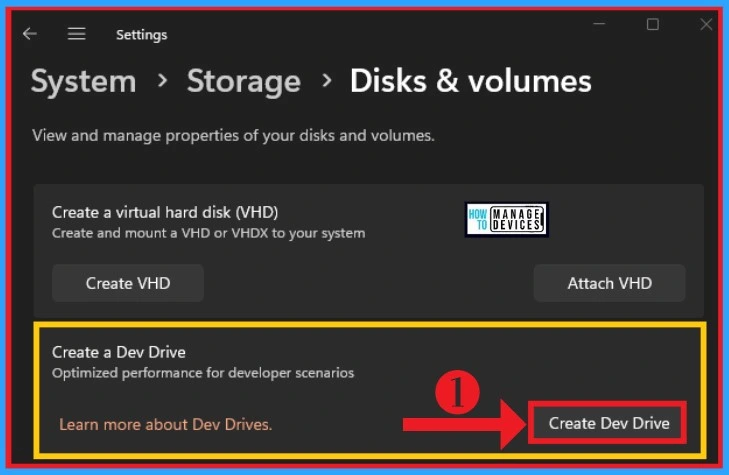
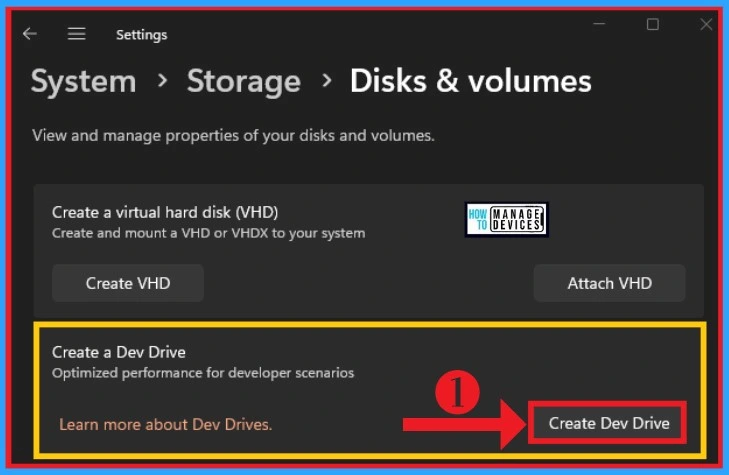
The Disks & volumes option helps you to View and manage the properties of your disks and volumes. You can easily create a Dev Drive from this window. For this, click on the Create Dev Drive option below. It helps to Optimize performance for developer scenarios.
Different Methods to Choose a Dev Drive Location
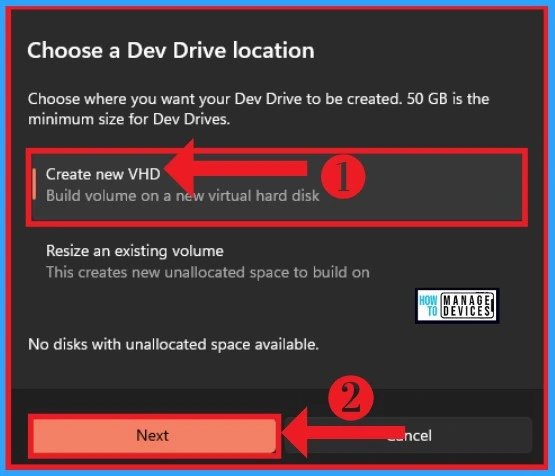
You can choose different locations to select a Dev Drive on your PC from the Disk & Volumes window. 50 GB is the minimum size. The list below shows the other methods to choose a Dev Drive Location.
- Create a New VHD
- Resize an Existing Volume
1. Create a New VHD
Creating a new VHD (Virtual Hard Disk) is one of the methods of creating a Dev Drive on your PC. It helps you to build volume on a new virtual hard disk. Select Create new VHD from the below window. Then click on the Next option.
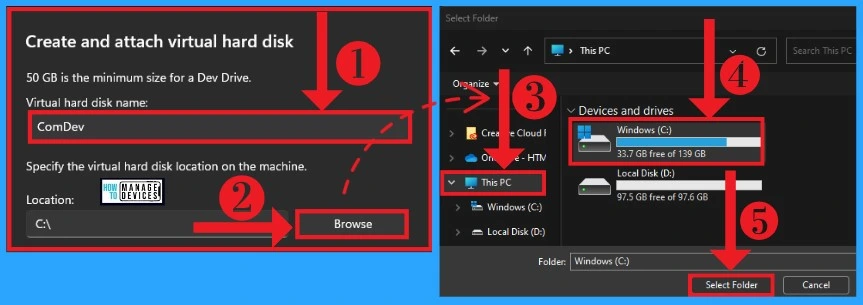
After that, you can give a name for the Virtual hard disk. Here, I give ComDev as a hard disk name. Then click on the Browse option from below to select location. You can easily choose a location for This PC. Windows(C:) is selected here to create a new VHD. Then click on the Select Folder option.
- New Smarter Faster OneDrive and Upcoming Features
- Overview of New Windows Backup Application in Windows
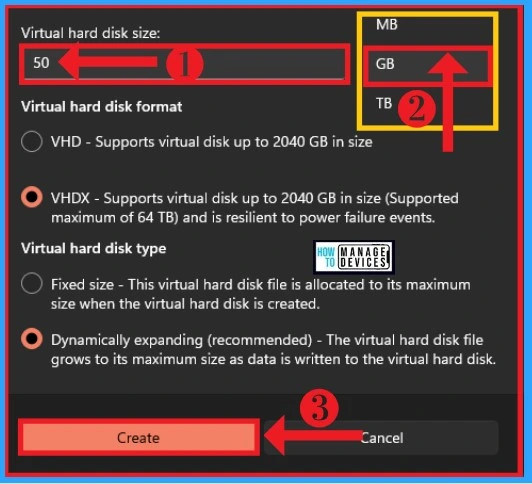
After that, you can give the Virtual hard disk size for your DevDrive. 50GB is the minimum size for a DevDrive. You can select the size from the below window. Select Virtual hard disk format and Virtual hard disk type from this window.
By default, the VHDX option is enabled as the hard disk format, and the Dynamically expanding option is chosen as the Virtual hard disk type. The below screenshot will guide you. You can easily change this option from the window below. Then click on the Create option.
| Virtual Hard Disk Size | Used to |
|---|---|
| VHD | It supports virtual disks of up to 2040 GB in size |
| VHDX | It supports virtual disks up to 2040 GB to 64 TB and is resilient to power failure events |
Initialize Disk
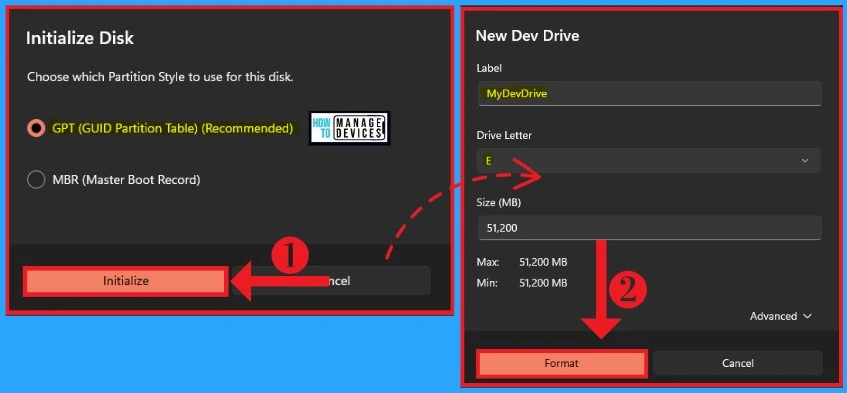
The Initialize Disk option allows you to choose types of partition styles to use for this disk. GPT(Guide Partition Table) and MBR (Master Boot Record) are the 2 options in this window. By default, the MBR option is selected, then click on the Initialize option.
The new Dev Drive option gives the label, drive letter, and size of the Dev Drive. Here, I give MyDevDrive as the label, and E letter is selected as the Drive Letter. This option can be given as user preference. Then Click on the Format option from the below window.
Created DevDrive on your PC
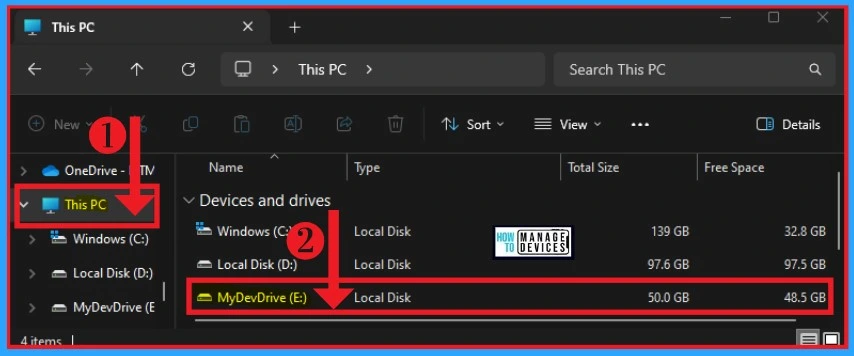
After completing all these steps, you can see the Created Dev Drive on your PC. The below window shows the created Dev Drive from This PC folder. You can also see all the details of the designed drive, like Name, Type, Total Size, Free Space, etc.
2. Resize an Existing Volume
Resize an Existing Volume is the second method used to create a Dev Drive in Windows 11 PC. This method helps you to create a Dev Drive by resizing an existing volume of your PC. The below list shows the steps for creating a Dev Drive by resizing an existing volume.
- Settings >System >Storage
- Click on the Create Dev Drive option from the Disk & Volumes option
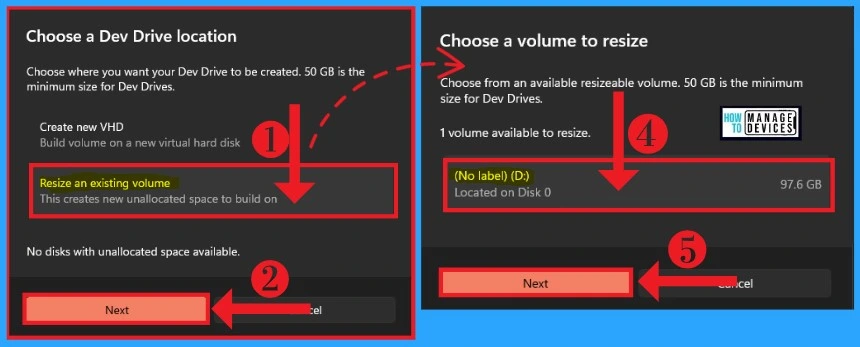
After that, select Resize an existing volume option from the below window. It helps to create new unallocated space to build Dev Drive. Then click on the Next button from the below window.
You can also choose a volume to resize, and 50 GB is the minimum size for Dev Drives. Select the volume from the below window and click the Next option to create Dev Drive.
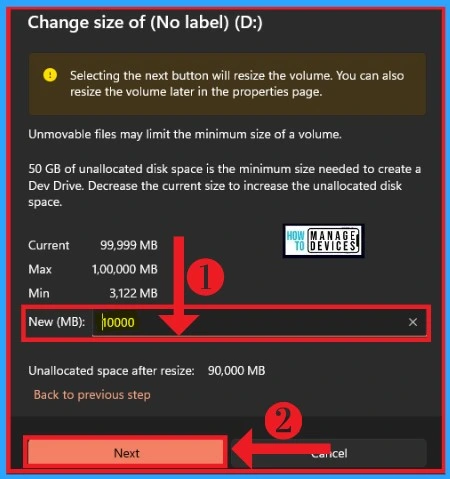
You can easily change the size of the selected volume from this window. This window shows the selected volume’s current, minimum, and maximum. Type the size of volume that you want for your Dev Drive. After resizing, it also shows the unallocated space, then click on the Next option.
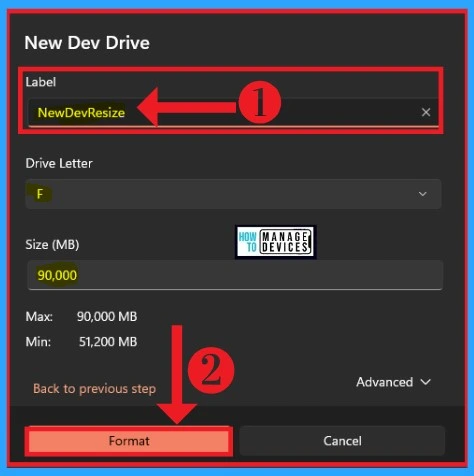
In this window, you can give the label, Drive letter, and size of the new Dev Drive. I give NewDevResize as the label name, and F is selected as the Drive Letter. This window also shows the allocated size for your Dev Drive. Click on the Format option from the below window.
- Microsoft is Planning to Remove VBScript from Windows Permanently
- Adobe Photoshop Express | Complete Feature Review
Created DevDrive Using Resize an Existing Volume
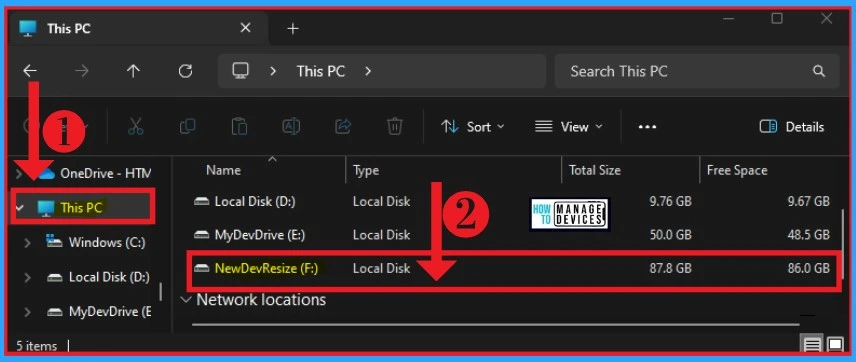
In the below window, you can see the created Dev Drive by Resize an existing Volume. You can easily view your created Dev Drive from This PC folder. For this, open This PC from your Windows 11 PC.
How to Delete Created Dev Drives in Windows 11 PC
You can quickly delete your Created Dev Drives in Windows 11PC. For this, select your This PC folder from your File Explorer. Right-click on the This PC folder, and it will show a new window. You can choose Show more options from the new window.
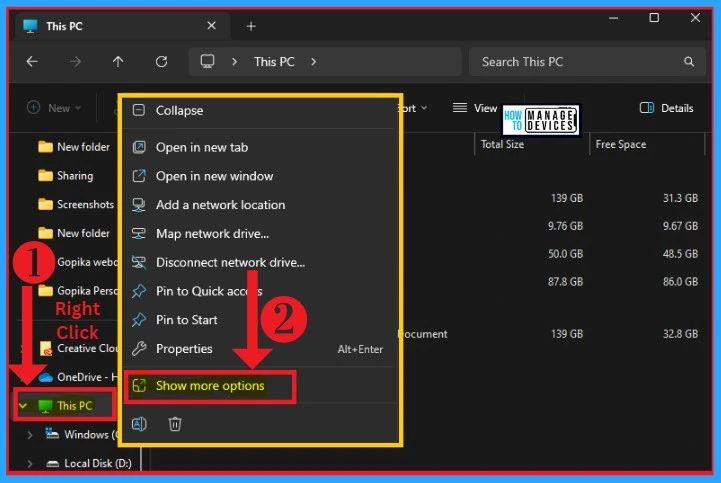
After that, another window will appear on your PC, and this option shows different options. Select the Manage option from this window. It helps you to manage your This PC folder.
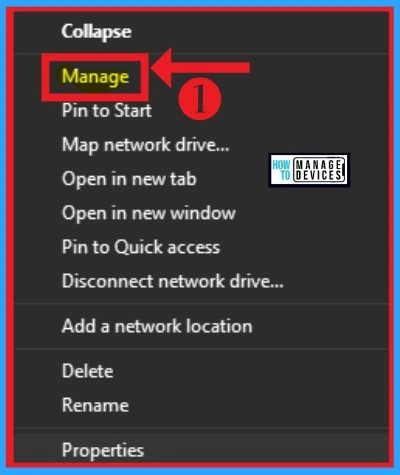
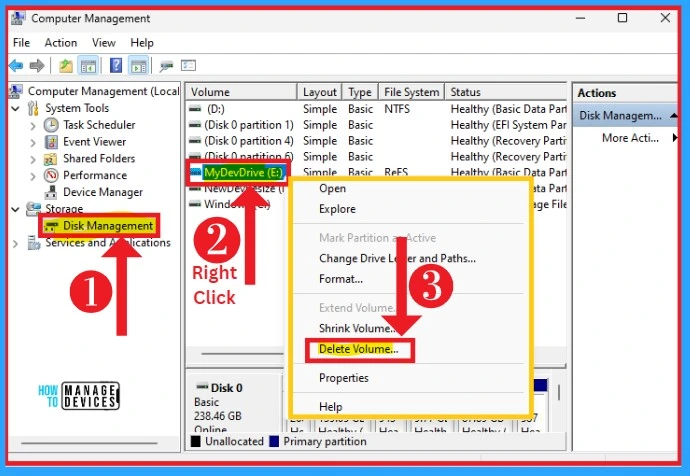
After clicking on the Manage option from the above window, the Computer Management window. Select the Disk Management option from the left side of the Computer Management window. Right-click on the MyDevDrive(Your created Dev Drive) and click the Delete Volume option from the pop-up window.
After that, your created Dev Drive with the Create New VHD method is deleted from your PC. You can check this on your File Explorer.
- Windows 11 KB5031354 KB5031358 October 2023 Patches | 3 Zero Day Vulnerabilities
- Windows 11 23H2 Features and Free Upgrade Guide
Deleting Created Dev Drive in Resize an Existing Volume
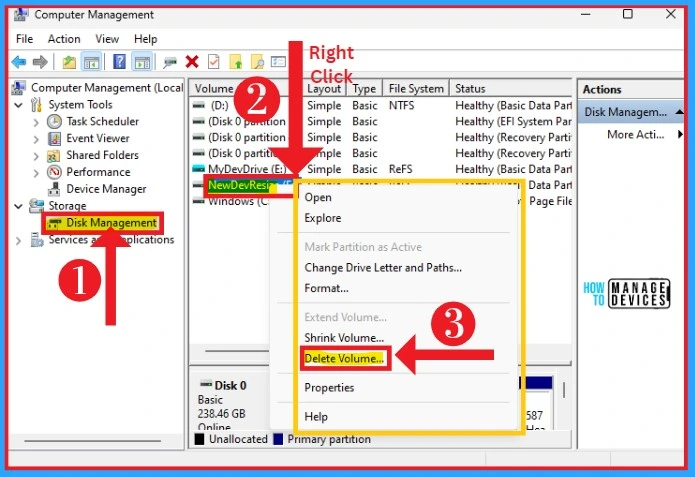
Created Dev Drive in Resize an Existing Volume can be permanently deleted from your. It helps to maintain your storage as before. The steps below will help you delete the Created Dev Drive in Resize an Existing Volume.
- Right Click on the This PC folder from your file explorer
- Select Show More options from the new window
- Click on the Manage option
- Select the Disk Management option from the Computer Management wind
- Right-click on your Created Dev Drive in Resize an Existing Volume
- Click on the Delete Volume option from the below window
We are on WhatsApp. To get the latest step-by-step guides and news updates, Join our Channel. Click here – HTMD WhatsApp
Author
Gopika S Nair is a computer enthusiast. She loves writing on Windows 11 and related technologies. She is here to share quick tips and tricks with Windows 11 or Windows 10 users.

What if the option Create dev drive is missing?
I am running Windows 11 23H2 with the latest updates, I have created an Intune policy for enabling dev drives. When I run fsutil devdrv query, it tells me that Developer volumes are enabled, but when I go to Settings -> System -> Storage -> Disk & Volumes, the option for create a dev drive is missing.
Is there anything else I need to do, or policy that I need to create?