Let’s learn how to use the PsExec utility tool in Windows 11. This tool is a command-line utility built for Windows by Microsoft. PsExec allows system administrators to control a computer remotely to manage the devices single-handedly.
It is a command-line interface with no need for installation, like any other software in a system. Microsoft designed this utility tool to give windows external support to make changes. Windows allows this type of executable file to modify its system settings.
The PsExec utility tool makes you able to IpConfig on a remote system. PsExec executes a program on a remote system, where remotely managed console applications run interactively.
You don’t even have to install a client on the target computer to use PsExec to access a remote process. This post describes using the PsExec utility tool in the command prompt and PowerShell.

- Configure Audit Policies for Windows 11 using GPO or Intune
- Windows 11 Account Lockout Policy Settings Group Policy and Intune options
- Use CHKDSK Tool to Fix Windows Issues
Introduction of PsExec Utility Tool
Utilities like Telnet and remote control programs like Symantec’s PC Anywhere let you execute programs on remote systems. Still, they can be a pain to set up and require you to install client software on the remote systems you wish to access.
PsExec is a lightweight telnet replacement that lets you execute processes on other systems, complete with full interactivity for console applications, without manually installing client software.
PsExec’s most powerful uses include launching interactive command prompts on remote systems and remote-enabling tools like IpConfig that otherwise cannot show information about remote systems.
NOTE! Some anti-virus scanners report that one or more tools are infected with a “remote admin” virus. None of the PsTools contain viruses, but they have been used by viruses, which is why they trigger virus notifications.
PsExec utility tool is an executable file that is not available in windows by default. So, you need to download the PsExec utility tool and set it into your system’s default folder. The following image shows the command line when the PsExec is not installed in your system.
In the following image, when you try to execute the psexec command, the error message shows, “psexec is not recognized as an internal or external command, operable program, or batch file.”

How to Download and Execute PsExec Utility Tool
From the website of Microsoft, you can download the PsExec via downloading the PsTools process utility tool. The PsTools contain many executable files that many users need, and PsExec is one of them. The downloadable link for PsTools is shown below:
The Step-by-step procedure to download and how execute such files or programs in the windows 11 system is briefly described.
Click here to download the PsTools in Windows 11 -> Download PsTools.
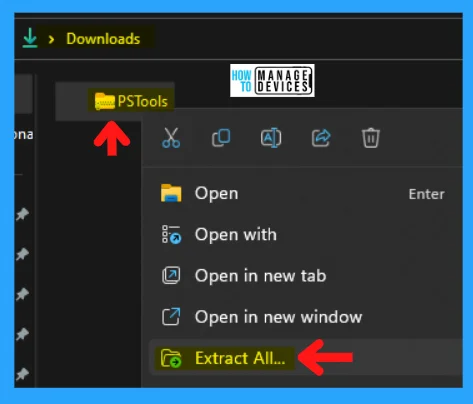
Step 1 Click on the PsTools link above to download the PsTools Zip file. Now go to the downloads folder of your device and right click on the PsTools zip file, and click on Extract All.
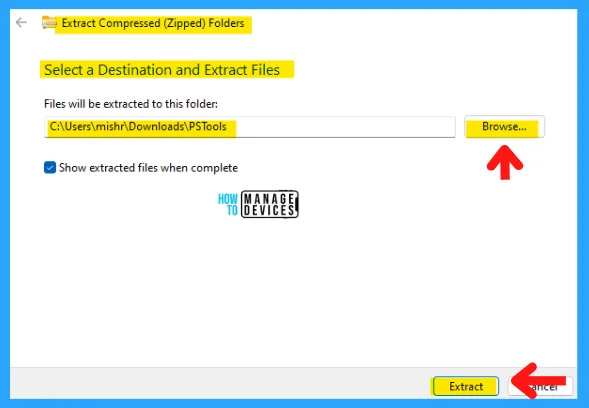
Step 2 next window asks to choose a location to unzip the file by browsing the folder; default, it is set to the same downloads folder. Click Extract to unzip the file and continue.
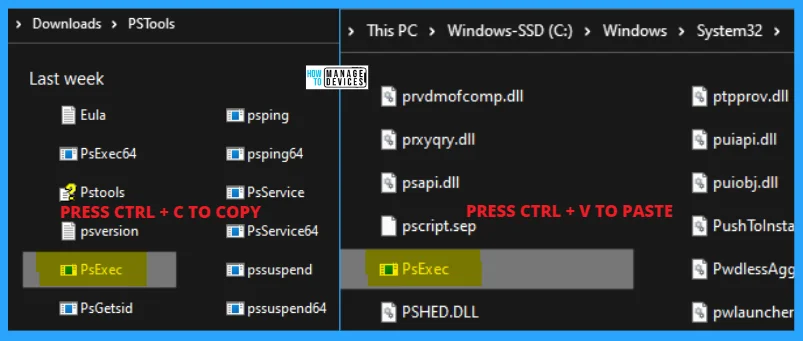
Step 3: Find PsExec in the extracted PsTools folder, press Ctrl + C to copy it, navigate to the C:\Windows\System32> location, and press Ctrl + V to paste it into the folder.
Using the PsExec Utility Tool in Command Prompt
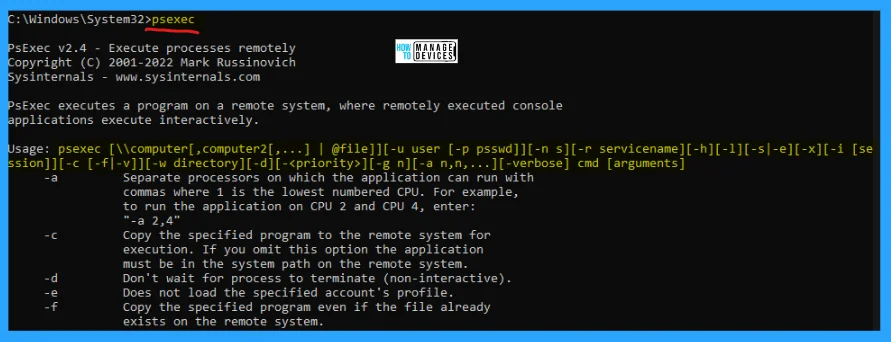
Open the Elevated Command Prompt, type psexec as C:\Windows\System32>psexec, and press Enter. Then it shows the syntax of PsExec is represented below:
psexec [\\computer[,computer2[,…] | @file]][-u user [-p psswd][-n s][-r servicename][-h][-l][-s|-e][-x][-i [session]][-c executable [-f|-v]][-w directory][-d][-<priority>][-a n,n,…] cmd [arguments]
The parameters of the PsExec command line are represented below, with the description of each parameter in the table.
| Parameters | Descriptions |
|---|---|
| -a | Separate processors on which the application can run with commas where 1 is the lowest numbered CPU. For example, to run the application on CPU 2 and CPU 4, enter: “-a 2,4.” |
| -c | Copy the specified executable to the remote system for execution. If you omit this option, the application must be in the system path on the remote system |
| -d | Don’t wait for the process to terminate (non-interactive). |
| -e | Does not load the specified account’s profile |
| -f | Copy the specified program even if the file already exists on the remote system |
| -i | Run the program so that it interacts with the desktop of the specified session on the remote system. If no session is specified, the process runs in the console session. This flag is required when attempting to run console applications interactively (with redirected standard IO) |
| -h | If the target system is Vista or higher, has the process run with the account’s elevated token, if available |
| -l | The run process is a limited user (strips the Administrators group and allows only privileges assigned to the Users group). On Windows Vista, the process runs with Low Integrity |
| -n | Specifies timeout in seconds connecting to remote computers |
| -p | Specifies optional password for user name. If you omit this, you will be prompted to enter a hidden password |
| -r | Specifies the name of the remote service to create or interact with |
| -s | Run the remote process in the System account |
| -u | Specifies the optional user name for login to a remote computer |
| -v | Copy the specified file only if it has a higher version number or is newer than the one on the remote system |
| -w | Set the working directory of the process (relative to the remote computer) |
| -x | Display the UI on the Winlogon secure desktop (local system only) |
| -arm | Specifies the remote computer is of the ARM architecture |
| -priority | Specifies -low, -below normal, -above normal, -high, or -real-time to run the process at a different priority. Use -background to run at low memory and I/O priority on Vista |
| computer | Direct PsExec to run the application on the remote computer or computers specified. If you omit the computer name, PsExec runs the application on the local system, and if you specify a wildcard (\\*), PsExec runs the command on all computers in the current domain |
| @file | PsExec will execute the command on each of the computers listed in the file |
| cmd | Name of application to execute |
| arguments | Arguments to pass (note that file paths must be absolute paths on the target system) |
| -accepteula | This flag suppresses the display of the license dialog |
| -nobanner | Do not display the startup banner and copyright message |
You can enclose applications with spaces in their name with quotation marks, e.g., psexec \marklap “c:\long name app.exe.” Input is only passed to the remote system when you press the enter key, and Ctrl-C terminates the remote process.
If you omit a user name, the process will run in the context of your account on the remote system but will not have access to network resources (because it is impersonating). Specify a valid user name in the Domain\User syntax if the remote process requires access to network resources or to run in a different account.
NOTE! The password and command are encrypted in transit to the remote system.
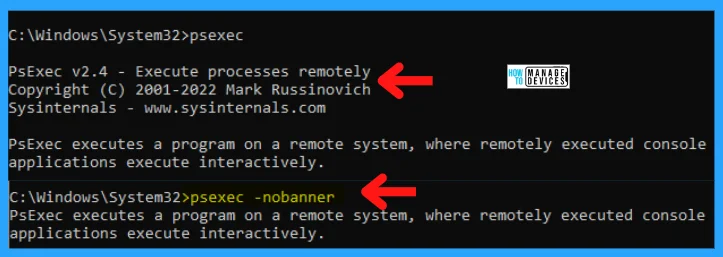
Error codes returned by PsExec are specific to the applications you execute, not PsExec. The psexec command is working properly, as shown in the below image. Let’s check some parameters of the psexec.
C:\Windows\System32>psexec -nobanner
When you execute the command C:\Windows\System32>psexec, the result shows the copyright message, syntax, and parameters.
To remove the copyright message, execute the command C:\Windows\System32>psexec -nobanner and press enter. Now you can see the copyright message disappeared.
C:\Windows\System32>psexec cmd
The psexec utility tool is also used to initiate some system default applications. Let’s run the psexec cmd command to see the results.
When you run the command ‘psexec cmd‘ in the command prompt, it’s open another command prompt window. You can perform any command line arguments in the newly opened command prompt.
Now you can close the newly opened command prompt, showing a message in the command prompt window, where the psexec cmd executed as ‘cmd exited with error code -1073741510‘.
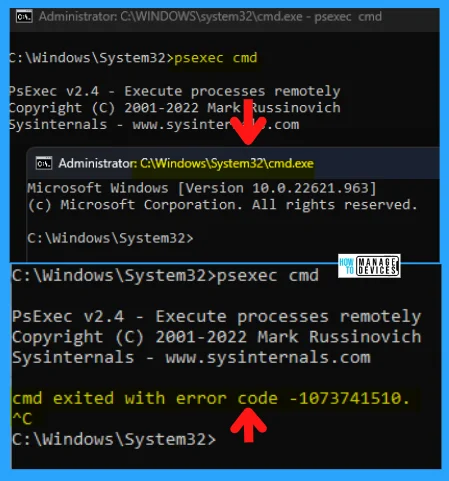
In the command psexec cmd, you can replace the cmd with notepad as psexec notepad to open the notepad immediately, or you can replace any system default application to run.
C:\Windows\System32>psexec -s cmd
In the psexec utility tool, the -s command is used to run the remote process in the system account. If you want to run psexec -s cmd, it opens another command prompt window with the system account name.
- Open Elevated Command Prompt
- Type psexec -s cmd
- Press Enter
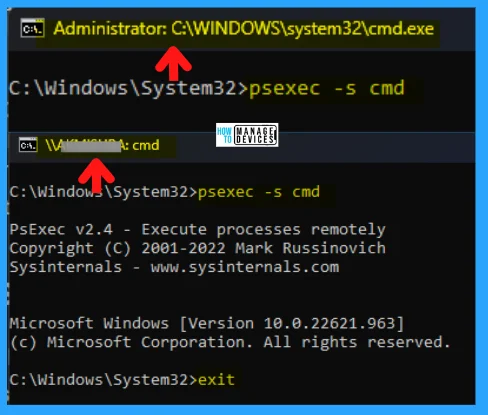
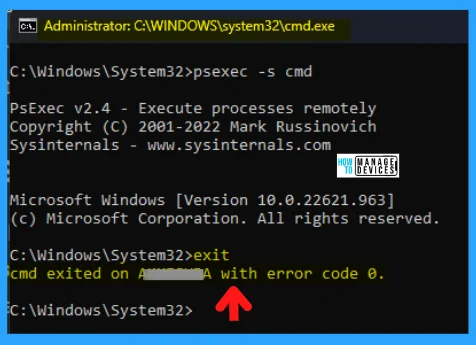
Now type exit and press Enter to close the system account command prompt window; the system account command prompt closes with the error message as cmd exited on username with error code 0.
NOTE! The error code 0 means the command was executed successfully.
C:\Windows\System32>psexec -accepteula
It has license agreements when you want to install some tools or any application. The same process is applicable with psexec. This flag ‘-accepteula‘ suppresses the display of the license dialog.

The following commands show the different processes and execution of the commands:
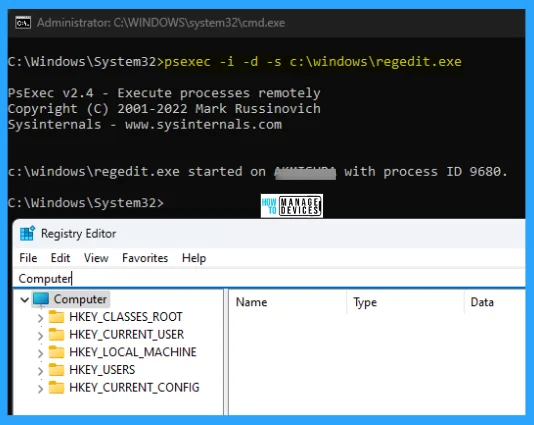
This command is used to run Regedit interactively in the System account to view the contents of the SAM and SECURITY keys; the syntax is given below.
psexec -i -d -s c:\windows\regedit.exe
To run Internet Explorer with limited-user privileges, use the command presented below.
psexec -l -d “c:\program files\internet explorer\iexplore.exe”

The command launches an interactive command prompt on \\marklap, and the syntax for the command is presented below.
psexec -i \\marklap cmd
This command executes IpConfig on the remote system with the /all switch and displays the resulting output locally. The syntax is presented below.
psexec -i \\marklap ipconfig /all
This command copies the program test.exe to the remote system and executes it interactively; the syntax is illustrated below.
psexec -i \\marklap -c test.exe
This command specifies the full path to a program installed on a remote system. The syntax is represented below if it’s not on the system’s way.
psexec -i \\marklap c:\bin\test.exe
Using PsExec Utility Tool in PowerShell
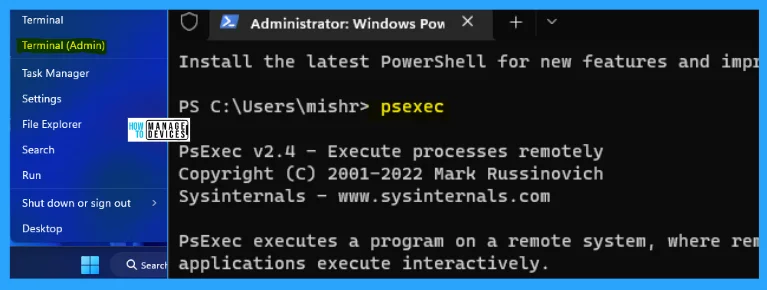
PsExec utility tool is also used in the PowerShell Admin console to execute the process locally or remotely. You can run all the commands with the same execution procedure in the command prompt.
The information on How to Use PsExec Utility Tool in Windows 11 is helpful. Please follow us on HTMD Community and visit our website HTMD Forum if you like our content.
Author
Alok is a Master of Computer Applications (MCA) graduate. He loves writing on Windows 11 and related technologies. He likes to share his knowledge, quick tips, and tricks with Windows 11 or Windows 10 with the community.
