Hello everyone! Today, we’re discussing the best way to install ASAP Utilities through the Intune Enterprise App Catalog. As many of you know, the Enterprise App Catalog offers various advantages for application deployment.
In our previous posts, we’ve explored different types of app installation processes. Microsoft Intune provides a range of deployment features, and one of them is the Enterprise App Catalog, which facilitates the prepackaged application deployment process.
This post will focus on installing ASAP Utilities, which stands for As Soon As Possible Utilities. It is a comprehensive tool that enhances functionality in Excel. Excel plays an integral role in data management and analytics.
One of the best features of ASAP Utilities is its ability to remove duplicates, combine cells without losing information, and combine rows and columns. This application saves time, allowing users to work more efficiently. As a result, it enhances the overall effectiveness of Excel for its users. This post will explore how to install ASAP Utilities, so let’s get started.
Table of Contents
What are the Benefits of ASAP Utilities App?
ASAP Utilities is a time-saving tool that automates repetitive tasks, reduces errors, and enhances data accuracy. It is user-friendly, easy for beginners and advanced Excel users, and has a wide range of features. It makes Excel work more efficiently and effectively for users.
Best way to Install ASAP Utilities using Intune Enterprise App Catalog App
The discussion above covers various aspects of the ASAP Utilities app, including its benefits and uses. The app is easy to install through the Enterprise App Catalog. Let’s look how to install it using the Enterprise App Catalog.
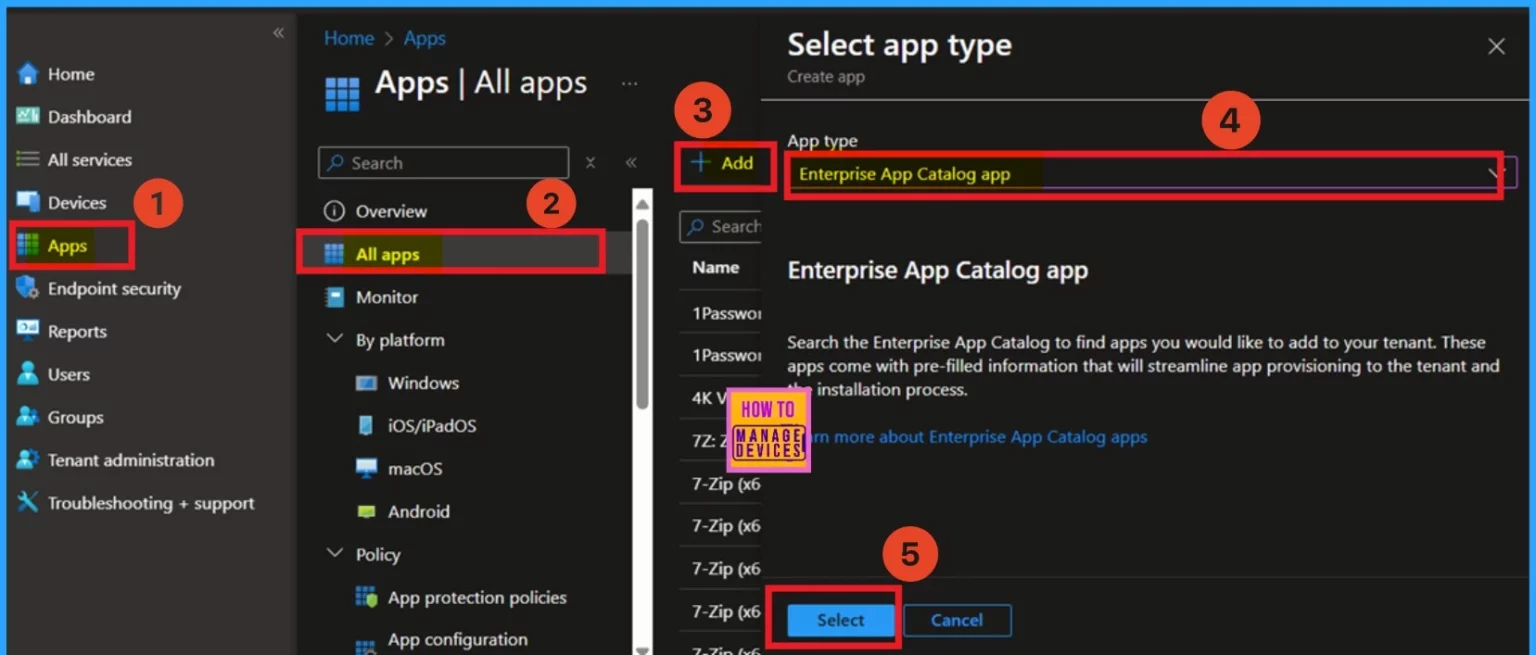
First, you must sign in to the the Microsoft Intune admin center. Begin by navigating to the “Apps” section and click on “All Apps.” Next, select the “+ Add” option.
- How to Manually Sync Intune Policies ASAP Time Intervals from Enrolled Devices
- Changes in File Opening Behaviour for MS Word Excel PowerPoint and M365 Apps on Outlook iOS, Android
- Install Cloud Compare App using Intune Enterprise App Catalog App
App Information
After selecting the app type, you will be directed to the App information page. Here, you can find a hyperlink to “Search the Enterprise App Catalog.” Click on this link, and you will be taken to a selection section where you can browse various apps. From there, you can choose the ASAP utilities you want and then click “Next.”
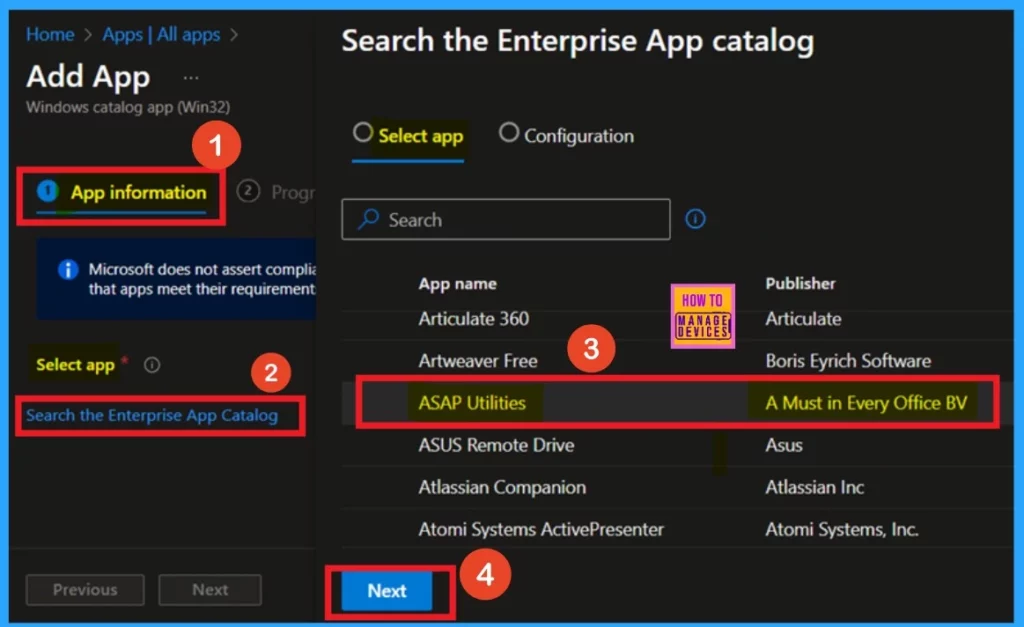
When you click “Next,” you will be now on to the Configurations tab. In this tab, you will see the available versions of ASAP Utilities. Currently, only one version is displayed, so you can select it and click “Select.”
| Package Name | Language | Architecture | Version |
|---|---|---|---|
| ASAP Utilities | en-US | x86,x64 | 8.7.2 |

Add a Logo
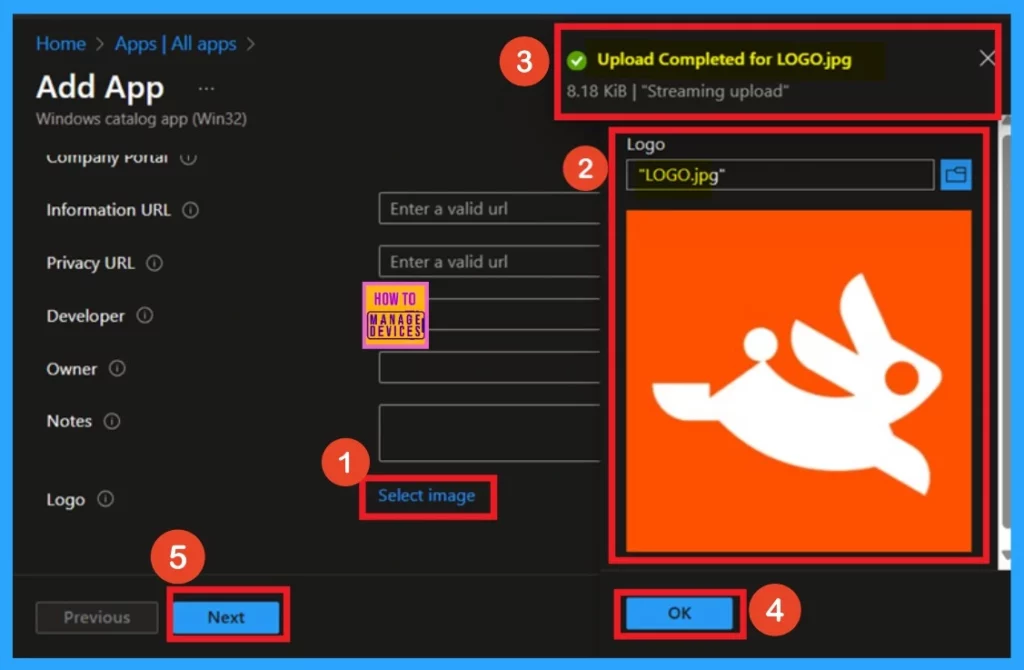
You are currently on the app information page. As you scroll down, you will find more details about the app. At the end of the app information page, there is an option called ”select an image”, in a hyperlink that allows you to upload the app logo. You can add the logo by using the file upload option.
Once the upload is complete, you will receive a notification. Click “OK” to proceed. Your logo will then be displayed on the app information page. After that, you can click on “Next.”
Program
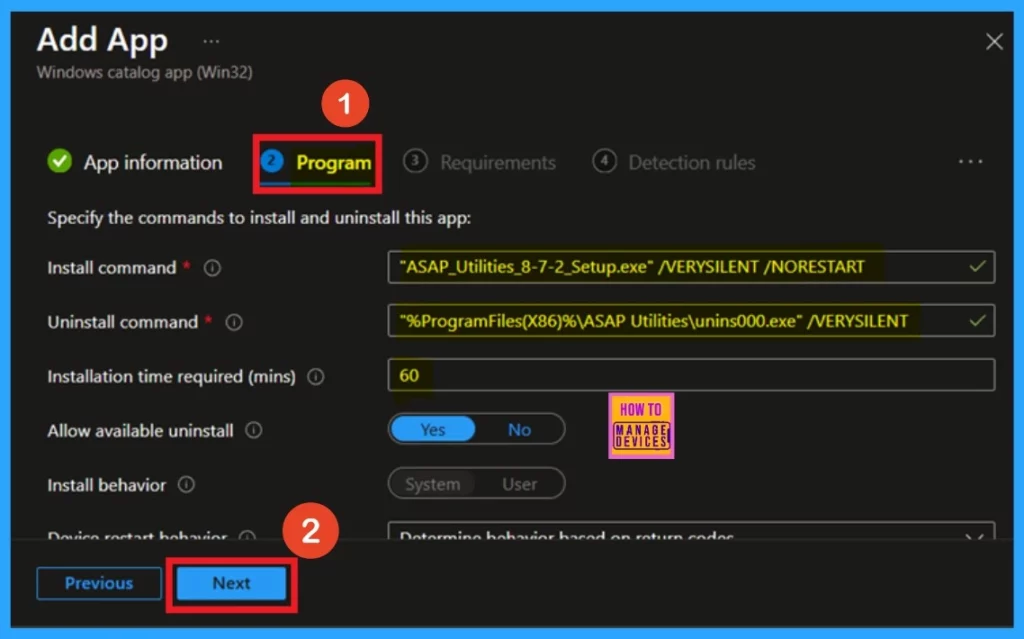
After adding the logo, you are now on the program page. Here, you will see details about the installed and uninstalled apps. You don’t need to do anything; just click on Next. The below screenshot will provide you the guidence.
Requirements
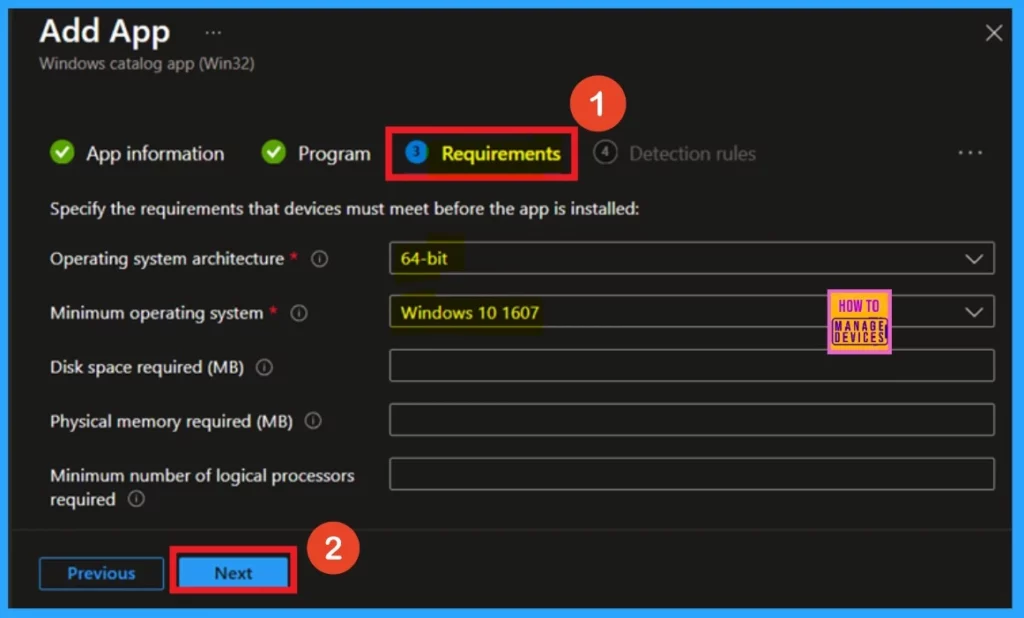
You are currently on the requirements page. Here, you will find details about the architecture and minimum operating system. You do not need to do anything on this page, as the Enterprise app catalog has already completed it. Click “Next” to proceed.
Detection Rule
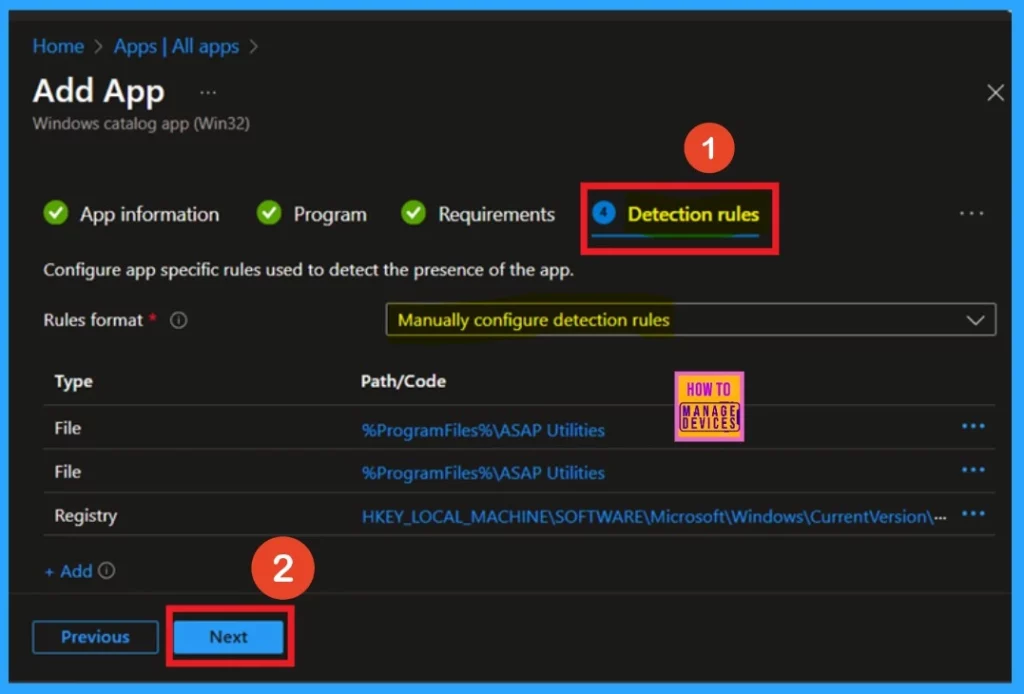
Next, you will access the Detection Rule tab. In this section, you can manually configure the detection rule using the specified format. While you can view the registry and file paths here, there is no need to make any changes.
- Simply verify the information and click “Next” to continue.
Scope Tag
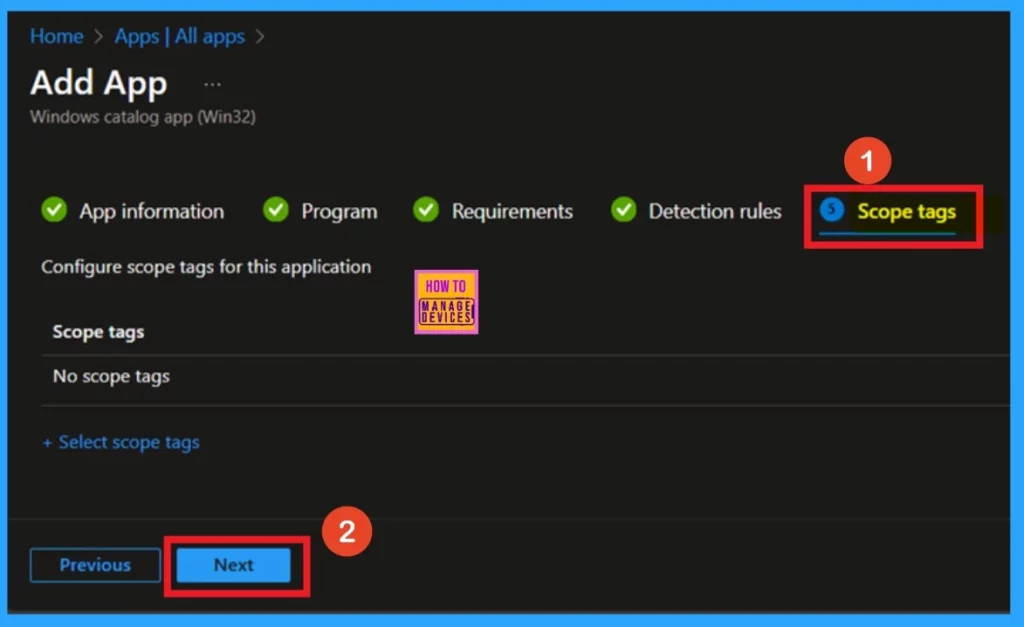
You are currently in the Scope section. Adding a scope tag is optional for the policy, but it can be helpful for organizing and managing your policy deployments. To add a scope tag, click on the “Select Scope Tag” hyperlink.
This will allow you to choose the appropriate scope tag from the available options. Once you have selected the desired scope tag, click “Next” to proceed to the next step.
- I skipped this section and click on the Next.
Assignment
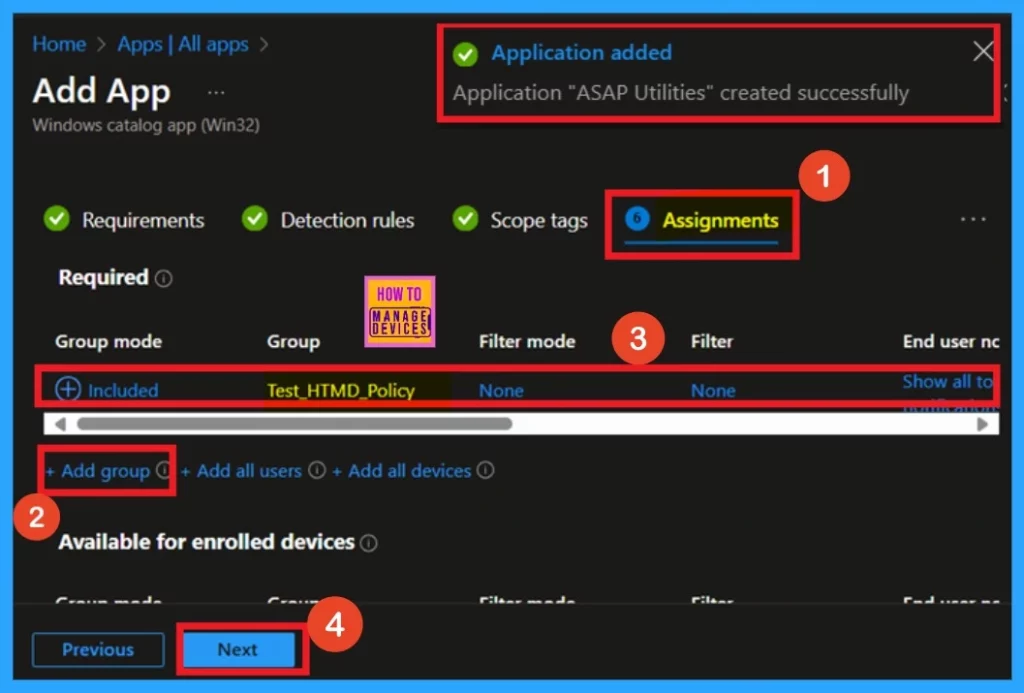
You are now in the Assignment section, which is very important. To install the app for a specific group, first you have to Click on the “Add Group” option. Select the group you want to install the app for. Once selected, the group will appear in the Included section. Finally, click Next to proceed.
Review + Create
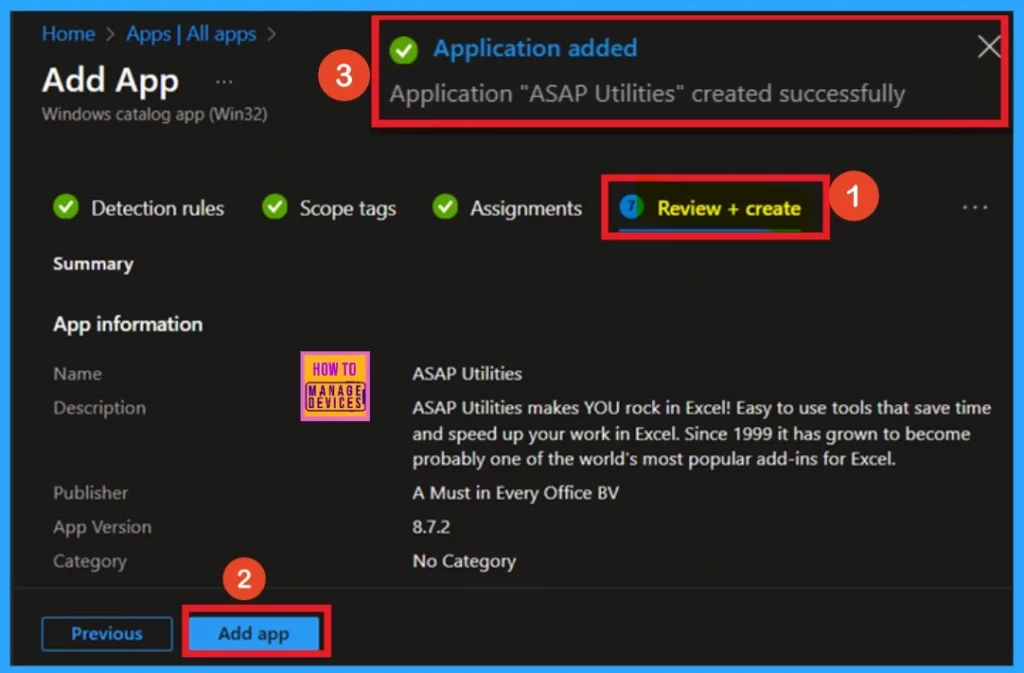
The next section you will encounter is Review + Create. This page serves as a detailed summary, displaying all the details related to the application. It provides an overview of key information, including the installation process and specifics about the application, such as its program name, publisher, and version details.
- Once you’ve reviewed the information and confirmed everything is correct, click on Add App.
- Then you will get a notification confirming that your ASAP Utilities app created Succcessfully.
Monitor Status – Device Status
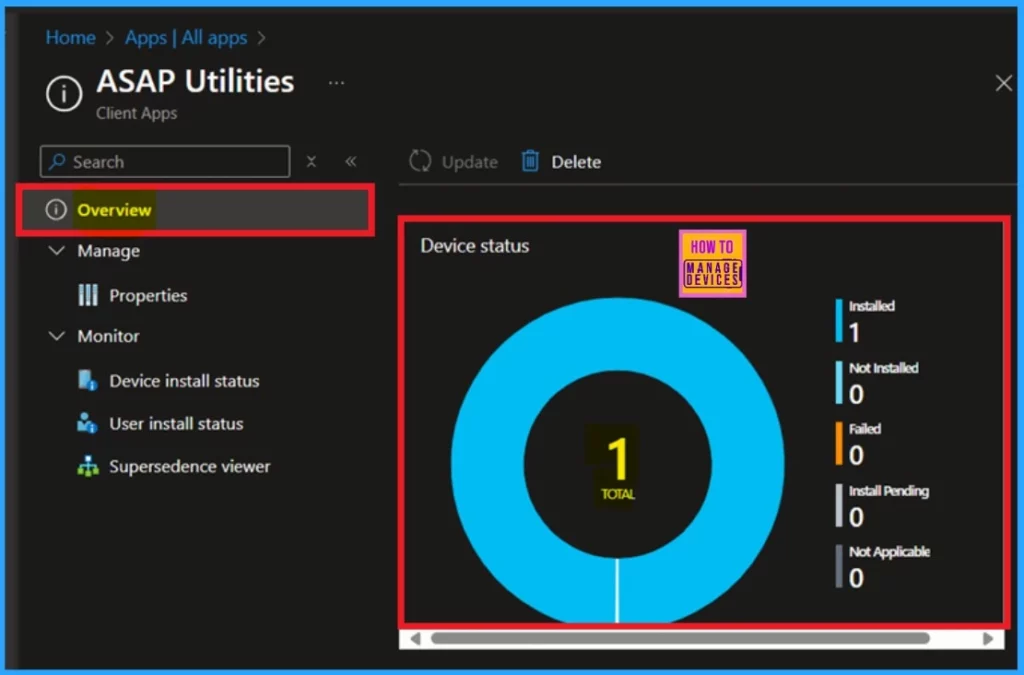
Now that your app has been successfully created, it’s important to verify the device status to ensure that the installation was completed correctly. To do this, first navigating to Apps > All Apps. Then Type “ASAP Utilities “ in the search bar to locate your app. Once you find ASAP Utilities, click on the app to open its details.
- This will redirect you to the Overview page, where you can review the device status.
- Here, you will see an indication confirming that the app has been successfully installed on the device.( The result will get it after the 8 hours waiting period).
End User Experiance
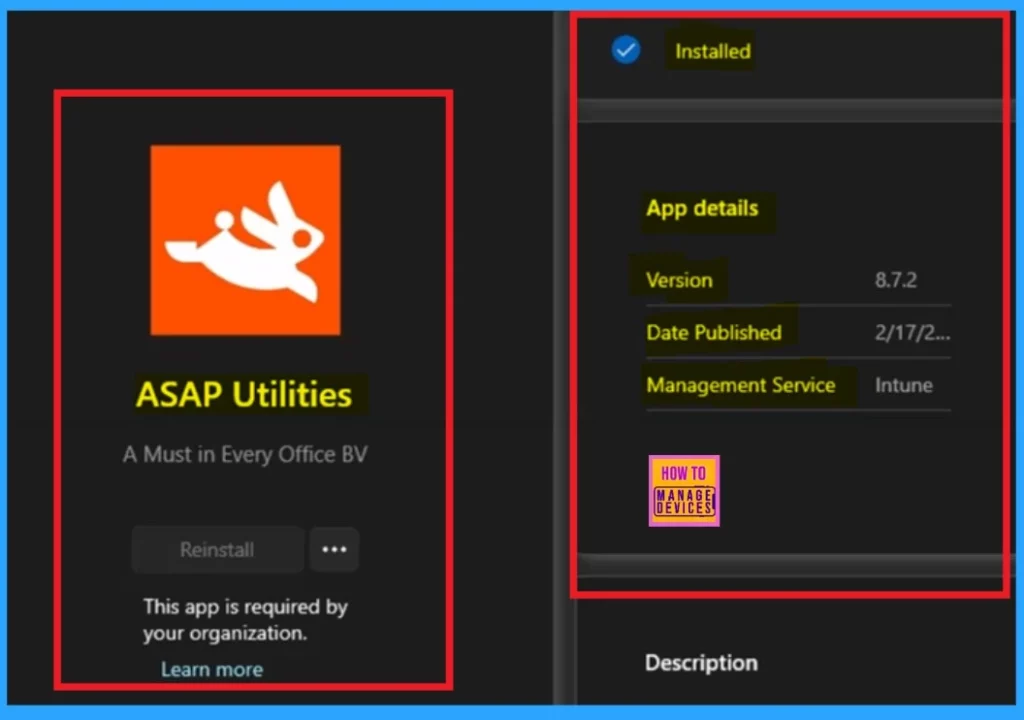
You can view the end-user experience results by checking the Company Portal. Navigate to the “Downloads and Updates” section, where you will find a list of apps installed in your organization. You can search for a specific app, but please note that the ASAP Utilities app will only appear after the policy deployment period of eight hours.
Need Further Assistance or Have Technical Questions?
Join the LinkedIn Page and Telegram group to get the latest step-by-step guides and news updates. Join our Meetup Page to participate in User group meetings. Also, Join the WhatsApp Community to get the latest news on Microsoft Technologies. We are there on Reddit as well.
Author
Anoop C Nair has been Microsoft MVP for 10 consecutive years from 2015 onwards. He is a Workplace Solution Architect with more than 22+ years of experience in Workplace technologies. He is a Blogger, Speaker, and Local User Group Community leader. His primary focus is on Device Management technologies like SCCM and Intune. He writes about technologies like Intune, SCCM, Windows, Cloud PC, Windows, Entra, Microsoft Security, Career, etc.
