Have you heard about Robopack? Intune and Robopack are SaaS solutions for end-to-end 3rd-Party App Lifecycle Management. Robopack is a helpful tool designed to improve efficiency in packaging tasks. It uses advanced automation to simplify complex processes.
Its interface is admin-friendly, ensuring ease of operation for all users. Operating at high speed, Robopack efficiently handles tasks such as package conversion and 3rd party app patch management, enhancing overall workflow productivity, etc.
Our recent post, “Robopack Makes Intune App Deployment to the Next Level,” explains Robopack’s comprehensive capabilities. This post describes how Robopack enhances Intune app deployment by simplifying app conversion and patching.
The post covers the technical aspects and includes personal insights and experiences. It highlights Robopack’s efficiency and effectiveness in optimizing workflow and ensuring easy operations.
- Robopack Intune Patching Solution is Free for Smaller Customers and NGO
- Intune Application Deployment using MSI EXE IntuneWin Formats
- Maximum Size Cap for Intune Win32 App is Increased Now
- Intune Advanced App And Vulnerability Management For 3rd Party Patch Management From Microsoft
- 6 Exciting Features Coming to Intune Enterprise App Management
- IntuneWinAppUtil.exe Windows 11 Compatibility
What is Package Conversion for Intune in Robopack?

Robopack will convert MSI packages into formats ready to deploy through Microsoft Intune.
How Does Robopack Simplify the Conversion Process?
Robopack provides an Admin-friendly interface where users can drag and drop their MSI files. With just a few clicks, these files are automatically converted into formats compatible with Intune, making the deployment process more accessible.
Robopack with New Updated Features
Robopack provides several key features that help with efficient software management. It specializes in package conversion for Intune, simplifying the process with drag-and-drop functionality. With access to a library exceeding 30,000 packages, Robopack ensures comprehensive coverage for diverse software needs.
It also helps patch management, providing automated updates to enhance app security and functionality and ensuring systems remain up-to-date with minimal intervention.
Creating a Trial Account on Robopack.com
To begin Robopack, visit Robopack.com and sign up for a complimentary trial. You can log in using either your Entra ID or an email account. Fill in your information, and an activation link will promptly arrive. Follow the link to set up your account password and complete the registration process.
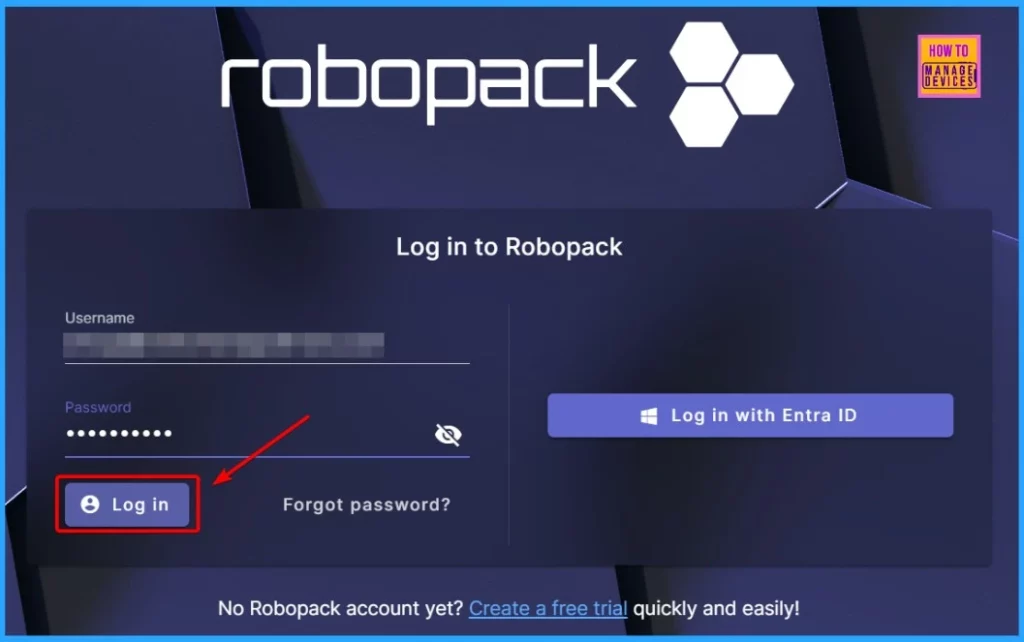
- Enter your Username and Password in the Robopack Log-in window.
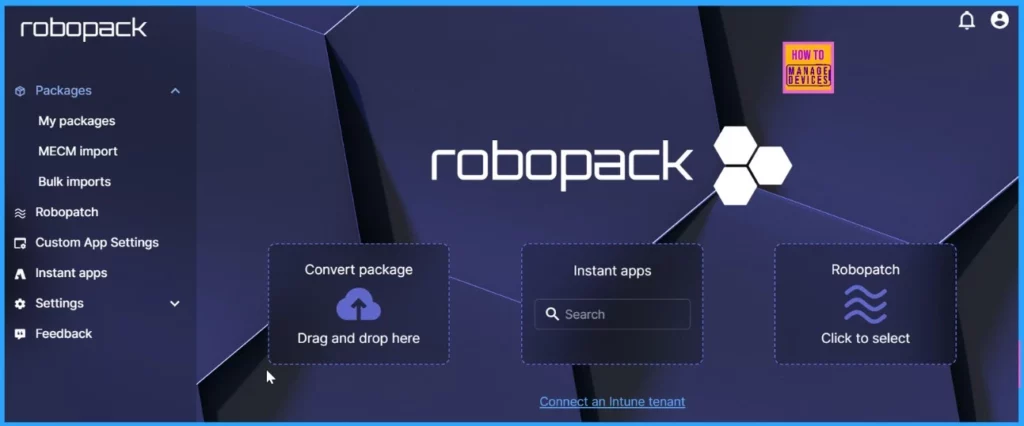
The Robopack home screen is designed for simplicity and efficiency. You’ll find various options for managing your account and accessing support on the left side. Three main features stand out in the centre of the screen.
| Robopack Feature | Details |
|---|---|
| Convert Package | Easily convert software packages |
| Instant Apps | Access a wide range of applications ready for deployment |
| Robopatch | Automate patch management to enhance app security |
Connecting Your Intune Tenant
You can connect your Intune tenant to Robopack to use its powerful features. Once connected, you can efficiently manage app deployments and simplify your software management tasks within your Intune environment.
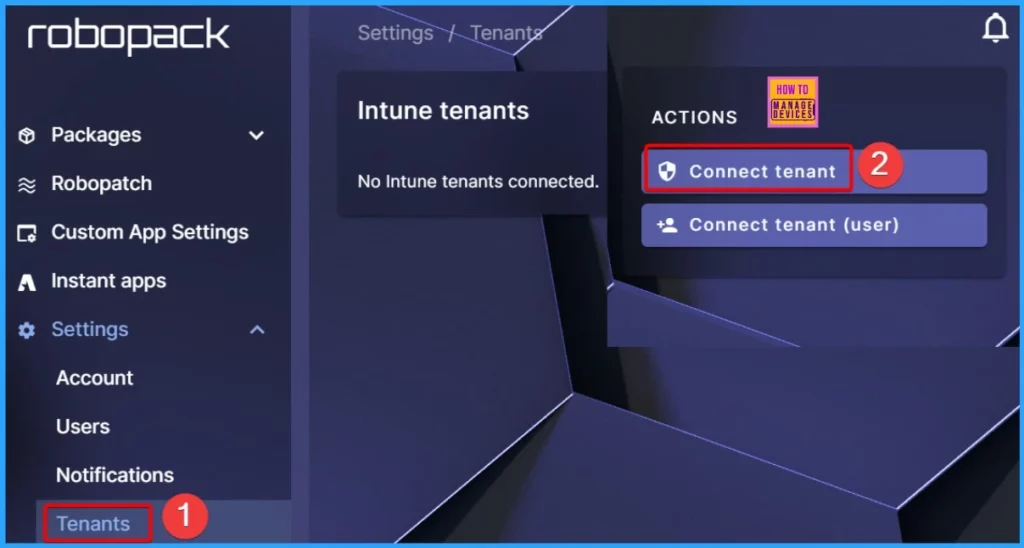
- Select the Tenants option on the Left of the Robopack
- Then choose the Connect Tenant option
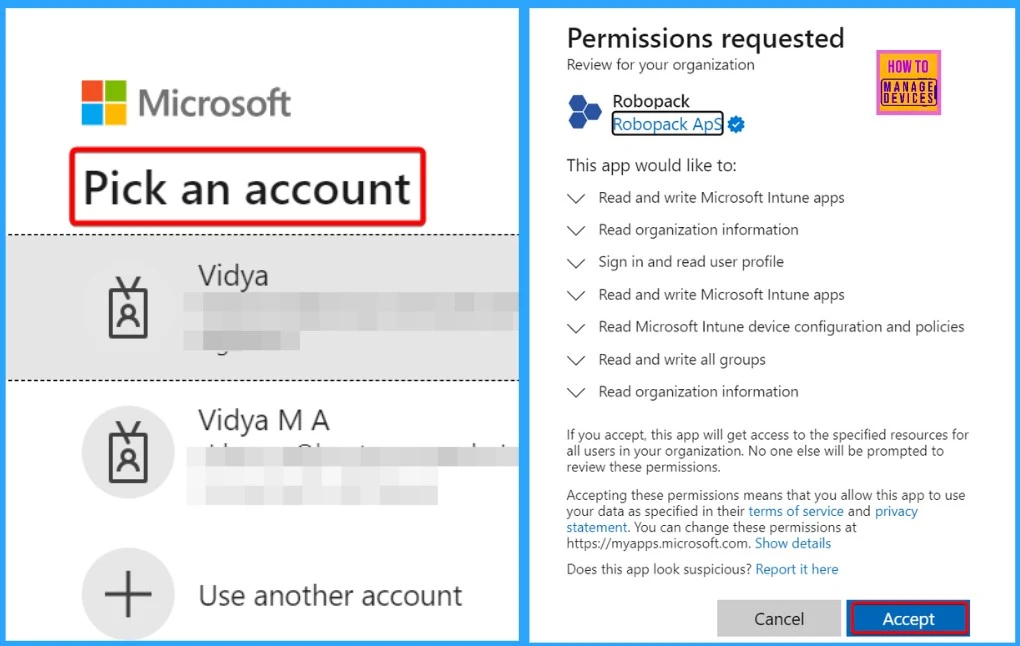
This step is crucial. Enter your email ID and password to log into your Intune admin portal. Once logged in, you’ll need to review and accept the permission request for your organization. Reviewing and accepting the permissions ensures that Robopack can securely integrate with your Intune environment and provide you with the necessary access to manage app deployments effectively.
- If you accept, this app will give all users in your organisation access to the specified resources. No one else will be prompted to review these permissions.
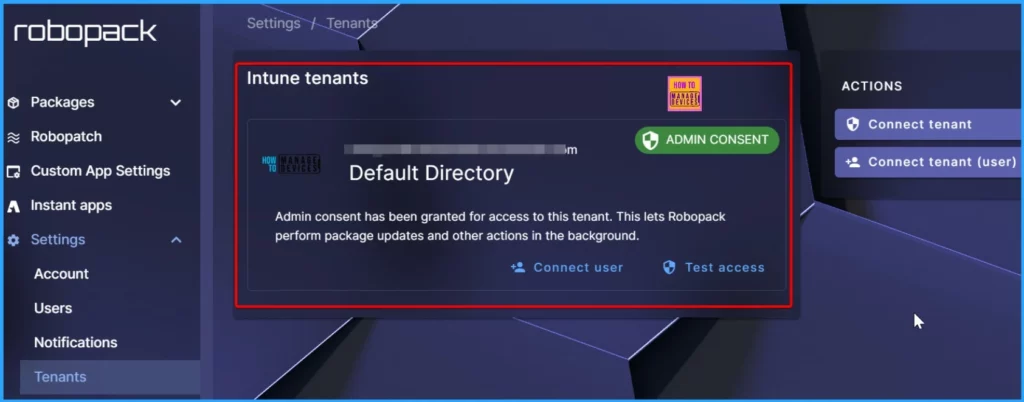
The message below shows that Admin consent has been granted to access this Tenant. This allows Robopack to perform package updates and other actions in the background.
Your First Patch Setup in Robopack
Now, you’re ready to set up patching with Robopack. First, select the Robopatch option on the Left side of the Robopack and select the “Add to Robopatch” option. Then click to select an app. Here, we selected Google Chrome.
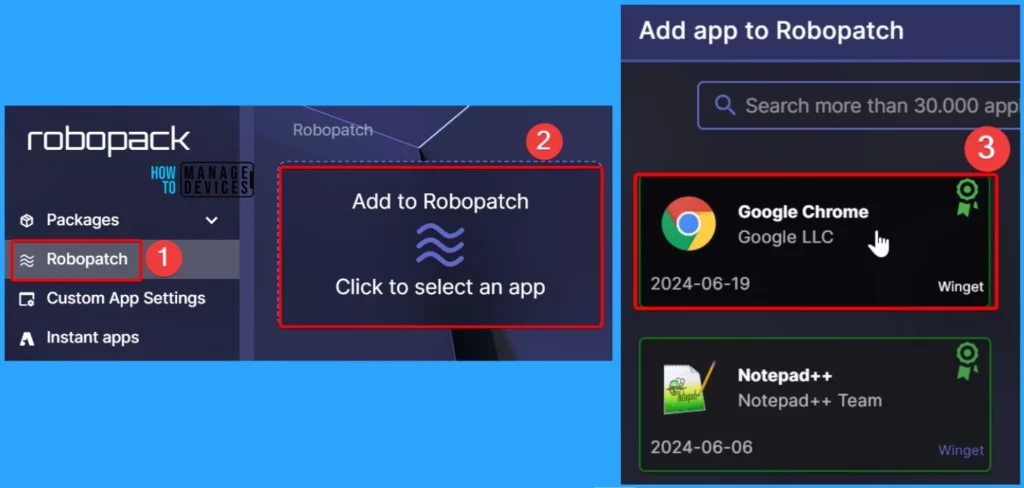
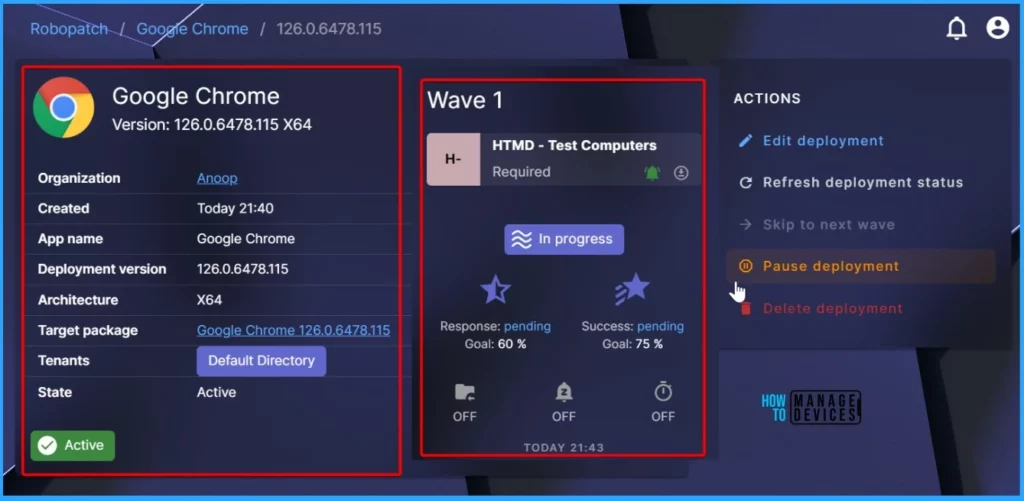
After selecting Google Chrome, Robopack shows the latest version, 126.0.6478.115 X64 of Google Chrome. After that, select the Add deployment wave.

Patching in Robopack uses “waves” to deploy applications in a specific order, ensuring proper testing. For example, you can deploy Chrome to a group of Virtual Computers, then to Google Applications owners, and finally add it to the Company Portal.
You can add one or more groups to a wave and define success criteria. If a wave fails, Robopack pauses the deployment process and notifies you.
- Select the Add group option and then assign the app to the group.
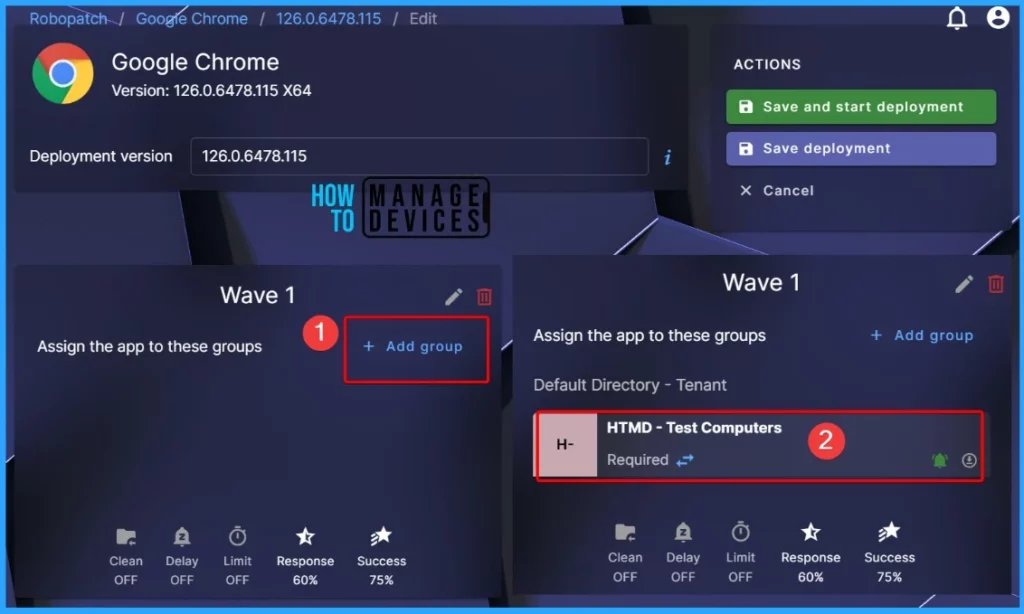
The screenshot below shows the organisation’s options, created date, app name, deployment version, architecture, target package, tenant and state. The selected Wave is HTMD Test Computers; it is in progress.
End-User Experience
When you click “Save & Start,” Robopack uploads Chrome to your tenant and initiates assignments for Wave 1. It monitors Intune to ensure it meets the success criteria before proceeding to Wave 2 and subsequent waves.
From now on, Google Chrome will automatically update whenever a new version is released, ensuring your applications stay current and secure.
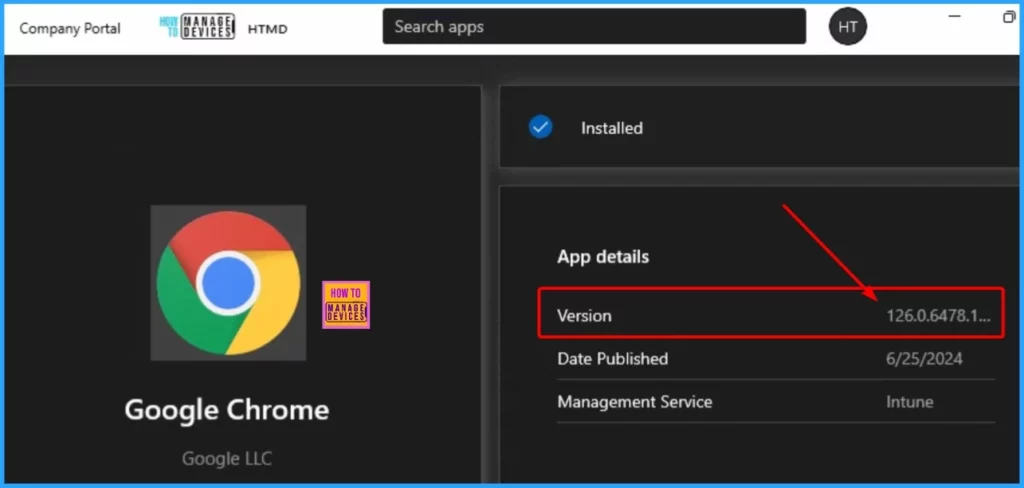
The Company portal window helps you show that Google Chrome has been patched successfully. It also shows the App details, such as the Version, Date published and Management service.
Customizing Application Settings in Robopack
Robopack allows users to customize application settings effortlessly. Select an application, such as Acrobat Reader, and then add specific configurations to refine the installation process. For instance, when Adobe starts, you can include registry keys to remove the End User License Agreement. Additionally, you can integrate files and PowerShell scripts as needed.
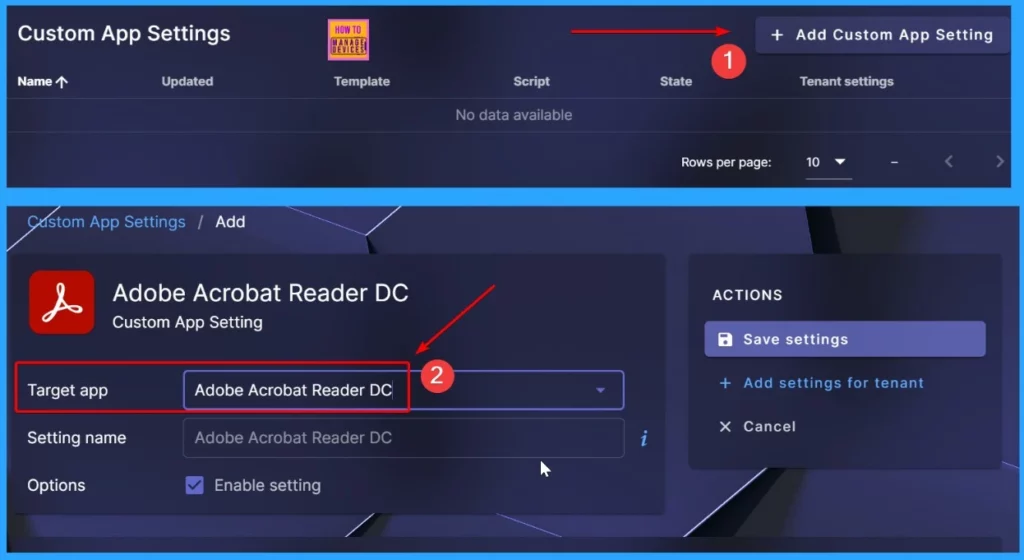
- Select the Custom App settings on the Left side of Robopack.
- Click the Add Custom App setting.
- Select the Target app as Adobe Acrobat Reader DC.
You can easily add your Registry Values by clicking the Add registry value option. Also, you should provide the details such as the Hive, Registry key, Value name, Value type value data, etc.

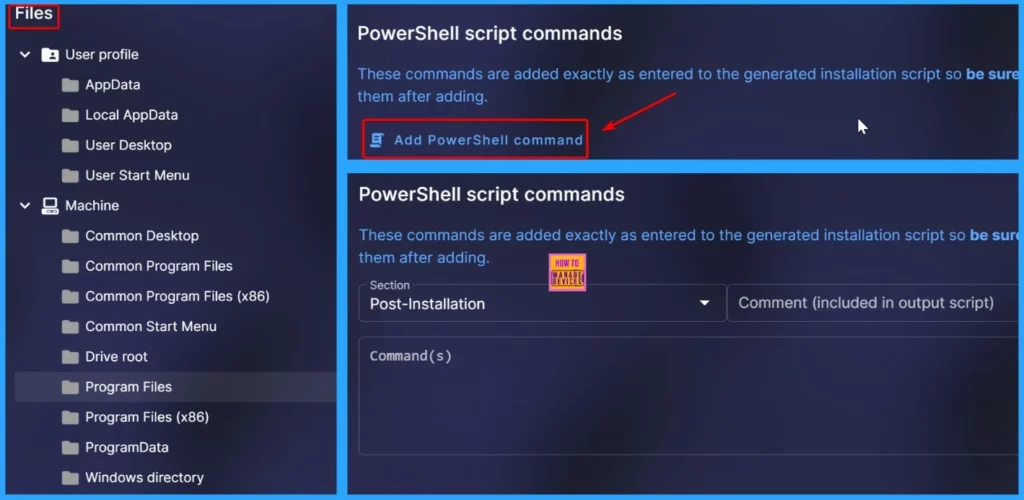
You can also add the File type and PowerShell Script commands. You can easily add the Files and PowerShell script commands by clicking the Add files and Add PowerShell command options.
Uploading and Converting Apps with Robopack
Let’s discuss how to upload and convert your custom apps using Robopack. You can upload any silent installer, and Robopack will wrap it in PSADT and IntuneWin formats, making it easy to upload to Intune.
Robopack can also create MSIX and AppV packages for you, providing flexibility in deployment options. The process is straightforward: once your app is converted to IntuneWin format, you can upload it to Intune with just a few clicks.
- Select the “Upload New Package” option (Select files or Select folder)
- The Upload new package includes 4 settings options. They are as follows
- Select package files
- Select a target package type
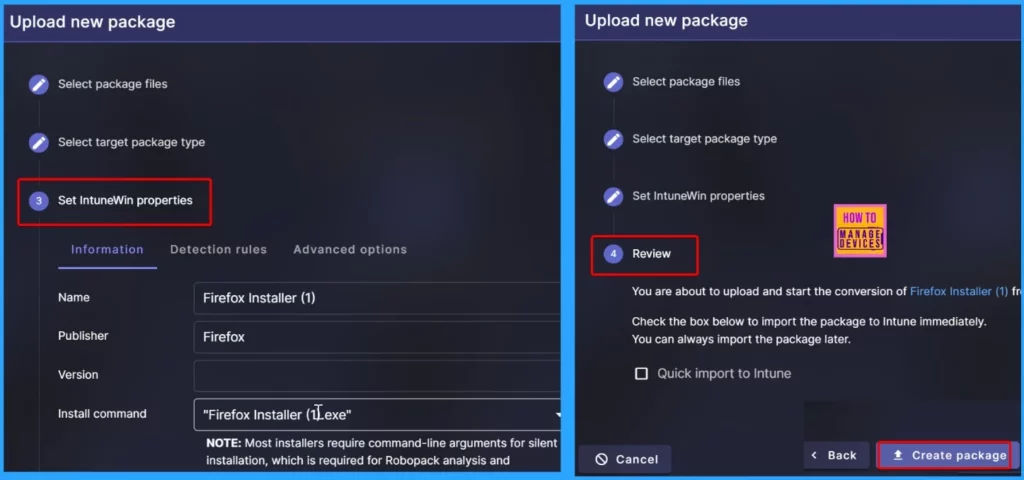
- Set IntuneWin properties
- Review
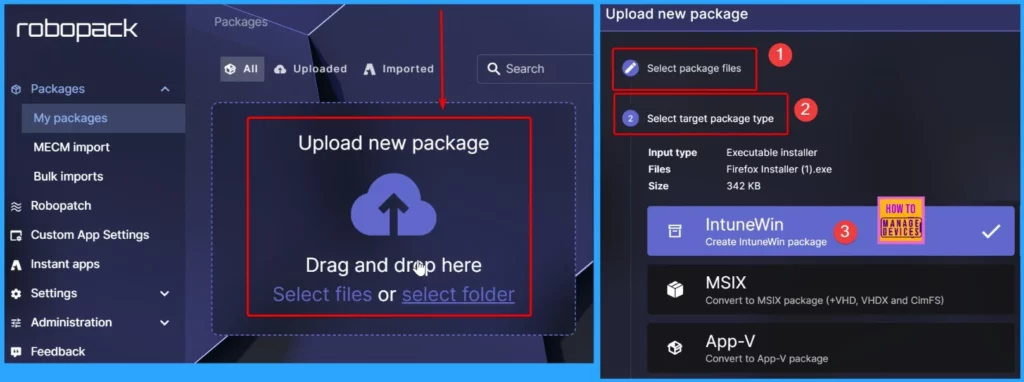
Once you’ve chosen the package files, the next step is to select the target package type we have chosen here: IntuneWin. After selecting IntuneWin, you’ll move on to setting the IntuneWin properties. These settings include the application’s name, publisher, version, and other configurations for how it will work in Intune.
Finally, the last step is reviewing all your settings before finalizing the package creation process. All 4 steps ensure everything is accurate and ready for deployment within your Intune environment.
Robopack even extracts and uploads the application icon to Intune, ensuring a polished appearance. After uploading, you’ll receive a shortcut to the application in Intune, allowing you to verify that the creation process was successful.
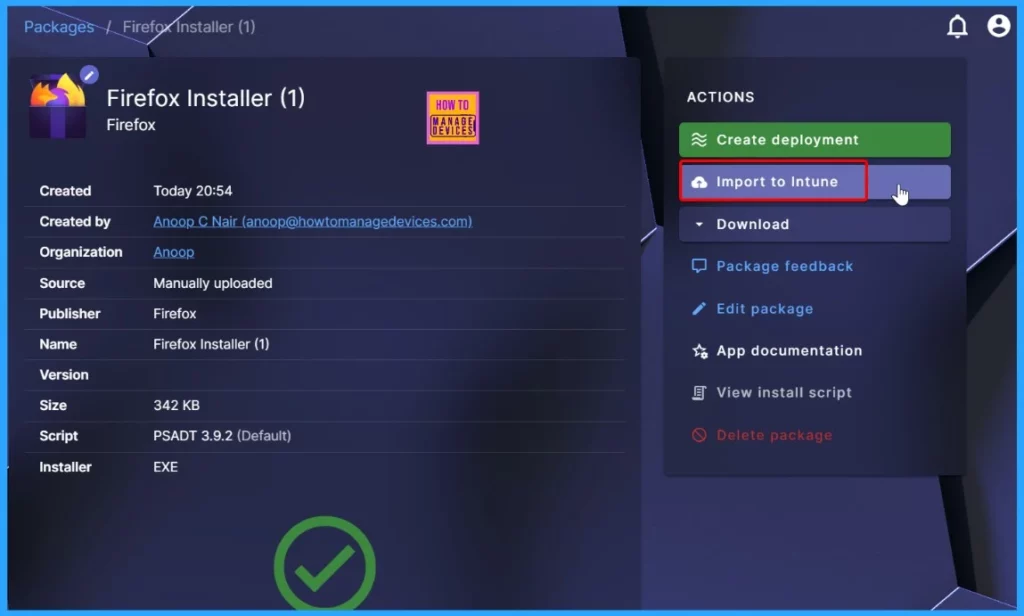
The Firefox installer has been successfully deployed. The next step is to Import it to Intune. To do so, click the Import to Intune option in the window below.
The below window shows 2 options: Select Tenant and the 2nd one is Customize import information. We selected the Inutune Tenant here, and the Robopack auto-fills the app information.
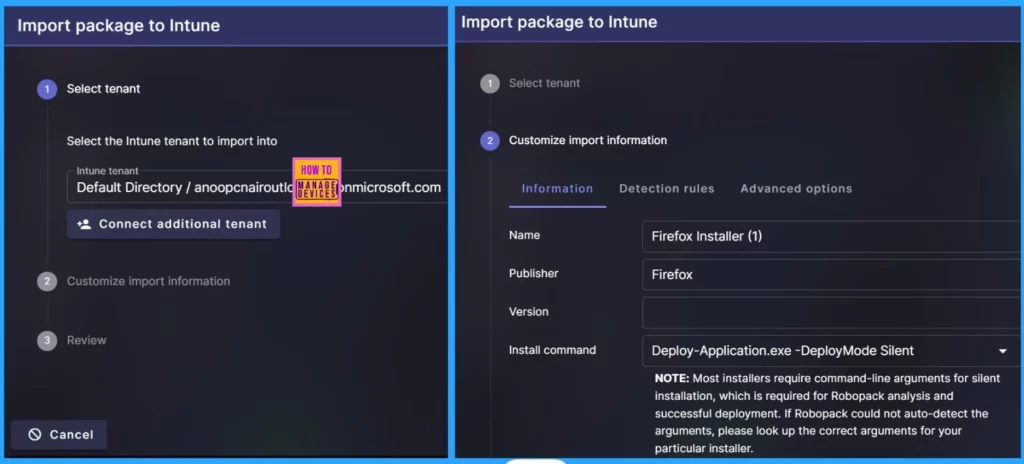
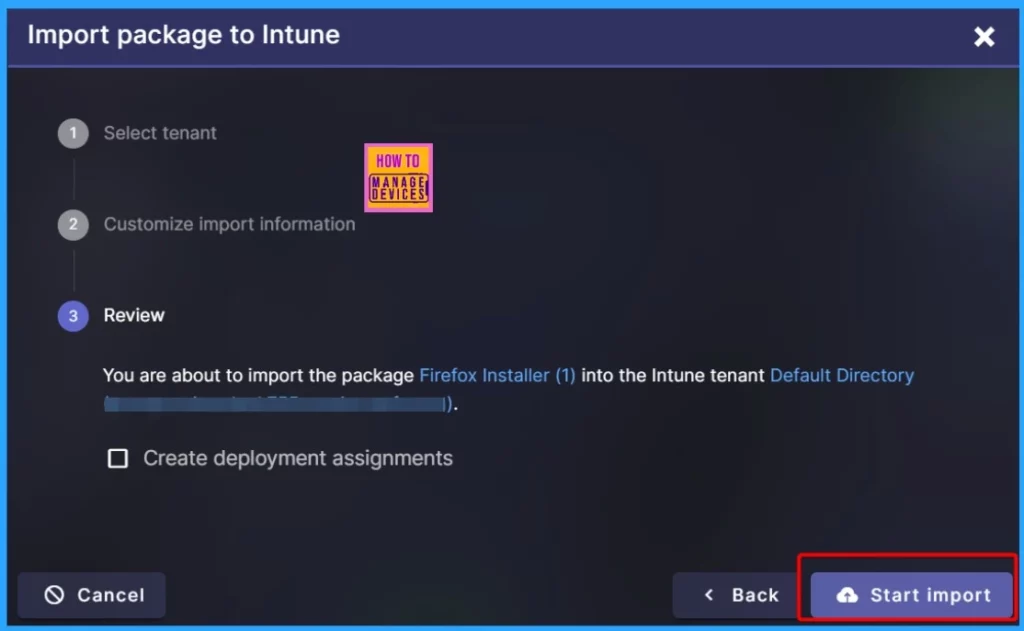
The final step is the Review. At this stage, you’re ready to import the Firefox installer package into the default directory of your Intune tenant. The Review step ensures that all configurations and settings are correct before the importation, providing a smooth and efficient deployment process within your Intune environment.
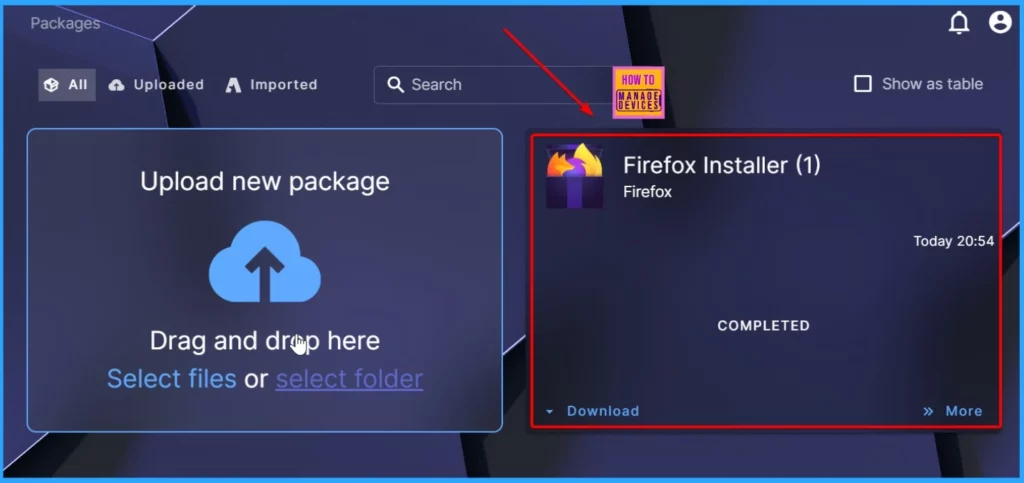
Firefox has been installed successfully. The installation time is displayed as 20:54, and the status is “Completed.” This information indicates that the installation process finished without issues, ensuring Firefox is ready for use on your system.
Simplifying App Deployment with Instant Apps in Robopack
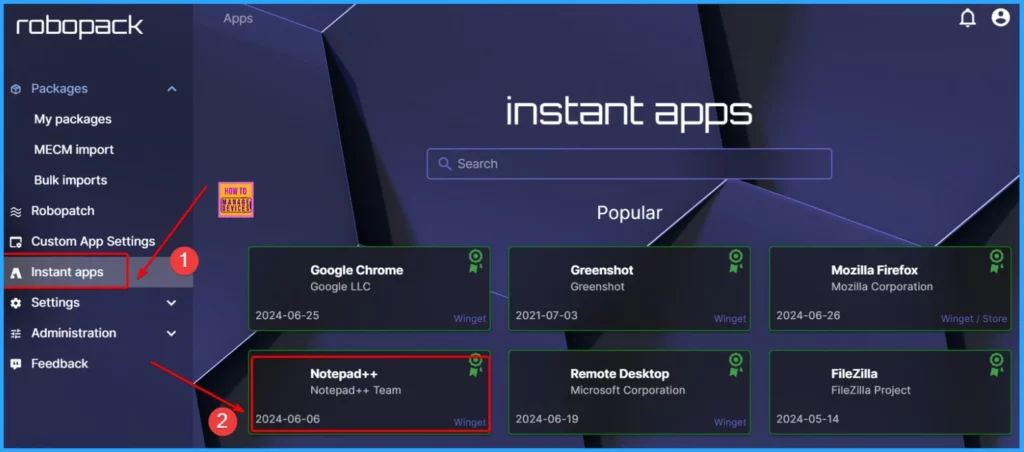
Robopack introduces the concept of Instant Apps. It offers an easy process to access and deploy applications directly from its repository. Whether you need to search, test, document, or package an application, Robopack handles it.
- Select the Instant Apps option on the Left side of Robopack.
- Here, we select the Notepad++ app.
Users can download packages for Config Manager servers or integrate them directly into Intune. Custom settings can also be applied as needed, ensuring flexibility and ease of deployment. By clicking “import,” verifying settings, and selecting your tenant, Robopack ensures a straightforward path to testing, converting, and importing apps into Intune.
- Select the Create Deployment option.
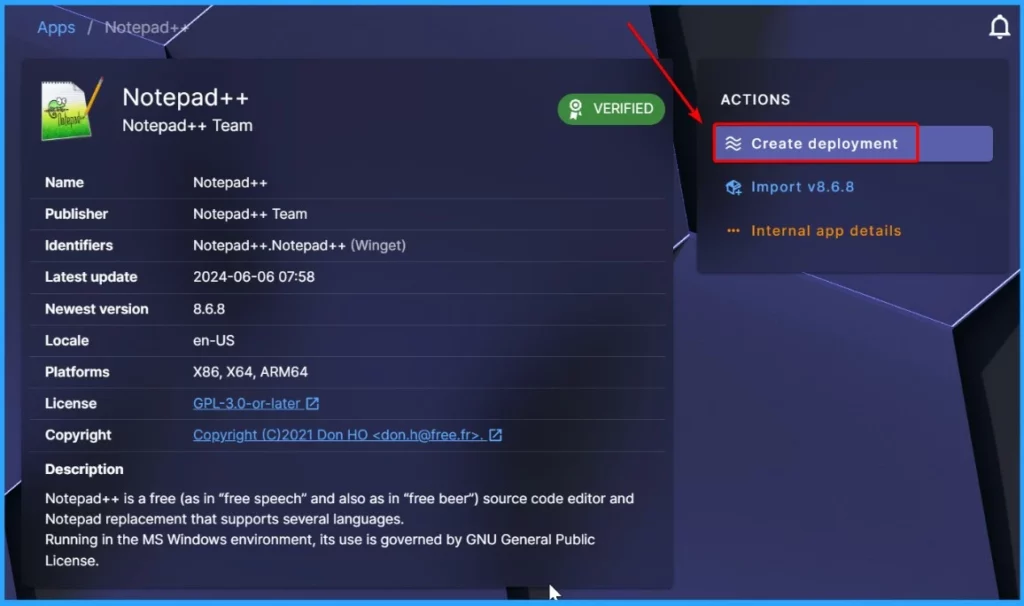
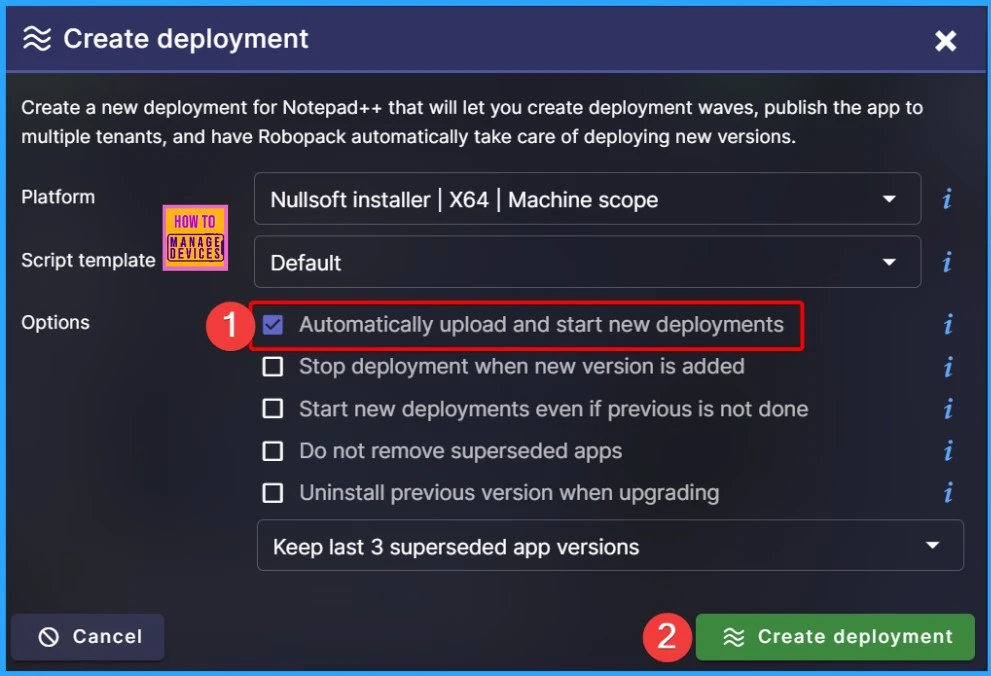
Create a new deployment for Notepad++ that will let you create deployment waves, publish the app to multiple tenants, and have Robopack automatically deploy new versions.
- Select the “Automatically upload and Start new deployment” option below from the Create Deployment window.
- Select the Create Deployment option.
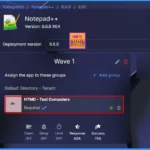
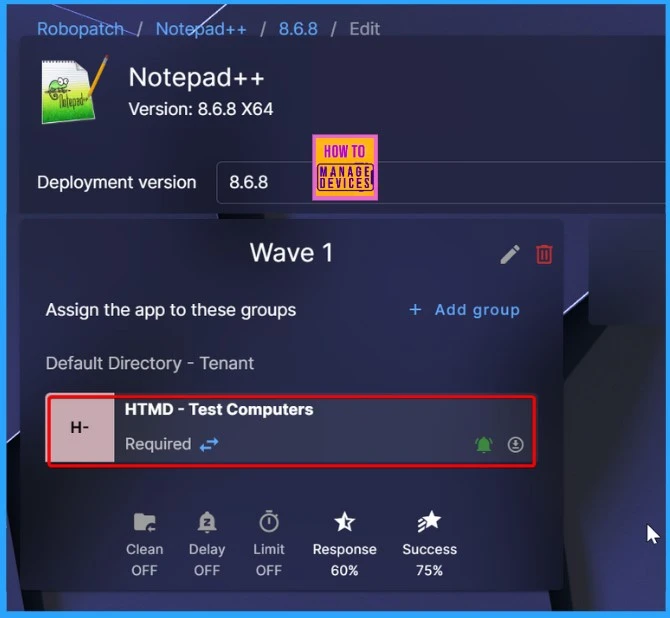
Select the Wave and assign the app to the specific group. Here, we selected the HTMD Test Computer group. The window below will help you provide more details.
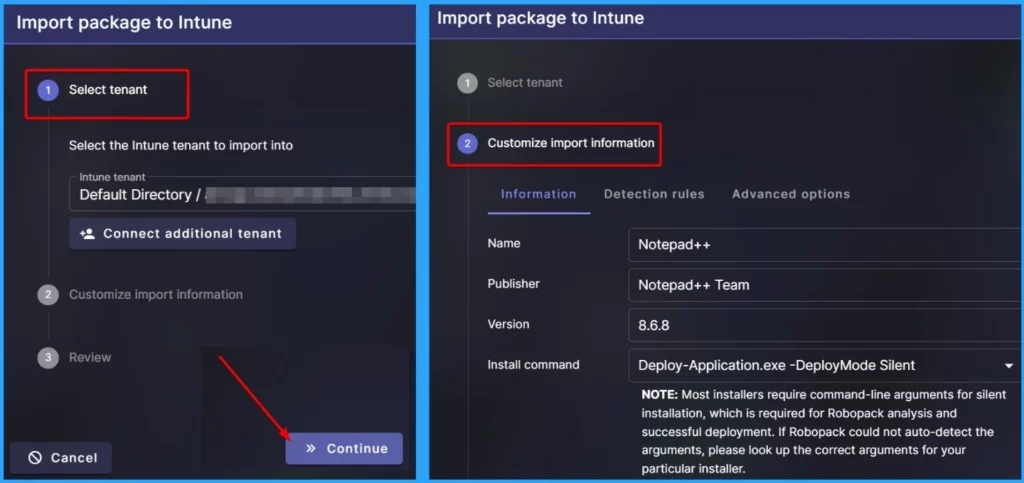
The next step is to Import the App package to Intune. You should Connect the Tenant and click the Continue option. After selecting Tenant, the second option is to customize the import information and click continue.
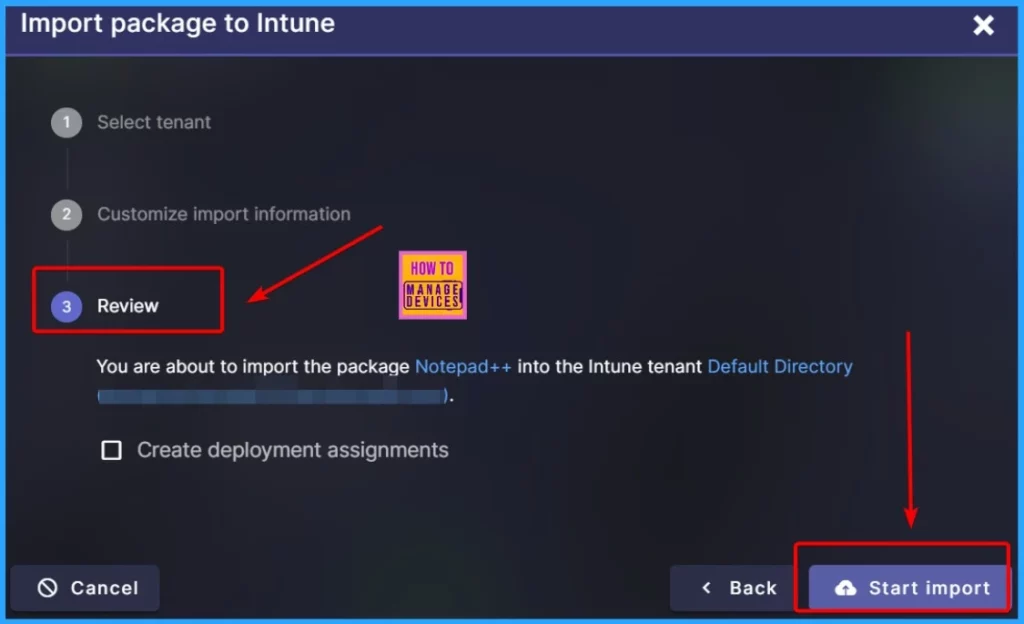
This is the Review stage. You will import the package Notepad++ into the Intune tenant Default Directory. Select the Start Import option from the window below.
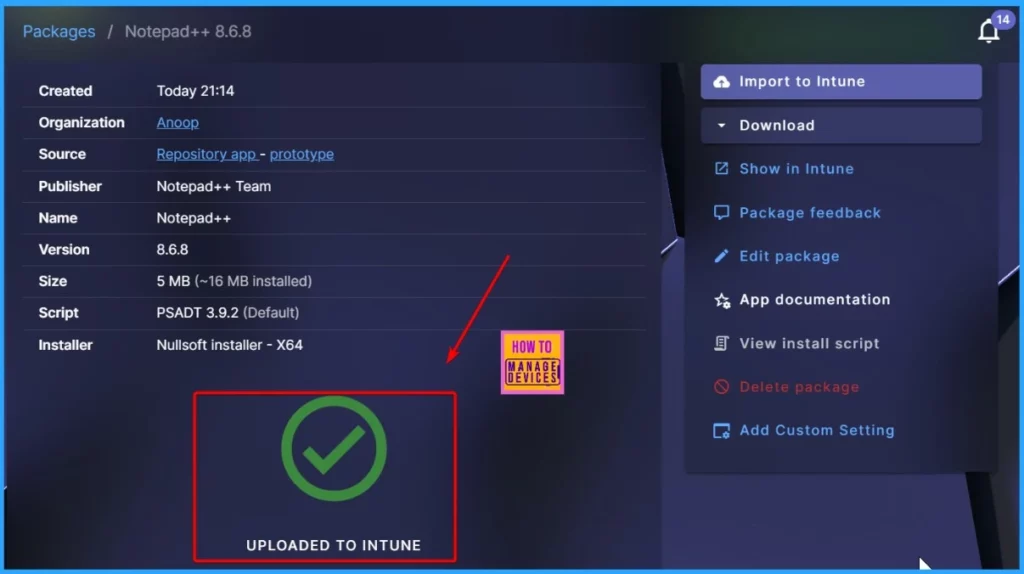
The screenshot below shows that Notepad++ has been successfully uploaded to Intune. It also shows details such as the Created date and time, Organisation, Source, Publisher, name, version, etc.
We are on WhatsApp now. To get the latest step-by-step guides, news, and updates, Join our Channel. Click here. HTMD WhatsApp.
Author
Anoop C Nair is Microsoft MVP! He is a Device Management Admin with more than 20 years of experience (calculation done in 2021) in IT. He is a Blogger, Speaker, and Local User Group HTMD Community leader. His main focus is on Device Management technologies like SCCM 2012, Current Branch, and Intune. He writes about ConfigMgr, Windows 11, Windows 10, Azure AD, Microsoft Intune, Windows 365, AVD, etc.
