Let’s discuss Robopack. Robopack Makes Intune App Deployment to the Next Level. Are you tired of spending lots of time dealing with tricky package stuff and tedious app setups? With Robopack, you can handle packages and install apps super easily. We have the latest guide on Intune and Robopack Intune and Robopack SaaS Solution for End to End 3rd Party App Lifecycle Management.
Robopack is easy to use, even if you’re not a computer expert. Plus, it keeps all your apps up-to-date without you having to worry. It works with many different systems, so you can use it wherever you are. With Robopack, you can save time and stress less and get things done faster.
In my experience, Robopack is an absolute solution. With a single click, I can effortlessly convert MSI and EXE files into Intunewin or Win32 app formats. Robopack simplifies everything, making the entire process easy to experience. The best part is that once the conversion is done, I can quickly deploy or import the app into the Intune Admin Center without any difficulties.
Robopack is integrated with Winget and the Microsoft Store, offering over 19,000 packages. However, Robopack doesn’t just deliver these packages blindly. Before making them available, they conduct extensive testing because many Winget packages have issues like improper uninstallation and other troubles.

- IntuneWinAppUtil.exe Windows 11 Compatibility
- Install Mozilla Firefox with Intune Enterprise App Catalog App
- Install Mozilla Firefox Browser from Microsoft Store using MEM Intune
- 6 Exciting Features Coming to Intune Enterprise App Management
Why would We Need Robopack?
If you are tired of dealing with complex package conversions that consume a lot of time and cause difficulties, Robopack is your solution. It simplifies the process and saves you time and effort.
Is Robopack Easy to Use?

Yes, absolutely! Robopack is designed with user-friendliness in mind. Its interface makes it easy for beginners and experienced users to navigate and use effectively.
Robopack Makes Intune App Deployment to Next Level
The best part of Robopack is that it doesn’t require any installation. You access the web page, and that’s it. No need to download or install anything on your device. With Robopack, you can change packages easily and set up apps quickly with just one click.
It is straightforward to use, even if you’re unfamiliar with technology. Robopack also automatically updates your apps, so you always have the newest versions without doing anything.
How to Covert Packages using Robopack
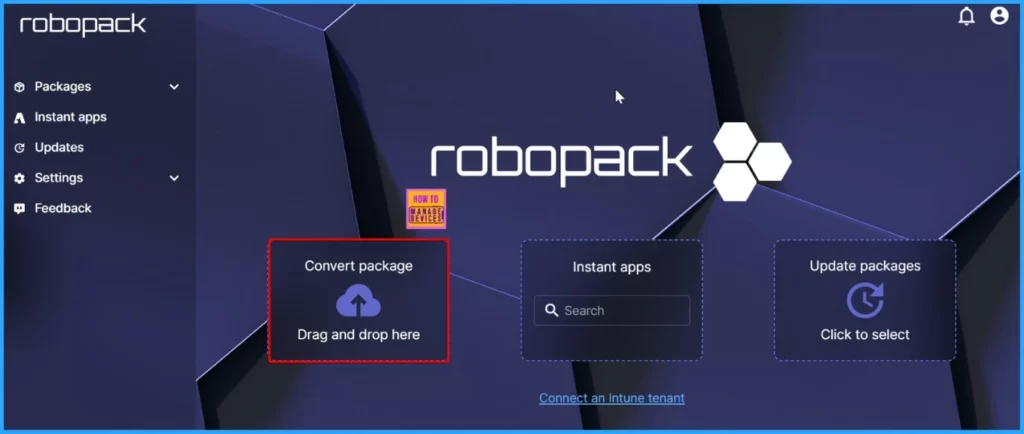
This is the main screen of Robopack. Here, you’ll see different menu options like Packages, Instant apps, Updates, Settings, and Feedback. However, the main focus is on the 3 big options in the center. The first one is called “Convert Package.”
- Click the Covert Package option from the Robopack Home page
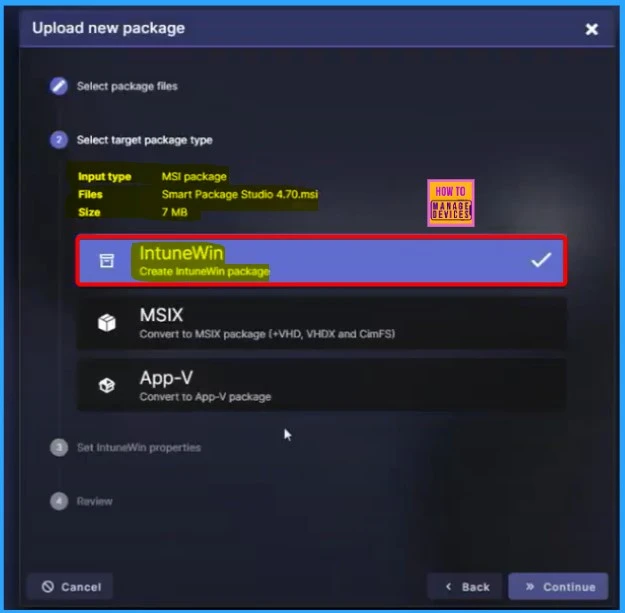
Once you upload your package file, you’ll see the “Upload new package” window. The next step is to choose the type of package you want. You can pick from options like IntuneWin, MSIX, or App-v. We choose IntuneWin here.
- Click Continue to proceed.
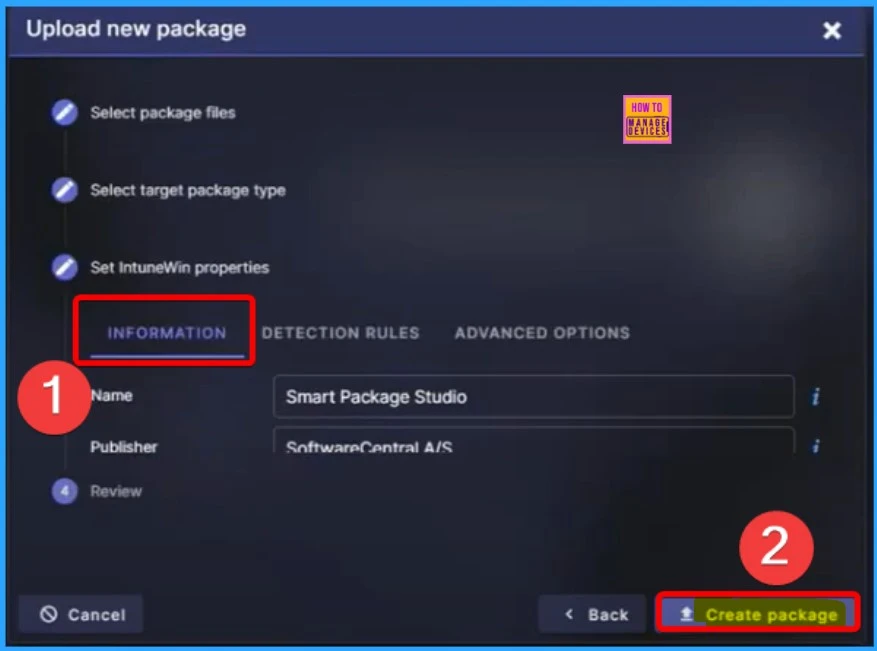
When you set up an IntuneWin package, you’ll find 3 primary tabs: Information, Detection Rules, and Advanced Options. The Information tab contains essential details like the app’s and publisher’s names.
It’s like filling in the basic info. Then, you’ll find rules about detecting the app in the Detection Rules tab. These include the format, type, and file details, which help the system recognize the app.
- Click the Create Package button from the below window
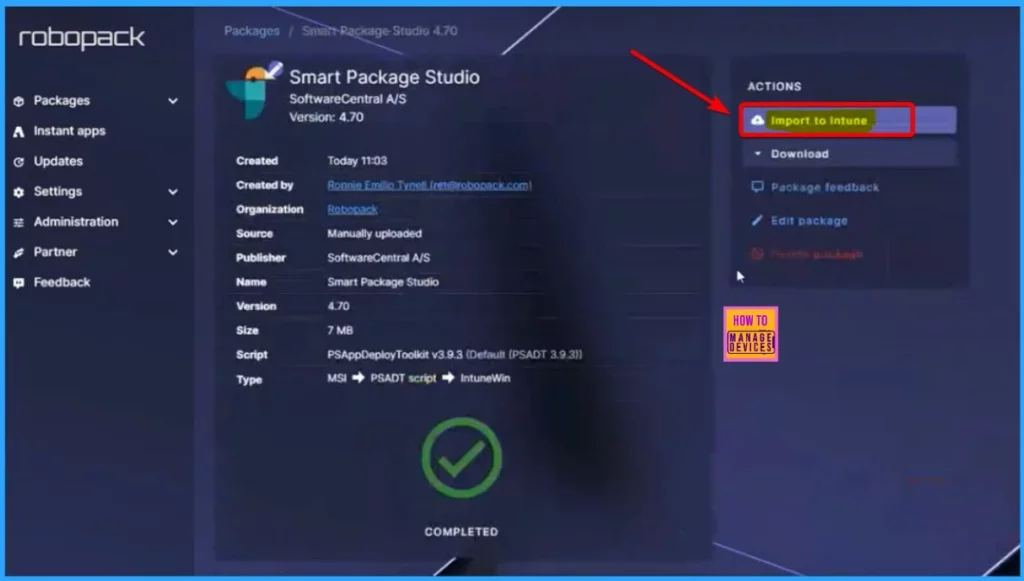
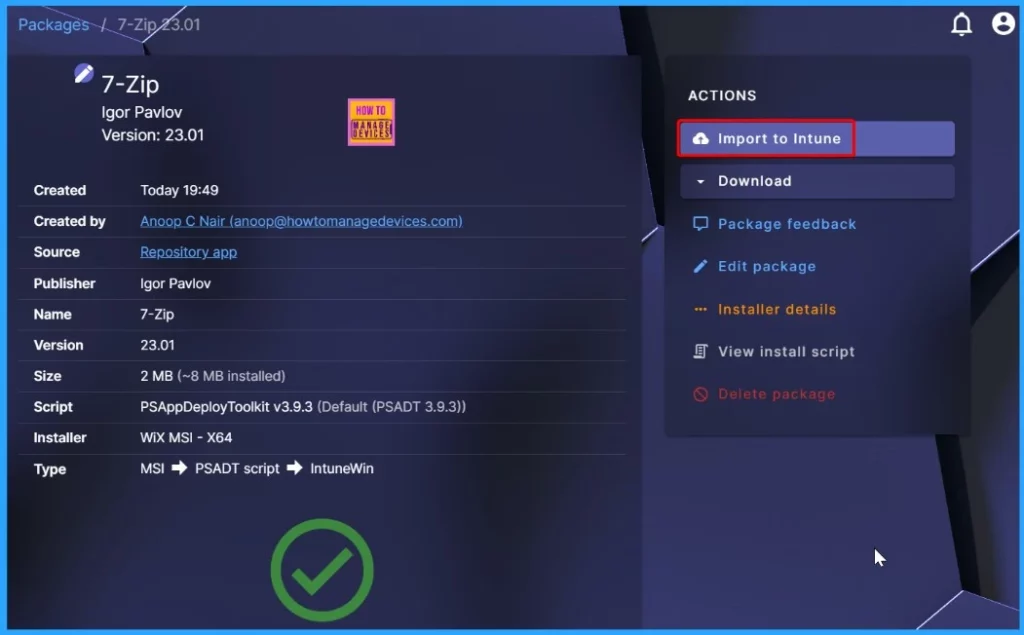
After creating the app package, you will see all the details about it, like when it was created, who created it, and its size, among other things. These can be found on the left side.
On the right side, you’ll see the Actions. One of these actions is “Import to Intune.” Click on that, and the app will quickly be imported into Intune. It’s a straightforward process to get your app where it needs to be.
Instant Apps
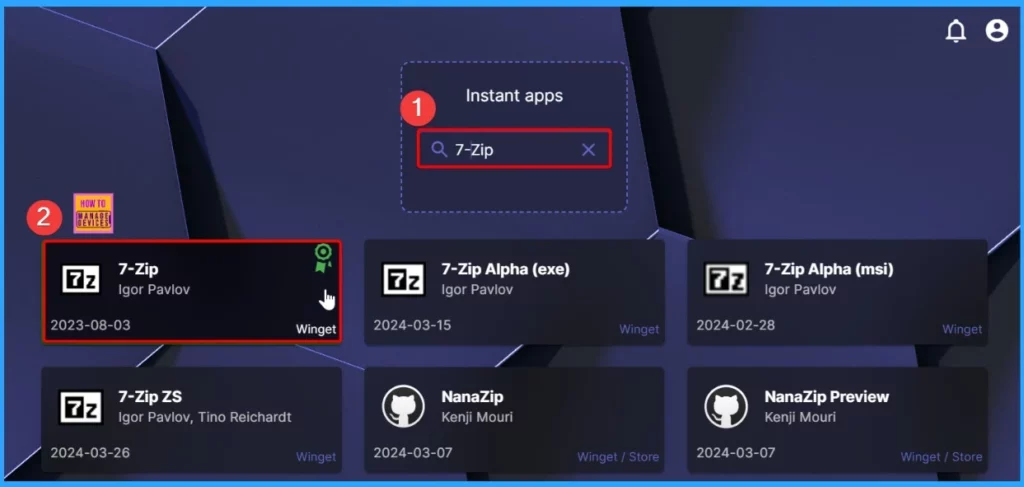
In Robopack, there is a feature called Instant Apps. Within this section, you’ll find a search box where you can look for specific apps. Here, we search for “7-Zip” in the search box. The results will display various options for 7-Zip. Among them, we select “7-Zip by Igor Pavlov.”
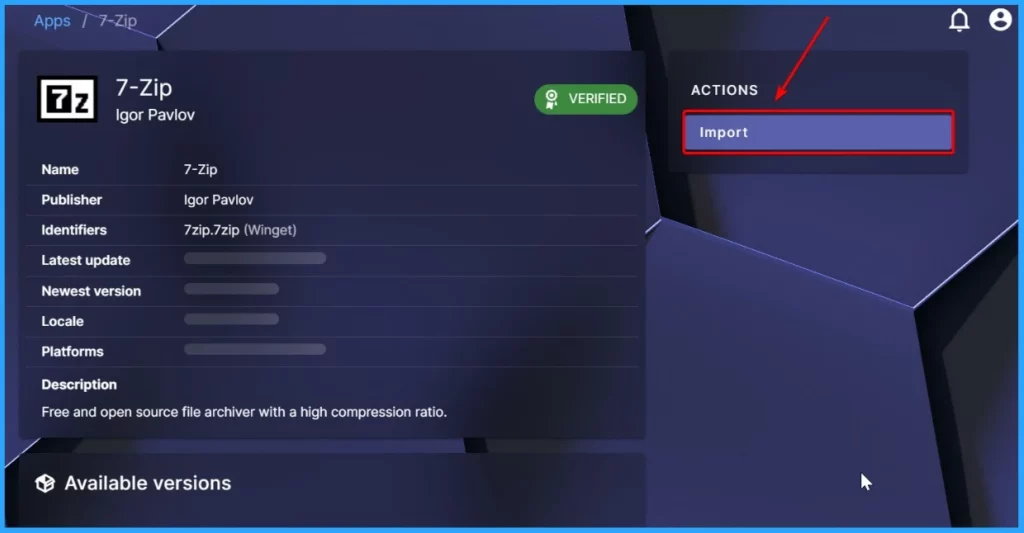
After selecting 7-Zip, a window showing important information about the app will appear. It will display the app’s name, 7-Zip, the publisher’s name, Igor Pavlov, and its identifiers, such as 7-Zip.7-Zip (Winget). This helps you confirm that you have selected the correct app before proceeding.
- Under Action, select the Import option.
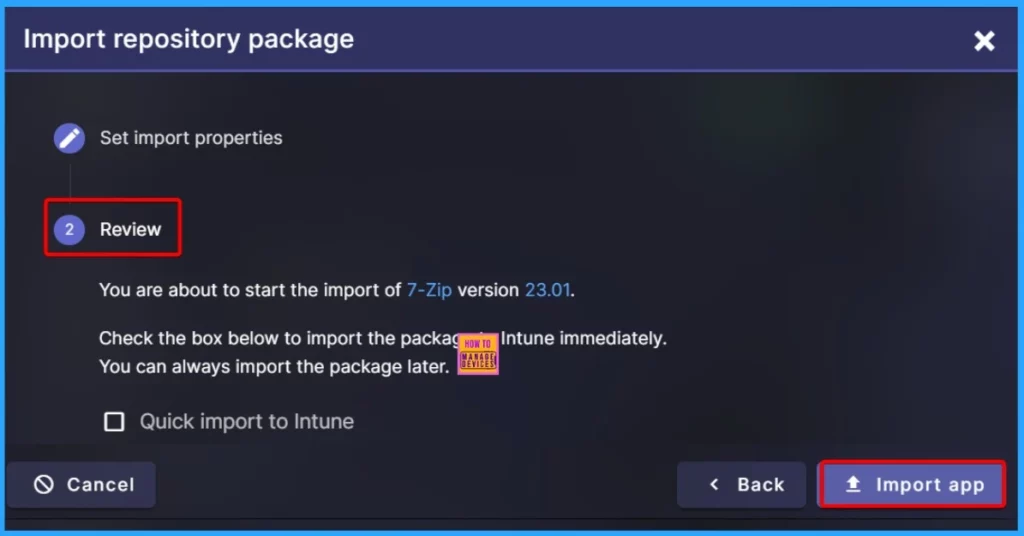
The “Import repository package” section has 2 settings. The first is “Set import properties,” where you configure details like app information, detection rules, and advanced options. The second setting is “Review,” where you double-check all your configured settings.
Once you finish both settings and everything looks good, check the box below to immediately import the package to Intune. If you prefer, you can always import the package later by unchecking the box. It’s a simple way to manage your packages when importing them into Intune.
- Select the Import app button from the Import Repository Package window
After importing the app, a window will appear confirming that the app has been created successfully, indicated by a green tick. It also displays the creation date, creator, source, and publisher name. On the right side, you’ll see a set of options.
| Actions | Details |
|---|---|
| Import to Intune | This option lets you import the app into Intune. |
| Download | Allows you to download the app. |
| Package Feedback | Provides a way to give feedback on the package. |
| Edit Package: | Lets you make changes to the package. |
| Installer Details | Shows details about the installer. |
| View Install Script | Allows you to view the installation script. |
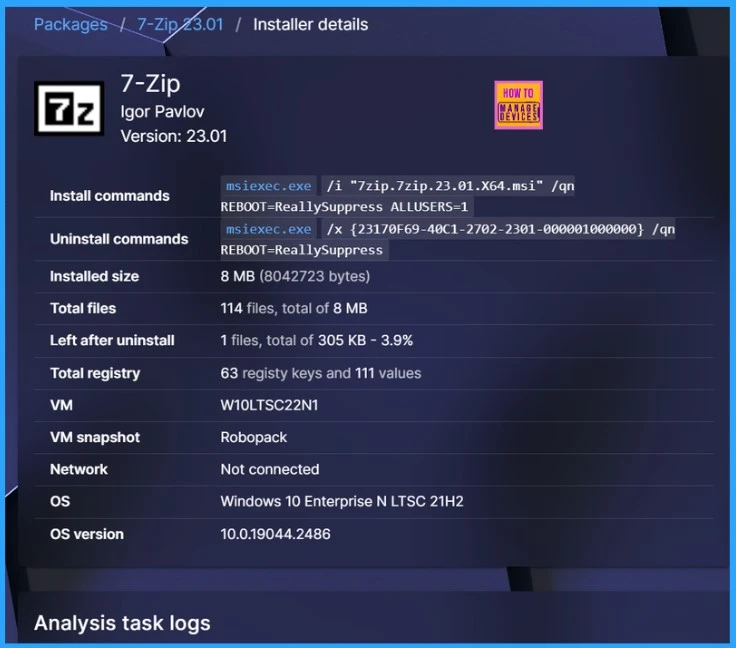
In the Installer Details window, you’ll find essential details about the app, such as the installation and uninstallation commands, along with information like installed size, total files, and what’s left after uninstallation. You can also see details about total registry entries.
Additionally, the Installer Details include analysis task logs, which provide insights into the installation process. This helps you understand how the app is installed and uninstalled and any potential issues that may arise.
- AVD GA Generally Available World Wide with MSIX AppAttach Feature?
- Intune Application Deployment using MSI EXE IntuneWin Formats
- Step by Step Guide to Create Deploy APPX Apps via SCCM and Troubleshooting Tips Configuration Manager
Updates Tab in Robopack
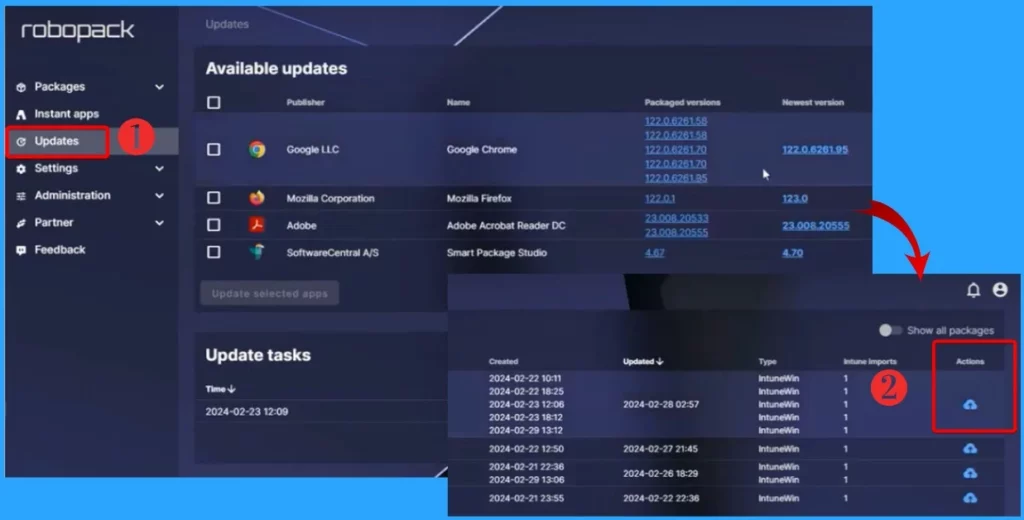
The Updates tab in Robopack is essential because it fixes problems with the app. It’s where you can find the latest version and updates. In the Updates tab, you will see Google Chrome listed along with the name of the company that makes it.
You will also see different versions of Chrome that have been packaged and which are the newest. So, if you want to ensure you’re using your favourite apps’ latest and best version, this tab is where you go.
- Go to Actions and click the Import symbol.
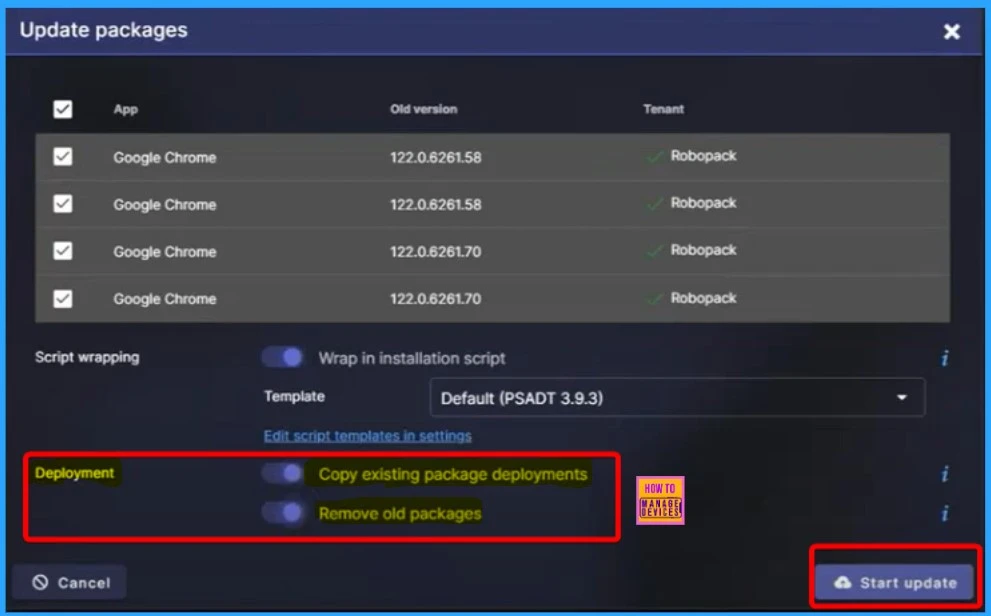
This is the window where you update your apps. It shows the app name, older versions, and who it belongs to. In the “Deployment” section, there are two settings: “Copy existing package deployment” and “Remove old package.” It would be best to turn on both settings by dragging the toggle switch to the right side. This way, you ensure you’re using the latest version and simultaneously clean up the old ones.
- Click the Start Update button from the below window
My Packages
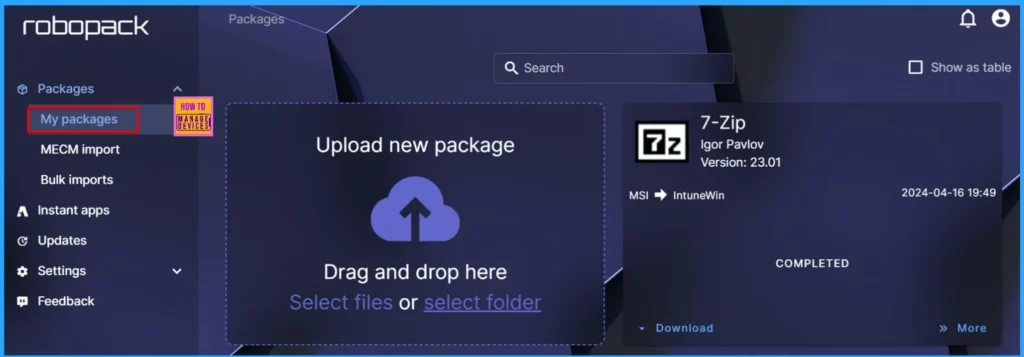
The Packages section has three options: My Packages, MECM import, and Bulk import. “My Packages” is the first one listed. You can upload new packages and see the recently downloaded apps. So, if you want to add a new app or check out what you’ve just got, this is the place to go.
MECM Import
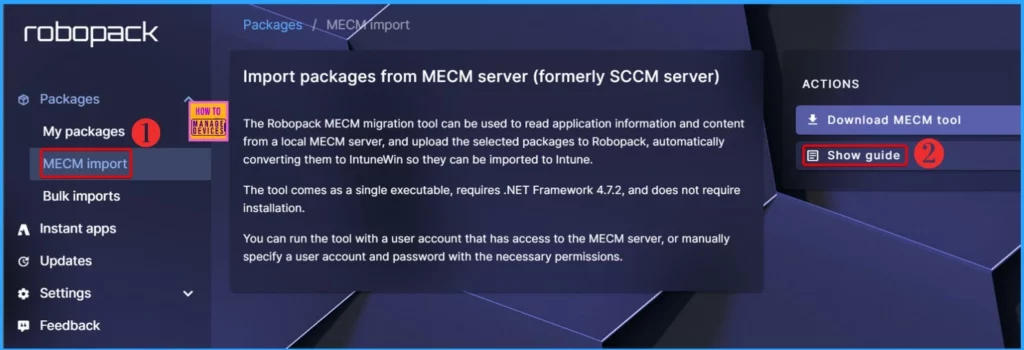
The Robopack MECM migration tool can read application information and content from a local MECM server and upload the selected packages to Robopack, automatically converting them to IntuneWin for import to Intune.
- The tool comes as a single executable, requires .NET Framework 4.7.2, and does not require installation.
- You can run the tool with a user account with access to the MECM server or manually specify a user account and password with the necessary permissions.
- You will also get a guide by clicking the show guide option
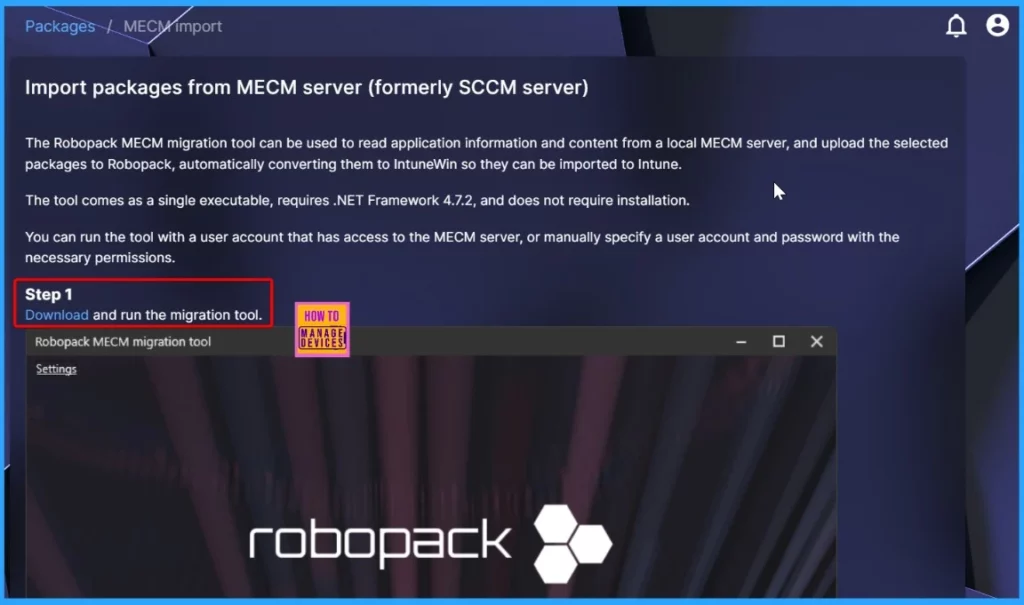
The Guide option is helpful because it shows step-by-step instructions with screenshots. For example, in the first step, you’ll see “Download and run the migration tool,” along with a screenshot to guide you. This way, you can follow along easily, knowing precisely what to do.
Bulk Import
Bulk package imports let you handle multiple packages at once. You can see all the ones you’ve done before. To make a new bulk import, go to the list of packages and pick which ones you want to include in the import. It’s a quick way to manage lots of packages in one go.

Account
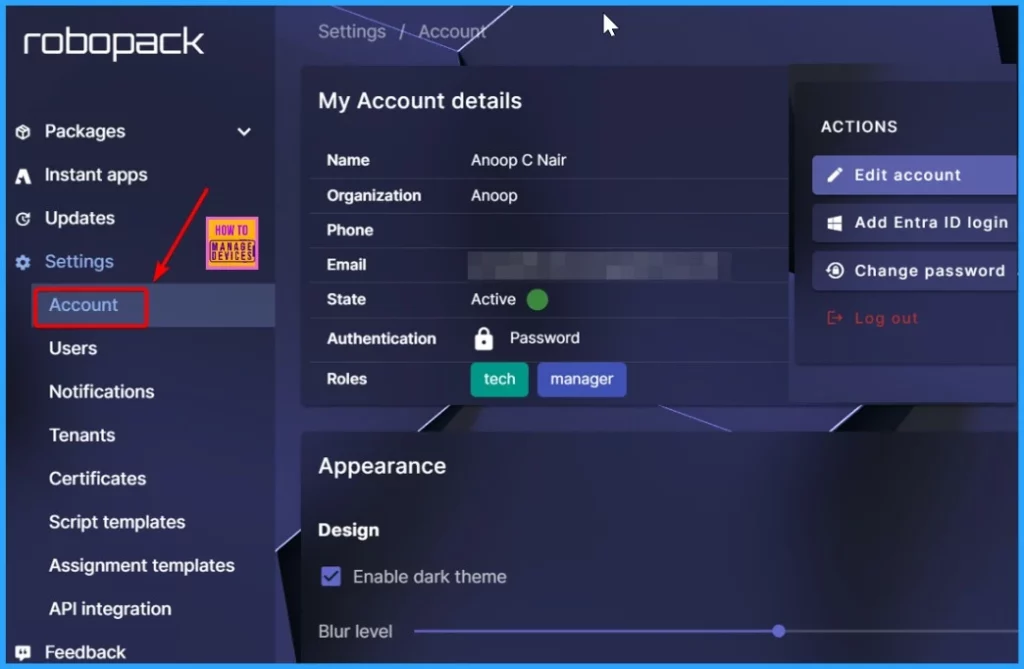
Under the Settings tab, you’ll find several options. The first one is Account. This is where you can view all your account details, such as your name, organization, phone number, email, state, and how you log in.
On the right side, you can edit your account, add a different login method, or change your password. This is where you manage all the essential aspects of your account.
Users
Under the Users section, you’ll find details like user names, emails, phone numbers, and states. Click the “Add User” option on the right side to add a new user.

Notifications
Notification settings allow you to control how your organization gets notified about different events. Here, you can see all the notification setups and adjust them if needed. For each event, you can decide when you want to be notified and what should happen when that event occurs.

Tenants
In the Tenants section, you can find details about your Intune Tenants. On the right side, there are actions you can take, like connecting the tenant and connecting it for a specific user. It’s a way to manage and set up your Intune Tenants easily.

Certificates
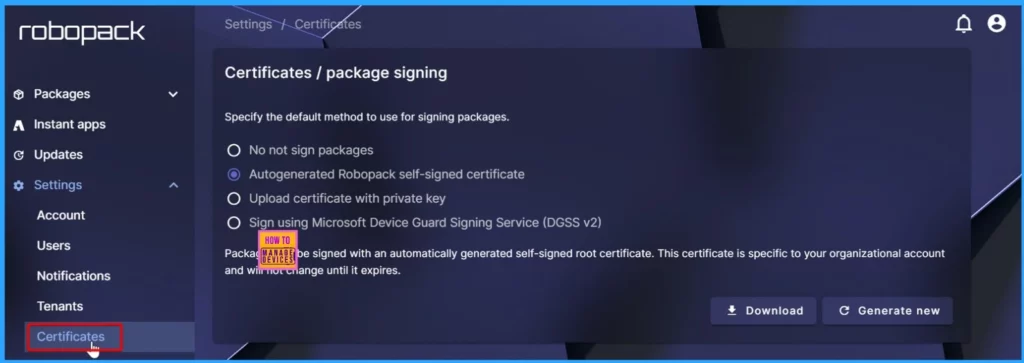
In the Certificates / Package Signing section, you can choose how you want your packages to be signed. There are a few options.
- No not sign packages – Your packages won’t be signed at all.
- Autogenerated Robopack Self-Signed Certificate – This option signs packages with a certificate generated by Robopack. It’s unique to your organization and stays the same until it expires.
- Upload Certificate with Private Key – You can upload your certificate and private key to sign packages.
- Sign Using Microsoft Device Guard Signing Service (DGSS v2) – This option allows you to sign packages using Microsoft’s Device Guard Signing Service.
If you choose the autogenerated self-signed certificate, you can download it or generate a new one if needed.
Script Templates
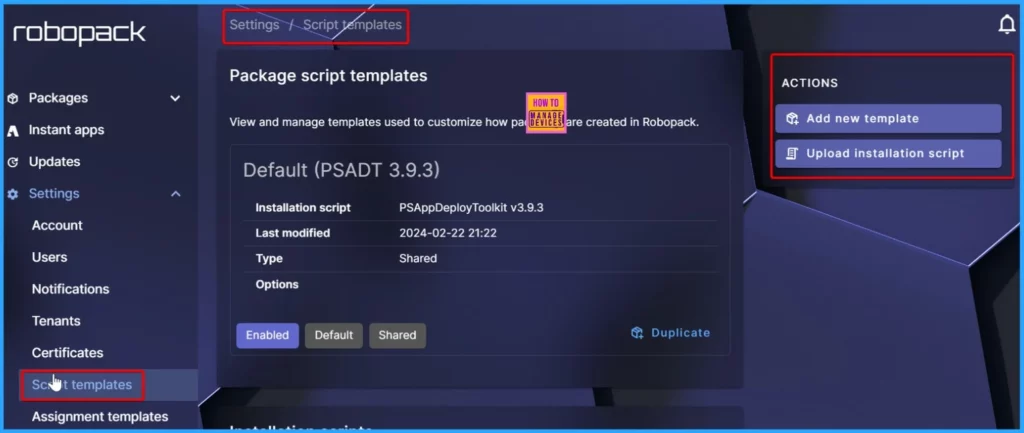
In the Package Script Templates section, you can view and control the templates used to customize how packages are created in Robopack. Default (PSADT 3.9.3), Installation Script, Last Modified, Type, options, and action will be displayed.
- You can add a new template or upload a script to create a new one. You can also duplicate an existing template to make a copy.
Intune Assignment Templates
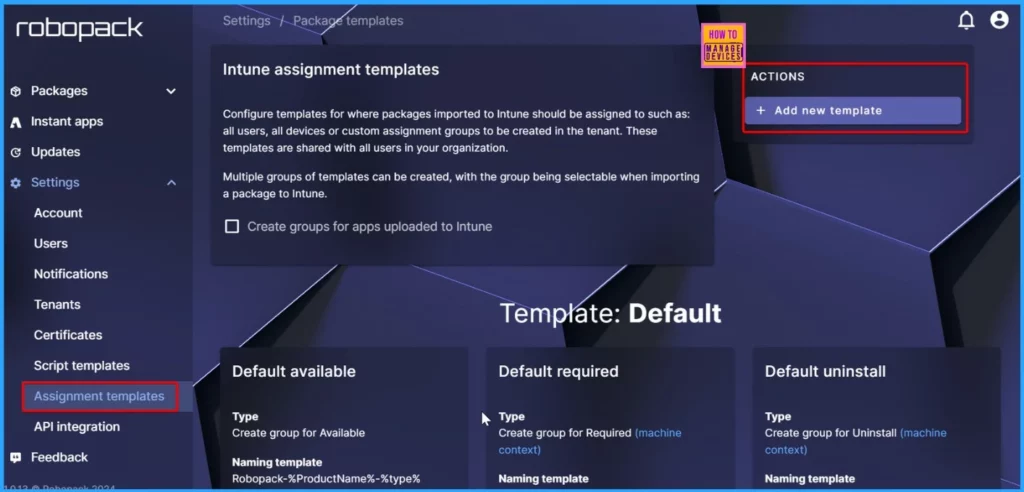
Configure templates for where packages imported to Intune should be assigned, such as all users, all devices or custom assignment groups to be created in the tenant. These templates are shared with all users in your organization.
- Multiple groups of templates can be created, with the group being selectable when importing a package to Intune.
API Integration
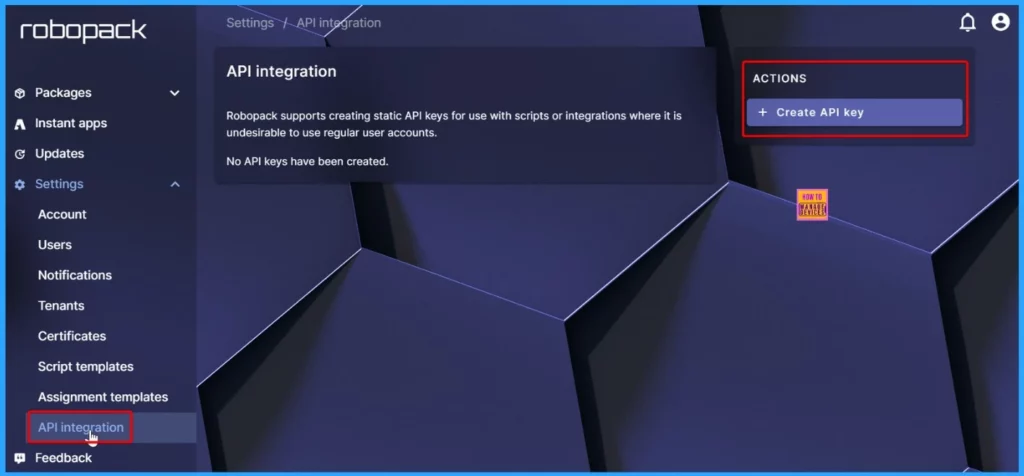
Robopack offers a feature to create static API keys. These keys are helpful for scripts or integrations where regular user accounts aren’t ideal. Currently, no API keys have been created.
Feedback
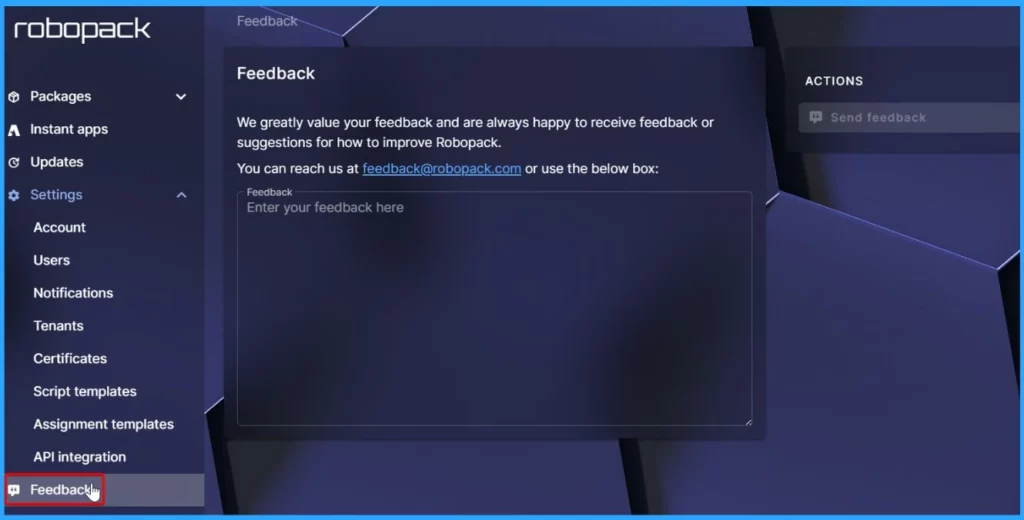
In the Feedback section, it’s simple to share your thoughts. Type your feedback or ideas for improvement in the “Enter your feedback here” section. You’ll see an action button called “Send Feedback” on the right side. Once you’ve entered your feedback, click this button to send it.
We are on WhatsApp now. To get the latest step-by-step guides, news, and updates, Join our Channel. Click here. HTMD WhatsApp.
Author
About the Author: Vidya is a computer enthusiast. She is here to share quick tips and tricks with Windows 11 or Windows 10 users. She loves writing about Windows 11 and related technologies. She is also keen to find solutions and write about day-to-day tech problems.
