In this article, I will explain how to Local User to Local Administrator Group with Intune local user membership policy. Adding a local user to the Local Administrator group via Intune using the Account Protection profile is a streamlined and secure method to manage user privileges on Windows devices. Microsoft recommends a solution called LAPS for managing local admin users, groups, and passwords automatically on Windows devices.
Account Protection is part of Intune’s broader Endpoint Security suite, allowing IT administrators to enforce security policies, including managing local group memberships. By leveraging this feature, administrators can ensure that specific users or groups are added to the Local Administrators group on managed devices, helping to balance security with the necessary administrative access. Create local user using the following Best Guide To Create A Local User With Intune Remediation Script.
An administrator can create a new “Account protection” profile within Intune to implement this. This profile is configured under “Endpoint security” and includes settings that allow adding or removing users from local groups. By specifying the local administrator group and designating the user or group to be added, Intune automatically applies this configuration to the targeted devices. This approach minimizes the need for manual intervention or custom scripting, making it easier to manage and enforce across large environments.
Using Account Protection to manage local administrator rights is particularly beneficial in environments with strict security requirements. It ensures that only authorized users have elevated privileges while reducing the risk of unauthorized access or changes.

Table of Contents
Key Reasons to Add a Local User to Local Administrator Group
Adding a local user to the local administrator group is done for several vital reasons, each granting the user certain privileges and responsibilities in the system. Here are the key reasons:
| Key Reasons | Details |
|---|---|
| Administrative Privileges | System Configuration: The user can change system settings, install software, and manage system resources. This includes modifying system files, configuring network settings, and installing or removing programs. User Management: The user can create, modify, and delete other user accounts on the machine, as well as manage permissions and group memberships. |
| Security Management | System Troubleshooting: The user has the authority to troubleshoot and fix various issues that may arise, including resolving software conflicts, system crashes, and hardware issues. Updates and Patches: The user can apply operating system updates and patches, which is crucial for maintaining the system’s security and stability. |
| Troubleshooting and Maintenance | File System Control: The user can access, modify, and delete any files or folders on the system, regardless of their ownership or permissions. This is essential for backup, recovery, and system management tasks. Resource Management: The user can manage and allocate system resources like disk space, memory, and CPU usage, ensuring the system runs efficiently. |
| Full Access to Files and Resources | Some applications and system updates require administrative privileges to be installed or configured properly. Adding a user to the local administrator group allows them to perform these tasks without needing to log in as a different user or temporarily use elevated permissions. |
| Required for Certain Software Installations | Some applications and system updates require administrative privileges to be installed or configured properly. Adding a user to the local administrator group allows them to perform these tasks without needing to log in as a different user or use elevated permissions temporarily. |
| Remote Management | If the system needs to be managed remotely, being a member of the local administrator group often allows for remote desktop connections, remote management tools, and other remote administration tasks. |
Additionally, the method integrates seamlessly with other Intune security policies, allowing for a unified approach to endpoint protection. By automating and centralizing the management of local administrator accounts, organizations can enhance their security posture and ensure compliance with internal and external security standards.
- New Windows Autopilot Device Preparation Experience using Intune
- Best Guide to Create a Local User with Intune Remediation Script
- Best Guide to Deploy New Intune Company Portal App on Windows using Intune
Account Protection Policy to Add a Local User to Local Administrator Group
Follow the below-mentioned steps to create an Account Protection Policy to Add a Local User to Local Administrator Group with Intune. Log In to the Microsoft Intune Admin Center using your administrator credentials.
- Navigate to Endpoint Security > Account Protection
- Click on +Create Policy
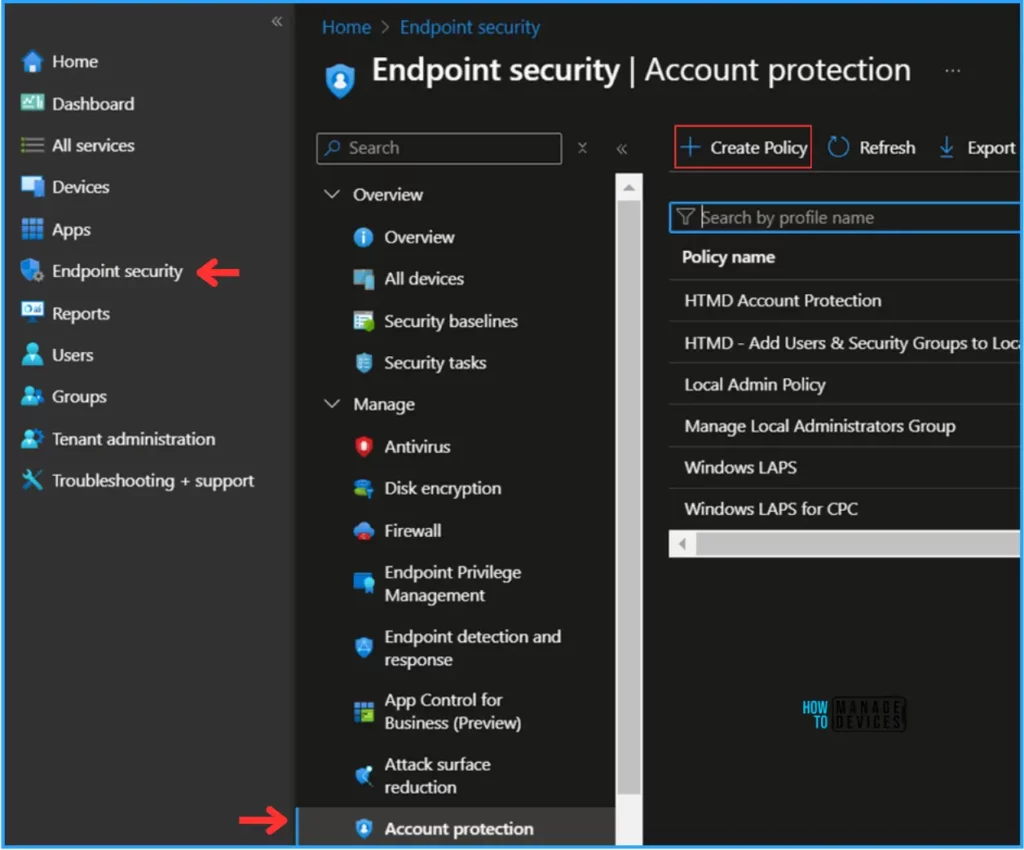
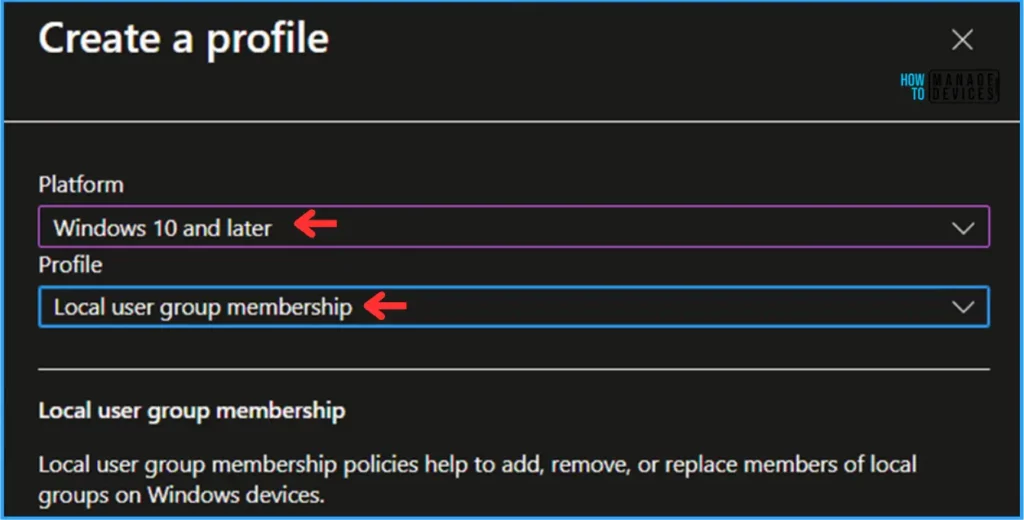
In the next step, we can create a new Account Protection Policy from scratch. For that, give the options mentioned below.
- Platform: Windows 10 and later
- Profile: Local user group membership
Note! Local user group membership policies help to add, remove, or replace members of local groups on Windows devices.
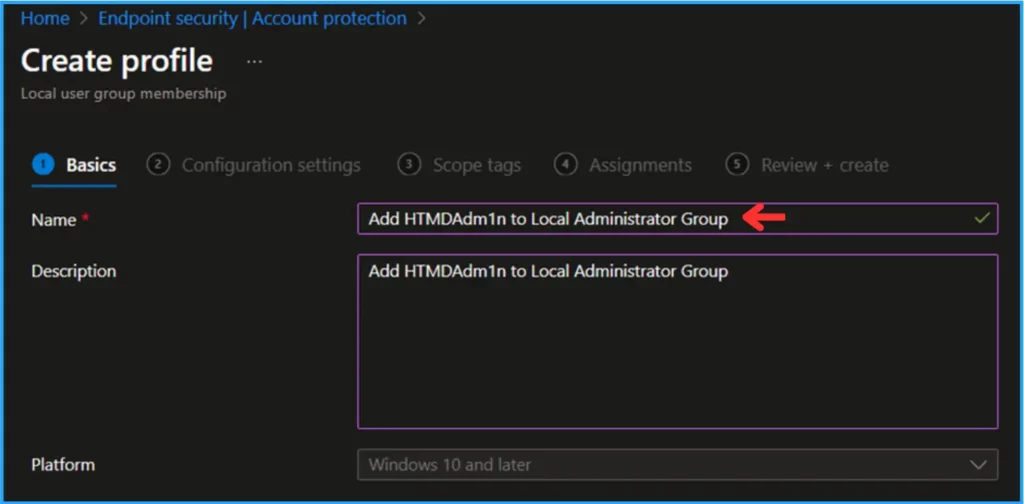
On the Basics details page, we can name the Local user group membership Account Protection policy “Add HTMDAdm1n to Local Administrator Group”. If needed, provide a brief policy description and click Next.
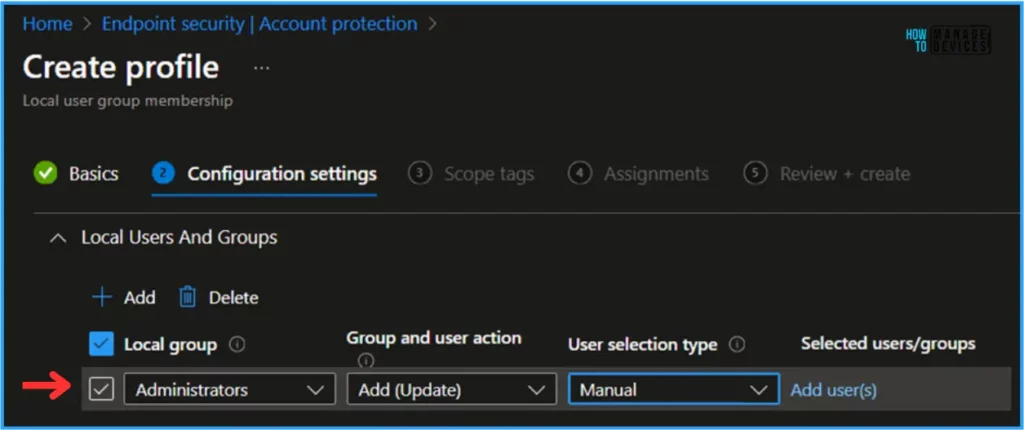
Configuration settings page under the Local Users And Groups option. Select the below-mentioned options
- Local group: Administrators
- Group and user action: Add (Update)
- User selection type: Manual
- How to Set App Defaults using Intune | Export the Default XML File & Encode it in Base64 format
- Easy Guide to Set Feature Updates for Windows 11 as Optional with Intune
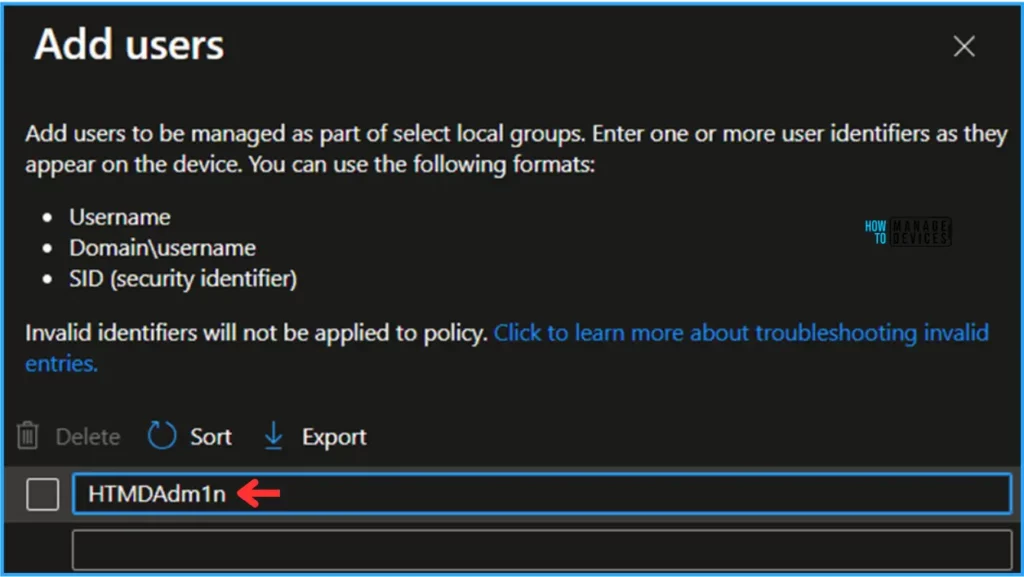
Once you click Add user(s) in the above screenshot, you will see an option to mention the Username. Here, we mention our Local User, HTMDAdm1n, and hit the OK button.
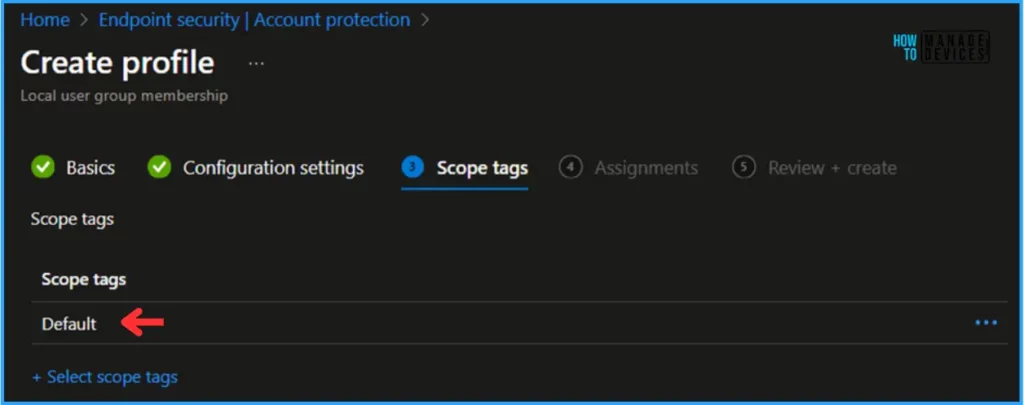
On the next tab, leave the scope tags Default. If you have any custom scope tag available, you can also select it for this deployment.
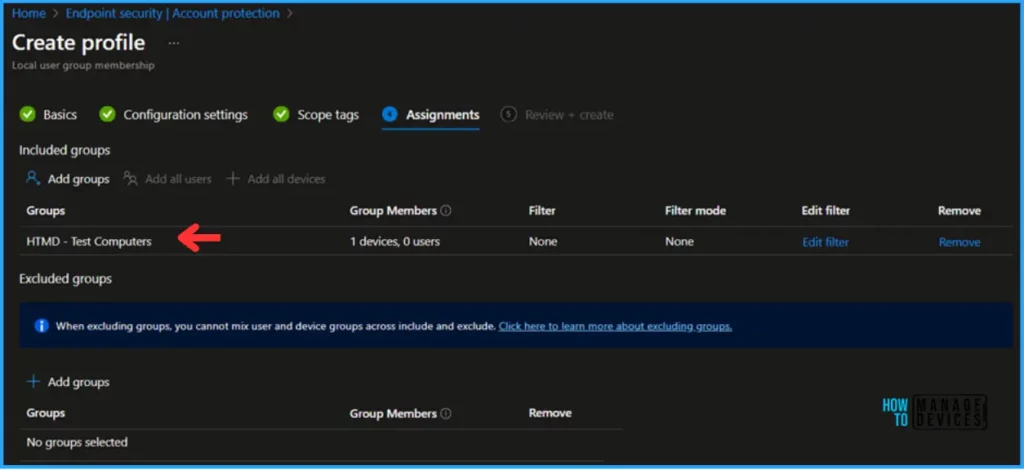
Under the Assignments tab, click Include Groups and select HTMD – Test Computers. The filter and Filter mode options should be kept as they are. In this assignment, there is no need to choose to Exclude any groups.
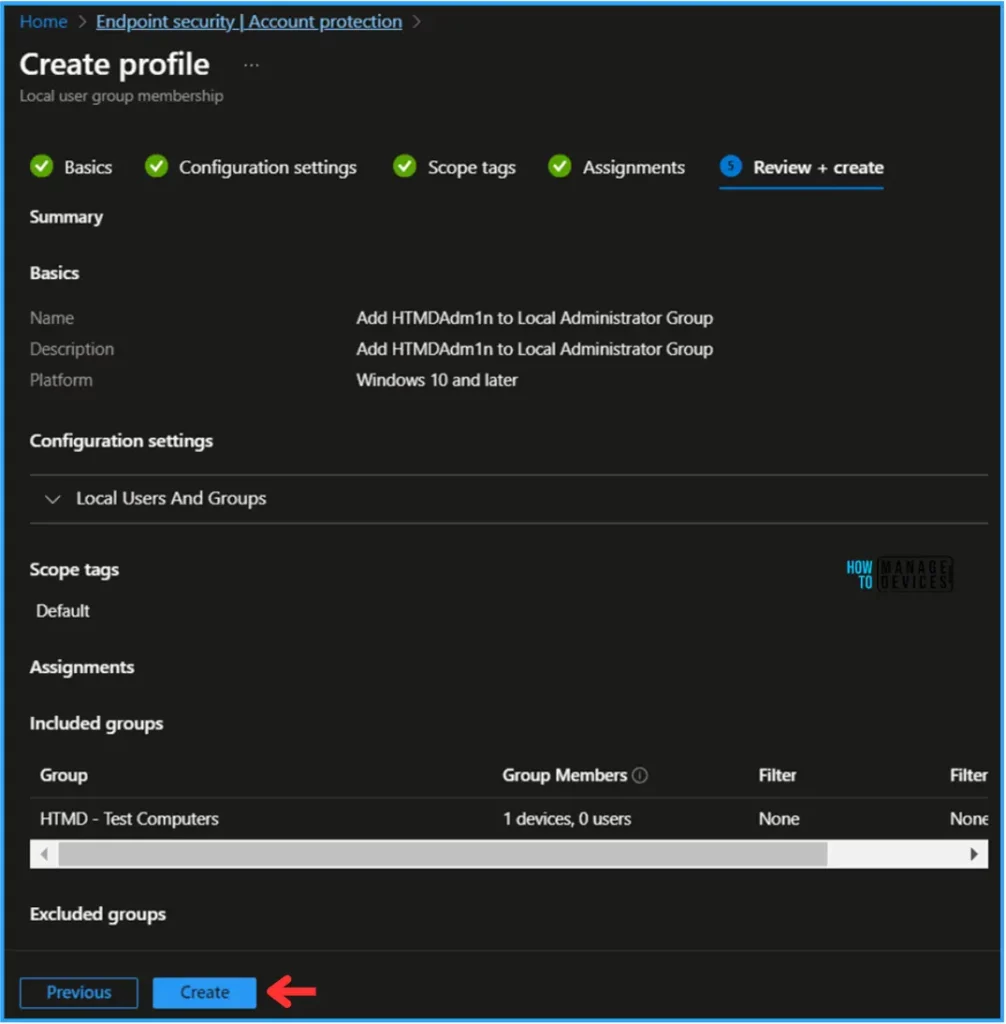
On the Review + Add tab, carefully review all your settings for “Add a Local User to Local Administrator Group” policy. Once you’ve confirmed everything is correct, select “Create” to implement the changes.
Monitor Add a Local User to Local Administrator Group Policy
This Account Protection policy has been deployed to the Microsoft Entra ID group (HTMD – Test Computers). The policy will take effect as soon as possible once the device is synced. You can also initiate a manual sync from the targeted machine or the Intune Portal.
To monitor the policy deployment status from the Intune Portal, follow the steps below.
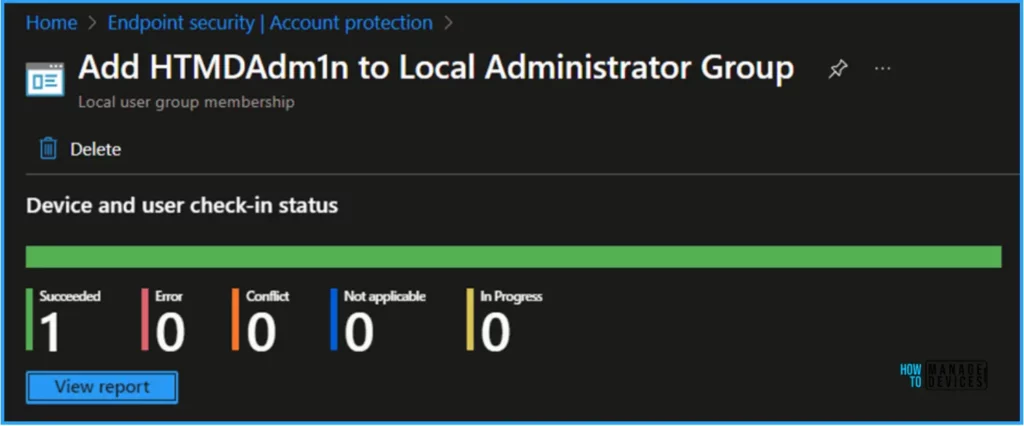
Navigate to Endpoint Security > Account protection. Search for the “Add HTMDAdm1n to Local Administrator Group” policy. The deployment status for this policy can be seen under the Device and user check-in status.
End User Experience – Add a Local User to Local Administrator Group Policy
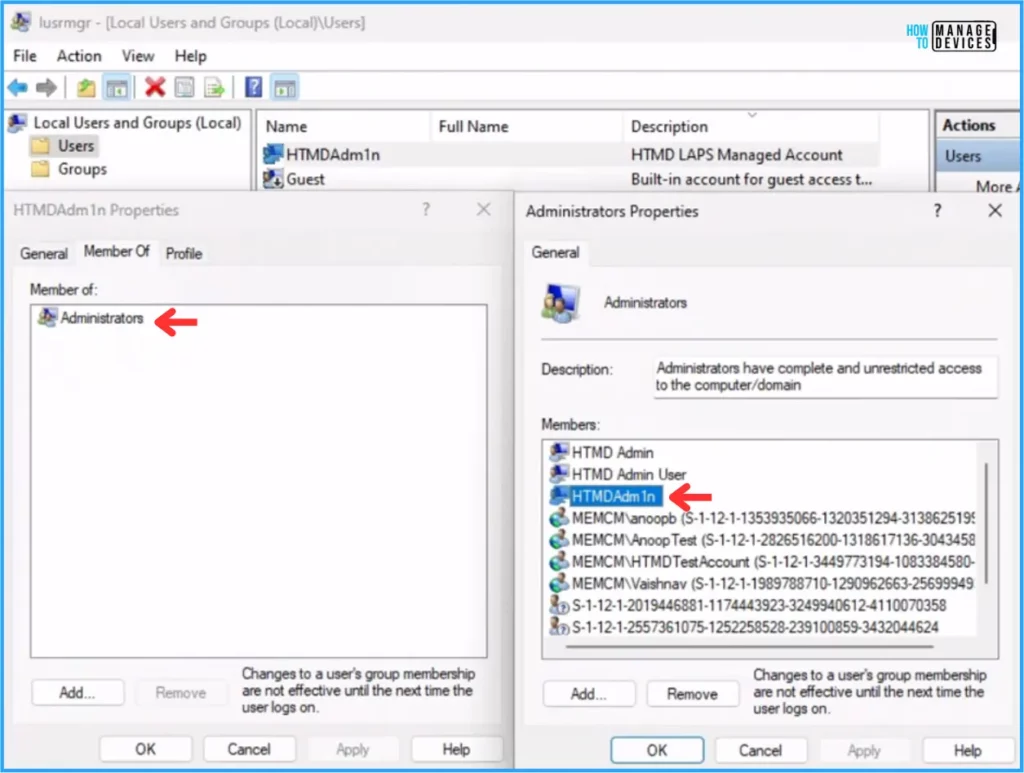
Now, we must check whether the Account Protection Local user group membership policy worked. To check the same. Log in to one of the policy-targeted devices.
Open Run and type lusrmgr.msc under Local Users and Groups (Local). Click on Users and select HTMDAdm1n. Right-click and go to Properties > Member Of. Now, the Administrators group has been added successfully.
Author
Vaishnav K has over 10+ years of experience in SCCM, Device Management, and Automation Solutions. He writes and imparts his knowledge about Microsoft Intune, Azure, PowerShell scripting, and automation. Check out his profile on LinkedIn.
