This article focuses on how to Setup New Windows LAPs using Intune Policies. We will explore how to apply this policy using Intune’s Configuration Profiles. The main goal is to acquire understanding and hands-on experience in effectively configuring and setting Local Admin Password Management Policy Using Intune.
There is a solution called LAPS from Microsoft to manage local admin passwords on Windows devices. Set Local Admin Password Management Policy Using Intune feature allows for the management of the password for the local administrator account. Enabling this setting ensures that the password for the local administrator is managed. If you choose to disable or not configure this setting, the password for the local administrator will not be managed.
By enabling this setting, you gain the ability to centrally control and change the password for the local administrator account on multiple systems. This can be beneficial for maintaining security and ensuring consistency across a network of computers.
On the other hand, if you choose to disable or not configure this setting, the password for the local administrator account will not be managed centrally. In this case, individual users will have the responsibility of managing their own local administrator passwords. This can result in different passwords being used across different systems, which may increase the risk of security breaches and make it more challenging to maintain a secure environment.
- Windows LAPS Role Based Access Controls Using Intune
- Windows LAPS Configurations from Azure AD and Intune
- Microsoft Intune 2304 April Update Windows LAPS Management
- New Built-in LAPs Client for Windows 11 and 10 | Conflict with Old Version of LAPs
- Azure AD LAPs Group Policy Settings for Windows 11 | Intune Policy for LAPs
- OLD LAPS for Windows 10 11 Privileged Access Management

It’s important to note that the local administrator account is a powerful account that has elevated privileges on a system. Therefore, proper management and security of its password are crucial to safeguarding the system against unauthorized access and potentially malicious activities.
What is New Windows LAPS?
LAPS is a Microsoft security product that IT pros have widely used for nearly a decade to secure Windows devices, aid in device recovery, and support helpdesk scenarios. Now Microsoft is modernizing and improving this technology. LAPS is available to Windows 10, 11, and Windows Server 2019 or 2022.
You can refer to the below blog post, and you will get detailed information about the LAPs policy. Let’s also have a quick look at a few more details on the new Windows LAPS.
- LAPS stands for Local Administrator Password Solution.
- The local admin account password is set during the OS installation of a device, but it is difficult to change all the device passwords. By using Windows LAPS, you can change it easily.
- Windows LAPS is a feature of Windows that automatically backup the local administrator account password for AD and Azure AD joined devices.
- Using LAPS, we can set unique local admin passwords for each device.
- Password can be saved on AD (AD joined device) or Azure AD (AAD joined device).
Video – Intune and Windows LAPS Deep Dive plus Basic Troubleshooting
Let’s look at the video where we have explained Intune and Windows LAPS Deep Dive along with Basic Troubleshooting tips. HTMD Monthly User Group was recording Windows Local Administrator Password Solution (LAPS) session.
Pre-Requisite for New Windows LAPS Deployment?
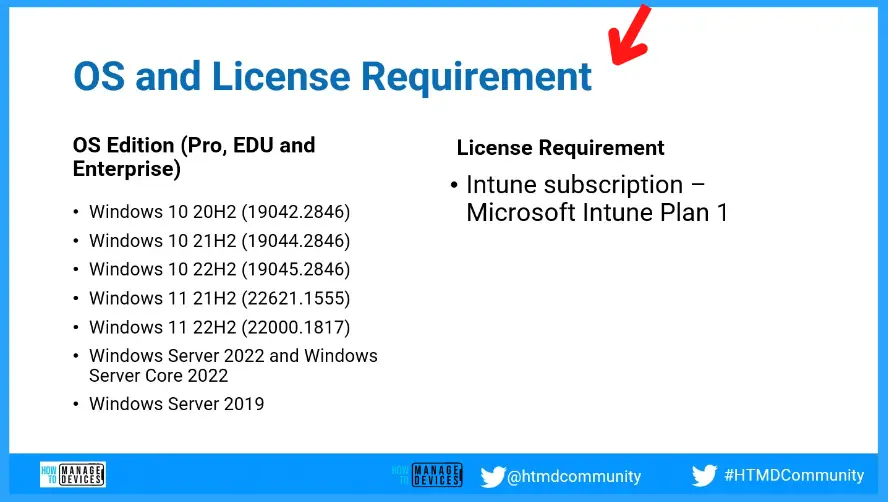
The following OS Editions are supported with New Windows LAPS Deployment. Those Windows editions are Pro, EDU, and Enterprise.
- Windows 10 20H2 (19042.2846)
- Windows 10 21H2 (19044.2846)
- Windows 10 22H2 (19045.2846)
- Windows 11 21H2 (22621.1555)
- Windows 11 22H2 (22000.1817)
- Windows Server 2022 and Windows Server Core 2022
- Windows Server 2019
The License Requirement for new Windows LAPs implementation is Intune subscription – Microsoft Intune Plan 1.
How to Configure LAPS from the Entra ID and Endpoint Security
Now. we have enabled the LAPs policy management using the above Intune Settings Catalog policy. The following policy can be used to fine-tune each feature of LAPS.
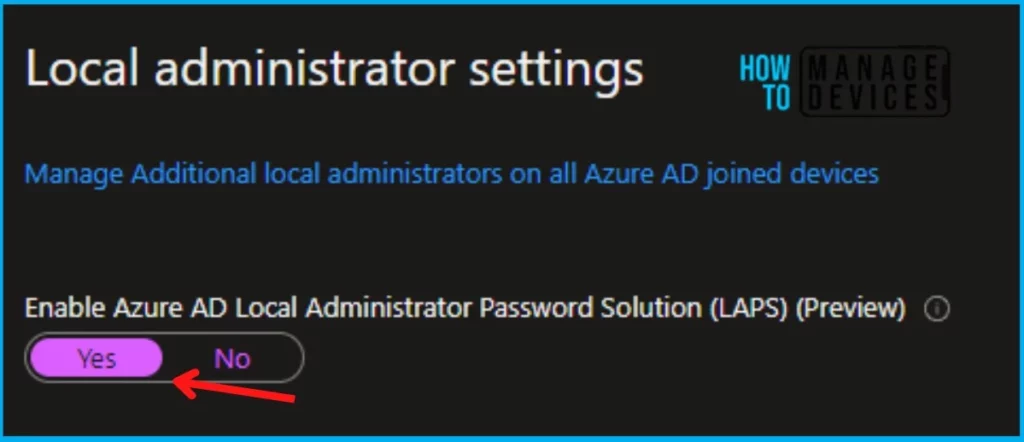
Also, as part of the prerequisite, we also need to enable the LAPS settings from Azure AD so that the LAPS policy will work perfectly. To enable the settings, navigate to https://portal.azure.com. Go to Azure Active Directory > Devices > Device Settings. Or you can do this from Entra Portal.
- Sign in to the entra.microsoft.com
- Navigate to Device – Device Settings
- Under Local Administrator settings, select “Yes” Enable Azure AD Local Administrator Password Solution (LAPS).
Configuration Profile to Rename and Enable Local Admin Account
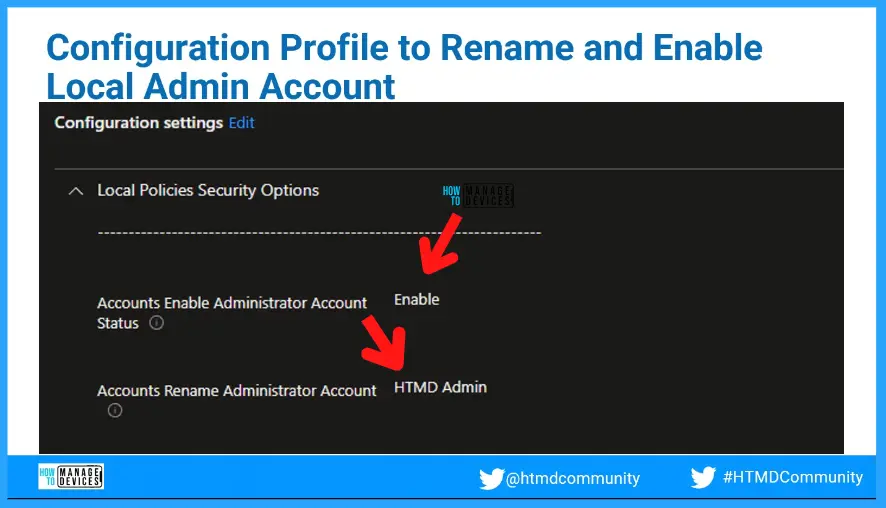
Let’s check how to configure Intune policies to Rename and Enable Local Admin accounts. This is one of the configurations that you need to follow before implementing the new Windows LAPS policies.
Local administrators are commonly targeted by attackers because of their well-known names. To avoid identifying this account as an administrative or elevated access account, it is recommended to choose another name.
- Accounts Enable Administrator Account Status > Enable.
- Accounts Rename Administrator Account > Provide the custom account name = HTMD_Adm in this example.
In the following video, we have explained how to rename and DISABLE the admin account but for LAPS implementation, you have to Rename and ENABLE the local admin account using the Intune policies.
Windows LAPs using Intune Endpoint Security
Under that, select Create Policy, and the profile, select Local admin password solution (Windows LAPS). Provide the name of the policy, under Configuration settings, provide the information according to the requirements.
Here I’m going to give an overview of how you can configure the LAPS policy from the Endpoint security. To apply the LAPS policy, you can navigate to Endpoint security in Intune portal > Account Protection. Under the Local administrator settings, make this Enable Azure AD Local Administrator Password Solution (LAPS) (Preview) option Yes.
NOTE! – You need to ensure that the following Rename Administrator Account Policy Using Intune is implemented to make the below configuration work.
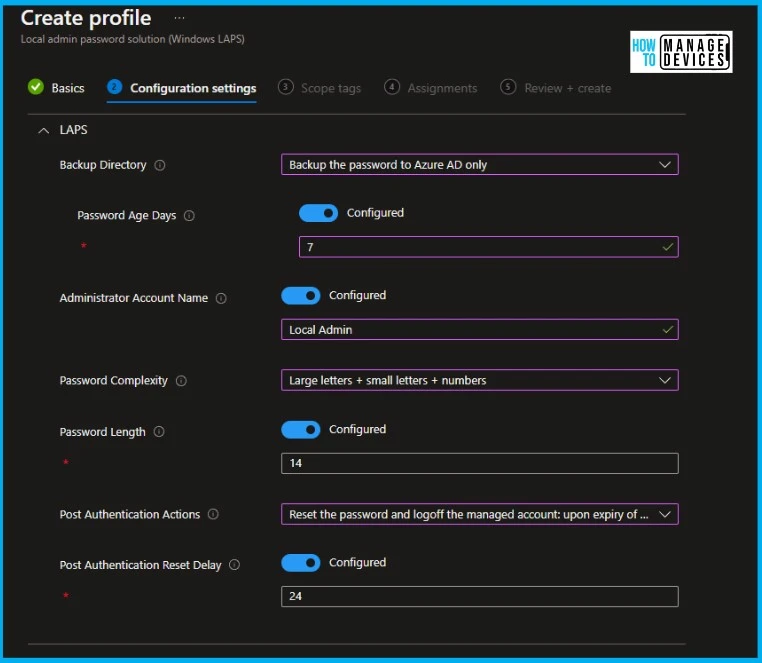
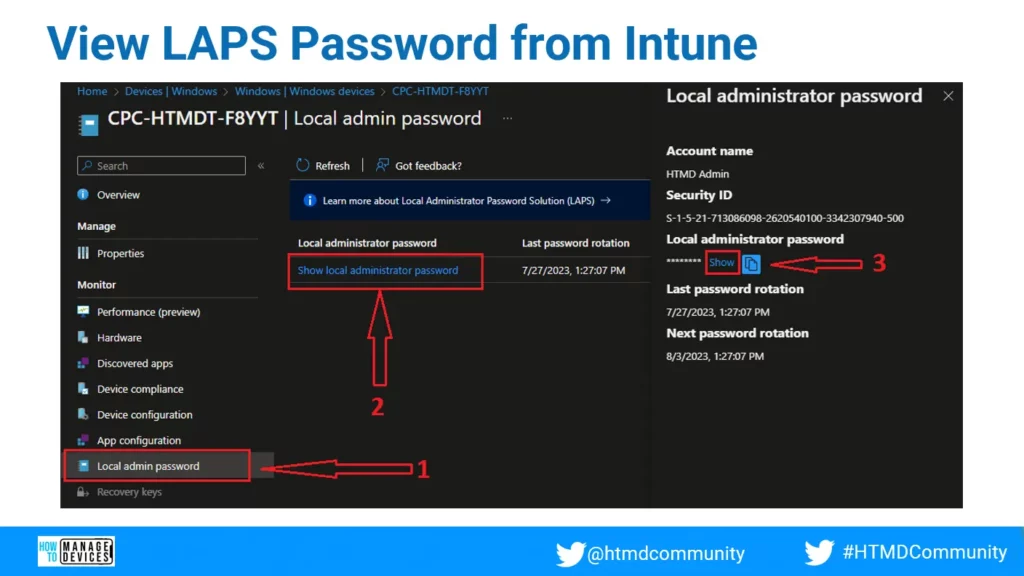
Assign this policy to the device group where you want to apply. Once the policy succeeded on the device, you can be able to see the device password under Device > Windows > Windows devices > Select the device. Now under “Local admin password” you will be able to retrieve the device password. This password will be rotated after the Password Age Days are set.
View LAPS Password from Intune Portal?
You can check out the Local Admin Password tab from Device Properties and Click on the Show Local Administrator Password link. You need to open the device properties as shown in the below screenshot.
Rotate LAPS Password from Intune?
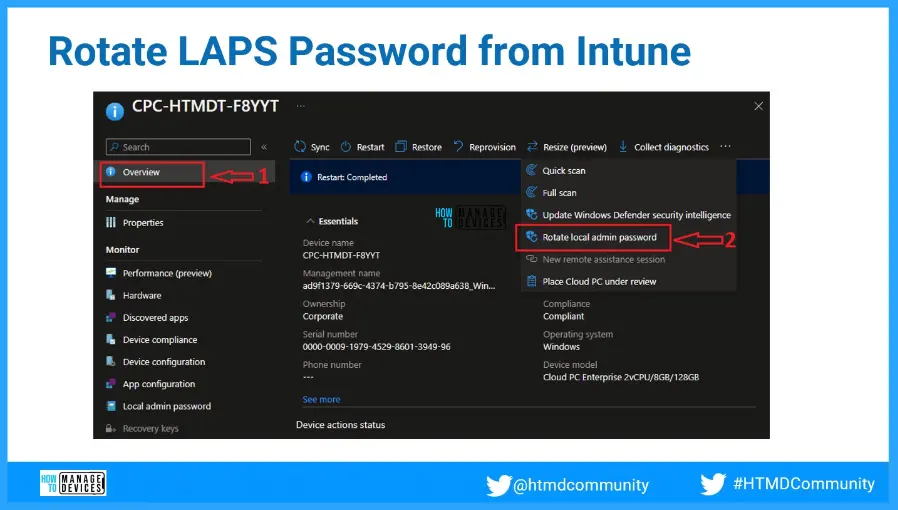
There is an option in Intune admin centre remote actions menu to Rotate Local Admin Password. You can check out the details in the below screenshot. Rotate password is the method to change the local administrator password of this particular device.
View LAPS Password from Entra ID – Devices?
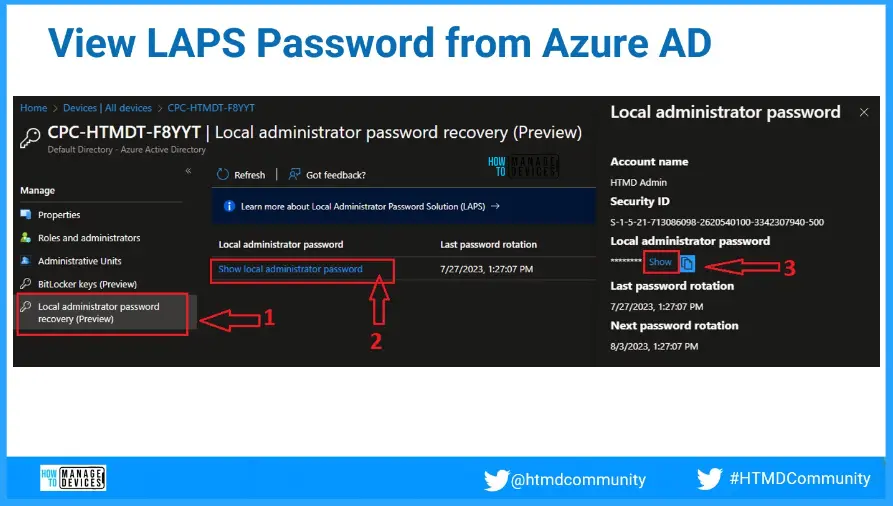
You can also check or recover the local admin password for a device from the Entra portal. Local Administrator Password Recovery option from Entra.Microsoft.com portal – Devices tab.
Verify LAPS Policy from Registry Keys
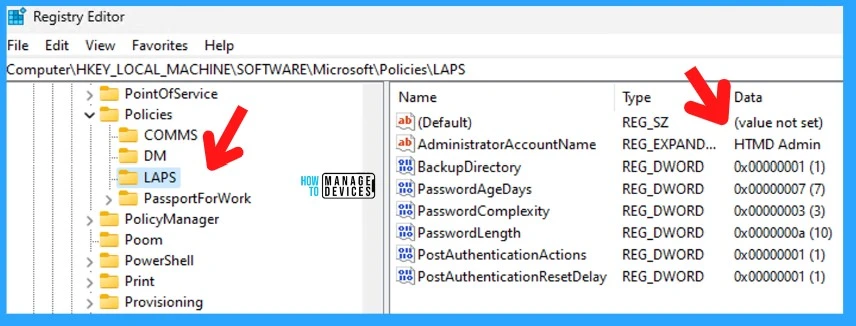
Check out the following registry key to confirm whether the New Windows LAPs using Intune Policies are implemented or not Computer\HKEY_LOCAL_MACHINE\SOFTWARE\Microsoft\Policies\LAPS.
Intune MDM Event Log
The better option is to check the LAPS event logs to troubleshoot LAPS Related issues. You can check the following event logs if you are looking for Intune policy deployment troubleshooting.
- Event log path – Applications and Services Logs – Microsoft – Windows – LAPS.
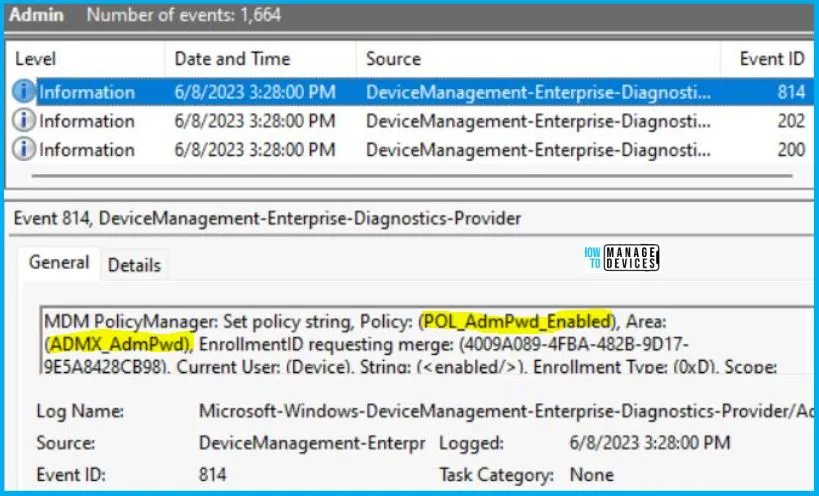
To verify the successful implementation of String or integer policies on Windows 10 or 11 devices through Intune, you can leverage event IDs 813 and 814. These event IDs provide valuable insights into the application status of the policy as well as the specific value assigned to the policy on those devices. In the case of this particular policy, the value is a String and is linked to the event ID 814.
By analyzing these event IDs, you can gain a clear understanding of the policy’s application status and the corresponding value associated with it on the devices in question.
To confirm this, you can check the Event log path – Applications and Services Logs – Microsoft – Windows – Devicemanagement-Enterprise-Diagnostics-Provider – Admin.
MDM PolicyManager: Set policy string, Policy: (POL_AdmPwd_Enabled), Area: (ADMX_AdmPwd), EnrollmentID requesting merge: (4009A089-4FBA-482B-9D17-9E5A8428CB98), Current User: (Device), String: (<enabled/>), Enrollment Type: (0xD), Scope: (0x0).
Set Local Admin Password Management Policy Using Intune
The following policy is not required if you are setting up the policies mentioned above from Entra ID (Azure AD) and the Endpoint Security section of Intune admin portal. To Set Local Admin Password Management Policy Using Intune, follow the steps stated below:
- Sign in to the Intune Admin Center portal https://intune.microsoft.com/.
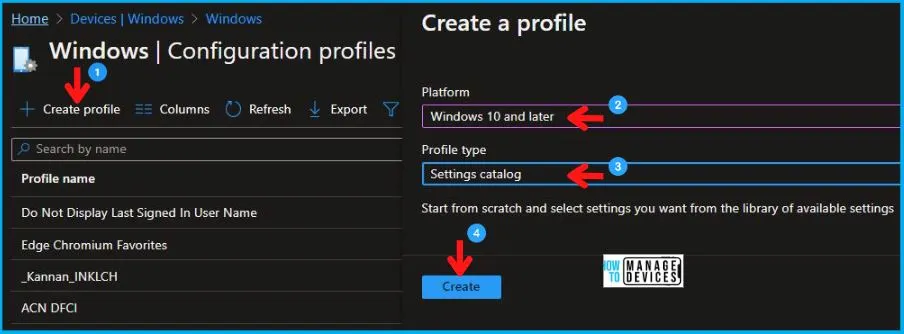
- Select Devices > Windows > Configuration profiles > Create a profile.
In Create Profile, Select Windows 10 and later in Platform, and Select Profile Type as Settings catalog. Click on Create button.
| Platform | Profile Type |
|---|---|
| Windows 10 and later | Settings Catalog |
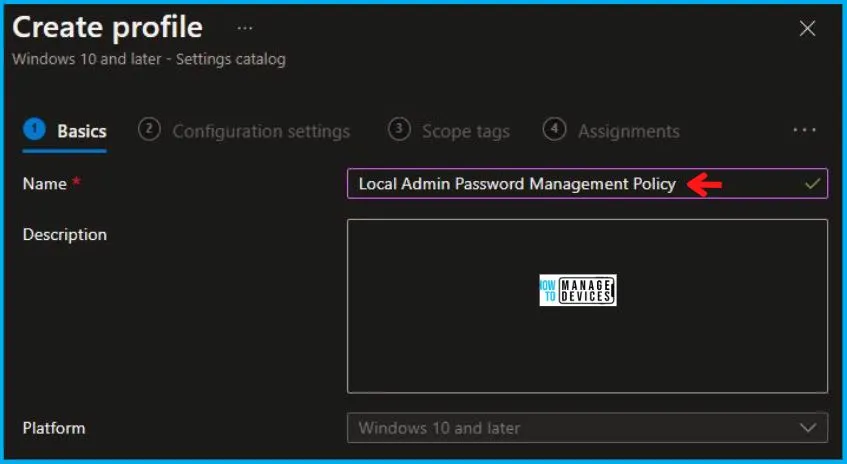
On the Basics tab pane, provide a name for the policy as “Local Admin Password Management Policy.” Optionally, you can enter a description for the policy and then proceed by selecting “Next.
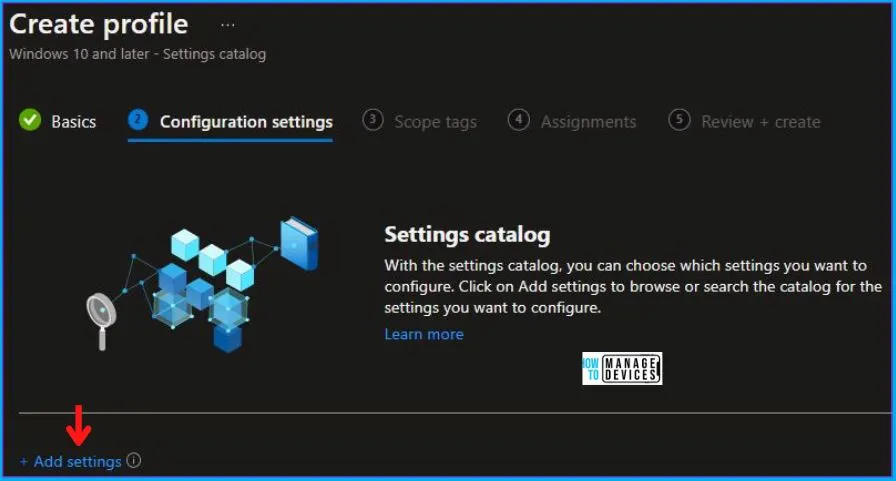
Now in Configuration Settings, click Add Settings to browse or search the catalog for the settings you want to configure.
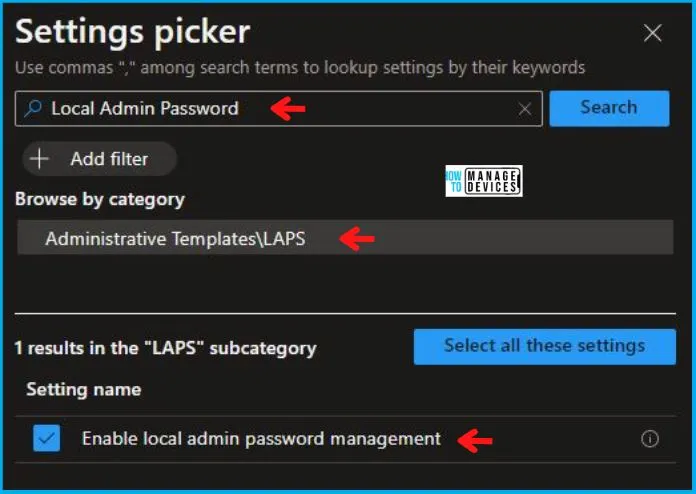
In the Settings Picker windows, search by the keyword Local Admin Password, you’ll get one category, Administrative Templates\LAPS, and select this.
When you select the option as stated above, you will see one option, which is Enable local admin password management. After selecting your setting, click the cross mark at the right-hand corner, as shown below.
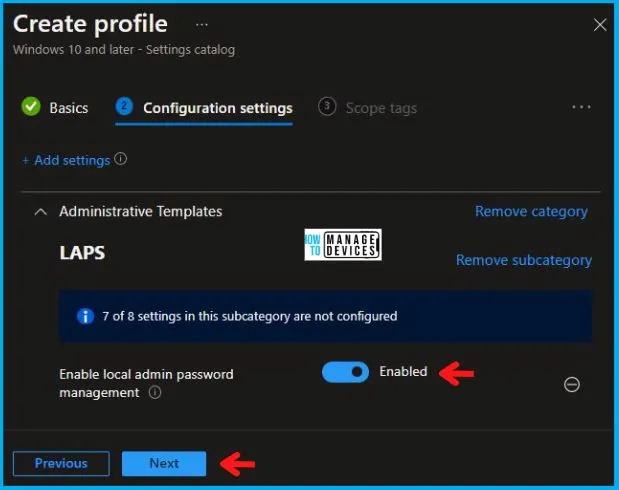
Now, in the Administrative Templates, set Enable local admin password management to Enabled, as shown below in the image.
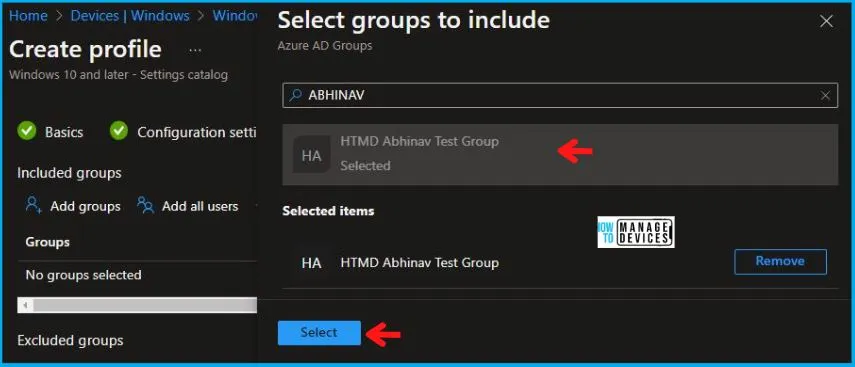
Using Scope tags, you can assign a tag to filter the profile to specific IT groups. One can add scope tags (if required) and click Next to continue. Now in Assignments, in Included Groups, you need to click on Add Groups, choose Select Groups to include one or more groups, and click Next to continue.
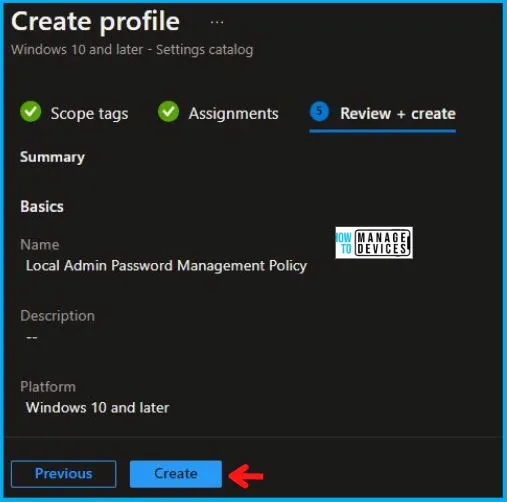
In the Review + Create tab, you need to review your settings. After clicking on Create, your changes are saved, and the profile is assigned.
NOTE! – The warning is that after successfully deploying this policy, the Local Admin account will get enabled. So if you are already deploying a policy to disable a local admin account, it’s better to remove that policy.
Upon successfully creating the “Local Admin Password Management Policy,” notification will appear in the top right-hand corner, confirming the action. You can also verify the policy’s existence by navigating to the Configuration Profiles list, where it will be prominently displayed.
Your groups will receive your profile settings when the devices check in with the Intune service. The Policy applies to the device.
Intune Report for Set Local Admin Password Management Policy
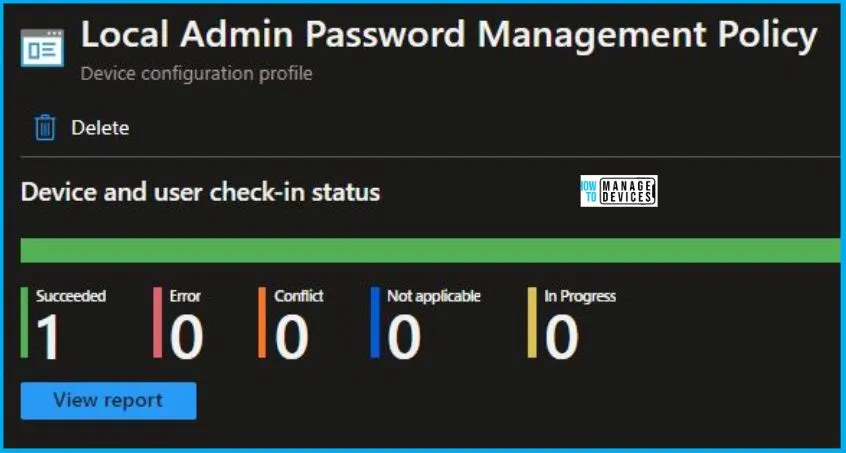
From Intune Portal, you can view the Intune settings catalog profile report, which provides an overview of device configuration policies and deployment status.
To track the assignment of the policy, you need to select the relevant policy from the Configuration Profiles list. By reviewing the device and user check-in status, you can determine if the policy has been successfully applied. If you require more detailed information, you can click on “View Report” to access additional insights.
By reviewing the above log entry in the Event Viewer, you will come across essential information, including the Area and Enrollment ID. These details play a significant role in identifying the corresponding registry path. To locate the specific information, please consult the table provided below:
| Area | Policy | String | Scoped | Event ID |
|---|---|---|---|---|
| ADMX_AdmPwd | POL_AdmPwd_Enabled | Enabled | Device | 814 |
The details presented in the table above for the Set Local Admin Password Management Policy Using Intune can be employed to access the registry settings that hold the group policy configurations on a specific computer. To accomplish this, you can execute “REGEDIT.exe” on the target computer and navigate to the precise registry path where these settings are stored.
- Computer\HKEY_LOCAL_MACHINE\SOFTWARE\Microsoft\PolicyManager\providers\4009A089-4FBA-482B-9D17-9E5A8428CB98\default\Device\ADMX_AdmPwd
When you navigate to the above path in the Registry Editor, you will find the registry key with the name POL_AdmPwd_Enabled. Refer to the table and image below.
| Registry Name | Data |
|---|---|
| POL_AdmPwd_Enabled | Enabled |

Author
Abhinav Rana is working as an SCCM Admin. He loves to help the community by sharing his knowledge. He is a B.Tech graduate in Information Technology.
