This article explains how to efficiently Manage SCCM Client on Windows Server Core Machines for readers seeking to enhance their understanding. We’ll use only the Command Line and manage SCCM clients in this post.
You can install SCCM clients on servers and workstations through various options like Client Push, AD Group Policy, etc. The client push installation method for the client is a straightforward process, as it involves triggering the installation directly from the SCCM Console. This approach offers a practical and efficient way to install the client, minimizing the need for manual intervention. But you should make sure the prerequisites are followed when you install the client, it’s explained here.
You would use the command line when you install the SCCM client using manual installation. Generally, the manual installation method would need the client source. You might typically copy the source file to a local directory, open the command prompt, and install the client. This process is straightforward on a Server or workstation with a Desktop Experience
However, It is important to note that installing and managing SCCM clients on Windows Server Core machines can be complex. As such, this guide is intended for professionals with expertise in the area of SCCM administration and configuration. So let’s get started!

What’s Windows Server Core
Most of you have already heard of or worked with Windows Server Core. However, a small percentage of my readers would haven’t worked on it.
The Windows Server Core option is an installation alternative that is available when deploying Windows Server’s Standard or Datacenter edition. It is a minimal installation option that encompasses most, albeit not all, server roles. The advantage of Windows Server Core is its reduced disk footprint and code base, leading to a smaller attack surface. However, it is important to note that some server roles are not included in Windows Server Core, making it unsuitable for organizations that require a broader range of server roles.
Windows Server Core installation removes non-essential services for specific server roles. Hyper-V can be managed via PowerShell or remotely in Hyper-V Manager without a GUI. To put it another way, Windows Server Core doesn’t have a desktop interface intentionally. Despite supporting traditional business apps and role-based workloads, Windows Server Core doesn’t come with a conventional desktop. Instead, it’s designed to be managed remotely using the command line, PowerShell or a GUI tool like RSAT or Windows Admin Center.
For your reference, Microsoft has created a table below with the available features in Server Core and Server with Desktop Experience. Please note that it is not a comprehensive list.
| Application | Server Core | Server with Desktop Experience |
|---|---|---|
| Command prompt | Available | Available |
| Windows PowerShell/ Microsoft .NET | Available | Available |
| Perfmon.exe | Not Available | Available |
| Windbg (GUI) | Supported | Supported |
| Resmon.exe | Not Available | Available |
| Regedit | Available | Available |
| Fsutil.exe | Available | Available |
| Disksnapshot.exe | Not Available | Available |
| Diskpart.exe | Available | Available |
| Diskmgmt.msc | Not Available | Available |
| Diskmgmt.msc | Not Available | Available |
| Server Manager | not Available | Available |
| Mmc.exe | Not Available | Available |
| Eventvwr | Not Available | Available |
| Wevtutil (Event queries) | Available | Available |
| Services.msc | Not Available | Available |
| Control Panel | Not Available | Available |
| Windows Update (GUI) | Not Available | Available |
| Windows Explorer | Not Available | Available |
| Taskbar | Not Available | Available |
| Taskbar notifications | Not Available | Available |
| Taskmgr | Available | Available |
| Internet Explorer or Edge | Not Available | Available |
| Built-in help system | Not Available | Available |
| Windows 10 Shell | Not Available | Available |
| Windows Media Player | Not Available | Available |
| PowerShell | Available | Available |
| PowerShell ISE | Not Available | Available |
| PowerShell IME | Available | Available |
| Mstsc.exe | Not Available | Available |
| Remote Desktop Services | Available | Available |
| Hyper-V Manager | Not Available | Available |
| WordPad | Not Available | Available |
When you log in to the Server Core for the first time, you’ll be greeted by a PowerShell prompt. This may come as a surprise, but it’s important to note that you’ll only be able to use commands to manage the server once you’ve logged in.
Install/Manage SCCM Client on Windows Server Core Machines
As I explained above, You can install SCCM clients on servers and workstations through various options like Client Push, AD Group Policy, etc., on Server Core and Server with desktop experience. In this guide, you’ll learn how to install the SCCM client manually on Server Core. The article by Anoop provides a clear explanation of the prerequisites and requirements for installing SCCM clients
- Create a local directory in the Server Core machine to copy the client source file using the below command. The output will look like the below
New-Item -Path 'C:\temp\SCCMClient' -ItemType Directory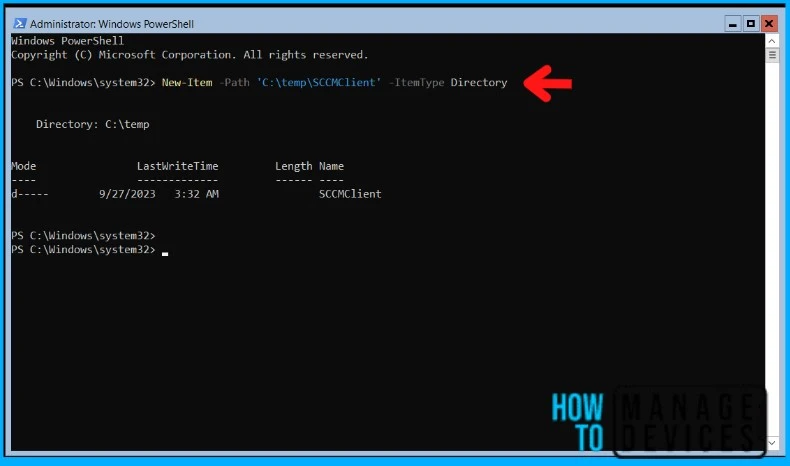
- You can get the Client Source from \\<site server name>\SMS_<site code>\Client\
- Copy the Source file to the newly created local directory using the below command
Copy-Item -Path \\<site server name>\SMS_<site code>\Client\ -Destination C:\temp\SCCMClient\ -Force -Recurse- The source file would have been copied to the local directory. Make sure to change the directory to C:\temp\SCCMClient\ by simply executing the command below
cd C:\temp\SCCMClient\Execute the below SCCM Client installation command from the client source location, as you can see in the screenshot.
Start-Process cmd -ArgumentList "/c ccmsetup.exe /BITSPriority:HIGH /NoCRLCheck SMSSITECODE=MEM RESETKEYINFORMATION=TRUE CCMHOSTNAME=<MP>" -Wait 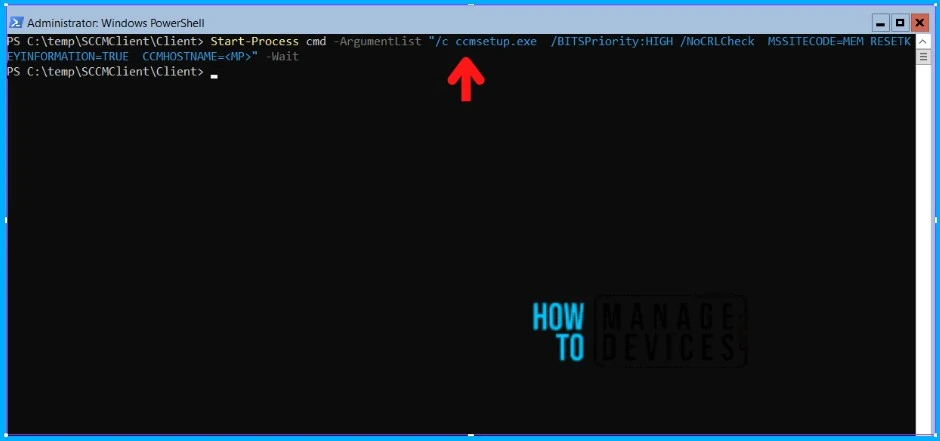
Monitor the SCCM Client Installation on a Windows Server Core Machine
The installation of the client should have already begun. Let’s verify the progress of the SCCM client installation on the Core Server. Open the Task Manager simply executing the command "taskmgr". Check if the CCMSetup service is running by expanding the Background Processes section in Task Manager for ccmsetup.exe (32-bit). The CCMSetup is the service that helps to install the SCCM client on the machine. Also, you can look for the CcmExec.exe in the details tab of Task Manager. You can check the CCMSeup service from services. msc. This service will be available only for a short period. The CCMSetup service will automatically get deleted after the successful installation or failed installation of the client.
Note! You cannot access the Task Manager in Windows Server Core by right-clicking on the taskbar due to the lack of desktop experience. However, you can use a one-line command (taskmgr) to open it.

The SCCM Client Installation can be monitored using log files from the C:\Windows\CCMSetup folder. Check the CCMSetup.log and client.msi.log from the C:\Windows\CCMSetup folder. The client.msi.log can be used to verify the successful or failed installation status of the SCCM client. You can use CMtrace to read the logs. If you want to open CMtrace in the server core, execute the below command on PowerShell
C:\Windows\CCM\CMTrace.exe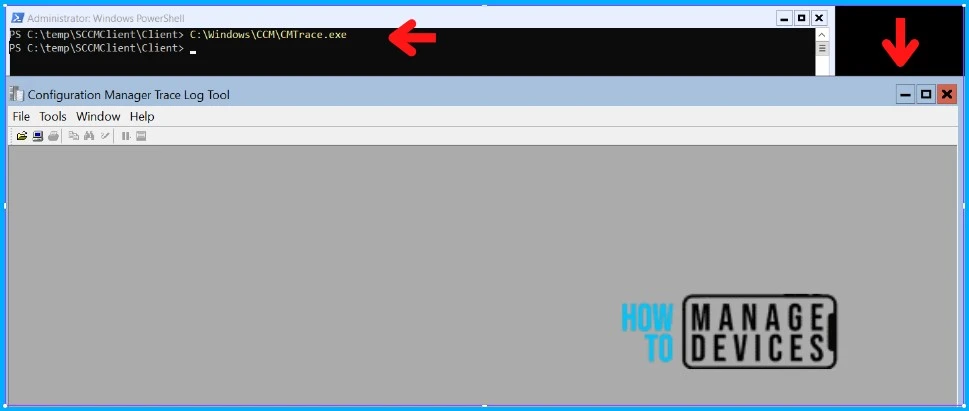
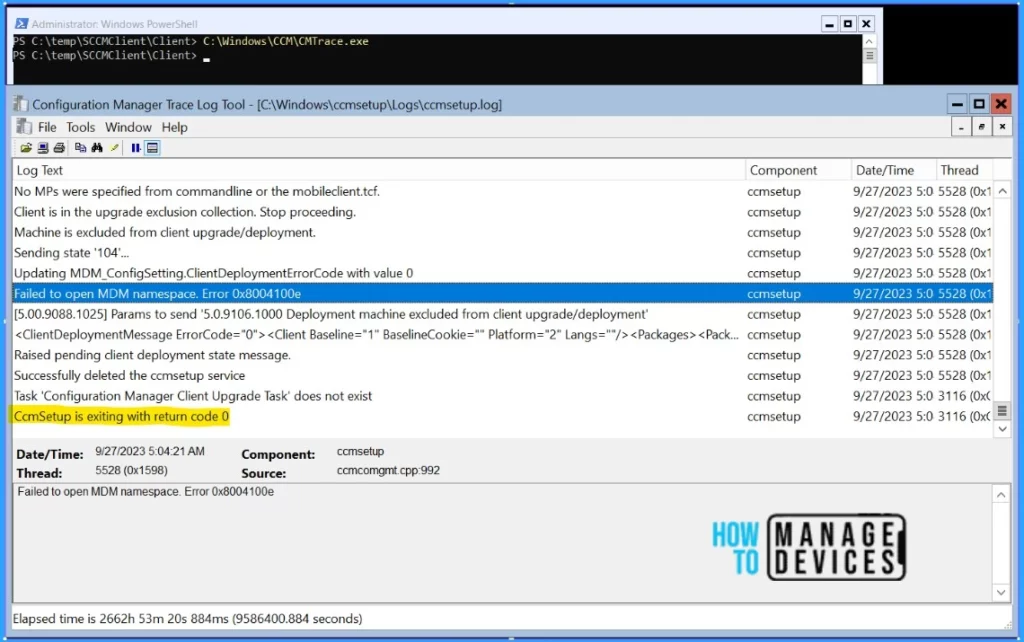
Following is the screenshot of CCMSetup.log. We should need to look at the exit code in CCMSetup.log. The exit code 0 means the SCCM agent has been pushed successfully.
Launch Software Center on Windows Server Core
SCCM Client installed on Windows Server Core machine during testing. I would access the Software Center on the Desktop Experience server without using the Command Line. To open the Software Center on Windows Server Core, it’s important to have knowledge of the specific commands necessary.
As per Microsoft, The new Software Center app isn’t supported on any version of Windows Server Core. We’ll check whether the Software Center is operable on Core Machines. Read more about Software Center here.
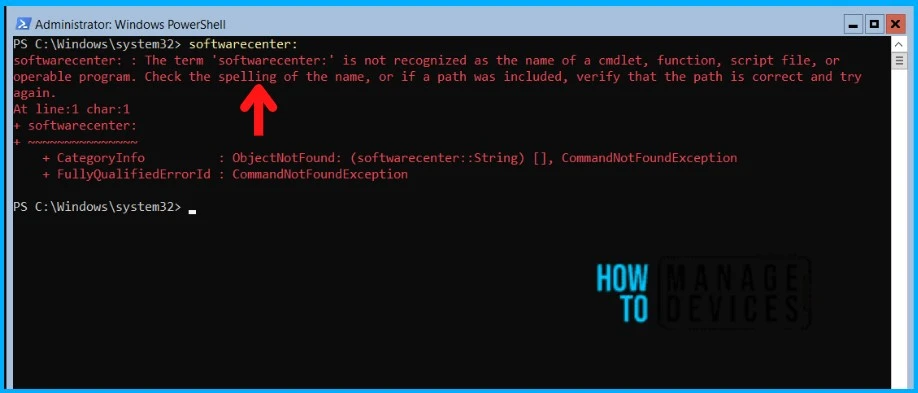
Enter the softwarecenter: command on Windows Server Core and validate the result. The output says the ‘softwarecenter:’ is not recognized as the name of a cmdlet, function, script file, or operable program.
We’ll try the next possible method to open SoftwareCenter
- Change the path to C:\Windows\CCM folder.
- Run SCClient.exe, and that should launch the SCCM Software Center on the computer.
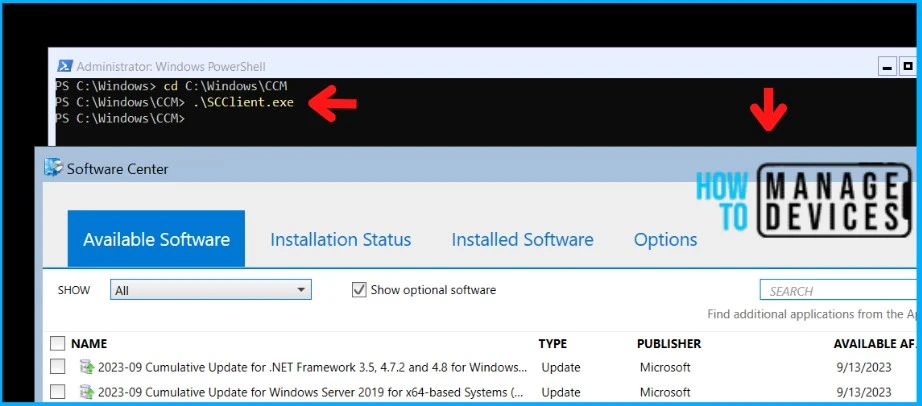
I could launch the old Software Center app on the Server Core machine without any issues..!
Let’s also open the new SoftwareCenter by executing SCClient.exe from the C:\Windows\CCM\ClientUX folder. I could launch the new Software Center app as well..!! You may wonder why it is not supported by Microsoft.
Clicking any of the Custom Tabs reveals an array of message boxes “Software Center can not be loaded. There is a problem loading the required components for the Software Center. You can try launching Software Center at a later time.“
My understanding is that you can launch both the old and new Software Centers on Server Core. But, the custom tabs feature won’t work in the new Software Center app.
Note! Microsoft has confirmed that the path C:\Windows\CCM\SCClient.exe is the legacy one and is no longer supported. In upcoming versions, there might be a possibility that this path will be removed. Using only the CommandLine to work on Windows Server Core is highly recommended.
Launch Configuration Manager Applet on Windows Server Core
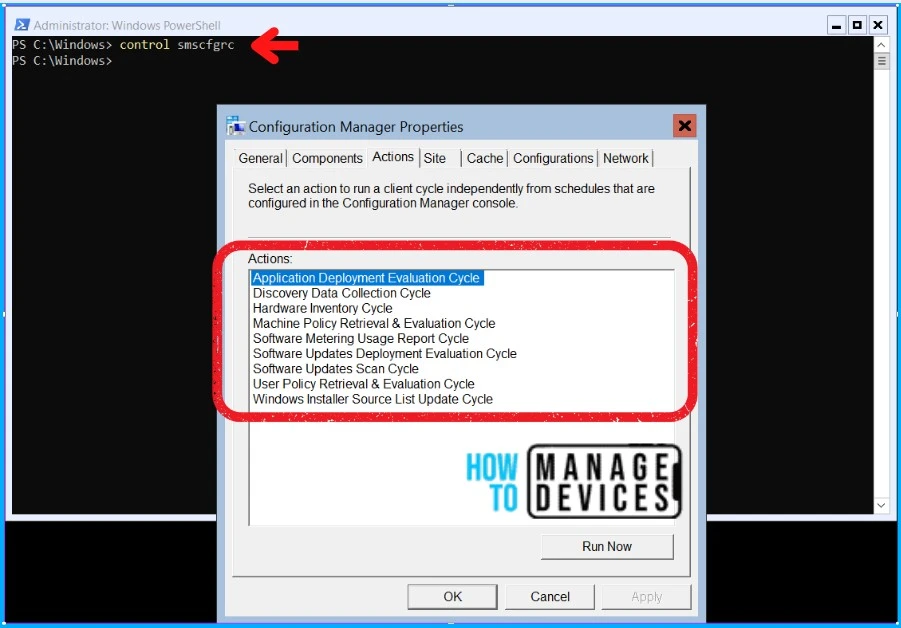
Let’s see how we can launch the Configuration Manager Applet on Windows Server Core. Generally, you go to the control panel, click the Configuration Manager Properties icon and open the Configuration Manager Applet
In this case, execute the command control smscfgrc to launch the Configuration Manager Applet. It should look the same as the Desktop Experience server. The action tab would list all the policies. You could run the policies from here. If you prefer using the command line to run the policies, you may refer to my previous blog post How to Trigger SCCM Client Agent Actions Using PowerShell Script
Trigger patches that are available in the Software Center app using commands
As I mentioned above, Windows Server Core has many limitations that would cause trouble for you when you work on it. It’s important to have knowledge of the specific commands necessary to manage Windows Server Core. Let’s see the PowerShell commands that would help you to patch the Windows Server Core manually.
The below command will list out the patches available in the Software Center app.
(Get-WmiObject -Namespace "ROOT\ccm\ClientSDK" -Class CCM_SoftwareUpdate -Property "*" -Filter ComplianceState=0 -ErrorAction Stop).Name
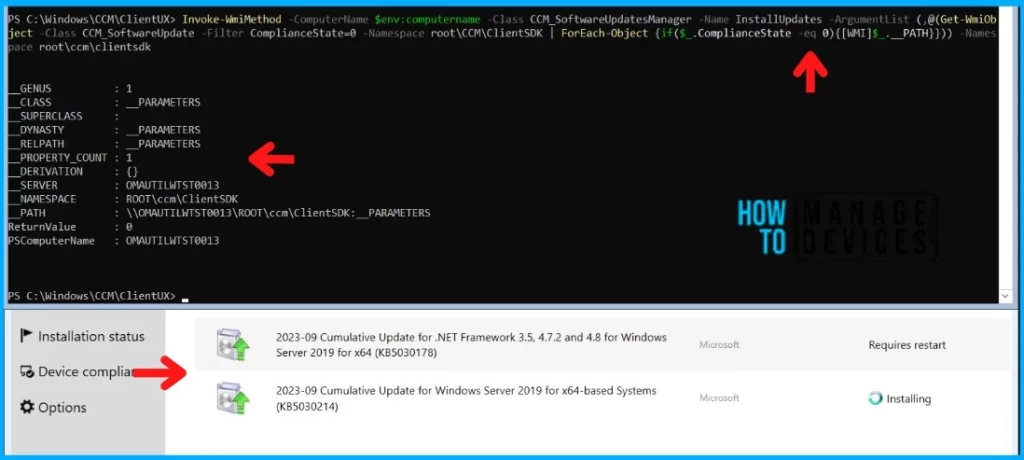
You can verify the patches available in the Software Center app using the above code. Let’s trigger the installation of above above-listed patches using the code below. The code will be helpful when you want to install the patch that you deployed as available. The required deployment should work without any interruption
Invoke-WmiMethod -ComputerName $env:computername -Class CCM_SoftwareUpdatesManager -Name InstallUpdates -ArgumentList (,@(Get-WmiObject -Class CCM_SoftwareUpdate -Filter ComplianceState=0 -Namespace root\CCM\ClientSDK | ForEach-Object {if($_.ComplianceState -eq 0){[WMI]$_.__PATH}})) -Namespace root\ccm\clientsdkThe below snapshot shows the patches in the Software Center app installed immediately after running the code.
Note! You can also use the above codes to automate the patching on the Desktop Experience servers.
Thank you all for reading this post. Will see you in the next post. Keep supporting the HTMD Community.
Author
About Author – Sujin Nelladath has over 10 years of experience in SCCM device management and Automation solutions. He writes and shares his experiences related to Microsoft device management technologies, Azure, and PowerShell automation.
